A responsive and fully functional keyboard is the gateway to interacting with your digital world. Whether you’re typing up a crucial document, strategizing your next marketing campaign, or simply navigating your favorite apps, your keyboard is your primary tool. However, like any piece of hardware, it sometimes requires a bit of driver TLC. Drivers are essential software components that allow your operating system to communicate effectively with your hardware. When your keyboard isn’t working as expected, or when you’re setting up a new one, installing or updating its driver is often the solution. This comprehensive guide will walk you through the process, ensuring your keyboard is always ready to perform.
The process of installing or updating a keyboard driver is generally straightforward, but it can vary slightly depending on your operating system and the type of keyboard you have. For most standard USB keyboards, Windows and macOS will automatically detect and install the necessary drivers. However, for specialized keyboards (like gaming keyboards with extra features, ergonomic keyboards, or older PS/2 keyboards), manual intervention might be required. We’ll cover the most common scenarios, from automatic detection to manual driver downloads and installation.
Understanding Keyboard Drivers and Their Importance
Before diving into the installation process, it’s beneficial to understand what a keyboard driver is and why it matters.
What is a Keyboard Driver?
A keyboard driver is a small piece of software that acts as a translator between your operating system (like Windows or macOS) and your keyboard hardware. It provides the operating system with the specific instructions needed to interpret the signals sent by your keyboard when you press a key. These signals are then translated into characters, commands, or actions within your software.
Think of it like this: your operating system speaks a general language, while your keyboard hardware has its own unique dialect. The driver bridges this communication gap, ensuring seamless interaction. Without the correct driver, your operating system might not recognize your keyboard, or it might not be able to interpret all of its functions.
Why are Keyboard Drivers Important?
- Basic Functionality: The most fundamental reason is to enable your keyboard to type characters. Without a driver, your computer wouldn’t know what to do when you press the “A” key, for instance.
- Advanced Features: Many modern keyboards come with extra features beyond basic typing. These can include:
- Multimedia Controls: Dedicated buttons for volume, play/pause, skip track, etc.
- Programmable Keys: Macro keys or shortcut keys that can be customized for specific applications.
- Backlighting and RGB Effects: Controls for adjusting lighting patterns and colors.
- Specialized Gaming Features: High polling rates, anti-ghosting, N-key rollover, and profile switching.
- Ergonomic Adjustments: Support for specific ergonomic layouts or key mapping.
A driver is essential for the operating system to understand and control these advanced features.
- Performance and Responsiveness: The right driver ensures that your keyboard input is processed quickly and accurately, contributing to a smooth and responsive typing experience. Outdated or corrupted drivers can lead to lag, missed keystrokes, or erratic behavior.
- Troubleshooting: When your keyboard isn’t working correctly, a driver issue is often one of the first things to check. Reinstalling or updating the driver can resolve many common problems.
- Compatibility: Drivers ensure that your keyboard is compatible with your current operating system version and any future updates.
Common Scenarios for Installing a Keyboard Driver
While most users won’t have to manually install keyboard drivers frequently, understanding the different scenarios is helpful.
Automatic Driver Installation (Plug and Play)
For the vast majority of users, installing a new keyboard is as simple as plugging it in. This is thanks to a technology called “Plug and Play” (PnP).
When you connect a USB keyboard to your computer, the operating system detects the new hardware. It then searches its built-in database of drivers or attempts to find a generic driver that can support the device. For most standard keyboards, this process is automatic and requires no user intervention. You’ll typically see a notification indicating that a device is being installed, and within seconds, your keyboard will be ready to use.
This is also the case for many wireless keyboards that use a USB dongle. Once you plug in the dongle, the operating system identifies it and installs the necessary drivers for both the dongle and the connected keyboard.
Manual Driver Installation for Specialized Keyboards
This is where you might need to get your hands dirty. Specialized keyboards, especially those from gaming brands or those with unique functionalities, often require specific drivers to unlock their full potential.
When you might need manual installation:
- Newer, High-End Keyboards: Brands like Logitech, Razer, Corsair, SteelSeries, and others often release new keyboard models with advanced features. While basic typing might work with a generic driver, accessing macros, custom lighting, or specific gaming modes will require their proprietary software and drivers.
- Ergonomic or Programmable Keyboards: Keyboards designed for specific ergonomic needs or those with extensive programmability often come with their own control software and drivers.
- Older Keyboards (e.g., PS/2): While less common now, older PS/2 keyboards might require specific driver configurations, though modern operating systems usually have built-in support.
- Troubleshooting Issues: If your keyboard is experiencing problems (e.g., certain keys not working, features malfunctioning), a manual driver update or reinstallation can be the solution, even if it was working previously.
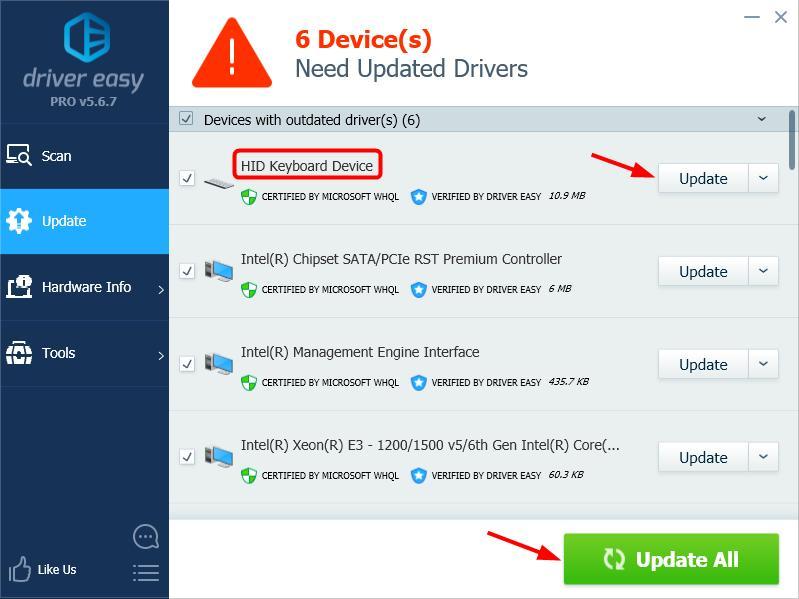
Updating Existing Drivers
Even if your keyboard is currently working, keeping its drivers up-to-date is good practice. Manufacturers regularly release driver updates to:
- Improve Performance: Optimize how the keyboard communicates with the system for faster response times.
- Fix Bugs: Address any glitches or issues that may have been discovered.
- Enhance Compatibility: Ensure smooth operation with the latest operating system updates or other software.
- Add New Features: Occasionally, driver updates can unlock new functionalities for your keyboard.
How to Install or Update Your Keyboard Driver
The process for manually installing or updating a keyboard driver typically involves downloading the driver from the manufacturer’s website and then installing it. We’ll break this down step-by-step.
Step 1: Identify Your Keyboard Model
Before you can download the correct driver, you need to know precisely which keyboard you have.
- Check the Keyboard Itself: Look for a brand name and model number on the underside of the keyboard or on its packaging.
- Check Your Purchase History: If you bought it online or have the receipt, the model name should be listed.
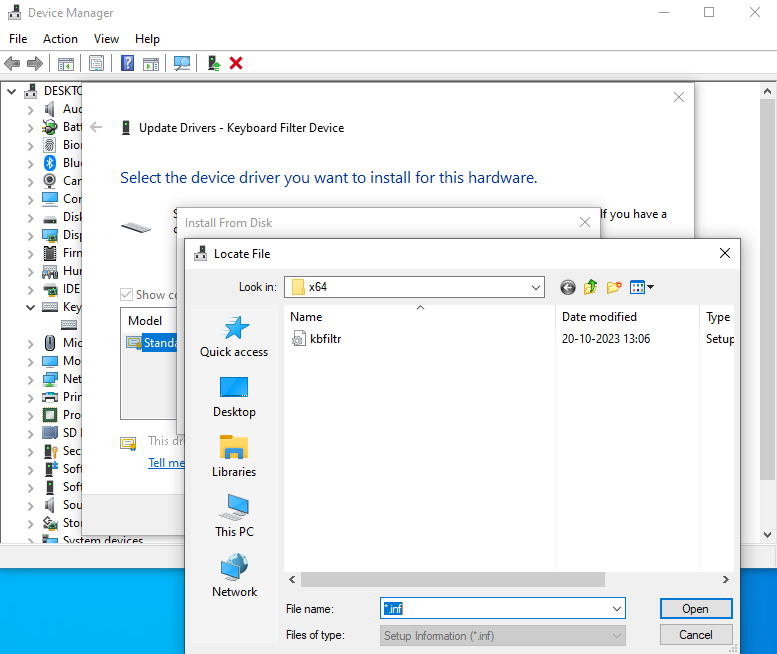
- Use Device Manager (Windows):
- Right-click the Start button and select “Device Manager.”
- Expand the “Keyboards” category.
- You’ll see your keyboard listed here. Double-click it.
- In the Properties window, go to the “Details” tab.
- From the “Property” dropdown menu, select “Hardware Ids.” This will show you codes that can help identify your keyboard model, though it might be cryptic. It’s often easier to just find the model name on the device itself.
- Check System Information (macOS):
- Click the Apple menu () in the top-left corner.
- Select “About This Mac.”
- Click “System Report…”
- Under “Hardware,” select “USB” (for USB keyboards) or “Bluetooth” (for wireless keyboards). You should see your keyboard listed with its manufacturer and model name.
Step 2: Download the Latest Driver
Once you have your keyboard’s model information, navigate to the manufacturer’s official website.
- Manufacturer’s Support or Download Section: Most manufacturers have a dedicated “Support,” “Downloads,” or “Drivers” section on their website.
- Search for Your Model: Use the search bar on the support page to find your specific keyboard model.
- Select Your Operating System: Crucially, ensure you download the driver that is compatible with your operating system (e.g., Windows 10 64-bit, macOS Ventura).
- Download the Driver File: You’ll typically find an executable file (.exe for Windows) or a disk image file (.dmg for macOS). Download this file to a location you can easily access, like your Desktop or Downloads folder.
Important Note: Always download drivers from the official manufacturer’s website. Downloading from third-party sites can expose you to malware and potentially install incorrect or harmful software.
Step 3: Install the Driver
The installation process can vary slightly depending on the driver file you downloaded.
For Windows:
- Locate the Downloaded File: Go to the folder where you saved the driver file (e.g., your Downloads folder).
- Run the Installer: Double-click the downloaded .exe file.
- Follow On-Screen Instructions: The installer will likely guide you through the process. This may involve:
- Accepting License Agreements: Read and accept the terms and conditions.
- Choosing Installation Location: Usually, you can accept the default location.
- Installation Progress: The installer will copy files and configure the driver.
- System Restart (Often Required): Many driver installations require your computer to restart to fully apply the changes. The installer will usually prompt you to do this. Make sure to save any open work before restarting.
- Verify Installation: After your computer restarts, your keyboard should be working correctly, and any special features should be accessible. You might also find new software installed on your computer related to your keyboard (e.g., for customizing lighting or macros).
For macOS:
- Locate the Downloaded File: Find the .dmg file you downloaded.
- Open the Disk Image: Double-click the .dmg file to mount it. This will usually open a new Finder window.
- Run the Installer Package: Inside the mounted disk image, you’ll typically find a .pkg file (the installer package). Double-click this file.
- Follow On-Screen Instructions: Similar to Windows, you’ll be guided through:
- Introduction and License: Review the introductory screens and accept the license agreement.
- Installation Type: Choose the type of installation (usually “Standard Install”).
- Administrator Password: You may be prompted to enter your macOS administrator password to allow the installation.
- Installation Process: The package will install the necessary files.
- System Restart (Sometimes Required): Some macOS driver installations may prompt you to restart your Mac.
- Verify Installation: After installation and a potential restart, test your keyboard.
Step 4: Reinstalling a Driver (Troubleshooting)
If your keyboard was working and suddenly stopped, or if it’s behaving erratically, reinstalling the driver can often fix the issue.
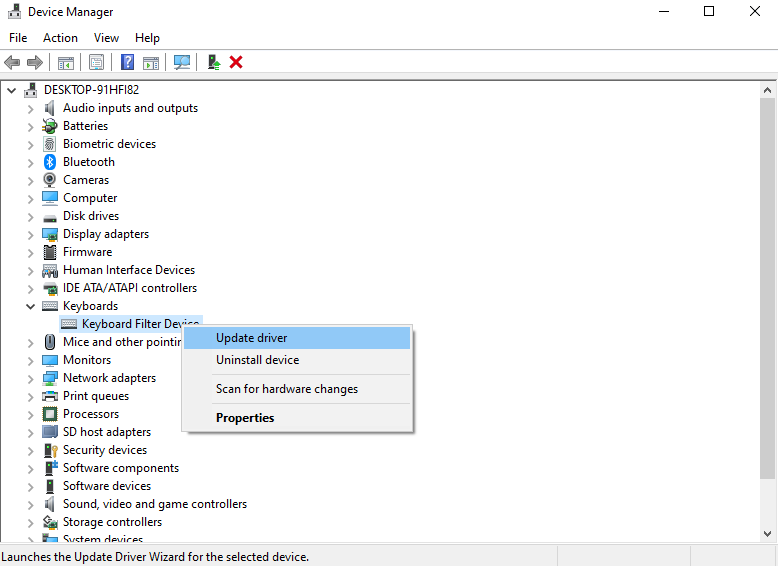
- Uninstall the Current Driver:
- Windows:
- Open Device Manager (Right-click Start > Device Manager).
- Expand “Keyboards.”
- Right-click your keyboard and select “Uninstall device.”
- Check the box that says “Delete the driver software for this device” if prompted.
- Click “Uninstall.”
- Restart your computer. Windows will often attempt to reinstall a generic driver upon reboot.
- macOS: Uninstalling drivers on macOS is less direct. Often, simply removing the manufacturer’s dedicated software from your Applications folder and then restarting your Mac is sufficient. If there’s a specific uninstaller provided by the manufacturer, use that.
- Windows:
- Download and Install the Latest Driver: Follow Steps 2 and 3 above to download and install the most recent driver for your keyboard.
Advanced Tips and Troubleshooting
Even with the best guidance, you might encounter a few hiccups. Here are some advanced tips and common troubleshooting steps.
Troubleshooting Common Issues
- Keyboard Not Detected After Installation:
- Try a Different USB Port: Sometimes, a specific USB port can be faulty.
- Restart Your Computer: A simple restart can resolve many temporary glitches.
- Check the Cable (Wired Keyboards): Ensure the USB cable is securely connected to both the keyboard and the computer. Try a different USB cable if possible.
- Check Batteries/Connection (Wireless Keyboards): For wireless keyboards, ensure the batteries are fresh or fully charged. Re-pair the keyboard with its receiver or Bluetooth device.
- Test on Another Computer: If possible, test your keyboard on a different computer to see if the issue is with the keyboard itself or your original computer.
- Specific Keys Not Working or Malfunctioning:
- Software Conflicts: Other installed software, especially gaming utilities or system optimization tools, might interfere with keyboard drivers. Try closing them one by one to see if the issue resolves.
- Keyboard Settings: Check if any specific software for your keyboard has disabled certain keys or created custom profiles that might be causing the problem.
- Physical Debris: For mechanical keyboards, sometimes debris can get lodged under keys. Gently try to clean around the affected keys.
- Driver Installation Fails:
- Administrator Privileges: Ensure you are logged in as an administrator when trying to install drivers.
- Antivirus Software: Temporarily disable your antivirus software during the driver installation, as it might sometimes interfere with the process. Remember to re-enable it afterward.
- Corrupted Download: Redownload the driver file from the manufacturer’s website in case the original download was incomplete or corrupted.
- System File Checker (Windows): Run the System File Checker tool to ensure your Windows system files are not corrupted, which could prevent driver installations. Open Command Prompt as administrator and type
sfc /scannow.
Using Manufacturer-Specific Software
For many advanced keyboards, the driver is just the starting point. The manufacturer’s dedicated software (e.g., Razer Synapse, Logitech G HUB, Corsair iCUE) unlocks the full potential.
- Customization: These programs allow you to:
- Assign macros to keys.
- Customize RGB lighting effects.
- Adjust key repeat rates and other input settings.
- Create and switch between different profiles for various applications.
- Firmware Updates: Manufacturer software also often provides firmware updates for your keyboard, which can improve performance and stability.
- Troubleshooting Tools: Some software includes built-in diagnostic tools to help troubleshoot issues with your keyboard.
Conclusion:
While the term “install keyboard driver” might sound technical, for most users, it’s a process that happens automatically. However, when you invest in specialized hardware or encounter issues, understanding how to manually install or update your keyboard driver is a valuable skill. By following these steps, you can ensure your keyboard is always performing at its best, whether you’re focused on productivity, unleashing your creativity, or dominating in the digital arena. A well-functioning keyboard is fundamental to a smooth and efficient computing experience, and keeping its drivers in top shape is a key part of that.
aViewFromTheCave is a participant in the Amazon Services LLC Associates Program, an affiliate advertising program designed to provide a means for sites to earn advertising fees by advertising and linking to Amazon.com. Amazon, the Amazon logo, AmazonSupply, and the AmazonSupply logo are trademarks of Amazon.com, Inc. or its affiliates. As an Amazon Associate we earn affiliate commissions from qualifying purchases.