In the rapidly evolving landscape of technology, Java stands as a towering pillar, powering everything from enterprise-level applications and cutting-edge AI tools to intricate mobile apps and robust backend systems. Its enduring popularity stems from its platform independence, robust ecosystem, and vast community support, making it an indispensable skill for aspiring developers and seasoned tech professionals alike. Whether you’re aiming to build the next revolutionary software, delve into data science, or simply enhance your digital security knowledge through understanding core development principles, mastering Java is a powerful step.
The gateway to Java development is the Java Development Kit (JDK). This crucial toolkit provides everything you need to write, compile, debug, and run Java applications. Without it, your journey into the world of Java is stalled before it even begins. This comprehensive guide will walk you through the process of installing the JDK on various operating systems, ensuring you’re well-equipped to unlock Java’s full potential and embark on a path of innovation and productivity.

Understanding the Java Development Kit (JDK) and Its Importance
Before diving into the installation process, it’s vital to understand what the JDK is and why it’s so fundamental to Java programming. Java isn’t just a language; it’s a platform, and the JDK is its primary engine for development.
What Exactly is the JDK?
The Java Development Kit (JDK) is a software development environment used for developing Java applications and applets. It includes the Java Runtime Environment (JRE), an interpreter/loader (java), a compiler (javac), an archiver (jar), a documentation generator (javadoc), and other tools needed for Java development.
To break it down further, the JDK comprises three key components:
- Java Virtual Machine (JVM): This is the heart of Java’s “write once, run anywhere” philosophy. The JVM is an abstract machine that provides a runtime environment in which Java bytecode can be executed. When you run a Java program, the JVM interprets the bytecode and translates it into machine-specific instructions.
- Java Runtime Environment (JRE): The JRE is essentially the JVM plus the Java class libraries and other supporting files. It contains everything required to run a Java application, but not to develop one. You can think of the JRE as the engine and its fuel, allowing the car (your Java program) to operate.
- Development Tools: This is where the “development” in JDK comes in. These tools include the
javaccompiler (which converts your human-readable Java code into bytecode), thejavalauncher (to run your compiled bytecode), thejartool (for packaging Java applications),javadoc(for generating API documentation), and a suite of debugging and monitoring utilities. These tools are indispensable for anyone looking to actively code in Java.
Why is JDK Essential for Developers?
For anyone looking to write, test, and deploy Java applications, the JDK is non-negotiable. It provides the complete ecosystem necessary for turning your ideas into functional software. From building sophisticated enterprise solutions to crafting engaging mobile apps or integrating advanced AI algorithms into your systems, the JDK is the foundational requirement.
Beyond its technical necessity, a strong grasp of Java and its development tools can significantly bolster your personal branding in the tech industry. It signals a capability to work with robust, scalable, and widely-used technologies, opening doors to diverse career opportunities in software engineering, data science, and IT consulting. For those considering online income streams or side hustles, Java proficiency is invaluable for freelancing, developing proprietary applications, or contributing to open-source projects. Its widespread use in financial tools and systems also makes it a valuable asset for anyone interested in fintech.
Pre-Installation Checklist and System Requirements
Before you download and install the JDK, a little preparation goes a long way to ensure a smooth and successful setup. This checklist will help you select the right version and confirm your system is ready.
Choosing the Right JDK Version: Oracle JDK vs. OpenJDK
One of the most common questions new Java developers face is which JDK to choose. Historically, Oracle JDK was the primary choice, but with changes in its licensing model, OpenJDK has gained significant traction.
- Oracle JDK: This is the commercial distribution of Java from Oracle. It offers long-term support (LTS) versions and is often used in enterprise environments. Be aware of its licensing; recent versions (JDK 11 onwards) are free for development and personal use but require a commercial license for production use.
- OpenJDK: This is an open-source implementation of the Java Platform, Standard Edition. It’s fully compatible with the Oracle JDK and is often preferred by individual developers and many companies due to its open-source nature and free-for-all-use licensing. Popular distributions of OpenJDK include Adoptium (formerly AdoptOpenJDK), Amazon Corretto, Microsoft Build of OpenJDK, and Red Hat’s OpenJDK.
Recommendation: For most individual developers and small to medium-sized projects, OpenJDK (specifically Adoptium Temurin or Amazon Corretto) is an excellent choice due to its open-source license and robust support. For enterprise settings, consult your organization’s IT policy regarding Oracle JDK licensing.
LTS Versions: Always prioritize Long-Term Support (LTS) versions (e.g., JDK 8, JDK 11, JDK 17, JDK 21). These versions receive extended support and updates, offering greater stability for long-term projects. Check the current LTS schedule before downloading.
System Compatibility and Requirements
Ensure your operating system meets the minimum requirements for the JDK version you plan to install. While Java is relatively lightweight, having sufficient resources will enhance your development experience, especially when working with integrated development environments (IDEs).
- Operating System: JDKs are available for Windows (64-bit), macOS (Intel and Apple Silicon), and various Linux distributions (64-bit). Ensure you download the correct installer for your specific OS and architecture.
- RAM: A minimum of 4GB RAM is recommended, but 8GB or more is highly advisable for smooth operation, particularly when running IDEs like IntelliJ IDEA or Eclipse.
- Disk Space: At least 500MB of free disk space is needed for the JDK installation itself, plus additional space for your projects and IDEs. Allocate several gigabytes to be safe.
- Internet Connection: Required for downloading the JDK installer and any additional tools or dependencies.
Checking for and Removing Previous Java Installations
Having multiple JDK versions installed isn’t inherently problematic, but it can lead to confusion if environment variables aren’t managed correctly. If you have an older or conflicting version that you no longer need, it’s often best to uninstall it to avoid path conflicts.
- Windows: Go to “Add or remove programs” in System Settings and uninstall any unwanted “Java Development Kit” or “Java Runtime Environment” entries.
- macOS: You can check for installed JDKs by opening Terminal and typing
java -versionandjavac -version. Older JDKs might be located in/Library/Java/JavaVirtualMachines/. You can remove them by deleting the respective directories. - Linux: Use your distribution’s package manager to list and remove Java packages (e.g.,
dpkg -l | grep jdkorrpm -qa | grep jdkand thensudo apt remove [package_name]orsudo yum remove [package_name]).
Once you’ve made your choices and checked your system, you’re ready to proceed with the installation.
Step-by-Step Installation Guides
The installation process varies slightly depending on your operating system. Follow the instructions for your specific environment carefully.
1. Windows Installation
Installing the JDK on Windows is typically a straightforward process using an installer.
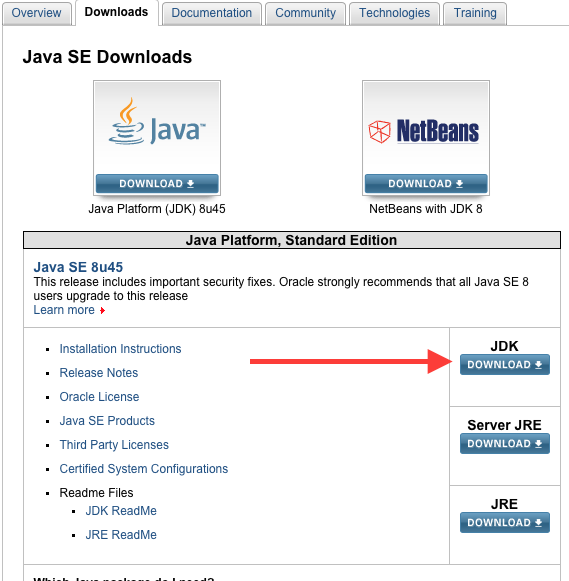
Downloading the Installer
- Visit a reputable OpenJDK distribution website: For example, Adoptium (adoptium.net) or Amazon Corretto (aws.amazon.com/corretto/).
- Select your JDK version: Choose an LTS version (e.g., JDK 17 or JDK 21) and ensure you select the Windows x64 installer (usually an
.msifile). - Download the installer: Save the file to a convenient location on your computer.
Running the Installer
- Locate the downloaded
.msifile and double-click it to start the installation wizard. - Follow the on-screen prompts:
- Click “Next” on the welcome screen.
- Accept the license agreement.
- Choose the installation path. The default path (e.g.,
C:Program FilesEclipse Adoptiumjdk-[version]) is usually fine. Make a note of this path, as you’ll need it later. - You can choose to install source code and public JRE if desired, but they are not strictly necessary for basic development. Ensure “Set JAVA_HOME variable” and “Add to PATH” options are selected if offered by the installer. If not, you’ll set them manually.
- Click “Next” or “Install” to begin the installation.
- If prompted by User Account Control (UAC), click “Yes” to allow the installer to make changes to your system.
- Click “Finish” once the installation is complete.
Setting Environment Variables (JAVA_HOME and Path)
Even if the installer claims to set these, it’s good practice to verify or set them manually for robustness. This allows your system and other applications to find the Java tools.
- Open System Properties: Search for “Environment Variables” in the Windows search bar and select “Edit the system environment variables.”
- Click “Environment Variables…” in the System Properties window.
- Under “System variables,” click “New…” to create
JAVA_HOME:- Variable name:
JAVA_HOME - Variable value: The path to your JDK installation directory (e.g.,
C:Program FilesEclipse Adoptiumjdk-17.0.9.9-hotspot). Click “OK.”
- Variable name:
- Edit the
Pathvariable:- Under “System variables,” find and select the
Pathvariable, then click “Edit…” - Click “New” and add
%JAVA_HOME%bin. This tells your system where to find thejavaandjavacexecutables. - Make sure this new entry is high in the list (you can move it up), to ensure it takes precedence over any older Java installations.
- Click “OK” on all open windows to save the changes.
- Under “System variables,” find and select the
Verification
- Open a new Command Prompt (or PowerShell) window. It’s crucial to open a new window after setting environment variables, as existing ones won’t reflect the changes.
- Type
java -versionand press Enter. You should see output indicating the installed JDK version. - Type
javac -versionand press Enter. This should also show the compiler version. - Type
echo %JAVA_HOME%and verify it points to your JDK directory.
If these commands execute successfully, your JDK is correctly installed.
2. macOS Installation
Installing the JDK on macOS is also quite straightforward, often involving a .dmg installer.
Downloading the Installer
- Go to an OpenJDK distribution website: Such as Adoptium or Amazon Corretto.
- Choose your JDK version: Select an LTS version and ensure you download the macOS installer for your architecture (x64 for Intel Macs, AArch64 for Apple Silicon M1/M2/M3 Macs). It will typically be a
.pkgor.dmgfile. - Download the file to your Downloads folder.
Running the Installer
- Locate the downloaded
.pkgor.dmgfile and double-click it. - If it’s a
.dmgfile, a new disk image will mount. Double-click the.pkginstaller inside. - Follow the on-screen prompts:
- Click “Continue,” agree to the license, and select “Install.”
- You might be prompted for your administrator password. Enter it to proceed.
- The installer will place the JDK in
/Library/Java/JavaVirtualMachines/.
- Click “Close” once the installation is complete. You can eject the
.dmgif applicable.
Setting Environment Variables (Often Automatic, But Good to Know)
On macOS, many JDK installers automatically configure the system to use the newly installed Java version. However, if you need to set JAVA_HOME manually or specify a particular JDK version, you can do so in your shell configuration file (e.g., .bash_profile, .zshrc).
- Identify the JDK path: The JDK is typically installed at
/Library/Java/JavaVirtualMachines/jdk-[version].jdk/Contents/Home. - Open your shell configuration file:
- For Zsh (default on modern macOS):
nano ~/.zshrc - For Bash:
nano ~/.bash_profile
- For Zsh (default on modern macOS):
- Add the following lines:
bash

export JAVA_HOME=$(/usr/libexec/java_home) # Or specify a direct path like /Library/Java/JavaVirtualMachines/jdk-17.0.9.jdk/Contents/Home

export PATH=$JAVA_HOME/bin:$PATH
If you want to ensure a specific JDK version is used, replace$(/usr/libexec/java_home)with the direct path to your preferred JDK’sContents/Homedirectory. - Save the file (Ctrl+O, Enter, Ctrl+X in nano).
- Apply the changes:
source ~/.zshrc(orsource ~/.bash_profile).
Verification
- Open a new Terminal window.
- Type
java -versionand press Enter. - Type
javac -versionand press Enter. - Type
echo $JAVA_HOMEand verify it points to your JDK directory.
If these commands display the correct version and path, your JDK is ready.
3. Linux Installation (e.g., Ubuntu/Debian)
Linux offers multiple ways to install the JDK: using a package manager (recommended for OpenJDK) or manual installation.
Using Package Manager (Recommended for OpenJDK)
This method is the easiest for many Linux distributions and is excellent for installing OpenJDK.
- Update package lists:
bash

sudo apt update
- Install OpenJDK (e.g., JDK 17):
bash

sudo apt install openjdk-17-jdk
Replaceopenjdk-17-jdkwith the version you need (e.g.,openjdk-11-jdk,openjdk-21-jdk). - Set default Java version (if multiple installed):
bash

sudo update-alternatives --config java

sudo update-alternatives --config javac
Follow the prompts to select your preferred JDK version.
Manual Installation (for specific OpenJDK builds or Oracle JDK)
If you need a specific build not available via your package manager, or are installing Oracle JDK, you might opt for manual installation.
- Download the JDK archive:
- Go to Adoptium, Amazon Corretto, or Oracle’s website.
- Select the Linux x64
.tar.gzarchive for your desired JDK version. - Download it to your
~/Downloadsdirectory.
- Create an installation directory:
bash

sudo mkdir -p /usr/lib/jvm
- Extract the archive:
bash

sudo tar -xzf ~/Downloads/jdk-[version]_linux-x64_bin.tar.gz -C /usr/lib/jvm
Replacejdk-[version]_linux-x64_bin.tar.gzwith your downloaded filename. - Set environment variables:
- Open your shell configuration file (e.g.,
nano ~/.bashrcornano ~/.zshrc). - Add the following lines, replacing the path with your actual JDK directory (e.g.,
/usr/lib/jvm/jdk-17.0.9):
bash

export JAVA_HOME=/usr/lib/jvm/jdk-17.0.9

export PATH=$JAVA_HOME/bin:$PATH
- Save and exit the editor.
- Apply changes:
source ~/.bashrc(orsource ~/.zshrc).
- Open your shell configuration file (e.g.,
- Configure system alternatives (optional but recommended): This integrates your manually installed JDK with the system’s
javaandjavaccommands.
bash

sudo update-alternatives --install "/usr/bin/java" "java" "${JAVA_HOME}/bin/java" 1

sudo update-alternatives --install "/usr/bin/javac" "javac" "${JAVA_HOME}/bin/javac" 1

sudo update-alternatives --config java

sudo update-alternatives --config javac
Select your newly installed JDK when prompted.
Verification
- Open a new Terminal window.
- Type
java -versionand press Enter. - Type
javac -versionand press Enter. - Type
echo $JAVA_HOMEand verify it points to your JDK directory.
If all commands show the correct version and path, your Linux JDK setup is complete.
Post-Installation and Next Steps
With the JDK successfully installed, you’re now ready to take your first steps in Java development. The installation is just the beginning; the real journey involves writing code and building applications.
Setting Up Your Integrated Development Environment (IDE)
While you can write Java code in a simple text editor, using an Integrated Development Environment (IDE) dramatically boosts productivity and streamlines the development process. Popular choices include:
- IntelliJ IDEA: Widely regarded as one of the most powerful and intelligent Java IDEs, available in both a free Community Edition and a feature-rich Ultimate Edition.
- Eclipse: A long-standing, open-source, and highly customizable IDE, popular in enterprise environments.
- VS Code: A lightweight yet powerful code editor with excellent Java support via extensions.
Download and install your chosen IDE, and it should automatically detect your newly installed JDK, allowing you to create your first Java project.
Your First Java Program: “Hello World!”
To confirm everything is working, let’s create and run the classic “Hello World!” program.
- Create a new file named
HelloWorld.javain a directory of your choice. - Add the following code:
java

public class HelloWorld {

    public static void main(String[] args) {

        System.out.println("Hello, World! From GlobalizeThis Tech.");

    }

}
- Open a Command Prompt/Terminal and navigate to the directory where you saved
HelloWorld.java. - Compile the code:
bash

javac HelloWorld.java
If successful, this will create aHelloWorld.classfile in the same directory. - Run the program:
bash

java HelloWorld
You should see the output:Hello, World! From GlobalizeThis Tech.
Congratulations! You’ve successfully compiled and run your first Java program.
Troubleshooting Common Issues
While the installation process is generally smooth, you might encounter a few common issues:
- ” ‘java’ is not recognized as an internal or external command” / “java: command not found”: This almost always indicates an incorrect
PATHenvironment variable. Double-check yourPATHandJAVA_HOMEsettings. Ensure you opened a new terminal/command prompt after making changes. - Wrong Java version detected: If
java -versionshows an older or different version than expected, it means another Java installation is being picked up first. Review yourPATHvariable to ensure your desired JDK’sbindirectory is listed first. On Linux/macOS, check ifupdate-alternativesor~/.bashrc/~/.zshrcentries are correctly configured. - Installation file corruption: If the installer fails or gives errors during download, try re-downloading the JDK file.
- Permissions issues: On Linux/macOS, ensure you use
sudofor commands that modify system-wide directories or files, and that your user has appropriate permissions.
Refer to official documentation or online forums if you encounter persistent issues. The Java community is vast and helpful.
Conclusion
Installing the Java Development Kit is the foundational step towards becoming a proficient Java developer. By following this comprehensive guide, you’ve not only set up your development environment but also taken a significant stride into a world of endless technological possibilities. From creating robust enterprise applications and powerful AI tools to developing engaging mobile apps and contributing to global digital security, Java remains a cornerstone of innovation.
Beyond the technical aspects, mastering Java significantly enhances your professional profile, boosting your personal branding and opening doors to diverse career paths in the tech industry. It empowers you to tackle complex problems, build solutions that make an impact, and even explore avenues for online income through app development or freelance projects.
Now that your JDK is installed and verified, the real adventure begins. Dive into learning the Java language, explore its vast libraries, experiment with different frameworks, and build projects that ignite your passion. The journey of a thousand lines of code begins with a single installation. Happy coding!
aViewFromTheCave is a participant in the Amazon Services LLC Associates Program, an affiliate advertising program designed to provide a means for sites to earn advertising fees by advertising and linking to Amazon.com. Amazon, the Amazon logo, AmazonSupply, and the AmazonSupply logo are trademarks of Amazon.com, Inc. or its affiliates. As an Amazon Associate we earn affiliate commissions from qualifying purchases.