Building a personal computer is an exhilarating journey, a blend of precision engineering and personal expression. From selecting the powerful CPU to the lightning-fast SSD, every component plays a crucial role in bringing your digital dreams to life. Among these vital parts, often overlooked yet undeniably important, is the I/O shield. This unassuming metal plate, which frames the rear ports of your motherboard, serves more purposes than merely filling a gap. Installing it correctly is a foundational step in ensuring the longevity, performance, and aesthetic appeal of your custom-built machine.
This comprehensive guide will walk you through everything you need to know about installing an I/O shield, covering both the traditional snap-in type and the more modern integrated shields. We’ll delve into why this small component holds significant weight in the grand scheme of PC building, what tools you’ll need, detailed step-by-step instructions, and crucial troubleshooting tips. Whether you’re a seasoned builder or embarking on your first DIY PC project, understanding the nuances of I/O shield installation is key to a clean, efficient, and robust system. Moreover, we’ll subtly touch upon how this meticulous attention to detail aligns with savvy tech practices, contributes to the value of your personal tech brand, and protects your investment, reflecting the core themes of Technology, Brand, and Money that define this platform.
Understanding the Importance of Your I/O Shield
Before we dive into the mechanics of installation, it’s essential to appreciate why the I/O shield isn’t just an optional accessory but a fundamental part of your PC build. Its functions extend far beyond simply covering a hole in your PC case, playing a critical role in both the functionality and the long-term health of your system.
More Than Just a Metal Plate: Functionality and Protection
At its core, the I/O shield provides a crucial barrier between the sensitive internal components of your PC and the external environment. Its primary functional roles include:
- Dust and Debris Prevention: One of the greatest enemies of electronic components is dust. Over time, dust buildup can insulate components, leading to overheating, reduced performance, and even component failure. The I/O shield effectively seals the gaps around your motherboard’s rear ports, significantly reducing the ingress of dust, pet hair, and other airborne particles into your case. This protection is a direct investment in the longevity and reliability of your system, preventing costly repairs or premature component replacement down the line.
- Electromagnetic Interference (EMI) Shielding: Your PC’s internal components generate electromagnetic interference, and conversely, external sources of EMI can interfere with your PC’s operation. The metal construction of the I/O shield acts as a Faraday cage, helping to contain internal EMI and prevent it from affecting other devices, while also protecting your PC from external EMI. This ensures stable data transmission through your ports and reliable system performance, contributing to a professional and consistent user experience. For those who rely on their PC for work or content creation, maintaining signal integrity is paramount, directly influencing productivity and the reliability of their digital tools.
- Proper Port Alignment: The I/O shield is custom-designed for your specific motherboard, featuring precisely cutouts for each port (USB, Ethernet, audio, video, etc.). When correctly installed, it guides the motherboard into the correct position within the case, ensuring that all ports align perfectly with their respective openings. This prevents frustrating misalignments that can damage connectors, restrict peripheral access, or even stress the motherboard itself. Such precision reflects a commitment to quality in tech assembly, enhancing the overall “brand” of your build.
Aesthetic and Organizational Benefits
Beyond its protective and functional roles, the I/O shield also contributes to the visual appeal and organization of your PC.
- Clean and Professional Finish: A properly installed I/O shield gives the rear of your PC a complete, polished look. It covers the bare metal edges of the case cutout, transforming an unsightly void into a neat, unified interface. This attention to detail elevates the overall aesthetic of your build, signaling professionalism and care—an important aspect for anyone showcasing their system, whether in a professional setting or to fellow enthusiasts.
- Reduced Cable Clutter: While not directly managing cables, the I/O shield, by providing well-defined port openings, implicitly encourages organized cable routing at the rear of the PC. When ports are easy to access and clearly defined, connecting peripherals becomes a simpler, less cumbersome task, indirectly contributing to a tidier setup. This organization is not just about looks; it can improve airflow and make future upgrades or troubleshooting much easier.
In essence, the I/O shield is a testament to the adage that “the little things matter.” Its correct installation ensures your system runs cooler, more stable, and presents a more professional image, safeguarding your investment and enhancing your overall computing experience.
Preparing for Installation: What You’ll Need and Do First
Like any successful project, installing an I/O shield begins with thorough preparation. Gathering the right tools and taking essential safety precautions will ensure a smooth, risk-free process. This meticulous approach not only streamlines the installation but also protects your valuable components and, by extension, your financial investment.
Essential Tools and Components
While I/O shield installation is relatively straightforward, having a few basic items on hand will make the process much easier:
- Your I/O Shield: Crucially, ensure you have the correct I/O shield. Each motherboard comes with its unique shield, custom-cut for its specific port layout. Using the wrong shield will lead to misalignment and frustration. Integrated I/O shields, as we’ll discuss, are pre-attached to the motherboard, simplifying this step.
- PC Case: The case needs to be ready to accept the motherboard. Ensure any rear case fans or obstructions are clear of the I/O shield opening.
- Motherboard: Have your motherboard close by, but not yet installed in the case for traditional I/O shields.
- Phillips Head Screwdriver: You’ll need this to secure the motherboard to the case later, but it’s good to have it ready.
- Anti-Static Wrist Strap (Recommended): To prevent electrostatic discharge (ESD) damage to your sensitive components.
- Flashlight or Headlamp (Optional but helpful): For better visibility inside the case, especially in dimly lit areas.
- Clean, Flat Work Surface: A spacious, non-conductive area to work on.
Safety First: Precautions Before You Begin
Working with computer components requires a degree of care to protect both yourself and your hardware. Adhering to these safety guidelines is not just good practice; it’s essential for preventing damage and ensuring a successful build. This careful approach reflects a responsible tech user’s ethos, safeguarding your valuable tech investments.
- Power Down and Disconnect: Before touching any internal components, always ensure your PC is completely powered off and disconnected from the wall outlet. If you’re building a new PC, this step is covered, but for upgrades or maintenance, it’s paramount.
- Ground Yourself to Prevent ESD: Electrostatic discharge is an invisible threat that can permanently damage sensitive electronic components. Always ground yourself before handling components:
- Use an anti-static wrist strap connected to an unpainted metal part of your PC case.
- Alternatively, frequently touch an unpainted metal surface (like your PC case) to discharge any static electricity built up on your body. Avoid working on carpeted surfaces if possible, as they generate static easily.
- Handle Components Carefully: Motherboards and other components are robust but can be damaged by excessive force or improper handling. Hold components by their edges, avoiding touching pins, circuits, or sensitive connectors.
- Work in a Well-Lit Area: Good lighting reduces eye strain and allows you to clearly see what you’re doing, minimizing errors and preventing accidental damage.
- Mind the Metal Tabs: Traditional I/O shields often have small, sharp metal tabs or “fingers” designed to make contact with the motherboard and provide grounding. These can be surprisingly sharp. Handle the shield with care to avoid cuts, and be gentle when installing to prevent bending or damaging these tabs unnecessarily. While they are functional, a little caution goes a long way.
By diligently following these preparatory steps, you’ll create a safe and efficient environment for installing your I/O shield, laying the groundwork for a successful and trouble-free PC build.
Step-by-Step Guide to I/O Shield Installation
Now that you understand the importance of the I/O shield and have prepared your workspace, it’s time for the actual installation. The process differs slightly depending on whether you have a traditional snap-in I/O shield or a modern integrated one. We’ll cover both scenarios in detail.
Identifying Your I/O Shield Type (Standard vs. Integrated)
Before you begin, determine which type of I/O shield you have:
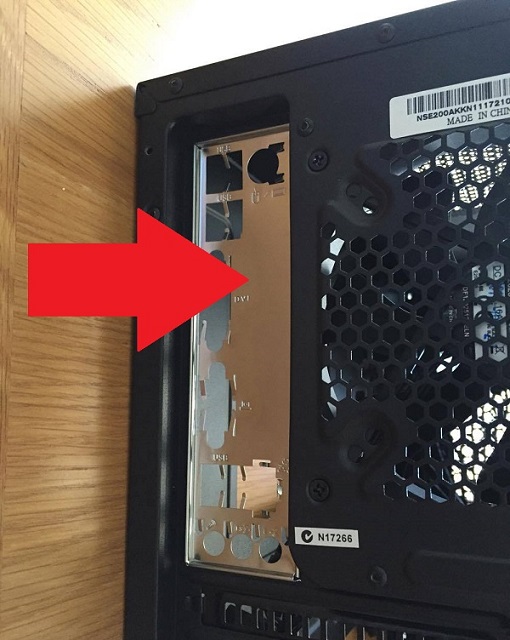
- Standard (Snap-in) I/O Shield: This is a separate metal plate, usually found in the motherboard box, that you manually insert into the PC case. It’s typically chrome, black, or sometimes color-coded. Most budget and mid-range motherboards, or older designs, feature this type.
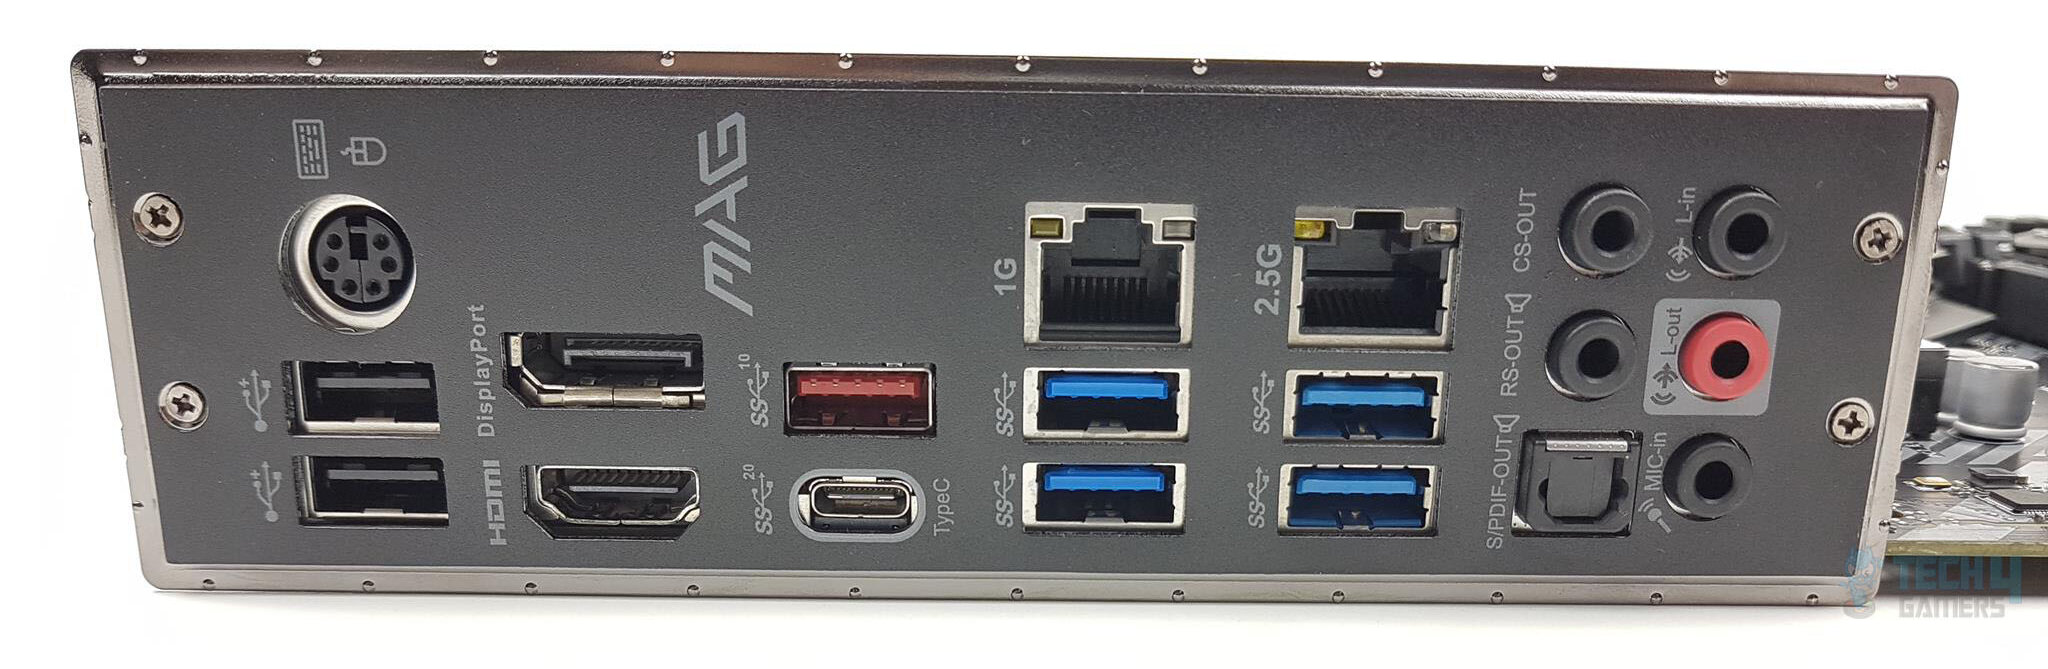
- Integrated I/O Shield: This shield is pre-attached to the motherboard itself, usually as part of the motherboard’s shroud. It’s often black, sometimes with branding, and feels like a seamless extension of the motherboard. Higher-end and more recent motherboards commonly feature integrated I/O shields, offering a simpler installation process.
Knowing your type is crucial as it dictates the steps you’ll follow.
The Standard I/O Shield Installation Process

This method requires a bit more precision but is straightforward once you know the steps.
- Orient the I/O Shield: Take your I/O shield and orient it correctly. The text (e.g., “USB,” “HDMI”) or logos on the shield will typically be readable from the outside of the case. Pay close attention to the shape of the cutouts – they should match the corresponding ports on your motherboard. There’s usually a slightly larger opening for the CPU’s display output (if your CPU has integrated graphics) and distinct shapes for USB, Ethernet, and audio jacks.
- Locate the I/O Shield Opening on Your Case: This opening is a rectangular cutout at the rear of your PC case, typically above where your expansion slots (for graphics cards) would be.
- Insert the I/O Shield into the Case:
- From the inside of the PC case, position the I/O shield so its front (the side with the text/logos) faces outwards.
- Align the top and bottom edges of the shield with the top and bottom of the case opening.
- Apply even pressure around the edges of the shield, particularly the corners. You should hear a satisfying “snap” or “click” as the shield seats firmly into place. The edges of the shield have small retaining clips that fit into the case’s cutout.
- Important Check: Ensure the shield is flush with the outside of the case and securely seated. It should not be easily pushed out or wobbly. Run your finger along the inner edge of the shield to ensure it’s fully seated and that no part is sticking out.
- Check the Tabs/Fingers: Most standard I/O shields have small metal tabs or “fingers” that extend inwards. These are designed to make contact with the metallic shrouds of the motherboard ports, providing electrical grounding and light pressure.
- Gently bend any tabs that might be obstructing the port openings. They should ideally sit above or around the port opening, not inside it, to avoid blocking or damaging the ports when you install the motherboard.
- Be cautious, as these tabs can be sharp and can also be bent too far, potentially causing issues. A slight outward curve is usually ideal, ensuring they don’t press directly into the port.
- Install the Motherboard: With the I/O shield securely in place, carefully lower your motherboard into the case.
- Align the motherboard’s screw holes with the standoffs in the case.
- As you lower the motherboard, ensure its rear ports gently push through the corresponding cutouts in the I/O shield. The tabs you checked earlier should now make light contact with the port shrouds.
- If you encounter resistance, do not force it. Lift the motherboard slightly, re-check the I/O shield tabs, and try again. Sometimes, a slight wiggle of the motherboard is needed to get all ports to line up perfectly.
- Once the motherboard is seated, secure it with the appropriate screws. This will help hold the I/O shield firmly in place.
Special Considerations for Integrated I/O Shields
Integrated I/O shields simplify the installation process significantly, making them a favored feature for many builders.
- No Separate Installation: Since the shield is pre-attached to the motherboard, you don’t need to insert it into the case separately. This eliminates the often-fiddly step of snapping the shield into place and bending tabs.
- Align and Lower the Motherboard: Simply align your motherboard with the standoffs in your PC case. The integrated shield will naturally align with the case’s I/O opening as you lower the motherboard.
- Gentle Pressure: Apply gentle, even pressure as you lower the motherboard. The integrated shield should fit snugly into the case’s cutout without significant force.
- Secure the Motherboard: Once the motherboard is seated and its screw holes align with the standoffs, secure it with screws. The integrated shield is held in place by the motherboard itself.
Integrated I/O shields offer a more seamless building experience, reflecting the continuous improvements in component design aimed at enhancing user-friendliness and precision. This trend towards thoughtful design underscores how brands are responding to builder needs, contributing to a better overall tech experience.
Common Pitfalls and Troubleshooting
Even with careful preparation and execution, you might encounter a few common issues during I/O shield installation. Knowing how to troubleshoot these can save you time and frustration, ensuring your build proceeds smoothly and your investment is protected.
Dealing with Misalignment and Port Obstruction
This is perhaps the most frequent problem builders face with standard I/O shields.
- Ports Not Lining Up: If, after installing the I/O shield, your motherboard’s ports don’t align with the shield’s cutouts, the shield itself might not be seated correctly in the case.
- Solution: Remove the motherboard (if already installed) and gently re-examine the I/O shield. Push firmly on its edges to ensure it’s fully snapped into the case. Sometimes one corner isn’t quite in. If it’s still misaligned, try removing the shield and reinserting it, ensuring it’s oriented correctly. Occasionally, a manufacturing defect in the case or shield can cause minor issues, but proper seating usually resolves this.
- Metal Tabs Blocking Ports: The small metal fingers on standard I/O shields are notorious for getting bent into the port openings, preventing the motherboard from seating correctly or even damaging the ports.
- Solution: Before installing the motherboard, carefully inspect each tab. Use a small, blunt tool (like the end of a pen or a plastic spudger) or your finger to gently bend any obstructing tabs outwards or around the port opening, rather than directly into it. The goal is for the tab to rest lightly on the metal casing of the port, not inside the port itself. If a tab is significantly bent or broken, it’s generally not critical to the function, but ensure it’s not causing a short or obstruction.
- Excessive Force Required: If you’re having to apply significant force to push the motherboard into place because of the I/O shield, stop immediately.
- Solution: Forcing components can lead to bending pins, damaging ports, or even cracking the motherboard. Re-evaluate the alignment of the shield and the tabs. The motherboard should slide into place with gentle pressure, with the ports slotting into the shield openings.
Ensuring a Snug and Secure Fit
A loose or improperly fitted I/O shield defeats many of its protective purposes.
- I/O Shield Feels Loose After Installation: If the shield rattles or doesn’t feel firmly attached to the case, it hasn’t properly clipped into place.
- Solution: Remove the motherboard (if installed). Re-check the I/O shield’s orientation and firmly press on all four edges and corners until it securely clicks into the case opening. Sometimes, case tolerances can be a bit tight, requiring a bit more force. Ensure the shield’s retaining clips are engaging with the case metal. If the shield remains loose even after proper installation of the motherboard, it might be a slight manufacturing tolerance issue with either the case or the shield. In most cases, once the motherboard is screwed into place, it will help hold the shield firmly.
- Gaps Around the Shield: Small gaps between the I/O shield and the case or the motherboard can allow dust and EMI to enter.
- Solution: While perfect flushness isn’t always achievable due to manufacturing tolerances, significant gaps suggest poor seating. Follow the steps for a loose shield. Ensure the motherboard is fully seated against the standoffs before screwing it down, as this will push the shield into its final position.
Troubleshooting these common issues reinforces the importance of patience and precision in PC building. Overcoming these small hurdles not only results in a more robust and reliable system but also builds confidence in your technical skills, enhancing your personal brand as a capable builder.
Beyond Installation: Protecting Your Investment and Ensuring Longevity
The proper installation of your I/O shield is more than just a step in the building process; it’s an act of foresight that contributes significantly to the long-term health and value of your PC. In the world of technology, where components can represent a substantial financial outlay, protecting that investment is paramount.
The Role of Proper Installation in System Longevity
A correctly installed I/O shield contributes to system longevity in several key ways:
- Sustained Performance: By effectively blocking dust and debris, the I/O shield helps maintain optimal internal temperatures. Components running cooler are less likely to thermal throttle, ensuring sustained performance over their lifespan. This means your PC continues to run efficiently for years, delaying the need for costly upgrades or repairs. From a “money” perspective, this maximizes the return on your initial hardware investment.
- Reduced Maintenance: A dust-free interior means less frequent internal cleaning. While regular maintenance is always recommended, a good I/O shield reduces the rate of dust accumulation, making your cleaning efforts more effective and less time-consuming. Less maintenance time translates to more productive time using your machine, which is valuable for anyone, from gamers to professionals.
- Enhanced Component Life: Reduced dust and stable temperatures directly extend the lifespan of all internal components, especially critical parts like the CPU, GPU, and RAM. Preventing premature failure means you won’t have to unexpectedly replace expensive hardware, directly impacting your personal finance related to tech ownership. It contributes to the “brand” of your well-maintained system—a testament to thoughtful engineering and care.
- Reliable Connectivity: By minimizing EMI, the I/O shield helps ensure your peripheral connections (USB, Ethernet, audio) remain stable and free from interference. This reliability is crucial for tasks ranging from online gaming to critical data transfers, reinforcing the “tech” aspect of consistent performance.
Choosing Quality Components: A Smart Investment
The discussion around I/O shields naturally extends to the broader topic of component selection. While the I/O shield itself is a small part, its effectiveness is often tied to the quality of the motherboard and case.
- Motherboard Quality and Integrated I/O Shields: High-quality motherboards from reputable brands often feature integrated I/O shields. This design choice by manufacturers like ASUS, MSI, Gigabyte, and ASRock reflects a commitment to ease of installation, durability, and a premium user experience. Investing in such a motherboard simplifies your build and inherently comes with better protection. This decision is an investment in a trusted brand, whose reputation for quality mitigates future headaches and increases the perceived value of your custom PC.
- Case Manufacturing Tolerances: Even with an integrated shield, the case’s manufacturing precision matters. A well-constructed case will have accurately cut I/O openings, allowing the motherboard (and its integrated shield) to slot in perfectly. Conversely, a cheaply made case might have slightly off-kilter openings, potentially causing issues even with a perfect shield. Choosing a quality PC case from a reputable brand (e.g., Fractal Design, Lian Li, Cooler Master, NZXT) is a smart “money” decision that pays dividends in ease of assembly, component protection, and superior airflow, further safeguarding your entire system.
- Long-Term Value and Resale: A meticulously built PC, using quality components and assembled with care (including proper I/O shield installation), retains its value better. If you ever decide to sell or upgrade, a clean, well-protected system built with attention to detail will command a higher resale price. This aspect clearly links the technical build process to “money” and the “brand” you establish as a careful builder.
In conclusion, paying attention to details like the I/O shield installation embodies a holistic approach to PC building. It’s about combining technical know-how with smart investment choices and an appreciation for quality, ensuring your digital companion serves you reliably and powerfully for years to come.
Conclusion
The I/O shield, often perceived as a minor detail in the grand symphony of PC building, plays a surprisingly significant role in the overall functionality, longevity, and aesthetic appeal of your custom machine. From its essential functions of blocking dust and mitigating electromagnetic interference to ensuring proper port alignment and contributing to a polished finish, its correct installation is a testament to meticulous craftsmanship and smart system design.
We’ve explored the critical importance of this unassuming metal plate, walked through the necessary preparations including vital safety precautions, and provided a detailed, step-by-step guide for both traditional snap-in and modern integrated I/O shields. Addressing common troubleshooting scenarios further equips you with the knowledge to overcome potential hurdles, transforming frustration into a rewarding problem-solving experience.
Beyond the immediate act of installation, understanding the I/O shield underscores a broader philosophy: that attention to small details contributes to large benefits. A properly installed I/O shield safeguards your components, extends their lifespan, and contributes to a more stable and reliable computing experience. This meticulous approach not only ensures the optimal performance of your technology but also protects your financial investment in hardware and enhances the “brand” of your custom-built PC—whether it’s for personal enjoyment, professional work, or gaming prowess.
Ultimately, installing an I/O shield correctly is more than just following instructions; it’s about building a robust foundation for your digital world, ensuring every connection is secure, every component is protected, and your PC stands as a testament to thoughtful engineering. Embrace the precision, appreciate the protection, and enjoy the fruits of a well-built system.
aViewFromTheCave is a participant in the Amazon Services LLC Associates Program, an affiliate advertising program designed to provide a means for sites to earn advertising fees by advertising and linking to Amazon.com. Amazon, the Amazon logo, AmazonSupply, and the AmazonSupply logo are trademarks of Amazon.com, Inc. or its affiliates. As an Amazon Associate we earn affiliate commissions from qualifying purchases.