Your HP printer is an indispensable tool for both work and personal projects, bridging the digital world with tangible documents. From printing critical reports to cherished family photos, its consistent performance hinges on one vital component: ink. While the act of installing a new ink cartridge might seem straightforward, understanding the nuances of the process and embracing best practices can significantly impact print quality, printer longevity, and even your overall productivity. This comprehensive guide will walk you through every step of how to install ink in an HP printer, equipping you with the knowledge to maintain your device with confidence and efficiency. We’ll delve into the necessary preparations, the step-by-step installation, common troubleshooting tips, and even how to optimize your ink usage for a smarter printing experience, aligning with modern tech trends and smart financial habits.

Before You Begin: Essential Preparations for Seamless Ink Replacement
The key to a smooth ink cartridge replacement process lies in proper preparation. Rushing through this stage can lead to frustrating errors, messy spills, or even damage to your printer. Taking a few moments to gather your thoughts and tools will save you time and hassle in the long run, ensuring your printer is ready for action without a hitch.
Identifying the Right Cartridge for Your HP Printer
The first and arguably most critical step is ensuring you have the correct ink cartridge. HP produces a vast array of printers, each designed to work with specific cartridge series. Using the wrong cartridge will either not fit, or if forced, could damage your printer.
To correctly identify your printer’s cartridge type:
- Check the Printer Itself: Look for a sticker or label on your printer, usually near the cartridge access door, on the front, or on the back. It will typically list the printer model number (e.g., HP OfficeJet Pro 9015, HP DeskJet 2755).
- Consult the User Manual: Your printer’s manual will clearly state the compatible ink cartridges. If you’ve misplaced the physical manual, HP’s support website offers digital versions for every model.
- Utilize the HP Smart App: For a truly modern approach, the HP Smart App (available for iOS, Android, Windows, and macOS) is an invaluable tool. Once your printer is connected, the app can automatically detect your printer model and show you the exact cartridge numbers you need, along with current ink levels and direct links to purchase genuine replacements. This digital integration streamlines the entire process, reflecting the ongoing convergence of tech and everyday convenience.
- Review Your Old Cartridge: If you’re replacing an empty cartridge, its body will have the cartridge number printed on it (e.g., HP 61, HP 952, HP 305).
- Understand Cartridge Types: HP primarily uses inkjet cartridges for its DeskJet, Envy, OfficeJet, and Photosmart lines. For LaserJets, you’ll be dealing with toner cartridges, which are a different beast entirely. This guide focuses on inkjet cartridges. Also, consider standard vs. XL (high-yield) cartridges. XL cartridges contain more ink, offering a lower cost-per-page, which is a smart financial decision for heavy users and contributes to less frequent replacements – a productivity boost.
When purchasing new cartridges, prioritize genuine HP cartridges. While third-party or refilled cartridges might seem cheaper upfront, they often lead to subpar print quality, potential printer damage, voided warranties, and even digital security risks if not sourced from reputable vendors. HP’s advanced printer technology relies on precisely engineered cartridges for optimal performance, ensuring vibrant colors and crisp text. This decision impacts not just print quality but also the long-term health and efficiency of your device.
Gathering Your Tools and Workspace Setup
With the correct cartridges in hand, dedicate a few minutes to prepare your physical workspace.
- Choose a Clean, Well-Lit Area: You’ll be dealing with ink, so a clean surface helps prevent contamination and makes it easier to see what you’re doing. Good lighting is crucial.
- Have Paper Towels or an Old Cloth Handy: Inks can sometimes drip, especially from old cartridges. These will help clean up any potential messes.
- Consider Wearing Disposable Gloves: If you want to keep your hands ink-free, gloves are a good idea.
- Locate Your Printer’s User Manual (Optional but Recommended): While this guide provides general instructions, specific printer models might have minor variations in accessing the cartridge bay. Your manual will have the precise details.
- Ensure Your Printer is Powered On: The printer needs to be on so that the cartridge carriage can move into the correct position for access. Do not unplug the printer during the process.
Step-by-Step Ink Cartridge Installation Process
Now that you’re prepared, let’s dive into the core process of installing your new ink cartridges. Following these steps carefully will ensure a smooth, error-free installation and get you back to printing in no time.
Accessing the Cartridge Bay
The first physical step is to open your printer to expose the ink cartridge area.
- Power On Your Printer: Ensure the printer is switched on and ready.
- Open the Cartridge Access Door: This is typically a front cover or a top lid, depending on your HP printer model. Refer to your manual if you’re unsure.
- Wait for the Cartridge Carriage to Move: Once the door is open, the internal carriage holding the cartridges will typically glide to the center of the printer, making them accessible. Wait for it to come to a complete stop before proceeding. Important: Do not try to manually force the carriage. This can cause damage.
- Observe Safety Precautions: Be mindful of internal components. Avoid touching any cables, ribbons, or the printhead itself (the metallic strip on the bottom of the carriage). Only handle the cartridges directly.
Removing the Old Cartridge
Once the carriage is in position, you can remove the depleted ink cartridge.
- Identify the Empty Cartridge: Most HP printers have a light indicator or a digital display that highlights which cartridge is low or empty.
- Release the Old Cartridge: The method varies slightly by model:
- Push-down Release: For many HP models, you gently push down on the front or top of the old cartridge until it clicks and releases. It will then spring slightly forward or upward.
- Pull-tab Release: Some older or specific models might have a small tab or lever you need to press or pull to release the cartridge.
- Carefully Pull Out the Cartridge: Once released, gently pull the cartridge straight out of its slot. Be careful to hold it upright to prevent any residual ink from spilling.
- Proper Disposal and Recycling: Do not simply toss the old cartridge in the trash. HP has robust recycling programs for ink cartridges, often available through retailers or directly via their website. This is an excellent practice for environmental responsibility and aligns with sustainable tech consumption. Many office supply stores also offer collection bins.
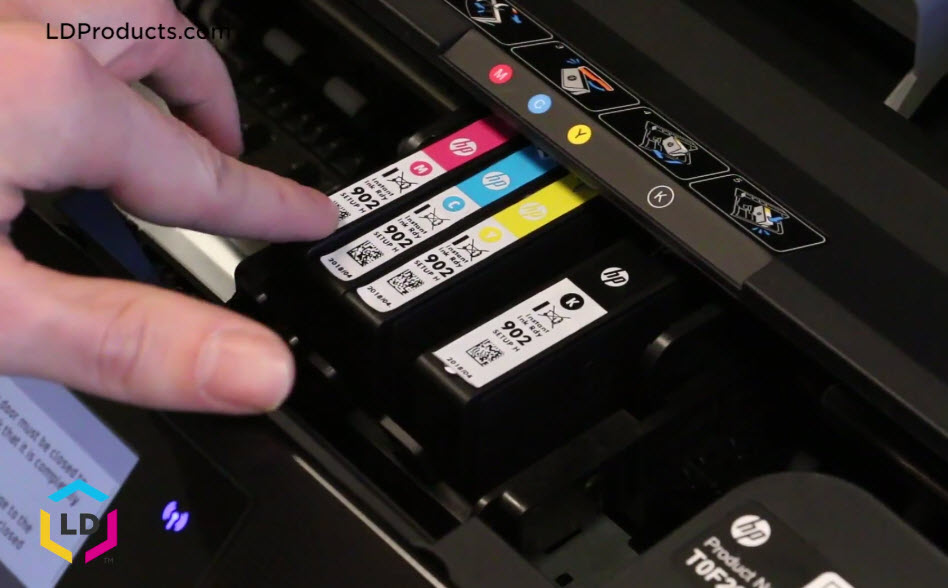
Preparing and Inserting the New Cartridge
With the old cartridge out, it’s time for the new one. This is where meticulous handling is crucial.
- Unpack the New Cartridge: Remove the new cartridge from its sealed packaging.
- Remove Protective Tape/Clip: New HP ink cartridges come with a piece of protective tape (usually copper-colored or clear plastic) or a small orange plastic clip covering the ink nozzles and electrical contacts. Carefully peel off this tape or remove the clip. Crucially, do not touch the copper-colored electrical contacts or the ink nozzles (the small holes) at the bottom. Oils from your fingers can clog the nozzles or interfere with the electrical connection, leading to print quality issues or detection errors.
- Match the Color/Slot: Each cartridge slot in the printer carriage is color-coded (e.g., C for Cyan, M for Magenta, Y for Yellow, K for Black). Ensure you are inserting the correct color cartridge into its corresponding slot. The cartridge itself will also often have a color label.
- Insert the New Cartridge: Slide the new cartridge into its designated slot. Push it firmly until you hear an audible click, indicating it’s securely latched into place. It should sit flush with the other cartridges or the carriage itself. Never force a cartridge if it doesn’t fit; double-check that you have the correct cartridge and are inserting it in the right orientation.
Finalizing the Installation and Initial Checks

You’re almost there! A few final steps will confirm the installation and prepare your printer for use.
- Close the Cartridge Access Door: Gently close the printer’s access door. The cartridge carriage might move back and forth a few times as the printer calibrates and initializes the new ink.
- Wait for Printer Initialization: Allow your printer a moment to recognize the new cartridge. You might see a message on the printer’s display or your computer screen indicating that new ink has been detected.
- Run a Test Print/Alignment Page: Many HP printers will automatically prompt you to print an alignment page after installing new ink. This process ensures the printhead is properly aligned, crucial for sharp text and accurate colors. Follow the on-screen instructions to print and scan the alignment page if prompted. If not prompted, you can usually initiate a test print or alignment from your printer’s control panel or through the HP Smart App on your computer or mobile device. This quick step is a fantastic productivity booster, preventing wasted prints later due to misalignment.
Troubleshooting Common Ink Installation Issues
Even with careful preparation, sometimes things don’t go perfectly. Knowing how to troubleshoot common issues can save you a service call and get you back to printing quickly. These tips leverage digital diagnostics and simple physical checks.
“Cartridge Not Detected” or Error Messages
This is perhaps the most common post-installation problem. The printer simply doesn’t recognize the new ink cartridge.
- Re-seat the Cartridge: The most frequent fix is to simply open the access door again, remove the newly installed cartridge, and re-insert it firmly until it clicks. Sometimes it just needs a more secure connection.
- Clean Electrical Contacts: If re-seating doesn’t work, remove the cartridge and gently wipe the copper-colored electrical contacts on the back of the cartridge with a clean, lint-free cloth (like a coffee filter or microfiber cloth). Also, gently wipe the corresponding contacts inside the printer carriage, being careful not to bend them. Re-insert the cartridge.
- Restart the Printer: Turn off your printer, wait about 60 seconds, and then turn it back on. This can sometimes clear minor glitches in the printer’s memory.
- Check for Firmware Updates: Outdated printer firmware can sometimes cause compatibility issues with newer cartridges. Use the HP Smart App or check HP’s support website to see if there are any available firmware updates for your specific printer model. Updating firmware is a critical digital security practice and can resolve many tech-related issues.
- Verify Genuine Cartridge: If you’re using a non-genuine or refilled cartridge, the printer might refuse to recognize it due to HP’s built-in authentication mechanisms. While this is sometimes seen as an inconvenience, it’s designed to protect printer performance and reduce support issues.
Poor Print Quality After Installation
If your prints are streaky, faded, or show incorrect colors, even with a new cartridge, here’s what to do:
- Run Print Head Cleaning Cycles: Ink nozzles can get clogged, especially if the printer hasn’t been used for a while. Access your printer’s maintenance menu (either on the printer’s display or via the HP Smart App on your computer) and run one or two print head cleaning cycles. This forces ink through the nozzles to clear any blockages. Be aware that cleaning cycles use a small amount of ink.
- Check Ink Levels (Even New Cartridges): While rare, a new cartridge could be faulty or have an issue. Use the HP Smart App or your printer’s display to verify that the printer is reporting full ink levels for the new cartridge.
- Re-run Alignment Page: As mentioned earlier, proper alignment is vital for print quality. If you skipped it or suspect an issue, run the alignment process again.
Dealing with Smudges or Leaks
Ink leaks are rare with genuine HP cartridges but can happen, especially if cartridges are mishandled or if using non-genuine alternatives.
- Gentle Handling: Always handle cartridges carefully, especially when removing protective tapes.
- Inspect for Damage: Before inserting, quickly inspect the new cartridge for any visible damage.
- Clean Up Immediately: If a leak occurs, use paper towels to clean up the ink immediately. Avoid letting it dry inside the printer. If the leak persists, contact HP support.
Optimizing Ink Usage and Printer Productivity
Managing your printer extends beyond just installing ink. Smart strategies for ink usage and leveraging your printer’s full capabilities can lead to significant cost savings and enhanced productivity, making your tech work smarter for your money.
Understanding HP Ink Subscription Services (Instant Ink)
HP’s Instant Ink service is a subscription model designed to simplify ink management and potentially save money.
- How it Works: Instead of buying cartridges as needed, you subscribe to a plan based on the number of pages you print per month. Your printer monitors ink levels and automatically orders and ships new cartridges to you before you run out.
- Cost-Effectiveness: For many users, especially those with consistent printing habits, Instant Ink can offer substantial savings compared to buying cartridges retail. It eliminates the worry of running out of ink and often includes recycling services. This is a prime example of how a “Money” topic integrates with “Tech” to provide a convenient and financially shrewd solution.
- Convenience and Productivity: The automatic delivery ensures you always have ink, preventing downtime. This boosts productivity by removing one more task from your to-do list.
Tips for Extending Cartridge Life and Maintaining Print Quality
Beyond subscription services, several practices can help you get the most out of every cartridge.
- Proper Printer Shutdown: Always use the printer’s power button to turn it off, rather than just unplugging it. This allows the printhead to “park” in a protective position, which helps prevent ink from drying and clogging the nozzles.
- Print Regularly: Infrequent printing is a common cause of dried-out ink nozzles. Printing at least once a week, even a simple test page, can keep the ink flowing and prevent clogs.
- Store Spare Cartridges Correctly: Keep new, unopened cartridges in their sealed packaging until needed. Store them in a cool, dark place, away from direct sunlight or extreme temperatures.
- Use Draft Mode for Non-Critical Prints: For internal documents or drafts, select “Draft” or “Economical” print quality settings. This uses less ink and can significantly extend the life of your cartridges without compromising readability for non-essential documents.
Leveraging the HP Smart App for Enhanced Management
The HP Smart App is more than just an ink identifier; it’s a powerful productivity hub for your HP printer.
- Monitor Ink Levels: Get real-time updates on your ink levels directly on your phone or computer.
- Order Supplies: Purchase new genuine HP cartridges directly through the app.
- Troubleshooting: The app often provides guided troubleshooting steps for common issues, like the “cartridge not detected” errors.
- Mobile Printing: Print documents and photos directly from your smartphone or tablet, a core feature of modern tech convenience.
- Scan and Share: Use your printer’s scanner (or your phone camera) to scan documents, enhance them, and share them directly from the app.
Conclusion
Installing ink in your HP printer doesn’t have to be a daunting task. By following these detailed steps, understanding the importance of genuine cartridges, and embracing smart maintenance practices, you can ensure your printer consistently delivers high-quality results. From identifying the right cartridge and meticulously inserting it, to troubleshooting common errors and leveraging productivity-enhancing tools like the HP Smart App and Instant Ink, you are now equipped to manage your printing needs efficiently. Proper ink management isn’t just about changing cartridges; it’s about maximizing your printer’s lifespan, optimizing your print quality, and ultimately, saving time and money. Take control of your printing experience and unlock the full potential of your HP printer.
aViewFromTheCave is a participant in the Amazon Services LLC Associates Program, an affiliate advertising program designed to provide a means for sites to earn advertising fees by advertising and linking to Amazon.com. Amazon, the Amazon logo, AmazonSupply, and the AmazonSupply logo are trademarks of Amazon.com, Inc. or its affiliates. As an Amazon Associate we earn affiliate commissions from qualifying purchases.