In the world of technology, few gadgets are as ubiquitous and essential for homes and businesses as the printer. Among the market leaders, HP stands out for its reliability, performance, and user-friendly design. However, even the most advanced HP printer is only as good as its ink supply. Running out of ink can halt productivity, whether you’re printing crucial business documents, vibrant family photos, or a student’s last-minute assignment. The good news is that installing new ink cartridges in an HP printer is a straightforward process, often requiring just a few minutes of your time.

This comprehensive guide will walk you through every step of installing an ink cartridge in your HP printer, ensuring you achieve optimal print quality and extend the life of your device. We’ll delve into the nuances of cartridge types, demystify the installation process, offer practical troubleshooting tips for common issues, and provide best practices to maximize your printing experience. For anyone navigating the complexities of digital security, productivity tools, or the ever-evolving landscape of AI, maintaining your basic tech infrastructure, like a properly functioning printer, is a foundational element. Understanding this process not only empowers you with practical tech literacy but also contributes to smart money management by preventing costly printer repairs or wasted ink. Let’s dive in.
Understanding Your HP Printer and Ink Cartridges
Before you even touch a new ink cartridge, it’s crucial to understand the basics of your HP printer model and the types of cartridges available. This foundational knowledge is key to making informed decisions that impact print quality, printer longevity, and your overall printing budget.
The Importance of Identifying Your Printer Model
The first and most critical step in successful ink cartridge installation is knowing your specific HP printer model. HP produces a vast array of printers, from compact desk jets to robust LaserJet series (though this guide focuses on inkjets), and each model requires specific ink cartridges. Attempting to install the wrong cartridge can lead to:
- Physical Damage: Forcing an incorrect cartridge can break internal components.
- Printer Errors: Your printer won’t recognize an incompatible cartridge, leading to frustrating error messages.
- Wasted Money: You’ll be stuck with a cartridge you can’t use.
Your printer model number is usually printed on the front, top, or back of the device. It might also be found on a sticker inside the cartridge access door. Take a moment to jot it down or take a picture before purchasing new ink. This simple step aligns with smart tech management, ensuring compatibility and avoiding unnecessary expenditure – a vital aspect of personal finance and business efficiency.
Types of HP Ink Cartridges and Their Implications
When it comes to purchasing ink, you generally have three primary options for your HP printer, each with its own advantages and disadvantages regarding cost, performance, and potential impact on your device:
-
Genuine HP Ink Cartridges (OEM – Original Equipment Manufacturer): These are cartridges manufactured by HP specifically for their printers.
- Pros: Guaranteed compatibility, superior print quality, consistent color accuracy, maximum reliability, and often backed by HP’s warranty. Using genuine HP ink also ensures your printer’s warranty remains valid.
- Cons: Typically the most expensive option.
- Tech & Money Aspect: While the initial cost is higher, genuine cartridges often yield more pages per cartridge and provide a more consistent output, potentially saving money in the long run by avoiding reprints due to poor quality or printer damage. From a tech perspective, they are engineered to work seamlessly with HP’s printhead technology.
-
Remanufactured Ink Cartridges: These are original HP cartridges that have been recycled, cleaned, refilled with ink by a third party, and sometimes fitted with new components.
- Pros: Significantly cheaper than new genuine cartridges, environmentally friendly due to recycling.
- Cons: Quality can vary widely between different remanufacturers. They may not perform as consistently as genuine cartridges, leading to potential issues like clogs, incorrect ink level readings, or even printer errors. Some printer warranties may be voided by their use, though laws vary.
- Tech & Money Aspect: This option appeals to the “money” aspect, offering substantial savings. However, the “tech” risk of inconsistent performance or printer compatibility issues is higher. It’s a balance between cost savings and potential reliability concerns.
-
Compatible Ink Cartridges: These are brand-new cartridges produced by a third-party manufacturer, designed to function with HP printers but are not made by HP.
- Pros: Often cheaper than genuine cartridges, providing an alternative to remanufactured options.
- Cons: Similar to remanufactured cartridges, quality can be inconsistent. There’s a risk of compatibility issues, poor print quality, and potential damage to your printer. Warranty concerns also apply here.
- Tech & Money Aspect: Like remanufactured cartridges, these offer cost savings but carry a higher risk profile for performance and printer health. It’s a gamble that some users take for the immediate financial benefit, but it requires careful consideration of the long-term tech implications.
When making your choice, weigh the initial cost savings against the potential for reduced print quality, printer malfunction, and the inconvenience of troubleshooting. For critical documents and high-quality output, genuine HP ink often provides the best value and peace of mind.
Why Proper Installation Matters: Beyond Just Printing
The act of installing an ink cartridge might seem trivial, but its proper execution is paramount for several reasons that extend beyond simply getting your printer to print:
- Optimized Print Quality: Correctly installed cartridges ensure the ink flows smoothly and evenly, leading to crisp text, vibrant colors, and accurate image reproduction. Misaligned or improperly seated cartridges can result in streaks, faded prints, or blotches.
- Printer Longevity: Forcing a cartridge or failing to remove protective strips can damage the printhead, cartridge contacts, or the printer’s internal mechanisms. This can lead to costly repairs or even the need for a new printer, directly impacting your personal finance and tech budget.
- Accurate Ink Level Monitoring: Properly installed genuine cartridges allow your printer to accurately monitor ink levels, providing timely warnings when ink is low and preventing unexpected mid-print outages.
- Preventing Ink Leaks and Clogs: Correct installation minimizes the risk of ink leaks, which can damage your printer’s internal components and create a messy situation. It also ensures the nozzles are correctly sealed when not in use, preventing them from drying out and clogging.
Understanding these implications reinforces that installing ink cartridges isn’t just a chore; it’s a small but significant act of maintenance that contributes to the overall health and efficiency of your HP printer.
Step-by-Step Guide to Installing HP Ink Cartridges
With a clear understanding of your printer and ink types, you’re now ready to tackle the installation process. Follow these steps meticulously to ensure a smooth, error-free experience and get back to printing in no time.
Preparation: Gathering Your Tools and Safety Precautions
Before you begin, a little preparation goes a long way. This minimizes interruptions and ensures you handle your cartridges safely.
- Gather Your Supplies: Ensure you have your new HP ink cartridges, your HP printer, and if desired, a clean, lint-free cloth or paper towel. The cloth can be useful for wiping up any incidental ink smudges, although modern cartridges are designed to minimize this.
- Power On and Stabilize: Turn on your HP printer. Make sure it’s connected to power and is in a “ready” state, not actively printing or performing any other operations. Allow it a moment to initialize. Ensure it’s on a stable, level surface to prevent movement during the process.
- Read Your Printer’s Manual (Optional but Recommended): While this guide is comprehensive, your specific HP printer model may have unique quirks or features. A quick glance at the “ink cartridge installation” section of your printer’s user manual can provide model-specific tips. This is part of being a savvy tech user, leveraging all available resources.
Accessing the Cartridge Bay
This is where you’ll gain access to the heart of your printer’s ink delivery system.
- Locate the Access Door: Most HP inkjet printers have a cartridge access door on the front or top. It might be a flip-up lid or a panel that slides open. Refer to your printer’s manual if you’re unsure.
- Open the Door: Gently open the cartridge access door. Upon opening, the print carriage (the assembly holding the ink cartridges) will typically move from its resting position to a central, accessible location.
- Wait for the Carriage to Stop: It’s crucial to wait until the print carriage completely stops moving and becomes idle. Attempting to interact with it while it’s in motion can damage the printer or injure your fingers. This pause is a safety measure built into the printer’s operational sequence.
Removing Old Cartridges (If Replacing)
If you’re replacing empty or low-ink cartridges, you’ll need to remove the old ones first. Skip this step if you’re installing cartridges in a brand-new printer.
- Identify the Cartridge to Remove: The printer software or an indicator light often tells you which cartridge is empty. If you’re replacing multiple, remove them one by one. Note the color and slot of each cartridge.
- Gently Press Down: Most HP cartridges are held in place by a simple locking mechanism. To release an old cartridge, gently press down on the back of it. You’ll usually hear a soft click, indicating it has disengaged from its slot.
- Pull Out Towards You: Once released, carefully pull the cartridge out of its slot towards you. Hold it by its plastic body. Avoid touching the copper-colored electrical contacts or the ink nozzles at the bottom, as residue from your skin can interfere with printing or clog the nozzles.
- Dispose Responsibly: Place the removed cartridge on a paper towel to avoid ink transfer. Consider recycling your old cartridges through HP’s recycling program or local electronics recycling centers. This reflects good digital citizenship and environmental responsibility, which can even positively impact a brand’s reputation for sustainability.
Unboxing and Preparing New Cartridges
New cartridges require careful handling to ensure optimal performance.

- Unpack One Cartridge at a Time: Remove the new cartridge from its sealed packaging. Only open the cartridge you intend to install immediately. Keeping others sealed prevents them from drying out.
- Handle with Care: Always hold the cartridge by its black plastic body. Again, do NOT touch the copper-colored electrical contacts or the ink nozzles. These are delicate components vital for proper function and print quality. Oils from your skin can cause poor conductivity or block ink flow.
- Remove Protective Tape/Clip: Locate the protective tape or clip on the cartridge. This is typically an orange or yellow pull tab. Gently pull it away to remove it. This tape covers the ink nozzles and/or air vents, preventing ink from drying or leaking during storage.
- Crucial Warning: Make sure only to remove the designated protective tape. Do not remove any other labels, stickers, or clear strips that are permanently affixed to the cartridge, as these are often part of the cartridge’s design and removing them can cause leaks or malfunction.
- Do Not Shake: Resist the urge to shake the cartridge, as this can introduce air bubbles into the ink supply, potentially leading to inconsistent printing or clogging.
Inserting the New Cartridges
Now, it’s time to place the new cartridges into their designated homes.
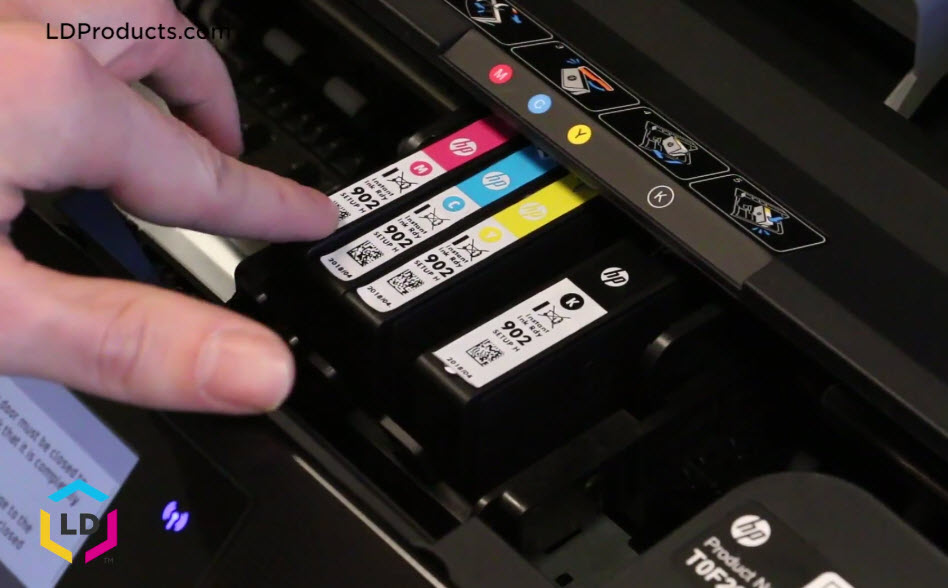
- Match Colors and Slots: Observe the labels on the cartridge and inside the cartridge bay. HP printers usually have color-coded slots (e.g., C for Cyan, M for Magenta, Y for Yellow, K for Black) or clear labels indicating where each cartridge goes. Ensure you match the cartridge to its correct slot.
- Slide and Push: Gently slide the new cartridge into its corresponding slot. Push it firmly but carefully until you hear a distinct click. This click indicates that the cartridge is securely seated and locked into place. Do not force it; if it doesn’t fit or click, double-check that you have the correct cartridge model and that it’s oriented correctly. A properly seated cartridge should not feel loose or wobbly.
- Repeat for All Cartridges: If you are installing multiple cartridges, repeat steps 1 and 2 for each one.
Closing the Printer and Final Checks
The physical installation is complete; now let your printer take over.
- Close the Access Door: Gently close the cartridge access door until it latches securely. Do not slam it.
- Printer Initialization: Your HP printer will typically begin an automatic initialization process. This can involve calibrating the newly installed cartridges, aligning printheads, and running internal diagnostics. You might hear various mechanical sounds. Be patient and allow this process to complete entirely, which can take a few minutes. Do not interrupt it by opening the door again or turning off the printer.
- Print a Test Page or Alignment Page (Recommended): Once the printer indicates it’s ready (e.g., status light stops blinking, display shows “Ready”), it might prompt you to print an alignment page. This is highly recommended as it fine-tunes the printhead positioning for optimal print quality. Follow the on-screen instructions, which often involve scanning the printed alignment page.
- Check Ink Levels: After initialization, you can check the ink levels via your printer’s control panel or through the HP Smart app on your computer or mobile device. This confirms the cartridges are recognized and working correctly.
Troubleshooting Common Installation Issues
Even with careful execution, sometimes issues arise. Knowing how to troubleshoot common problems can save you a trip to support or an unnecessary printer replacement. This is where your tech problem-solving skills come into play.
Printer Not Recognizing Cartridge
This is perhaps the most frequent post-installation issue.
- Re-seat the Cartridge: The most common fix is simply removing the problematic cartridge and re-inserting it, ensuring it clicks firmly into place. Sometimes, it just needs a better connection.
- Clean Contacts: Carefully remove the cartridge again. Using a clean, lint-free cloth or cotton swab very lightly dampened with distilled water, gently wipe the copper-colored electrical contacts on the back of the cartridge and inside the printer’s carriage. Ensure they are completely dry before re-inserting. Dirt, ink residue, or oils can disrupt the electrical connection.
- Restart the Printer: Turn off your printer, unplug it from the wall for 60 seconds, then plug it back in and turn it on. This can reset the printer’s internal memory and resolve temporary glitches.
- Update Printer Drivers: Ensure your printer drivers are up-to-date. Outdated software can sometimes cause communication issues between the printer and the cartridges. Check the HP support website for your specific model.
- Try a Different Cartridge: If you have another new cartridge, try installing it to determine if the issue is with the printer or a faulty cartridge.
Poor Print Quality After Installation
If your prints are streaky, faded, or show incorrect colors, don’t immediately blame the ink.
- Run Printhead Cleaning Utility: Most HP printers have a built-in “clean printhead” or “clean cartridges” utility in their settings menu or through the HP Smart app. This process flushes the nozzles and can resolve clogs. You might need to run it a few times.
- Perform Printhead Alignment: If you skipped the alignment page after installation, run it now. Proper alignment ensures all colors print in the correct position.
- Check Ink Levels: Verify that the cartridges are indeed full and recognized. A low-ink warning might appear if a new cartridge isn’t fully seated.
- Inspect for Protective Tape: Double-check that all protective tape has been removed from the cartridge nozzles. Even a tiny piece can block ink flow.
- Use Quality Paper: Sometimes, the issue isn’t the ink but the paper. Using paper that is too thin, textured, or damp can affect print quality.
Cartridge Jamming or Not Fitting
If a cartridge won’t go in or gets stuck, do not force it.
- Verify Model Compatibility: The most common reason for a cartridge not fitting is that it’s the wrong model for your printer. Double-check your printer model number and the cartridge’s compatibility.
- Check Orientation: Ensure you’re inserting the cartridge in the correct orientation. There’s usually only one way it fits correctly.
- Inspect for Obstructions: Look inside the cartridge slot for any foreign objects, bent pins, or debris that might be blocking the cartridge.
- Examine the Cartridge: Check the new cartridge itself for any manufacturing defects or damage that might prevent it from seating properly.
Best Practices and Maintenance Tips
Beyond installation, a few best practices can significantly enhance your HP printer’s performance, extend its lifespan, and optimize your printing costs. This aligns with both “Tech” for device longevity and “Money” for long-term savings.
Choosing the Right Ink: Genuine vs. Third-Party Revisited
The decision between genuine HP ink and third-party alternatives often comes down to budget versus reliability and quality.
- Genuine HP Ink: For crucial documents, professional presentations, or high-quality photo prints where color accuracy and longevity are paramount, genuine HP ink is the undisputed choice. It ensures consistency, protects your printer’s warranty, and is engineered to work flawlessly with HP’s proprietary printhead technology. While the upfront cost is higher, the reliability and superior results often justify the investment, preventing wasted paper and reprints. This can be viewed as a “smart money” decision for quality-conscious users.
- Third-Party (Remanufactured/Compatible) Ink: If your printing needs are less critical (e.g., drafts, casual home use where exact color fidelity isn’t essential) and budget is a primary concern, third-party options can offer significant cost savings. However, be prepared for potential variations in print quality, lower page yields, and the possibility of compatibility issues. It’s advisable to research reputable third-party brands and read reviews to minimize risks. Understand that using non-HP ink can affect your printer’s warranty, a crucial consideration for financial planning and avoiding unexpected repair costs.
Printer Maintenance for Longevity
Proper printer care goes beyond just installing ink.
- Regular Use: Inkjet printers benefit from regular use. Printing at least once a week, even a test page, helps prevent ink from drying out in the nozzles and causing clogs.
- Keep Software Updated: Regularly update your HP printer drivers and firmware. These updates often include performance enhancements, bug fixes, and improved compatibility with new operating systems and cartridges. This is a core “Tech” best practice.
- Clean Exterior: Periodically wipe down the exterior of your printer with a soft, dry cloth to prevent dust buildup. Keep the cartridge access door closed when not in use to protect internal components.
- Proper Storage of Spare Cartridges: Store unopened ink cartridges in their original, sealed packaging in a cool, dark place until needed. This preserves their shelf life and prevents the ink from drying out or degrading.
- Unplug During Extended Downtime: If you plan not to use your printer for an extended period, turn it off and unplug it from the wall.
Environmentally Responsible Cartridge Disposal
As responsible tech consumers, disposing of empty ink cartridges properly is important.
- HP Planet Partners Program: HP has a robust recycling program called HP Planet Partners, allowing you to return used genuine HP cartridges for free recycling. This ensures components are reused or responsibly disposed of, reducing environmental impact. Check the HP website for details in your region.
- Local Recycling Centers: Many electronics stores, office supply retailers, and municipal recycling centers accept empty ink cartridges.
- Reduce Waste: By choosing reputable cartridges and performing proper maintenance, you minimize wasted ink and cartridges, contributing to more sustainable printing habits. This demonstrates good brand citizenship and aligns with broader environmental trends in technology.
Conclusion
Installing ink cartridges in your HP printer is a foundational skill for any tech-savvy individual or business. By understanding your printer model, choosing the right ink, following the installation steps carefully, and knowing how to troubleshoot common issues, you empower yourself to maintain peak printing performance. This guide not only provides a clear pathway to efficient cartridge replacement but also underscores the broader importance of tech literacy, smart financial choices in consumables, and responsible device maintenance.
A properly functioning printer contributes significantly to personal and professional productivity, making the small effort invested in correct ink cartridge installation a highly worthwhile endeavor. With these tips in hand, you’re now equipped to handle your HP printer’s ink needs with confidence, ensuring crisp, clear, and consistent prints every time.
aViewFromTheCave is a participant in the Amazon Services LLC Associates Program, an affiliate advertising program designed to provide a means for sites to earn advertising fees by advertising and linking to Amazon.com. Amazon, the Amazon logo, AmazonSupply, and the AmazonSupply logo are trademarks of Amazon.com, Inc. or its affiliates. As an Amazon Associate we earn affiliate commissions from qualifying purchases.