In today’s fast-paced digital landscape, a reliable printer remains an indispensable tool for homes and businesses alike. From important documents and creative projects to everyday convenience, the ability to print efficiently is paramount. Among the leading manufacturers, HP (Hewlett-Packard) stands out for its extensive range of printers, known for their innovation, reliability, and user-friendly design. However, even the most intuitive devices require proper setup to unlock their full potential. This guide will walk you through every step of installing your HP printer, ensuring a smooth, secure, and optimal experience from the moment you unbox it. By following these detailed instructions, you’ll not only connect your printer but also integrate it seamlessly into your digital workflow, leveraging the full power of HP’s technology ecosystem.

Proper installation isn’t just about getting your printer to print; it’s about investing in the longevity and efficiency of your device, potentially saving you from costly support calls or premature replacements. As we delve into the technical nuances, we’ll also touch upon how this process reflects HP’s commitment to user experience (a key aspect of brand strategy) and how a do-it-yourself approach can be a smart financial move.
The Essential Pre-Installation Checklist: Laying the Groundwork for Success
Before you even think about plugging in your new HP printer, a little preparation goes a long way. This initial phase is crucial for preventing common hiccups and ensuring a smooth installation process, saving you time and frustration down the line. Think of it as your tech-savvy pre-flight check, where attention to detail pays dividends.
System Requirements and Compatibility: Ensuring Your Tech Aligns
Every piece of technology has specific requirements to function optimally. Your HP printer is no exception. Begin by consulting your printer’s manual or the HP support website for its minimum system requirements. This typically includes:
- Operating System (OS): Confirm that your computer’s operating system (Windows, macOS, Linux) is compatible with the printer’s drivers and software. Newer printers might not support very old OS versions, and vice versa. Staying updated with your OS is generally good practice for digital security and compatibility with modern apps and gadgets.
- Available USB Port: If you plan to connect via USB, ensure you have an open USB port on your computer. Note the USB version (e.g., USB 2.0, USB 3.0) for optimal connection speeds, although printers are generally not bandwidth-intensive.
- Network Access: For wireless or Ethernet connections, you’ll need an active internet connection and access to your Wi-Fi network name (SSID) and password, or an available Ethernet port on your router.
- Disk Space: Ensure your computer has sufficient free disk space for the printer drivers and any accompanying software, such as the HP Smart app. While drivers are usually small, the full software suite can take up a few hundred megabytes.
- Memory (RAM) and Processor: While printers aren’t CPU-intensive for basic operations, having adequate system resources can improve the responsiveness of printer software and overall productivity.
Understanding these requirements not only guarantees compatibility but also gives you insight into the technological demands of your new device. It’s a foundational step in any tech setup, reflecting a smart approach to integrating new tools into your existing digital environment.
Gathering Your Tools and Workspace: Setting the Scene for Efficiency
A cluttered or unprepared workspace can lead to frustration and potential errors. Take a few moments to set up your installation environment:
- Location: Choose a stable, flat surface for your printer, away from direct sunlight, excessive heat, or moisture. Ensure there’s enough space around it for proper ventilation and easy access to paper trays and ink/toner compartments. Consider proximity to your computer and power outlet. For wireless printers, a central location within your network’s range is ideal.
- Power Source: Ensure you have a readily available power outlet. It’s advisable to use a surge protector to safeguard your printer from power fluctuations, which can be a small but wise investment in protecting your tech.
- Connectivity Cables:
- USB Cable: While many HP printers come with a USB cable, some newer models (especially those focused on wireless) might not include one. Have a USB A-to-B cable ready if you plan on a wired connection or if you need it for initial wireless setup (sometimes required).
- Ethernet Cable: If you’re setting up a wired network printer, have an Ethernet cable of appropriate length.
- Documentation: Keep your printer’s quick setup guide and any software CDs handy. Even if you plan on downloading everything, these often contain important serial numbers or specific instructions.
- Computer: Have the computer you intend to primarily use with the printer nearby and powered on.
- Internet Access: Ensure your internet connection is stable, as you’ll likely download drivers and the HP Smart app.
By preparing your workspace, you streamline the process, embodying a productive approach to task management. This meticulous preparation prevents backtracking and ensures that each subsequent step flows smoothly.
Network Considerations for Seamless Connectivity: The Wireless Advantage
For most modern HP printers, wireless connectivity is the preferred method due to its flexibility and convenience. Understanding your network setup is vital for a hassle-free wireless installation.
- Wi-Fi Network Name (SSID) and Password: You’ll need these to connect your printer to your home or office network. Double-check them for accuracy.
- Router Location: Ensure your printer is within a reasonable range of your Wi-Fi router. While Wi-Fi signals can travel, obstacles like thick walls can weaken them. A good signal strength is crucial for reliable printing.
- Network Type (2.4 GHz vs. 5 GHz): Most HP printers support the 2.4 GHz Wi-Fi band, which offers broader coverage. Some newer models might also support 5 GHz. Ensure your router’s 2.4 GHz band is enabled and note its SSID if it differs from the 5 GHz band. This technical detail can sometimes be a stumbling block for users unfamiliar with network configurations.
- Digital Security: Consider setting up a strong, unique password for your Wi-Fi network if you haven’t already. A secure network protects not only your printer but all connected devices from unauthorized access, a critical aspect of modern digital security.
Thinking ahead about network integration helps you embrace the technological advantages of wireless printing, fostering a more organized and accessible digital ecosystem. It’s about smart connectivity, a hallmark of modern tech solutions that HP aims to provide.
Unboxing and Physical Setup: Bringing Your HP Printer to Life
With your preparations complete, it’s time to physically set up your HP printer. This phase involves carefully unboxing, connecting essential components, and loading consumables, turning your new gadget from a box into a functional printing device.
Powering Up and Initial Configuration: The First Spark
- Unpack Carefully: Gently remove the printer from its box. Take note of all packaging materials, protective tapes, and foam inserts. HP often uses specific colors (e.g., blue tape) to highlight items that need to be removed. Remove all these protective materials from the exterior and interior of the printer, including the scanning bed and ink/toner cartridge areas. Failure to remove all tape can lead to paper jams or prevent the printer from functioning.
- Connect Power: Plug one end of the power cord into the designated port on the back of your HP printer and the other end into a wall outlet or surge protector. HP recommends plugging directly into a wall outlet for initial setup to rule out issues with power strips.
- Power On: Press the power button. The printer will typically go through an initialization process, which might involve displaying messages on its control panel, moving internal parts, and calibrating. Follow any on-screen prompts on the printer’s display, such as selecting your language or region. This initial sequence is the printer’s brand introduction, showing off its design and functionality.
Loading Media and Installing Consumables (Ink/Toner): Ready to Print
- Load Paper: Open the paper input tray and adjust the paper guides to fit the size of your paper (e.g., Letter, A4). Load a stack of plain white paper. Ensure the paper is not wrinkled or bent.
- Install Ink Cartridges or Toner Cartridges: This is a critical step, unique to your specific HP printer model (inkjet vs. laser).
- For Inkjet Printers: Open the access door to the ink cartridge area. Wait for the carriage to move to the center. Remove the ink cartridges from their packaging, being careful not to touch the copper contacts or ink nozzles. Remove any orange pull-tabs or protective tape. Insert each cartridge into its corresponding slot (usually color-coded) until it clicks into place. Close the access door. The printer will likely go through an alignment process.
- For Laser Printers: Open the front cover to access the toner cartridge area. Remove the protective packing materials. Gently shake the new toner cartridge side-to-side to distribute the toner evenly. Remove the sealing tape (often orange or green). Insert the toner cartridge into its slot until it locks securely. Close the front cover.
- Close all doors and trays: Ensure everything is properly closed to avoid error messages. Your printer is now physically ready.
This phase is where the tangible aspect of your HP product comes alive. The tactile experience of installing cartridges and loading paper is part of the brand’s commitment to user-friendly design, making complex technology accessible.
Connecting Your Printer: USB, Wi-Fi, or Ethernet
Choosing the right connection method depends on your needs and printer model. HP offers flexible options to fit various setups.
- USB Connection (Wired):
- If you’re using a USB cable, do NOT connect it to your computer yet. Connect one end of the USB cable to the square USB port on the back of your printer. You will be prompted to connect the other end to your computer during the software installation step. This staggered approach is a common best practice to ensure drivers are installed correctly before the hardware connection.
- This direct connection offers simplicity and reliability, ideal for a single-computer setup or when network access is not available.
- Wireless (Wi-Fi) Connection:
- This is the most popular option for its flexibility. Many modern HP printers have a touchscreen display that guides you through the wireless setup.
- On the printer’s control panel, navigate to the “Wireless” or “Network” settings.
- Select “Wireless Setup Wizard.” The printer will search for available Wi-Fi networks.
- Select your network’s SSID from the list.
- Enter your Wi-Fi password (WPA/WEP key) using the printer’s keypad. Be precise, as passwords are case-sensitive.
- Once connected, the wireless icon on your printer’s display should become solid, and you might receive a confirmation message.
- Alternatively, some HP printers support Wi-Fi Protected Setup (WPS). If your router has a WPS button, you can often press it, then follow prompts on your printer to connect without typing the password.
- Ethernet Connection (Wired Network):
- If your HP printer supports Ethernet, plug one end of an Ethernet cable into the Ethernet port on the back of the printer and the other end into an available LAN port on your router or network switch.
- The printer should automatically obtain an IP address from your network. This is a robust option for office environments or when maximum reliability is needed.
The choice of connection method often influences convenience and performance, highlighting the versatility of HP’s product offerings. Wireless connectivity, in particular, enhances productivity by allowing printing from multiple devices across your home or office, aligning with modern technology trends.
Software Installation and Driver Deployment: Integrating with Your Digital World
Physical setup is only half the battle. For your HP printer to communicate effectively with your computer and other devices, you need the right software and drivers. This is where the digital brain of your printing system comes into play.
The HP Smart App: Your Digital Command Center
HP has streamlined the installation and management process significantly with the HP Smart app. This application is a cornerstone of the HP brand experience, designed to simplify setup, printing, scanning, and managing your printer from various devices.
- Download and Install:
- Go to
123.hp.comon your computer or mobile device’s web browser. This is HP’s dedicated portal for easy printer setup. - The website will usually detect your operating system and guide you to download the appropriate HP Smart app.
- Alternatively, search for “HP Smart” in your operating system’s app store (Microsoft Store for Windows, App Store for macOS/iOS, Google Play Store for Android).
- Install the HP Smart app.
- Go to
- Add Your Printer:
- Open the HP Smart app.
- Click “Add Printer” or the plus (+) icon.
- The app will search for printers on your network. Select your HP printer from the list. If it doesn’t appear, ensure your printer is powered on and connected to the same network as your computer/mobile device.
- Follow the on-screen prompts to complete the setup. The app will guide you through connecting the printer (if not already done wirelessly) and installing necessary drivers.
- Benefits of HP Smart: This app isn’t just for installation. It allows you to print from anywhere (via mobile devices), scan documents, order supplies, check ink levels, and even perform basic maintenance tasks. It’s a powerful tool that enhances productivity and provides a centralized hub for all your HP printing needs, a prime example of integrated software solutions in modern tech.
Manual Driver Installation and Firmware Updates: For Specific Needs
While HP Smart is generally recommended, sometimes a manual driver installation or firmware update is necessary, particularly for older models or specific troubleshooting scenarios.
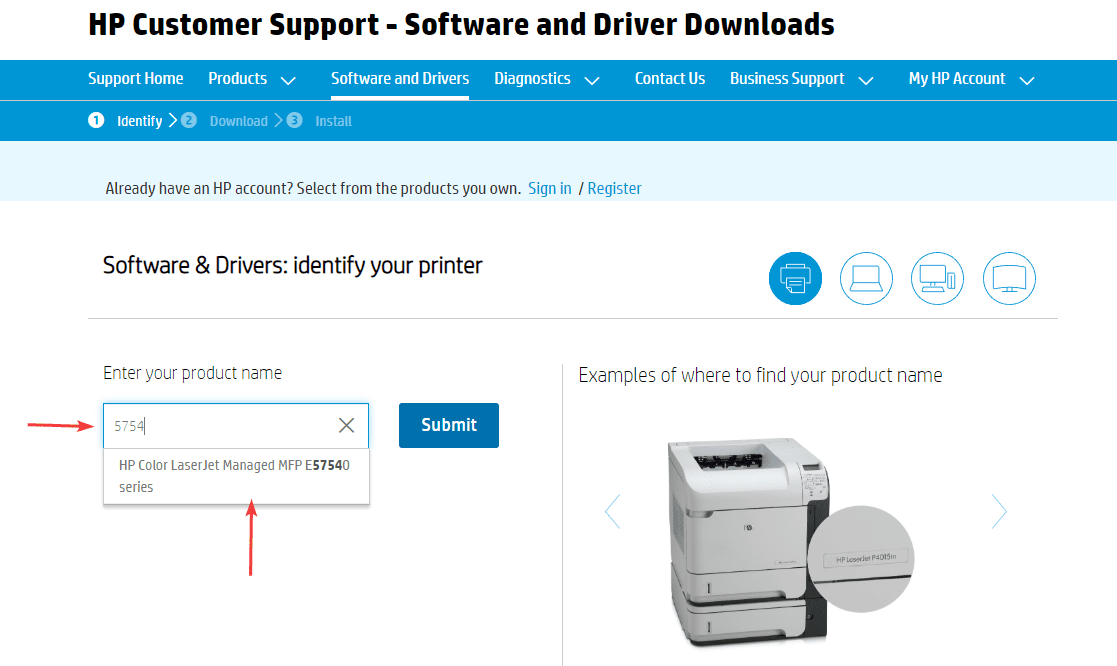
- Manual Driver Download:
- Visit
support.hp.comand navigate to the “Software and Driver Downloads” section. - Enter your printer’s model name or number.
- Download the full feature software package or the basic print driver. The full package offers more utilities, while the basic driver is lighter.
- Run the downloaded installer file. Follow the on-screen instructions, selecting your connection type (USB, wireless, or network). If connecting via USB, you’ll be prompted to plug in the USB cable at a specific point in the installation.
- Visit
- Firmware Updates:
- Firmware is the internal software that controls your printer’s hardware. HP regularly releases firmware updates to improve performance, add features, and fix bugs.
- You can often update firmware directly through the HP Smart app, your printer’s control panel (under “Tools” or “Settings”), or by downloading an update utility from HP’s support website.
- Always ensure your printer is connected to a stable power source and network during a firmware update. Interrupting an update can permanently damage the printer.
- These updates are crucial for maintaining your printer’s technological edge and ensuring compatibility with the latest operating systems and applications, thereby extending its useful life and protecting your investment.
Securing Your Printer on the Network: Digital Safety First
In an age where digital security is paramount, your network-connected printer is another potential entry point. Taking a few simple steps can significantly enhance its security:
- Strong Wi-Fi Password: As mentioned earlier, a robust password for your Wi-Fi network is your first line of defense.
- Printer Administrator Password: Many HP printers, especially business-oriented models, allow you to set an administrator password through their web interface (accessed by typing the printer’s IP address into a browser). This prevents unauthorized users from changing settings.
- Disable Unused Services: If your printer has features like FTP or Web Services that you don’t use, consider disabling them through the printer’s web interface or control panel. This reduces the attack surface.
- Firewall Settings: Ensure your computer’s firewall is configured to allow communication with your printer. This is usually handled automatically by the HP software, but it’s worth checking if you encounter connectivity issues.
These measures underscore the importance of digital security in all aspects of our tech usage, turning a simple printer into a more robust and protected asset.
Post-Installation Best Practices and Ongoing Maintenance: Maximizing Your Investment
Installing your HP printer is a significant first step, but the journey doesn’t end there. To ensure your printer delivers consistent performance, lasts longer, and continues to meet your needs, it’s essential to adopt some post-installation best practices and embrace proactive maintenance. This approach aligns with smart money management, as proper care extends product lifespan and reduces potential repair costs.
Testing, Registering, and Optimizing Performance: The Final Touches
- Print a Test Page: Once the software installation is complete, print a test page. This confirms that the printer is correctly communicating with your computer and that ink/toner is flowing properly. Most HP software offers an option to print a test page, or you can do it from your computer’s printer settings.
- Register Your Product: Register your HP printer on the HP website. This often provides access to warranty information, product support, and special offers. It also ensures you receive relevant updates and support communications, bolstering your connection to the HP brand ecosystem.
- Explore HP Smart Features: Spend some time familiarizing yourself with the HP Smart app. Discover its scanning capabilities, mobile printing options, and ability to order ink/toner. This maximizes the utility of your printer and enhances your digital productivity.
- Calibrate and Clean (if prompted): For inkjet printers, the setup process might include an alignment page print. Follow the instructions to scan this page, which calibrates the print heads for optimal print quality. Some printers also offer a print head cleaning utility.
Proactive Maintenance for Longevity and Print Quality: Protecting Your Asset
Regular, simple maintenance can significantly extend your HP printer’s lifespan and maintain its print quality, making it a sound financial choice to invest time in care.
- Keep Software and Firmware Updated: Regularly check for and install updates for the HP Smart app and your printer’s firmware. These updates often include performance enhancements, bug fixes, and security patches.
- Clean Regularly:
- Exterior: Wipe down the printer’s exterior with a soft, lint-free cloth.
- Glass Platen (Scanner): For all-in-one printers, clean the scanner glass with a glass cleaner (sprayed onto a cloth, not directly onto the glass) to ensure clear scans.
- Internal Cleaning Cycles: Many HP printers have built-in cleaning utilities (e.g., “Clean Printheads,” “Calibrate Printheads,” “Clean Paper Path”) accessible through the control panel or HP Smart app. Run these periodically or if you notice print quality issues (streaks, faded colors).
- Use Quality Consumables: Always use genuine HP ink cartridges or toner. While off-brand alternatives might seem cheaper upfront, they can lead to print quality issues, potential damage to the printer, and may void your warranty. This is where the brand integrity of HP plays a role, offering a consistent and reliable user experience.
- Proper Paper Storage: Store paper in a cool, dry place to prevent moisture absorption, which can cause jams and print quality degradation.
- Dust Control: Keep your printer covered when not in use in dusty environments. Dust is a notorious enemy of electronics and can clog internal mechanisms.
- Power Down Correctly: When turning off your printer, use the power button on the printer itself. This allows the print head (for inkjets) to park correctly, preventing ink from drying out.
By adopting these practices, you’re not just maintaining a gadget; you’re preserving an essential tool, ensuring it remains a reliable asset in your tech arsenal for years to come. This diligent approach is a smart investment, showcasing how mindful tech management contributes to long-term financial savings and productivity.
Troubleshooting Common Installation Hiccups: Quick Solutions for Smooth Operations
Even with the most careful planning, sometimes things don’t go perfectly. Knowing how to quickly troubleshoot common issues can save you a call to customer support and get you back to printing faster. HP’s brand commitment includes robust support resources, but self-sufficiency is a valuable skill.
Resolving Connectivity and Driver Issues
- “Printer Not Found” / Connectivity Problems:
- Check Power: Ensure the printer is plugged in and turned on.
- Restart Everything: Power off the printer, your computer, and your router. Wait a minute, then power them back on in this order: router, then printer, then computer. This often resolves temporary network glitches.
- Verify Wi-Fi: Ensure your printer and computer are connected to the same Wi-Fi network (and often the same band, 2.4GHz is most common). Double-check the Wi-Fi password.
- USB Connection: If using USB, try a different USB port on your computer or a different USB cable. Make sure the cable is securely connected at both ends.
- Firewall/Antivirus: Temporarily disable your computer’s firewall or antivirus software to see if it’s blocking communication. If this resolves the issue, you’ll need to create an exception for your printer’s software.
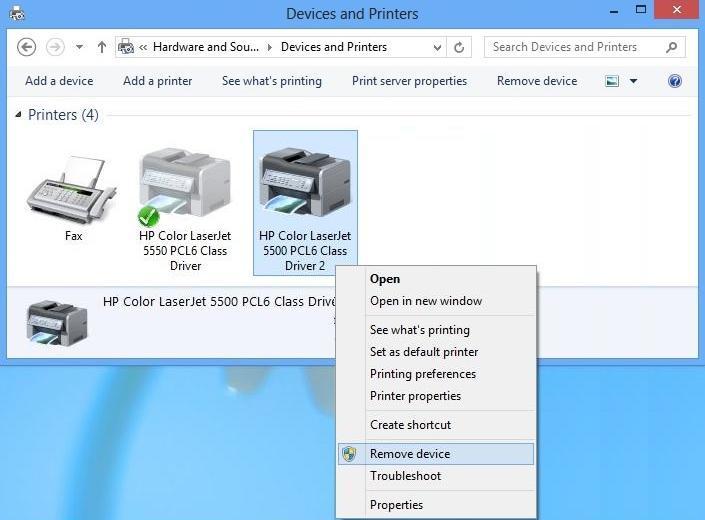
- “Driver Unavailable” / Printing Errors:
- Reinstall Drivers: The most common solution is to uninstall the existing HP printer software and drivers from your computer, then reinstall them from
123.hp.comor the HP Smart app. - Update OS: Ensure your operating system is up to date, as driver compatibility can sometimes be tied to OS versions.
- Run HP Print and Scan Doctor: This free tool from HP (
support.hp.com/us-en/drivers/hp-print-and-scan-doctor) can automatically diagnose and fix many common printing and scanning problems. It’s an excellent example of HP’s proactive tech support tools.
- Reinstall Drivers: The most common solution is to uninstall the existing HP printer software and drivers from your computer, then reinstall them from
Addressing Print Quality and Error Messages
- Print Quality Issues (Streaks, Fading, Incorrect Colors):
- Run Cleaning Cycles: Use the printer’s built-in utilities (from the control panel or HP Smart app) to clean printheads, align cartridges, or calibrate color.
- Check Ink/Toner Levels: Low ink/toner is a common culprit. Replace cartridges as needed.
- Use Genuine HP Supplies: As mentioned, non-HP cartridges can cause quality issues.
- Paper Type: Ensure you are using the correct paper type setting for your print job (e.g., photo paper for photos).
- Error Messages on Printer Display:
- Consult Manual/HP Support: Specific error codes often point to particular issues. Refer to your printer’s manual or search the HP support website for the exact error code.
- Basic Troubleshooting: Common errors like “Paper Jam” or “Out of Paper” require checking the paper path and loading paper correctly. “Cartridge Problem” usually means reseating or replacing the indicated cartridge.
- Restart: Sometimes a simple power cycle of the printer can clear temporary error states.
By familiarizing yourself with these basic troubleshooting steps, you empower yourself to resolve common issues, saving time and potentially avoiding professional assistance, which contributes to smart money management in the long run. These quick fixes are a practical aspect of digital literacy and enhance your overall productivity.
Installing an HP printer doesn’t have to be a daunting task. By following this comprehensive guide, from the initial pre-installation checks to the final software integration and ongoing maintenance, you can ensure a smooth, secure, and optimized setup. Your HP printer, a testament to modern technology and robust brand engineering, is now poised to serve your printing needs efficiently and reliably. Embrace the full capabilities of your new device, leverage the convenience of the HP Smart app, and enjoy the seamless productivity that a properly installed and maintained HP printer brings to your digital life. This DIY approach not only saves you money but also deepens your understanding of your tech, turning a routine setup into an empowering experience.
aViewFromTheCave is a participant in the Amazon Services LLC Associates Program, an affiliate advertising program designed to provide a means for sites to earn advertising fees by advertising and linking to Amazon.com. Amazon, the Amazon logo, AmazonSupply, and the AmazonSupply logo are trademarks of Amazon.com, Inc. or its affiliates. As an Amazon Associate we earn affiliate commissions from qualifying purchases.