The modern workplace and home office rely heavily on the seamless integration of hardware and software. Among the most essential yet often misunderstood pieces of technology is the inkjet or laser printer. Hewlett-Packard (HP) remains a dominant force in this sector, providing sophisticated imaging solutions that require precise maintenance. While the physical act of installing an HP cartridge may seem straightforward, doing so correctly involves understanding technical nuances—from chip communication to printhead alignment—that ensure longevity and high-quality output.
This guide provides an in-depth technical walkthrough on how to install HP cartridges, troubleshoot common recognition errors, and optimize your printer’s performance through digital tools.

Understanding Your Hardware: Preparation and Compatibility
Before opening your printer or handling any consumables, it is critical to understand the specific requirements of your device. HP utilizes a wide range of cartridge technologies, and a mismatch can lead to hardware errors or even damage to the internal carriage system.
Identifying the Correct Cartridge Type
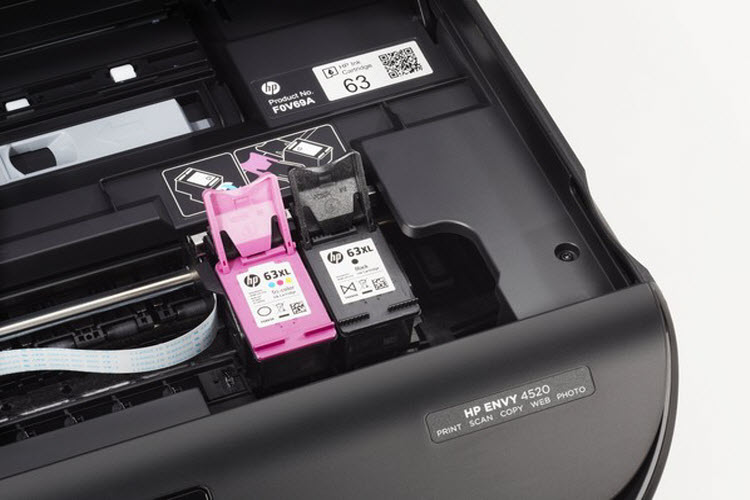
Every HP printer model is designed to work with a specific series of cartridges. This is not merely a matter of physical size but of internal circuitry and ink chemistry. For instance, HP OfficeJet printers often use individual pigment-based ink tanks (such as the HP 952 or 962 series), whereas the HP DeskJet or Envy series may utilize tri-color and black cartridges with integrated printheads (such as the HP 63 or 65 series).
To identify the correct version, check the label inside the cartridge access door or refer to the HP Smart app. It is essential to distinguish between Standard (A) and High Yield (XL) cartridges. While XL cartridges contain more ink or toner and offer a lower cost-per-page, they maintain the same physical footprint, making them compatible with the same slots as standard versions.
Unboxing and Handling Sensitive Components
Modern HP cartridges are sophisticated electronic components. When unboxing a new unit, avoid touching the copper-colored electrical contacts or the ink nozzles. Static electricity from your fingers or oils from your skin can interfere with the communication between the cartridge and the printer, leading to “Cartridge Not Recognized” errors.
Always keep the cartridge in its sealed plastic packaging until you are ready to install it. Once the orange protective tab or plastic tape is removed, the ink is exposed to air and can begin to dry or leak if not seated in the printer immediately.
Step-by-Step Installation Process for HP Ink and Toner
The installation process varies slightly between Inkjet (ink) and LaserJet (toner) models, but the fundamental principles of alignment and software handshake remain the same.
Preparing the Printer for Replacement
To begin the replacement, ensure the printer is powered on. Opening the access door while the printer is off may prevent the carriage from moving into the “access” position, which can lead to mechanical strain if you attempt to force it.
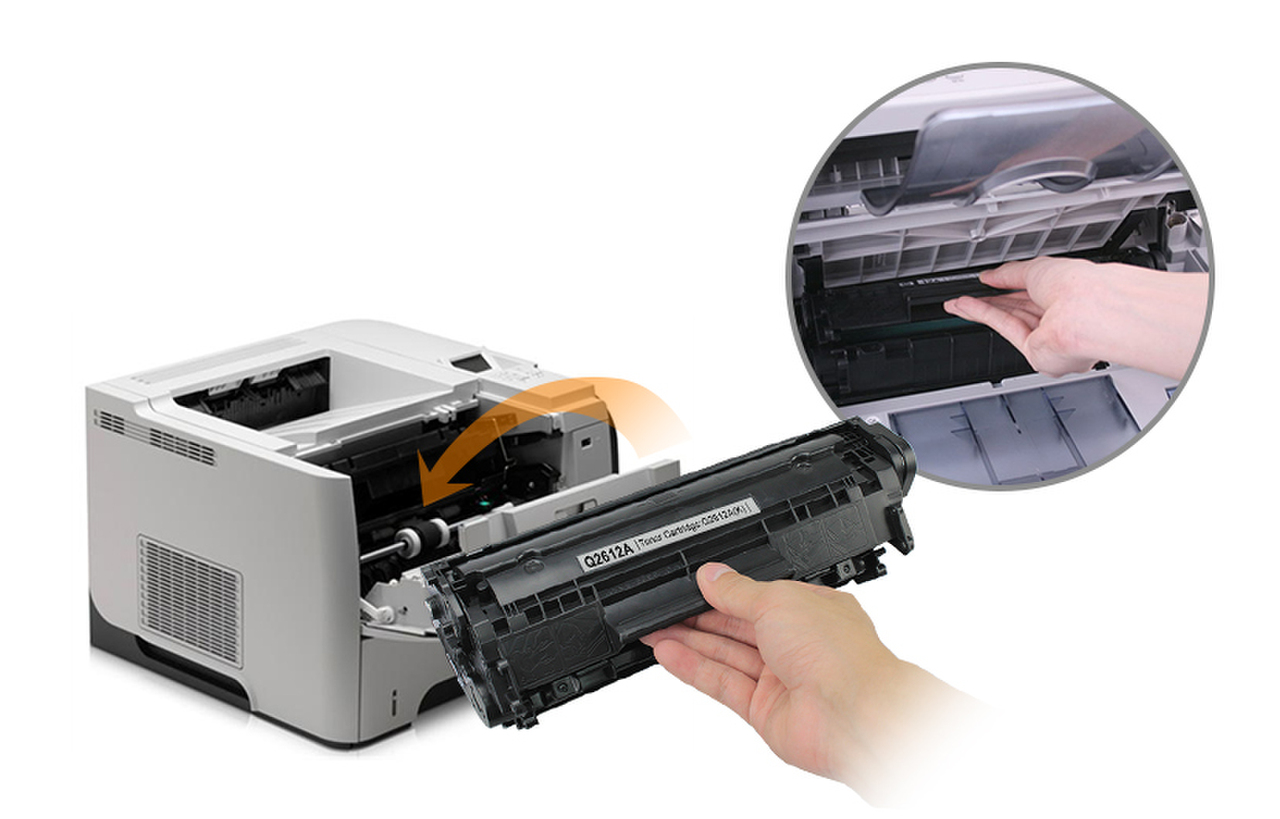
- Open the Cartridge Access Door: For most Inkjet models, this involves lifting the scanner unit or a front-facing panel. Wait for the carriage to become silent and idle in the center of the track.
- Remove the Depleted Cartridge: Depending on the model, you will either press down on the cartridge to release it or lift a small latch. Gently pull the cartridge toward you and set it aside for recycling.
Inserting the New Cartridge Correctly
Once the carriage is empty, it is time to seat the new hardware. This is a critical step where mechanical alignment must be perfect.
- Remove Protective Materials: Pull the orange tab to remove the plastic sealing tape. Ensure no residual adhesive remains on the copper contacts.
- The “Click” Mechanism: Slide the new cartridge into the empty slot at a slight upward angle. Push it forward until it clicks into place. If your printer uses a latch system, lower the latch to secure the cartridge.
- Color Matching: Ensure that the icons (circles, squares, or triangles) on the cartridge match the labels on the carriage. Inserting a Cyan cartridge into a Magenta slot can contaminate the printhead and require an intensive cleaning cycle to fix.
Running the Alignment and Calibration Cycle
After closing the access door, the printer’s internal firmware will detect the new hardware. Most modern HP printers will automatically print an “Alignment Page.” This is not a waste of ink; it is a vital technical calibration.
The printer uses the sensors on the carriage to read the alignment page and calibrate the horizontal and vertical positioning of the nozzles. If your printer does not have a scanner, the process is internal. If it does have a scanner, you must place the printed alignment page on the scanner glass and press “Scan” to complete the handshake. This ensures that text remains sharp and images do not suffer from “banding” or color shifting.
Troubleshooting Common Installation and Recognition Errors
Even with a perfect physical installation, digital hurdles can arise. HP printers use “Dynamic Security” to verify the authenticity of cartridges, which can occasionally trigger false positives or communication errors.
Resolving “Cartridge Not Recognized” Messages
If the printer display shows an error after installation, the most common cause is a poor connection between the cartridge’s copper contacts and the printer’s pins.
- The Hard Reset: With the printer on, disconnect the power cord from the back of the device. Wait 60 seconds, then plug it back in. This clears the printer’s temporary memory (RAM) and forces a fresh scan of the hardware.
- Cleaning the Contacts: If the error persists, remove the cartridge. Use a lint-free cloth lightly dampened with distilled water to gently wipe the copper contacts on the cartridge. Do not use tap water or alcohol, as minerals or harsh chemicals can corrode the sensitive traces. Once dry, re-insert the cartridge.
Addressing Print Quality Issues Post-Installation
If the new cartridge is recognized but produces streaky or faded lines, the issue usually lies with the printhead nozzles. This can happen if a cartridge was stored improperly before purchase.
Navigate to the “Tools” or “Setup” menu on your printer’s control panel. Select “Maintain Printer” and then “Clean Printhead.” This process forces a small amount of ink through the nozzles to clear any dried blockages. If the first level of cleaning doesn’t work, HP software usually offers a “Level 2” or “Deep Clean” option.
Advanced Maintenance: Maximizing Cartridge Longevity and Performance
To get the most out of your technology investment, you should look beyond the physical installation and utilize the software ecosystem HP provides.
Utilizing HP Smart App Features
The HP Smart App is the central hub for managing your printer’s health. By linking your printer to the app on your PC or smartphone, you gain access to real-time ink level monitoring and automated supply ordering.
One of the most useful tech features within the app is the “Supply Information” report. This provides data on the exact number of pages printed and the estimated “end of life” for the current cartridge. For business environments, this data is invaluable for budgeting and reducing downtime. Furthermore, the app allows for remote firmware updates, which can improve the printer’s efficiency and compatibility with newer operating systems.
Best Practices for Storage and Firmware Updates
Technology is only as reliable as its maintenance. To prevent your cartridges from failing prematurely, follow these technical best practices:
- Avoid Excessive Power Cycles: Every time a printer is turned on, it performs a “prime” cycle that uses a small amount of ink to clear the nozzles. If you print frequently, it is often more efficient to leave the printer in “Sleep Mode” rather than turning it off completely.
- Firmware Awareness: HP frequently releases firmware updates. While these often improve security and connectivity, users should be aware that some updates reinforce “Dynamic Security” measures. If you use third-party or remanufactured cartridges, a firmware update might cause those cartridges to stop working. Always read the update notes before proceeding.
- Environmental Control: Printers and cartridges are sensitive to heat and humidity. Store spare cartridges in a cool, dry place. High humidity can cause the ink to become too viscous, while extreme heat can cause the plastic housing of toner cartridges to warp, leading to leaks.
By mastering the installation process and understanding the underlying technology of your HP printer, you ensure that your device remains a productive tool rather than a source of frustration. Proper physical handling combined with proactive software management results in professional-grade prints and a significantly longer lifespan for your hardware.
aViewFromTheCave is a participant in the Amazon Services LLC Associates Program, an affiliate advertising program designed to provide a means for sites to earn advertising fees by advertising and linking to Amazon.com. Amazon, the Amazon logo, AmazonSupply, and the AmazonSupply logo are trademarks of Amazon.com, Inc. or its affiliates. As an Amazon Associate we earn affiliate commissions from qualifying purchases.