Upgrading or replacing your laptop’s hard drive is one of the most impactful DIY enhancements you can undertake. Whether your current drive is failing, you’re running out of storage space, or you simply crave a significant performance boost, swapping out the internal storage unit can breathe new life into an aging machine or supercharge a newer one. In an era dominated by rapid technological advancements and increasing demands on personal computing, understanding how to manage your hardware is an invaluable skill. This guide will walk you through every step of installing a new hard drive in your laptop, from initial preparations to post-installation setup, ensuring a smooth and successful upgrade.
This endeavor isn’t just about technical prowess; it’s about making a smart financial decision and leveraging technology to enhance your productivity. Instead of investing in an entirely new laptop, a drive upgrade can offer a cost-effective solution to common performance bottlenecks. Moreover, it empowers you to understand the inner workings of your devices, a crucial aspect in today’s tech-driven world where digital security and efficient resource management are paramount. Let’s delve into how you can empower your laptop with a new storage solution.
Essential Preparations: Setting the Stage for Success
Before you even think about unscrewing panels or touching delicate internal components, thorough preparation is crucial. Skipping these preliminary steps can lead to data loss, hardware incompatibility, or frustrating delays. This phase is where foresight meets tech-savvy planning, ensuring a smooth transition and safeguarding your valuable information.
Data Backup: Your Digital Safety Net
This is, without a doubt, the most critical step before any major hardware intervention. Installing a new hard drive often means you’ll be performing a fresh installation of your operating system, which will wipe any data on the target drive. Even if you plan to clone your old drive, unforeseen errors can occur. Therefore, backing up all your important files – documents, photos, videos, music, applications, and settings – is non-negotiable.
You have several options for backing up your data:
- External Hard Drive: A simple and reliable method. Connect an external drive and copy your files over, or use your operating system’s built-in backup utility (e.g., Windows Backup and Restore, macOS Time Machine).
- Cloud Storage: Services like Google Drive, Dropbox, OneDrive, or iCloud offer convenient online storage. This is excellent for critical documents and files that need to be accessible from anywhere, though large media libraries might be slow to upload.
- Network-Attached Storage (NAS): For those with a home network server, a NAS provides a robust, centralized backup solution for multiple devices.
- Cloning Software: If your goal is to directly transfer everything from your old drive to the new one without reinstalling Windows, you can use specialized cloning software (e.g., Macrium Reflect, EaseUS Todo Backup). This usually requires an external enclosure or adapter to connect the new drive to your laptop while the old one is still installed.
Ensure your backup is complete and verifiable. The peace of mind knowing your digital life is safe is priceless. This step directly impacts your productivity, as a lost document can cause significant setbacks.
Assembling Your Toolkit: What You’ll Need
While you might envision complex tools, installing a laptop hard drive typically requires only a few basic items:
- Small Phillips-head screwdriver: Most laptops use standard Phillips-head screws, often very small. A precision screwdriver set is highly recommended.
- Spudger or plastic pry tool: Useful for gently prying open plastic latches or separating panels without scratching the laptop casing. Guitar picks can also work in a pinch.
- Anti-static wrist strap (recommended): This prevents static electricity discharge, which can damage sensitive electronic components. If you don’t have one, regularly touch a grounded metal object (like an unpainted metal pipe or the metal casing of a desktop computer) to discharge static before touching internal components.
- A clean, well-lit workspace: To avoid losing tiny screws and to clearly see what you’re doing.
- Small container or magnetic mat: For keeping track of the various tiny screws you’ll remove. Laptops often use different lengths and types of screws for different parts, so keeping them organized is crucial.
Understanding Your Laptop’s Anatomy and Compatibility
Laptops are not all built the same. The process for accessing the hard drive can vary significantly between brands (e.g., Dell, HP, Lenovo, Asus, Apple) and even between different models from the same manufacturer. Before purchasing a new drive, you must research your specific laptop model:
- Consult your laptop’s manual: The user manual or service manual (often available for download from the manufacturer’s support website) will provide detailed instructions on accessing and replacing components.
- Search online: A quick search for “[Your Laptop Model] hard drive replacement” or “[Your Laptop Model] SSD upgrade” will often yield helpful videos (YouTube is a great resource) or step-by-step guides from other users or repair sites.
- Identify the drive type and form factor:
- 2.5-inch SATA: This is the most common form factor for traditional laptop HDDs and SATA SSDs. They are typically 7mm thick, though some older laptops might accommodate 9.5mm drives.
- M.2 SATA or NVMe PCIe: Newer, ultra-thin laptops often use M.2 drives, which look like small sticks of RAM. M.2 drives come in different lengths (e.g., 2242, 2260, 2280 – where 22 is the width in mm and the last two digits are the length). It’s crucial to know if your laptop supports M.2 SATA (slower, but still much faster than HDD) or the much faster NVMe PCIe protocol. Some laptops have a slot for both 2.5-inch and M.2 drives, offering flexible upgrade paths.
Knowing your laptop’s specific requirements ensures you purchase a compatible drive, saving you both time and potential shipping costs for returns.
Choosing the Right Drive: Performance Meets Budget
This is where the “Tech” and “Money” aspects of your decision truly intertwine. The choice between different drive types will significantly impact your laptop’s performance and your wallet.
- Hard Disk Drives (HDDs): Traditional spinning platters. They offer the lowest cost per gigabyte, making them ideal for mass storage, but are the slowest option and more susceptible to physical shock. If you only need vast amounts of storage for archival purposes and speed isn’t a primary concern, an HDD might suffice.
- Solid State Drives (SSDs): These drives use flash memory, similar to USB sticks, with no moving parts. They are dramatically faster than HDDs, consume less power, generate less heat, and are more durable.
- SATA SSDs (2.5-inch): These replace traditional HDDs and are limited by the SATA III interface’s maximum theoretical speed of 600 MB/s. They offer a huge performance upgrade over HDDs.
- M.2 NVMe PCIe SSDs: These are the fastest consumer drives available, connecting directly to the motherboard via the PCIe bus. They can offer speeds multiple times faster than SATA SSDs, leading to near-instantaneous boot times and application loading. If your laptop supports NVMe, this is the ultimate performance upgrade.
Consider your needs:
- Budget: SSDs are generally more expensive per gigabyte than HDDs, especially NVMe drives.
- Capacity: How much storage do you realistically need? 250GB-500GB is often sufficient for the operating system and essential applications, with larger drives (1TB+) for extensive media libraries.
- Performance: For most users, an SSD is a transformative upgrade. If your laptop’s primary use involves demanding applications, video editing, or gaming, an NVMe SSD is highly recommended if compatible.
- Reputable Brands: Stick with established brands known for reliability and performance, such as Samsung, Crucial, Western Digital, Kingston, or Seagate.
Preparing for a Fresh Start: Bootable Media & Drivers
Unless you are cloning your old drive, you will need to install a fresh operating system on your new drive.
- Operating System Installation Media:
- Windows: You can download the Windows Media Creation Tool from Microsoft’s website. This tool allows you to create a bootable USB drive or DVD with the Windows installer. Make sure to download the correct version (e.g., Windows 10 Home/Pro, 64-bit).
- macOS: For Mac users, installing a new drive typically involves using macOS Recovery Mode, which can download and install the OS directly from Apple’s servers after the drive is installed.
- Linux: Download the ISO file for your preferred Linux distribution (e.g., Ubuntu, Fedora) and use a tool like Rufus or Etcher to create a bootable USB drive.
- Download Essential Drivers: After installing the OS, you’ll need drivers for your laptop’s specific components (chipset, graphics, Wi-Fi, touchpad, audio). Download these from your laptop manufacturer’s support website before starting the installation and save them to a separate USB drive. This ensures you’ll have network access and full functionality immediately after the OS is installed.
The Installation Process: A Step-by-Step Walkthrough
With all preparations complete, it’s time to physically replace the drive. Approach this stage with patience and care, remembering that laptop components are delicate.
Power Down and Static Discharge: Safety First
Before you open your laptop, ensure it is completely powered off, not just sleeping. Disconnect the power adapter and remove the battery if it’s external and easily removable. If the battery is internal (as is common in most modern laptops), simply disconnecting the power adapter is usually sufficient, but some advanced guides might suggest disconnecting the internal battery cable once the laptop is open.
Crucially, discharge any static electricity from your body. Wear an anti-static wrist strap, or repeatedly touch a grounded metal object before handling any internal components. This prevents electrostatic discharge (ESD) which can irreversibly damage sensitive electronics.
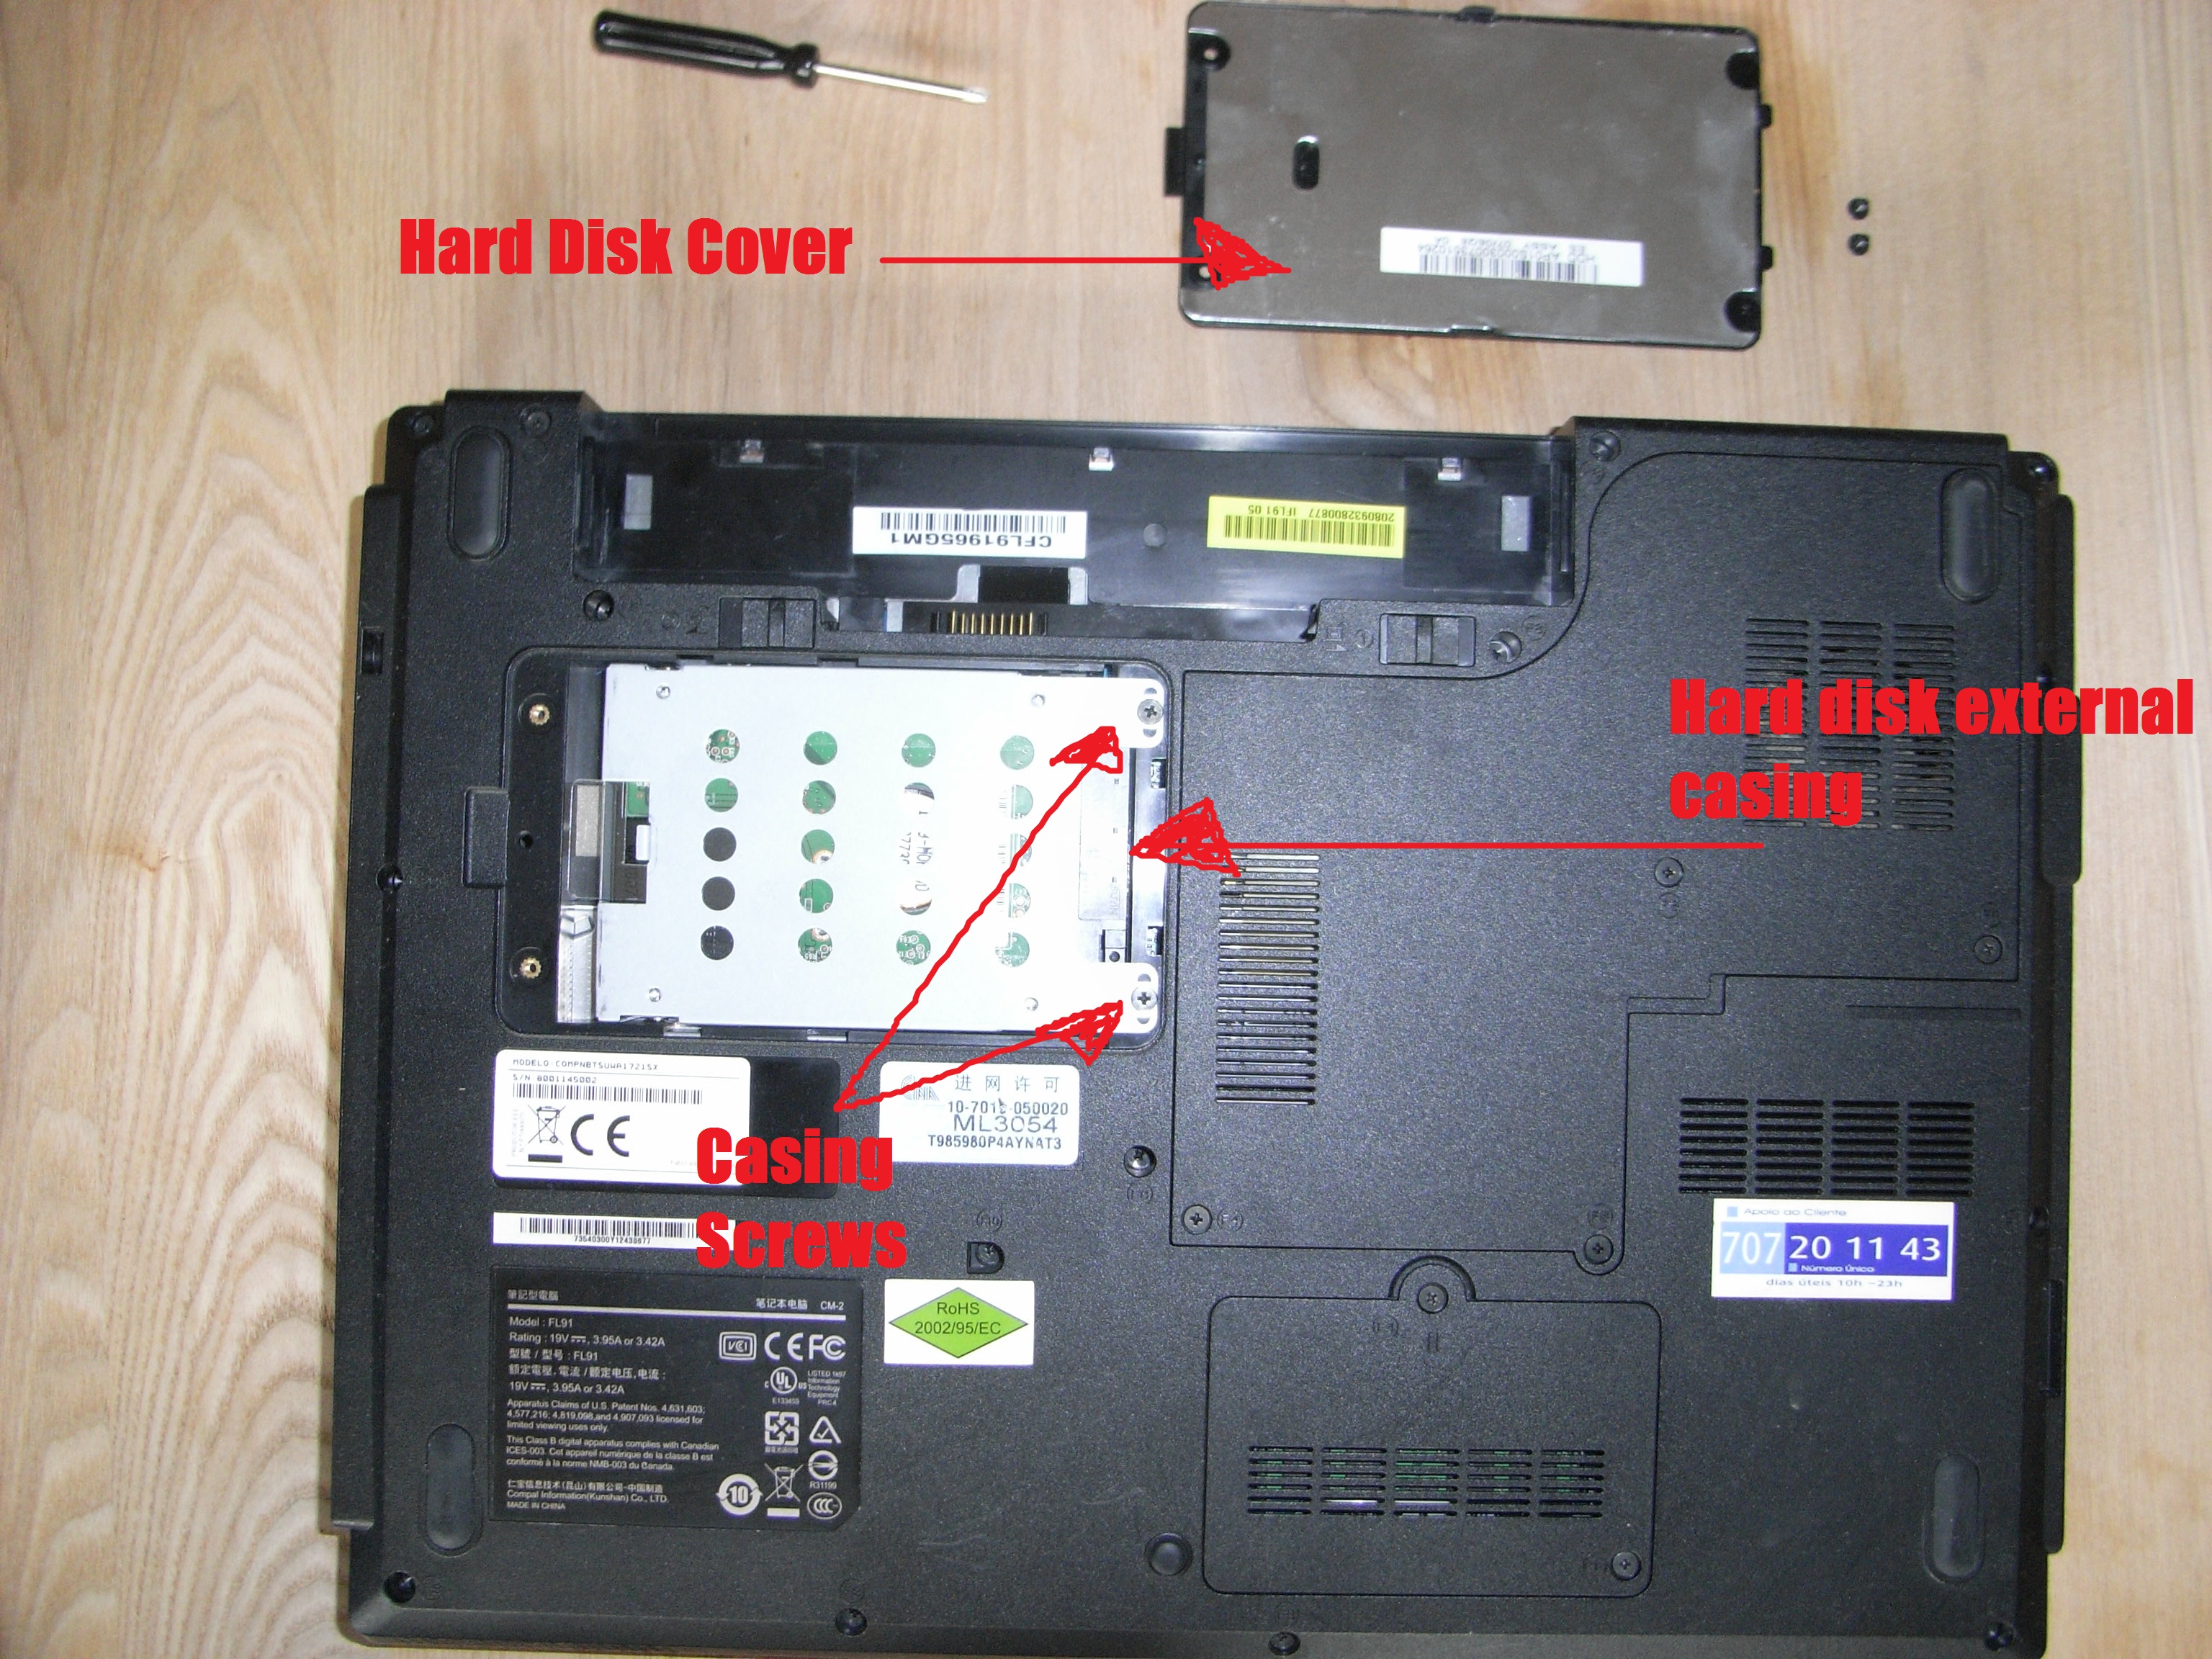
Accessing the Drive Bay: Navigating Your Laptop’s Design
This is where laptop designs diverge significantly.
- Bottom Panel Removal: Many laptops have a full bottom cover secured by multiple screws. You’ll need to remove all visible screws on the underside, and sometimes hidden screws under rubber feet or stickers. Gently use a plastic pry tool to unclip the bottom panel.
- Dedicated Access Panel: Some older or more service-friendly laptops have a small, easily removable panel specifically for the hard drive, RAM, or battery.
- Keyboard Removal: In some ultrabooks or older designs, accessing the hard drive might involve removing the keyboard or top case. This is more complex and usually requires careful disconnection of ribbon cables.
Refer to your specific laptop model’s service manual or online video guides for precise instructions. Keep track of which screws came from where, as they often vary in size and length.
Gently Removing the Old Drive
Once the drive bay is exposed:
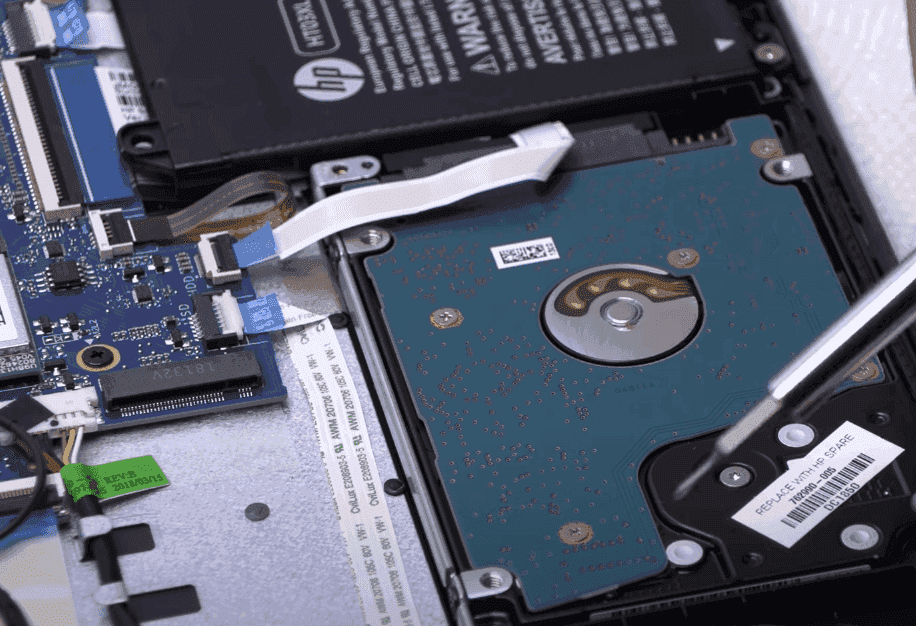
- Locate the Drive: The hard drive is usually secured in a metal or plastic bracket.
- Disconnect Cables: Carefully disconnect the SATA data and power cables (for 2.5-inch drives) or gently pull the M.2 drive straight out of its slot.
- Unscrew the Bracket: The drive might be held in place by a few screws. Remove these.
- Slide or Lift Out: Gently slide the old drive out of its bay or lift it up. Be careful not to force anything.
- Transfer Bracket/Caddy: If the old drive was mounted in a metal caddy or bracket, you’ll likely need to transfer this to the new drive. Remove any small screws securing the old drive to this caddy, then attach the new drive in the same manner.

Seating the New Drive: Precision and Security
- Attach Bracket/Caddy: If your new drive didn’t come with one, attach the bracket or caddy you removed from the old drive.
- Insert the New Drive:
- 2.5-inch SATA: Slide the new drive (with its bracket) into the bay, ensuring the SATA connector aligns correctly. It should slide in smoothly.
- M.2 NVMe/SATA: Align the notch on the M.2 drive with the key in the slot. Insert it at a slight angle (usually 30 degrees) and then gently push it down. It will then be secured with a small screw at the opposite end.
- Secure the Drive: Screw the drive or its bracket back into place within the laptop chassis.
- Reconnect Cables (2.5-inch SATA): If applicable, firmly reconnect the SATA data and power cables. Ensure they click into place.
Reassembly: Putting Everything Back Together
Reverse the disassembly process carefully:
- Replace Panels: Re-attach the bottom panel or access cover, ensuring all clips align before applying gentle pressure.
- Replace Screws: Screw back all the screws you removed, making sure they go into their original locations. Do not overtighten.
- Reinstall Battery: If you removed an external battery, reinsert it.
Give your laptop a quick visual check to ensure no screws are left over and all panels are flush.
Post-Installation Essentials: Bringing Your Laptop to Life
With the new drive physically installed, the next phase involves software configuration to get your laptop up and running optimally. This is where your preparations for bootable media and drivers become crucial.
Initial Boot and BIOS/UEFI Verification
- Connect Power: Plug in your laptop’s power adapter.
- Power On: Press the power button. Your laptop might boot directly into the operating system installer if your bootable media is present. If not, you might see an error message about “no bootable device.”
- Access BIOS/UEFI: Immediately after powering on, repeatedly press the designated key to enter your laptop’s BIOS/UEFI settings (common keys include F2, F10, F12, DEL, ESC, or a combination depending on the brand).
- Verify Drive Recognition: In the BIOS/UEFI, navigate to the storage or boot section. Confirm that your new hard drive is recognized. If it’s not, power down, re-check the drive’s connections, and try again.
- Set Boot Order: Ensure your bootable USB drive or DVD is prioritized in the boot order settings. Save changes and exit BIOS/UEFI. Your laptop should now attempt to boot from the installation media.
Operating System Installation: A Clean Slate
Follow the on-screen prompts of your operating system installer.
- Windows: You’ll typically be guided through choosing language, time, and keyboard settings. When prompted to choose an installation type, select “Custom: Install Windows only (advanced).” You’ll then see a list of drives. If your new drive is unallocated space, select it and click “New” to create partitions, or simply select it and click “Next” for Windows to handle it automatically. Follow the rest of the prompts to complete the installation.
- macOS: Boot into macOS Recovery Mode (Cmd + R at startup). Use Disk Utility to erase and format the new drive (usually APFS for SSDs). Then proceed with “Reinstall macOS.”
- Linux: The installation process will guide you through partitioning and selecting your new drive as the target.
This process will take some time, so be patient. Your laptop may restart multiple times.
Installing Drivers and Essential Software
Once the operating system is installed:
- Install Core Drivers: Start by installing the essential drivers you downloaded earlier. Begin with the chipset drivers, then network drivers (Wi-Fi/Ethernet) to get online, followed by graphics, audio, and touchpad drivers. Restart your laptop after installing crucial drivers.
- Windows Update/Software Updater: Once online, run Windows Update (or your Linux distribution’s software updater) to download any remaining drivers, security patches, and system updates.
- Install Essential Software: Reinstall your web browser, antivirus software, productivity suite (e.g., Microsoft Office, LibreOffice), and any other applications you regularly use.
Optimal performance and digital security depend on having up-to-date drivers and software.
Data Restoration: Getting Back to Work
Finally, it’s time to restore your backed-up data.
- Copy Files: Connect your external backup drive or log into your cloud storage and copy your important files back to your new hard drive. Organize them logically for future productivity.
- Verify Data Integrity: Briefly open some files to ensure they were restored correctly.
This completes the process, allowing you to get back to full productivity with your upgraded laptop.
Troubleshooting Common Hurdles
Even with careful planning, sometimes issues arise. Here are solutions to common problems you might encounter:
“Drive Not Detected”: Diagnosing Recognition Issues
- Check Physical Connections: Power down the laptop and re-open it. Ensure the SATA cables (for 2.5-inch drives) are firmly seated on both the drive and the motherboard. For M.2 drives, ensure it’s fully seated in the slot and the retaining screw is in place.
- BIOS/UEFI Settings: Re-enter BIOS/UEFI. Look for settings related to SATA controller mode (usually AHCI is recommended for SSDs). Ensure the SATA port is enabled if applicable.
- Test with Another Device: If possible, try connecting the new drive to another computer using an external enclosure or adapter to rule out a faulty drive.
Booting Problems and OS Installation Errors
- Boot Order: Double-check that your bootable installation media (USB/DVD) is first in the boot order in BIOS/UEFI.
- Installation Media Integrity: If you’re getting errors during OS installation, your bootable USB/DVD might be corrupted. Try recreating it.
- Drive Formatting: For Windows, ensure you select the “Unallocated Space” on your new drive during installation. For Mac, use Disk Utility to format it correctly (APFS for SSDs).
- Secure Boot/UEFI vs. Legacy: Some systems have “Secure Boot” enabled by default. If you’re installing an older OS or certain Linux distributions, you might need to disable Secure Boot or enable “Legacy Boot” (CSM) in BIOS/UEFI.
Performance Concerns Post-Upgrade
- Drivers: Ensure all chipset, storage controller, and other essential drivers are installed and up-to-date. Missing drivers are a primary cause of poor performance.
- SSD Alignment: For SSDs, ensure the drive is properly aligned. Modern OS installers usually handle this automatically, but if you cloned an old HDD, alignment issues can arise. Tools like
DiskPartin Windows or third-party utilities can check/fix this. - TRIM Support: Ensure TRIM is enabled for your SSD (usually automatic in modern OSs) to maintain performance over time.
- Background Processes: Check Task Manager (Windows) or Activity Monitor (macOS) for resource-hungry background applications that might be consuming CPU or disk cycles.
Conclusion: Empowering Your Laptop’s Future
Successfully installing a new hard drive in your laptop is more than just a technical fix; it’s a testament to your ability to take control of your technology. This DIY upgrade offers a powerful blend of performance enhancement, increased storage, and often a significant cost saving compared to purchasing a new machine. You’ve not only extended the life and utility of your laptop but also gained invaluable insight into its architecture.
In a world where technology trends constantly push for faster, more efficient solutions, understanding how to maintain and upgrade your devices is a critical skill for both personal productivity and smart money management. Whether you’ve opted for the blazing speed of an NVMe SSD or the expanded capacity of a SATA drive, your laptop is now better equipped to handle your digital demands. Enjoy the fruits of your labor – a faster, more responsive, and more capable computing experience!
aViewFromTheCave is a participant in the Amazon Services LLC Associates Program, an affiliate advertising program designed to provide a means for sites to earn advertising fees by advertising and linking to Amazon.com. Amazon, the Amazon logo, AmazonSupply, and the AmazonSupply logo are trademarks of Amazon.com, Inc. or its affiliates. As an Amazon Associate we earn affiliate commissions from qualifying purchases.