In an era defined by digital convenience, our laptops have become indispensable companions for work, education, entertainment, and communication. Yet, despite their advanced capabilities, one common bottleneck often emerges: storage. Whether you’re a content creator wrestling with large video files, a gamer needing more room for the latest titles, a student archiving years of research, or simply finding your system sluggish due to a full drive, the need for more or faster storage is a universal experience. Fortunately, upgrading your laptop’s hard drive is not only a viable solution but also a surprisingly accessible DIY project that can breathe new life into an aging machine or significantly enhance a newer one.
This comprehensive guide will walk you through every step of installing a new hard disk in your laptop, transforming a daunting task into an empowering achievement. We’ll cover everything from the crucial preparations and tools you’ll need, to the physical installation process, and finally, the essential post-installation software setup. By following these detailed instructions, you’ll not only expand your digital capacity but also gain a deeper understanding of your laptop’s internal workings, ultimately unlocking its full potential and ensuring it keeps pace with your digital demands.
Why Upgrade Your Laptop’s Storage?
Before diving into the mechanics, it’s worth understanding the compelling reasons behind a storage upgrade. It’s more than just adding gigabytes; it’s about enhancing your entire computing experience.
Addressing Storage Constraints
Perhaps the most common reason for an upgrade is simply running out of space. Modern operating systems, applications, and multimedia files are notoriously storage-hungry. A full hard drive can lead to frustrating messages about low disk space, prevent software updates, and even cause your operating system to slow down as it struggles to find temporary space. Upgrading provides the necessary room to store your ever-growing digital life without compromise, ensuring smooth operation and preventing the need to constantly delete files.
Boosting Performance with an SSD
For many, the primary motivation isn’t just more space, but significantly improved speed. Traditional Hard Disk Drives (HDDs) use spinning platters and read/write heads, making them mechanical bottlenecks in an otherwise fast system. Solid State Drives (SSDs), on the other hand, use flash memory, offering dramatic improvements in data access speeds. Replacing an HDD with an SSD can lead to:
- Faster Boot Times: Your laptop will start up in seconds, not minutes.
- Quicker Application Loading: Programs will launch almost instantly.
- Snappier File Transfers: Copying large files becomes a breeze.
- Improved Overall Responsiveness: Multitasking feels smoother and more efficient.
The performance boost from an SSD is arguably the most impactful upgrade you can make to an older laptop, often making it feel like a brand-new machine.
Replacing a Failing Drive or Expanding Capabilities
Hard drives, especially HDDs, are susceptible to mechanical failure over time. Slow performance, strange clicking noises, data corruption, or frequent system crashes can all be signs of an impending drive failure. Replacing a failing drive is not just an upgrade; it’s a necessary repair to prevent data loss and restore functionality.
Additionally, some laptops offer options for expanding capabilities by adding a secondary drive. For instance, you might keep your existing HDD for mass storage and add a smaller, faster M.2 NVMe SSD for your operating system and frequently used applications, creating a powerful hybrid storage solution. Even standard 2.5-inch drives can often be swapped out for higher-capacity versions, or an SSD can be installed in place of an HDD to gain both speed and potentially more space.
Pre-Installation Essentials: Gathering Your Tools and Preparing Your System
Before you open your laptop, meticulous preparation is key to a smooth and successful installation. Skipping these steps can lead to frustration, damage, or even data loss.
What You’ll Need
Gathering the right tools and components beforehand will streamline the process:
- New Hard Drive (HDD or SSD): Ensure it’s the correct form factor (most laptops use 2.5-inch SATA drives). Check the thickness as well; most modern laptops accommodate 7mm drives, but some older models might use 9.5mm. NVMe SSDs, if your laptop supports them, are smaller M.2 sticks.
- Small Phillips-Head Screwdriver: The most common tool required. Some laptops might also use Torx or other specialized screws, so have a small electronics toolkit handy.
- Plastic Pry Tool (Spudger): Highly recommended for carefully opening laptop cases without marring the plastic. Guitar picks can also work in a pinch.
- Anti-Static Wrist Strap: Critical for preventing electrostatic discharge (ESD) which can permanently damage sensitive internal components. If you don’t have one, regularly touch a grounded metal object (like a bare metal pipe or the unpainted metal part of a power strip) to discharge static electricity.
- Clean, Well-Lit Workspace: A tidy area reduces the chance of losing tiny screws and allows you to see what you’re doing clearly.
- External Enclosure or USB-to-SATA Adapter (Optional but Recommended): If you plan to clone your existing drive, this allows you to connect the new drive to your laptop externally for data transfer.
- USB Flash Drive for OS Installation Media or Cloning Software: Essential if you’re performing a clean operating system install or using bootable cloning software.
Critical Preparations
These steps are non-negotiable for a safe and effective upgrade:
- Data Backup: The Golden Rule. This is the single most important step. Before you do anything else, back up all your critical data – documents, photos, videos, system settings, everything. Use cloud storage, an external hard drive, or a network-attached storage (NAS) device. While the process is generally safe, accidents can happen, and a complete backup is your ultimate safeguard against data loss.
- Power Down and Disconnect: Fully shut down your laptop. Do not just close the lid or put it to sleep. Unplug the power adapter and remove the battery if it’s externally accessible. For laptops with internal batteries, it’s often recommended to disconnect the battery connector inside the laptop, but we’ll get to that. After disconnecting power, press and hold the laptop’s power button for 10-15 seconds to discharge any residual electricity in the system’s capacitors.
- Consult Your Laptop’s Manual or Support Page: Laptop designs vary wildly. What applies to a Dell might not apply to an HP or a MacBook. Your laptop’s official service manual or support website will provide precise instructions for accessing internal components, including the hard drive bay. This is crucial for understanding screw locations, clip mechanisms, and potential hidden traps. Don’t guess.
- Drive Compatibility Check: Reconfirm that your new drive is compatible. Most laptops use 2.5-inch SATA drives. Physically inspect the drive bay or the old drive’s dimensions. If you’re upgrading to an M.2 NVMe SSD, ensure your laptop has an M.2 slot and supports the NVMe protocol.
The Step-by-Step Guide: Physically Installing Your New Hard Drive
With preparations complete and tools at hand, you’re ready for the physical installation. Take your time, work carefully, and refer to your laptop’s specific manual whenever in doubt.
Accessing the Drive Bay
This is often the trickiest part, as it varies widely between laptop models.
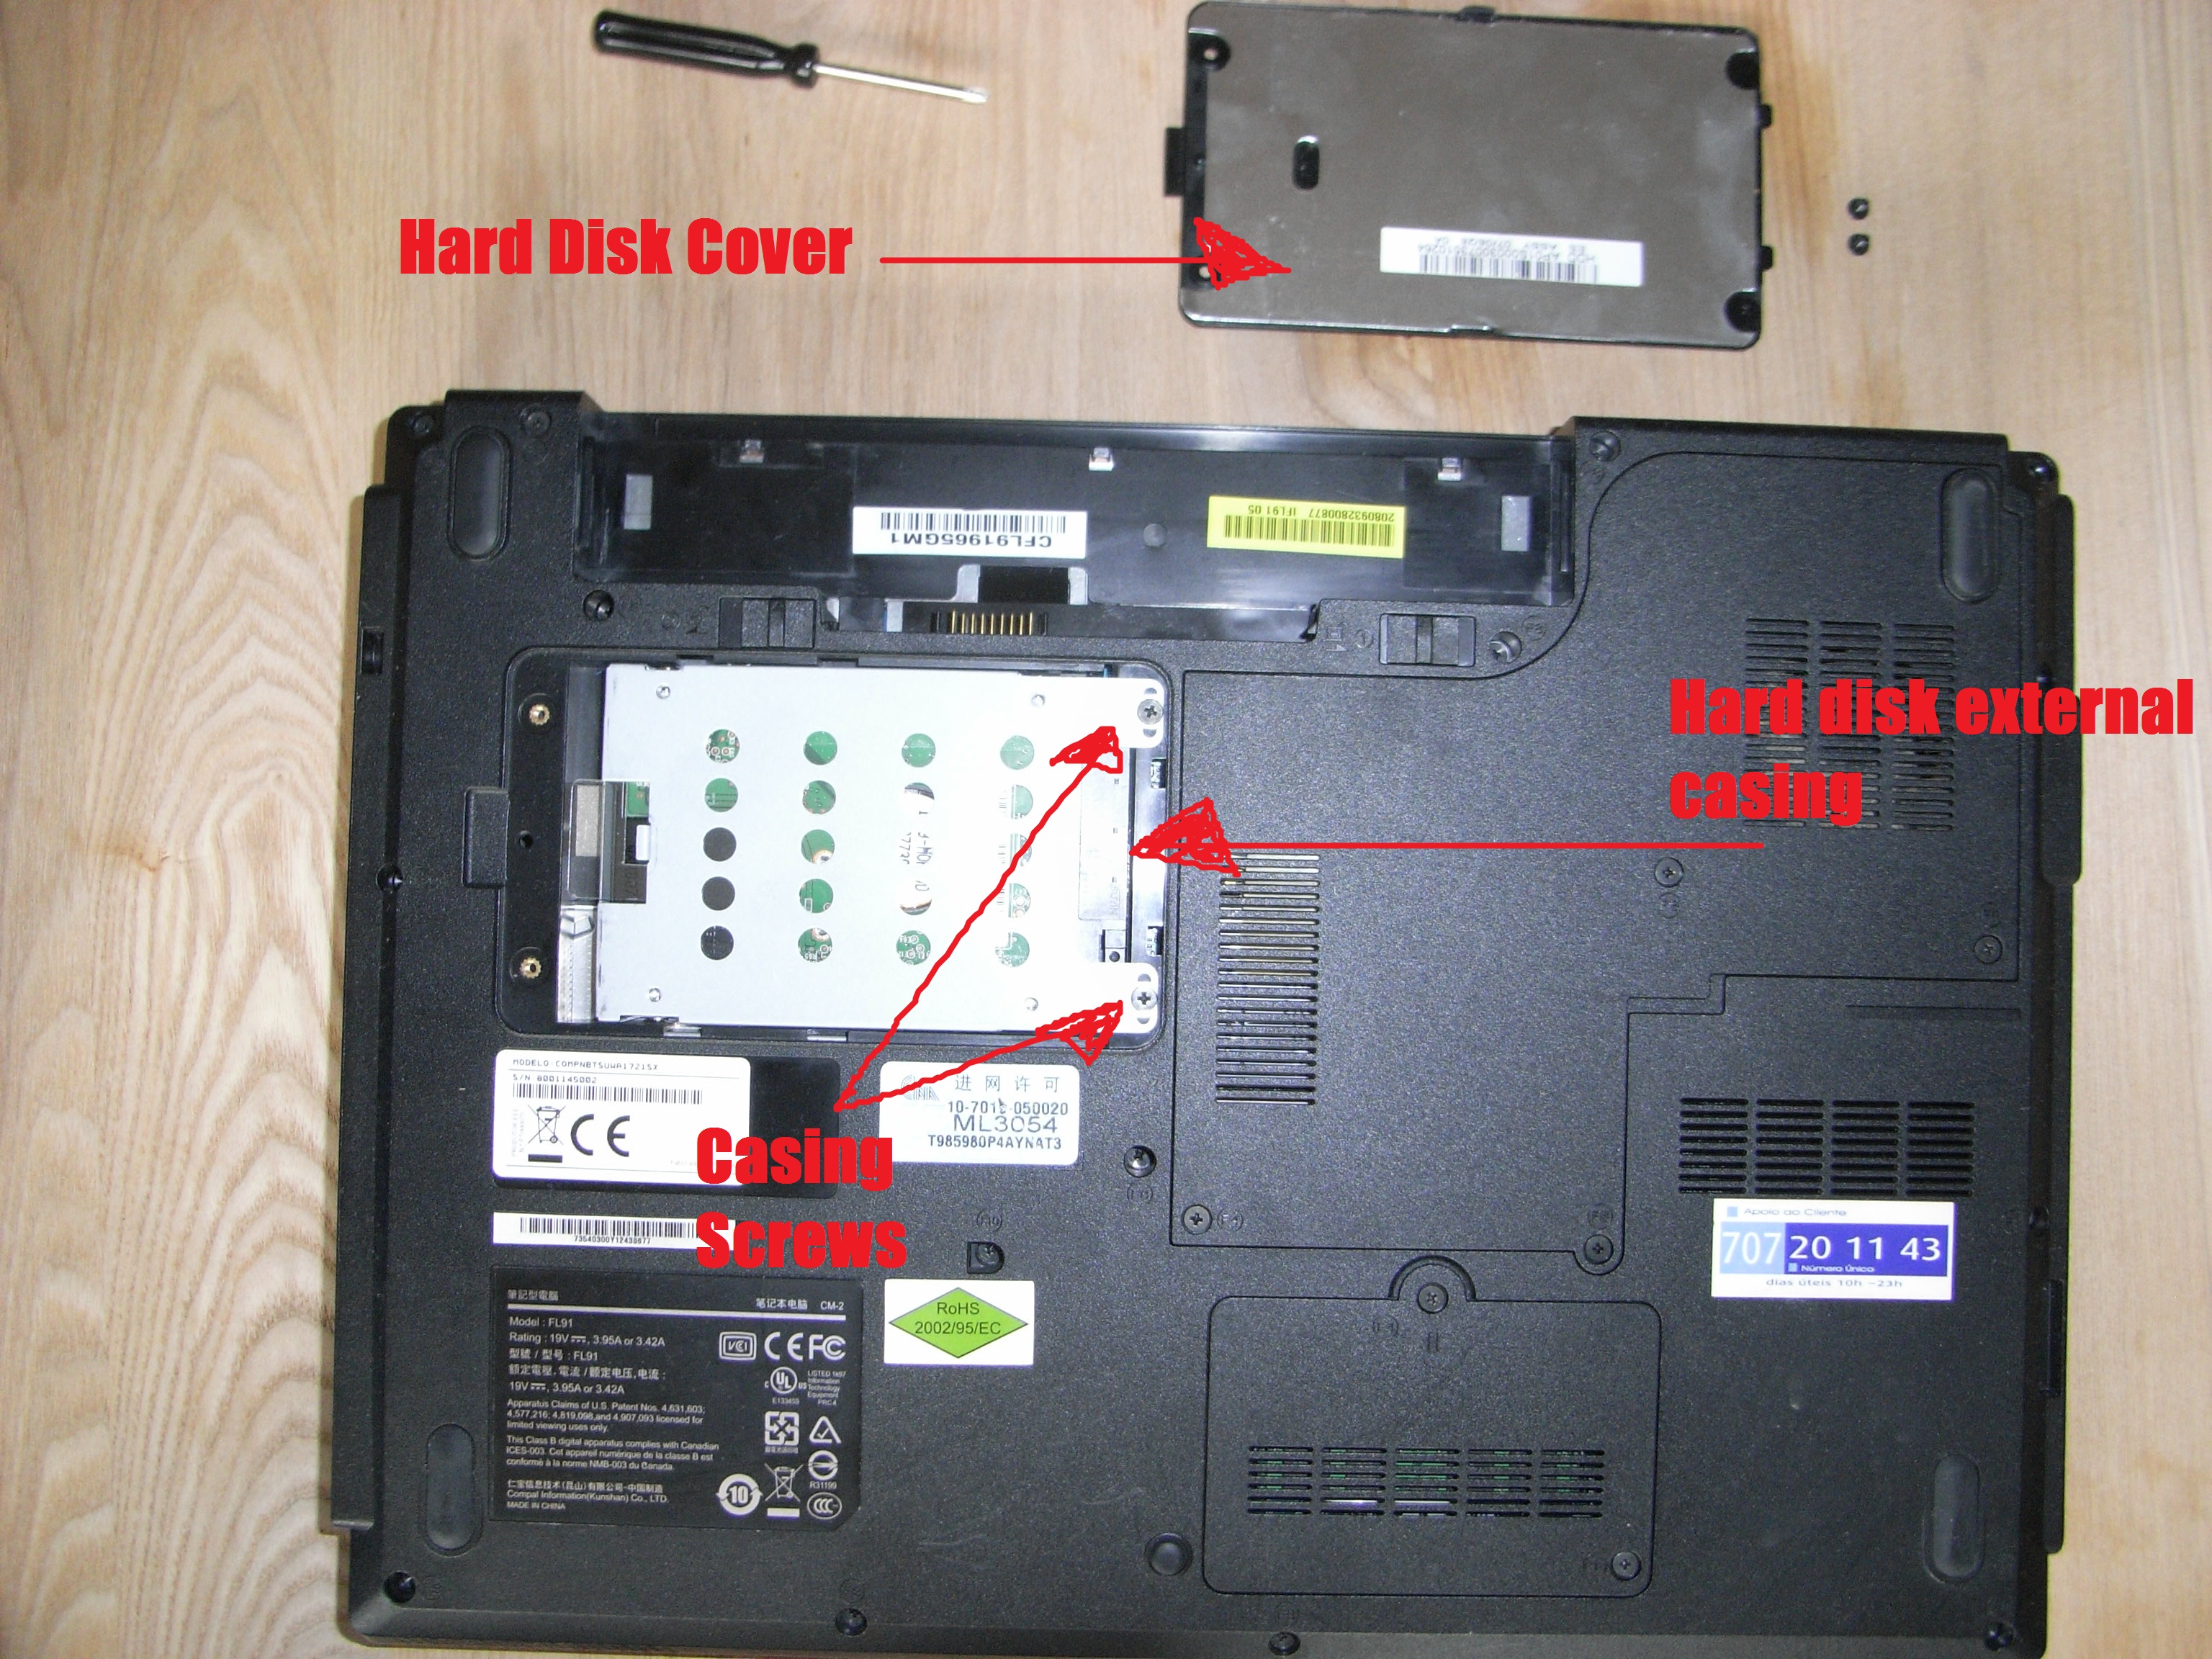
- For Laptops with Dedicated Access Panels: Some older or business-grade laptops feature small, clearly marked panels on the bottom, often secured by one or two screws. Unscrew these, and the panel should lift off, granting direct access to the hard drive, RAM, or Wi-Fi card.
- For Laptops Requiring Full Bottom Cover Removal: This is more common in modern, slimmer designs.
- Remove All Visible Screws: Carefully turn your laptop over and remove all screws from the bottom case. Pay attention to screw lengths and types; some might be longer or shorter depending on their location. It’s helpful to draw a diagram or use an organizer to keep track of where each screw came from.
- Carefully Pry Open the Case: Once all screws are removed, use your plastic pry tool to gently separate the bottom cover from the main chassis. Start from a corner or a seam where there’s a slight gap. Work your way around the edges, listening for release clips. Apply steady, gentle pressure; never force it, as plastic clips can break easily.
- Internal Battery Disconnection (If Applicable): Once the bottom cover is off, locate the internal battery. It’s usually a large, rectangular pack connected by a cable to the motherboard. Gently disconnect this cable from its connector on the motherboard. This completely cuts power to the components, providing an extra layer of safety during the installation.
Removing the Old Drive (If Applicable)
Once you’ve gained access, locating the hard drive should be straightforward.
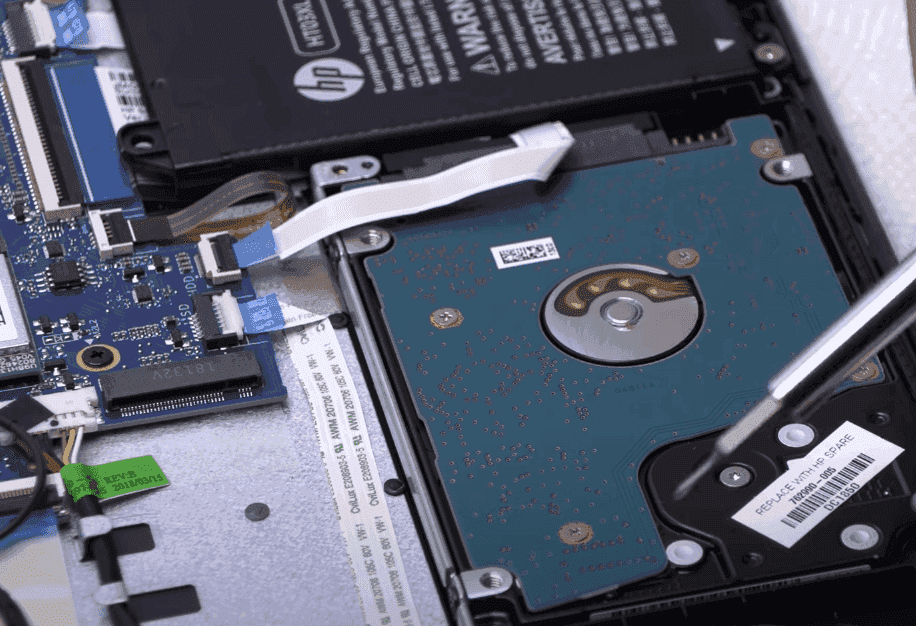
- Identify the Drive: It will typically be a 2.5-inch rectangular component, often housed in a metal or plastic caddy/bracket.
- Unscrew the Caddy/Bracket: The drive caddy itself is usually secured to the laptop chassis by 2-4 small screws. Remove these.
- Slide Out the Drive: Gently slide the old drive away from the SATA data and power connector. It might be snug, so a little wiggle might be necessary. Avoid pulling directly on the cables.
- Remove Drive from Caddy: The old drive is usually secured to its caddy or bracket with additional screws on its sides. Remove these screws to free the drive from its mounting hardware. You’ll need to transfer this caddy to your new drive.

Installing the New Drive
This is essentially the reverse of the removal process.
- Attach Caddy to New Drive: Mount your new hard drive or SSD into the caddy/bracket you just removed from the old drive. Ensure the SATA connector on the new drive aligns correctly with the opening in the caddy. Secure it with the small screws on the sides.
- Insert New Drive: Carefully slide the new drive (now in its caddy) into the SATA data and power connector in the laptop’s drive bay. Ensure it’s fully seated and feels secure.
- Secure the Caddy: Re-attach the caddy/bracket to the laptop chassis with the screws you removed earlier.
- Reconnect Internal Battery (If Disconnected): If you disconnected the internal battery, carefully re-attach its cable to the motherboard connector.
Reassembling Your Laptop
- Replace Bottom Cover: Carefully align the bottom cover with the chassis, ensuring all clips snap back into place. Start by gently pressing around the edges.
- Secure All Screws: Once the cover is seated, reinsert all the screws, placing them back in their original positions (if you noted them). Tighten them until they are snug, but do not overtighten, as this can strip threads or crack plastic.
- Reinsert External Battery (If Applicable): If your laptop has a removable external battery, reinsert it.
Post-Installation Procedures: Setting Up Your Drive and System
With the hardware installation complete, the next phase involves software setup to get your new drive operational and your system running smoothly.
Initial Power-Up and BIOS Check
- Connect Power and Boot: Reconnect your power adapter. Do not plug in any USB devices or external drives yet. Power on your laptop.
- Access BIOS/UEFI: Immediately after pressing the power button, repeatedly press the designated key to enter your laptop’s BIOS/UEFI settings. Common keys include F2, Del, F10, or Esc, but this varies by manufacturer. Consult your manual if unsure.
- Verify Drive Detection: Within the BIOS/UEFI menu, navigate to the storage or boot section. You should see your newly installed hard drive listed. If it’s not detected, double-check your physical connections before proceeding.
- Adjust Boot Order (If Necessary): If you plan to install an operating system from a USB drive, you may need to adjust the boot order to prioritize the USB drive over the internal hard drive. Save changes and exit BIOS/UEFI.
Preparing the Drive for Use (New Installation)
A brand-new hard drive or SSD is uninitialized and unformatted, meaning the operating system cannot “see” or use it yet.
- Windows Disk Management: If you’ve booted into an existing Windows installation (e.g., you installed a secondary drive or replaced the OS drive and are booting from a recovery USB), press
Windows Key + Xand select “Disk Management.” You’ll likely see the new drive listed as “Unallocated Space” or be prompted to initialize it (choose GPT for modern systems).- Right-click the unallocated space and select “New Simple Volume.”
- Follow the wizard to assign a drive letter, choose the file system (NTFS for Windows), and give it a label.
- macOS Disk Utility: For macOS users, boot from your macOS installer USB drive (or a recovery partition). From the Utilities window, select “Disk Utility.”
- Select your new drive from the sidebar.
- Click “Erase” and choose a name, format (APFS for newer macOS, Mac OS Extended for older), and scheme (GUID Partition Map).
- Linux
GPartedorfdisk: Linux distributions offer robust disk management tools. If performing a clean install, the installer will guide you. For an already running system, useGParted(graphical) or command-line tools likefdiskorpartedto create partitions and format them (e.g., Ext4).
Operating System Installation or Cloning
You have two main paths after installing the physical drive:
- Clean Installation: This is recommended for optimal performance, especially if you’re upgrading from an old, cluttered system or moving to an SSD.
- Create Bootable Media: Download the official OS installer (Windows Media Creation Tool, macOS installer from App Store, Linux ISO). Use a tool like Rufus (for Windows/Linux) or
dd(for Linux/macOS) to create a bootable USB drive. - Boot from USB: Boot your laptop from the USB drive (you might need to adjust the boot order in BIOS/UEFI).
- Follow On-Screen Prompts: The OS installer will guide you through partitioning, formatting, and installing the operating system onto your new drive.
- Create Bootable Media: Download the official OS installer (Windows Media Creation Tool, macOS installer from App Store, Linux ISO). Use a tool like Rufus (for Windows/Linux) or
- Cloning (Migrating OS): This transfers your entire existing operating system, applications, and files from your old drive to the new one, avoiding a fresh install.
- Connect New Drive (Externally): Use your USB-to-SATA adapter or external enclosure to connect the new drive to your laptop while your old OS is still running.
- Use Cloning Software: Programs like Macrium Reflect Free (Windows), Acronis True Image, or Clonezilla (free, cross-platform) are popular choices.
- Initiate Cloning Process: Follow the software’s instructions to select your old drive as the source and your new drive as the destination. If moving to a smaller SSD, you might need to resize partitions to fit.
- Swap Drives: Once cloning is complete, shut down the laptop, physically swap the old drive for the new, cloned drive, and boot up. Your system should ideally start exactly as it was before, but on the new drive.
Driver Installation and Updates
After a clean OS install, your system might lack some essential drivers (e.g., for Wi-Fi, graphics, trackpad).
- Download from Manufacturer: Visit your laptop manufacturer’s support website, enter your model number, and download the latest drivers for your specific operating system. Start with network drivers if Wi-Fi isn’t working.
- Run System Updates: Once basic drivers are installed, run Windows Update, macOS Software Update, or your Linux distribution’s package manager to ensure all system components and security patches are up to date.
Troubleshooting Common Issues and Maximizing Your New Drive’s Potential
Even with careful preparation, issues can arise. Knowing how to troubleshoot and optimize your new drive will ensure a smooth, long-lasting experience.
Drive Not Detected
- Check Physical Connections: This is the most common culprit. Power off, open the laptop, and firmly reseat the SATA data and power cables to the drive and the motherboard. Ensure the drive is fully pushed into its slot.
- Recheck BIOS/UEFI: Enter BIOS/UEFI again to confirm the drive is listed. If not, try resetting BIOS settings to default.
- Test Drive Externally: If you have a USB-to-SATA adapter, try connecting the new drive to another computer (or your laptop externally) to see if it’s detected. This helps rule out a faulty drive or a problem with your laptop’s internal SATA port.
Slow Performance After SSD Upgrade
If you upgraded to an SSD but aren’t seeing the expected speed boost:
- Verify AHCI Mode: Ensure that AHCI (Advanced Host Controller Interface) mode is enabled in your laptop’s BIOS/UEFI. If it’s set to IDE mode, your SSD won’t perform optimally. Warning: Changing this setting after an OS installation can lead to boot errors; research the specific steps for your OS to enable AHCI safely if you installed in IDE mode.
- Check TRIM (for SSDs): TRIM is a command that helps SSDs maintain performance over time by efficiently managing data deletion. Modern operating systems (Windows 7+, macOS, most Linux distros) usually enable TRIM automatically. You can verify its status via command line (
fsutil behavior query DisableDeleteNotifyfor Windows;sudo trimforce statusfor macOS).
Boot Issues
- Incorrect Boot Order: Your system might be trying to boot from the wrong device. Re-enter BIOS/UEFI and ensure the new hard drive (or your OS installer USB) is at the top of the boot order.
- Corrupted OS Installation/Cloning: If you performed a clean install, something might have gone wrong. Try reinstalling. If you cloned, the cloning process might have failed or been incomplete. Try cloning again or consider a clean install.
- Missing Boot Manager: Sometimes the boot sector can be corrupted. Windows offers “Startup Repair” options from its installation media; Linux users might need to use a live USB and tools like
boot-repair.
Maximizing Performance and Longevity
To get the most out of your new storage:
- Regular Backups: Continue to back up your data regularly. A new drive is just as susceptible to accidental deletion, software corruption, or theft as an old one.
- Keep OS and Drivers Updated: Software updates often include performance enhancements and security fixes for storage devices.
- SSD Best Practices:
- Avoid Defragmentation: SSDs do not benefit from defragmentation; it actually shortens their lifespan. Windows automatically disables defrag for SSDs.
- Maintain Free Space: Try to keep at least 15-20% of your SSD’s capacity free. This allows space for over-provisioning and wear-leveling, which are crucial for SSD performance and longevity.
- Monitor Drive Health: Use utilities like CrystalDiskInfo (Windows) or the Disk Utility’s S.M.A.R.T. status (macOS/Linux) to keep an eye on your drive’s health indicators.
Congratulations! You’ve successfully navigated the process of installing a new hard drive in your laptop. This upgrade not only addresses storage limitations but often dramatically improves your system’s performance, especially when migrating to an SSD. By taking the time to understand the process and apply careful attention to detail, you’ve empowered yourself with valuable technical skills and revitalized your essential digital companion. Enjoy the newfound speed and space!
aViewFromTheCave is a participant in the Amazon Services LLC Associates Program, an affiliate advertising program designed to provide a means for sites to earn advertising fees by advertising and linking to Amazon.com. Amazon, the Amazon logo, AmazonSupply, and the AmazonSupply logo are trademarks of Amazon.com, Inc. or its affiliates. As an Amazon Associate we earn affiliate commissions from qualifying purchases.