Virtualization has become an indispensable tool for developers, IT professionals, students, and tech enthusiasts alike. It allows us to run multiple operating systems on a single physical machine, creating isolated environments for testing software, experimenting with new operating systems, or even running legacy applications. Oracle VM VirtualBox is a popular, free, and open-source virtualization software that makes this process accessible to a wide audience. While VirtualBox is powerful on its own, unlocking its full potential and achieving a seamless user experience within your virtual machines (VMs) often hinges on installing a crucial component: VirtualBox Guest Additions.
This article will guide you through the process of installing VirtualBox Guest Additions, explaining why it’s essential and detailing the steps involved for various operating systems. We’ll delve into how these additions enhance performance, improve usability, and bridge the gap between your host and guest systems, ultimately boosting your productivity and overall tech workflow.
Understanding the Significance of VirtualBox Guest Additions
Before we dive into the installation process, it’s vital to understand why Guest Additions are so important. Think of them as a set of specialized drivers and utilities designed specifically to optimize the performance and functionality of your guest operating system within a VirtualBox environment. Without them, you might encounter limitations such as:
- Poor Graphics Performance: Resolutions might be fixed, and graphics acceleration will likely be absent, leading to laggy interfaces and a suboptimal visual experience.
- Limited Mouse Integration: The mouse pointer might not move smoothly between the host and guest OS, requiring manual capture and release, which can be frustrating.
- Lack of Shared Folders: You won’t be able to easily share files between your host and guest machines, necessitating manual copy-pasting or external storage.
- No Clipboard Sharing: Copying and pasting text between your host and guest operating systems will be impossible.
- Subpar Network Performance: While basic networking will function, optimization for better speed and reliability might be missing.
- Inability to Use Dynamic Screen Resizing: The guest OS screen might not automatically adjust its resolution when you resize the VirtualBox window.
Guest Additions actively address these issues by installing drivers that allow the guest OS to better communicate with the VirtualBox hypervisor. This optimized communication results in a much more fluid and functional virtual environment, akin to running an OS directly on your hardware.
Installing VirtualBox Guest Additions: A Step-by-Step Guide
The installation process for VirtualBox Guest Additions is generally straightforward, but it can vary slightly depending on the guest operating system you are using. We’ll cover the most common scenarios: Windows and various Linux distributions.
Installing Guest Additions on Windows
Windows virtual machines benefit immensely from Guest Additions, unlocking features like seamless mouse integration, shared folders, and better graphics.
Prerequisites
Before you begin, ensure the following:
- You have a Windows virtual machine successfully installed and running in VirtualBox.
- You have administrative privileges within the Windows guest OS.
Installation Steps
- Start Your Windows VM: Power on your Windows virtual machine.
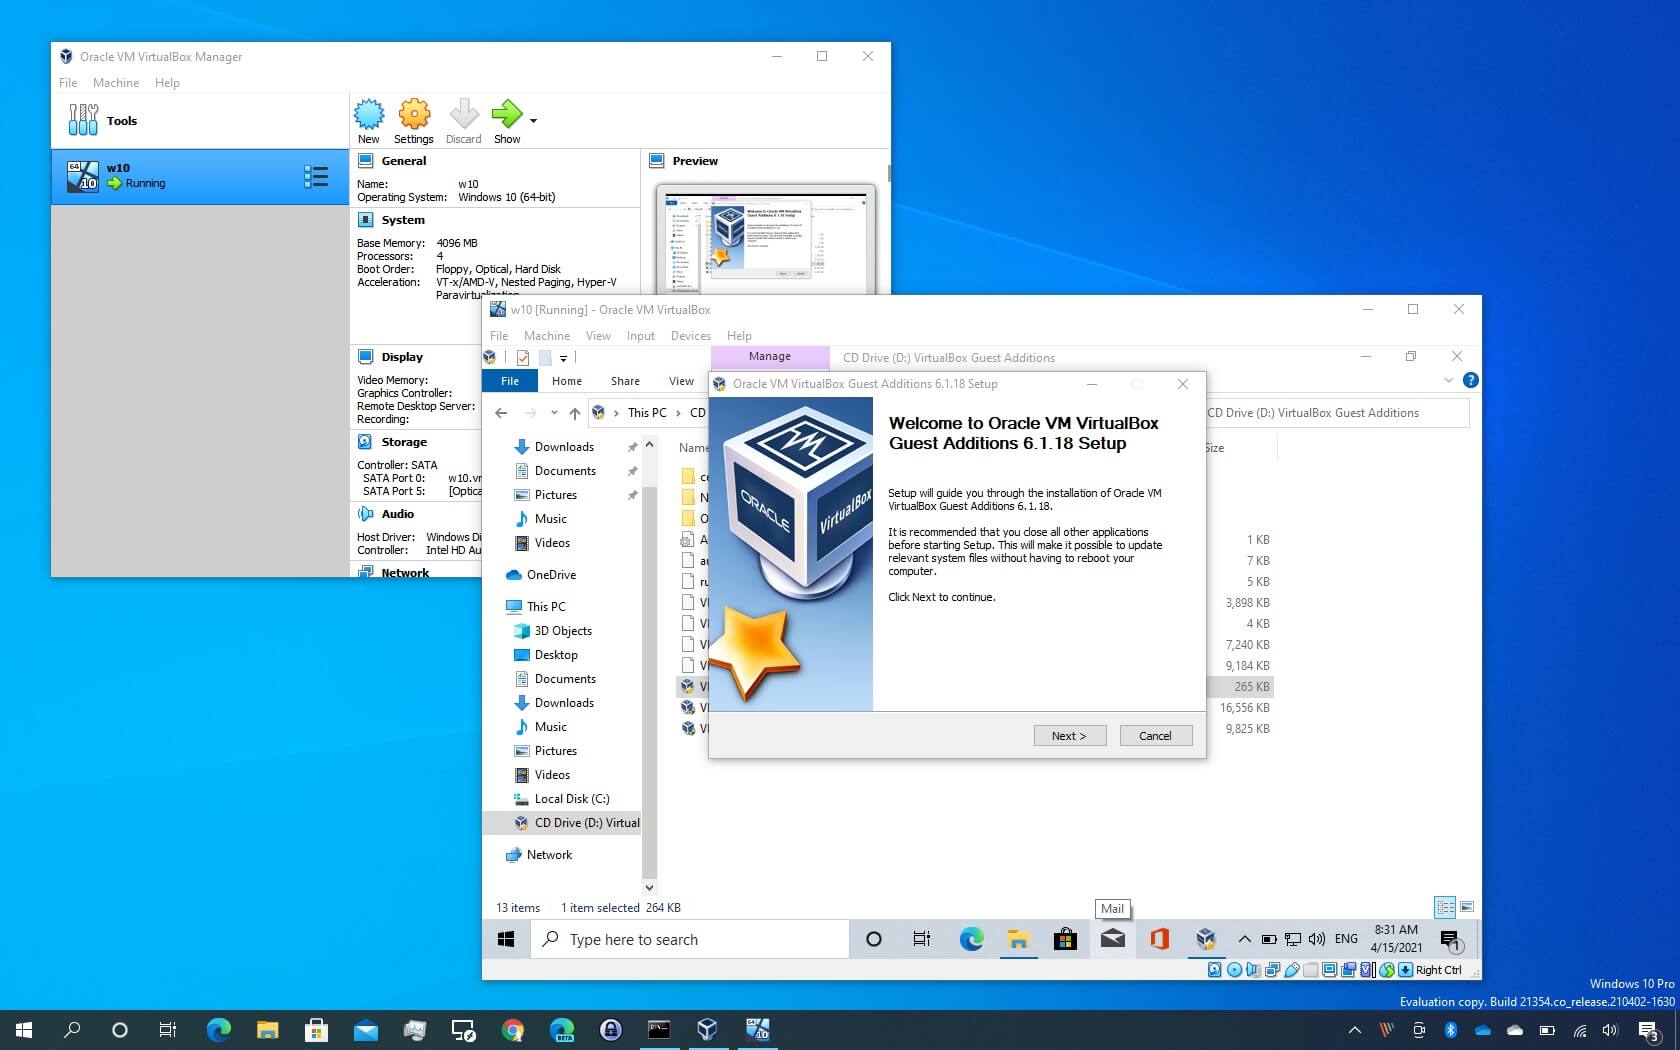
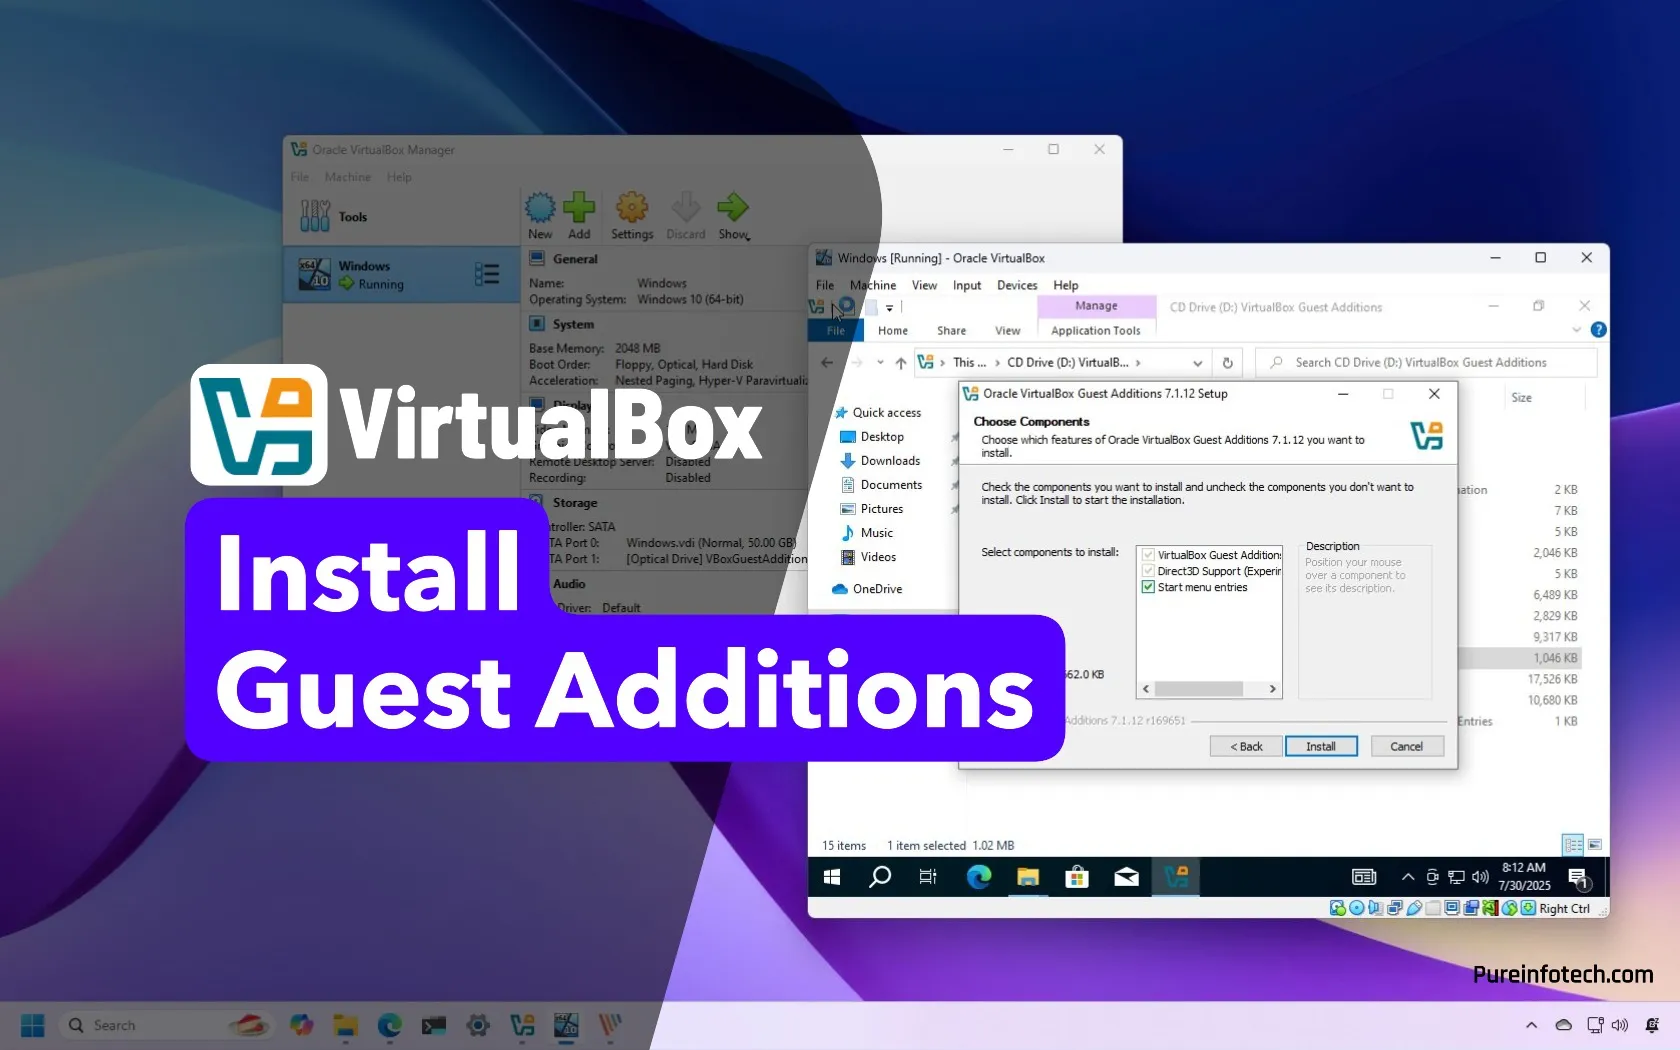
- Insert the Guest Additions CD Image:
- With your Windows VM running, navigate to the VirtualBox menu bar.
- Click on Devices.
- Select Insert Guest Additions CD image….
- This action virtually mounts an ISO file containing the Guest Additions installer into your VM’s virtual CD/DVD drive.
- Run the Installer:
- Once the CD image is mounted, Windows should automatically prompt you to run the installer. You’ll typically see an AutoPlay notification. If not, open File Explorer within your Windows VM, navigate to This PC (or Computer), and double-click the CD drive labeled “VirtualBox Guest Additions.”
- Execute the appropriate installer for your Windows version (e.g.,
VBoxWindowsAdditions-amd64.exefor 64-bit orVBoxWindowsAdditions-x86.exefor 32-bit). The installer will usually detect the correct version automatically.
- Follow the On-Screen Prompts:
- The VirtualBox Guest Additions Setup wizard will appear. Click Next to proceed.
- Accept the default installation components unless you have specific reasons to change them. The default options usually include necessary drivers and utilities for optimal performance.
- Click Install.
- Grant Permissions: During the installation, you might encounter Windows security prompts asking if you trust the software. Always click Install or Yes to allow the installation of the necessary drivers.
- Reboot Your VM: Once the installation is complete, you will be prompted to restart your Windows virtual machine. Click Finish and let the VM reboot.
After the reboot, you should immediately notice improvements: smoother mouse movement, the ability to resize the VM window and have the resolution adjust accordingly, and the foundation for setting up shared folders and clipboard sharing.
Installing Guest Additions on Linux
Linux distributions also significantly benefit from Guest Additions, offering enhanced graphics, seamless mouse integration, and shared clipboard functionality. The installation process on Linux typically involves using the terminal.
Prerequisites
- A Linux virtual machine successfully installed and running in VirtualBox.
- Root or
sudoprivileges within the Linux guest OS. - Internet access within the Linux guest OS to download necessary packages (though the ISO often contains the core components).
Installation Steps
- Start Your Linux VM: Power on your Linux virtual machine.
- Insert the Guest Additions CD Image:
- Similar to Windows, go to the VirtualBox menu bar, click Devices, and select Insert Guest Additions CD image….
- Mount the CD Image (if not automatic):
- In most modern Linux distributions, the CD image will be automatically mounted. You might see an icon appear on your desktop or in your file manager.
- If it’s not automatically mounted, you’ll need to do it manually. Open a terminal and typically use commands like:
bash

sudo mount /dev/cdrom /mnt
(The exact device name/dev/cdrommight vary; check your system if this doesn’t work).
- Navigate to the Mounted Directory:
- Change your directory to the mount point in the terminal:
bash

cd /mnt
- Change your directory to the mount point in the terminal:
- Run the Installer Script:
- Execute the Linux installer script. You’ll need root privileges for this:
bash

sudo ./VBoxLinuxAdditions.run
- Execute the Linux installer script. You’ll need root privileges for this:
- Handle Dependencies (Important!):
- Before running the installer, it’s crucial to ensure you have the necessary build tools and kernel headers installed. The
VBoxLinuxAdditions.runscript requires these to compile kernel modules for your specific Linux kernel. - The exact commands vary slightly between Linux distributions. Here are examples for some popular ones:
- Before running the installer, it’s crucial to ensure you have the necessary build tools and kernel headers installed. The
    *   **Debian/Ubuntu-based systems (e.g., Ubuntu, Mint):**
        ```bash
        sudo apt update
        sudo apt install build-essential dkms linux-headers-$(uname -r)
        ```
    *   **Fedora/CentOS/RHEL-based systems:**
        ```bash
        sudo dnf update  # or sudo yum update
        sudo dnf install kernel-devel kernel-headers dkms gcc make bzip2 perl
        ```
        (For older CentOS/RHEL, replace `dnf` with `yum`).
*   **Important:** After installing dependencies, it's often a good practice to **reboot** your Linux VM *before* running the Guest Additions installer. This ensures the newly installed kernel headers are active.
- Re-run the Installer: After ensuring dependencies are met and the CD is mounted, navigate back to the mount point (
/mnt) and run:
bash

sudo ./VBoxLinuxAdditions.run
- Monitor the Installation: The script will output its progress in the terminal. It will compile and install kernel modules. Pay attention to any error messages.
- Reboot Your VM: Once the installation script completes successfully, reboot your Linux virtual machine:
bash

sudo reboot
Upon reboot, your Linux VM should exhibit improved performance, better screen resizing, and the groundwork for clipboard sharing and shared folders.
Leveraging Guest Additions Features for Enhanced Productivity
Once Guest Additions are installed, you can unlock a suite of features that significantly improve your interaction with the VM and boost your productivity, whether you’re working on tech projects, managing your brand’s digital presence, or organizing your personal finances.
Shared Folders: Seamless File Transfer
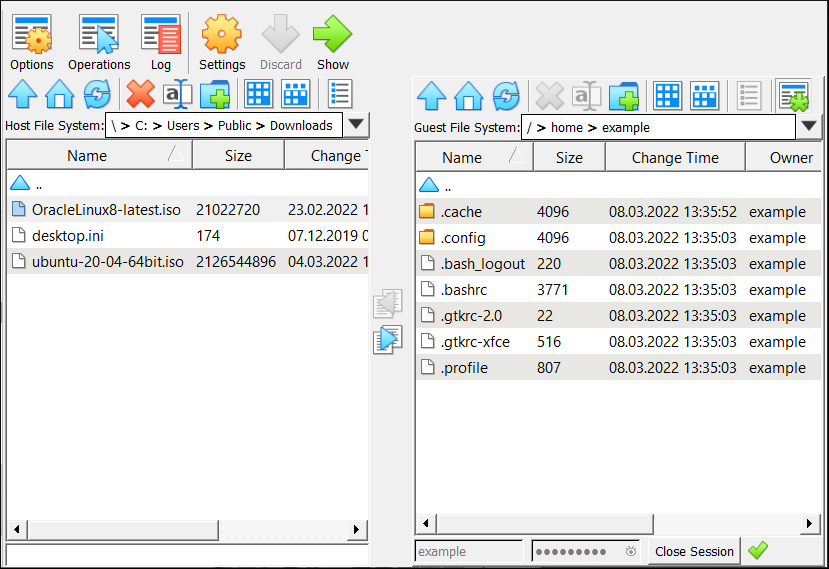
Shared Folders are a cornerstone of efficient VM usage. They allow you to designate specific directories on your host machine that will be accessible from within your guest OS as if they were regular network drives or mounted folders.
How to set up Shared Folders:
- Shut down your VM (or in some cases, it can be done with the VM running).
- Go to your VM’s Settings in VirtualBox Manager.
- Select the Shared Folders section.
- Click the Add Folder icon (usually a folder with a plus sign).
- Folder Path: Browse and select the directory on your host machine you want to share.
- Folder Name: Give it a recognizable name that will be used within the guest OS.
- Read-only: Check this if you only want the guest OS to be able to read files, not modify or delete them.
- Auto-mount: Check this if you want the folder to be automatically mounted every time the VM starts.
- Make Permanent: For persistent shared folders across VM reboots.
After setting up and enabling auto-mount, the shared folder should appear within your guest OS. On Windows, it will typically be accessible under “Network locations” or a mapped drive. On Linux, it’s often mounted under /media/sf_FolderName (where FolderName is the name you gave it). You might need to add your user to the vboxsf group in Linux for access:
sudo usermod -aG vboxsf $USER
Then, log out and log back in for the group change to take effect.
Shared Clipboard: Effortless Copy-Pasting
The shared clipboard feature allows you to copy text or files on your host and paste them directly into your guest OS, and vice-versa, without any manual file transfer.
Enabling Shared Clipboard:
- With your VM running, go to the VirtualBox menu: Devices -> Shared Clipboard.
- Select Bidirectional for seamless two-way copying and pasting. You can also choose Host To Guest or Guest To Host if you only need one-way functionality.
This feature is invaluable for quickly transferring code snippets, configuration details, or any other textual information, dramatically speeding up tasks related to development, IT troubleshooting, or even composing emails.
Dynamic Window Resizing: Adapting to Your Workflow
With Guest Additions installed, resizing the VirtualBox window dynamically adjusts the screen resolution of your guest operating system. This means you don’t have to manually change the resolution settings within the guest OS to match the window size, providing a fluid and responsive user interface. This is particularly useful when you need to view content side-by-side with your host applications or when working on designs where screen real estate is critical.
Troubleshooting Common Installation Issues
While the installation is usually smooth, occasional hiccups can occur. Here are some common problems and their solutions:
- “Could not find guest additions installer” Error: This usually means the CD image wasn’t properly inserted or mounted. Try re-inserting it from the Devices menu.
- Linux Installer Fails with Kernel Module Errors: This is almost always a dependency issue. Ensure you have installed the correct
build-essential,dkms, andlinux-headerspackages for your exact kernel version (uname -r). Reinstalling these packages and rebooting before running the Guest Additions installer can resolve this. - Shared Folders Not Accessible in Linux: Verify that your user is part of the
vboxsfgroup and that you have logged out and back in after adding yourself to the group. Also, ensure the “Auto-mount” option is checked in the VM settings. - Clipboard Not Working: Double-check that “Bidirectional” shared clipboard is enabled in the Devices menu. Sometimes, a VM reboot is needed for this setting to take full effect.
- Graphics Issues Persist: Ensure you have selected a suitable graphics controller in your VM’s display settings (e.g., VBoxSVGA or VMSVGA). After installing Guest Additions, sometimes re-applying or changing this setting and rebooting can help.
Conclusion
Installing VirtualBox Guest Additions is not an optional step; it’s a fundamental enhancement that transforms a basic virtual machine into a highly functional and user-friendly computing environment. By providing optimized drivers and utilities, Guest Additions bridge the gap between your host and guest operating systems, delivering superior graphics, seamless integration, and efficient file sharing. Whether you’re a developer leveraging VMs for testing, a student exploring new operating systems, or a professional managing complex IT infrastructure, mastering the installation and utilization of VirtualBox Guest Additions will undoubtedly elevate your virtual machine experience, paving the way for increased productivity and smoother workflows across your technological endeavors.
aViewFromTheCave is a participant in the Amazon Services LLC Associates Program, an affiliate advertising program designed to provide a means for sites to earn advertising fees by advertising and linking to Amazon.com. Amazon, the Amazon logo, AmazonSupply, and the AmazonSupply logo are trademarks of Amazon.com, Inc. or its affiliates. As an Amazon Associate we earn affiliate commissions from qualifying purchases.