In today’s digital landscape, a robust and versatile web browser is an indispensable tool for navigating the vast expanse of the internet. While macOS comes pre-equipped with Safari, a capable browser in its own right, many users find themselves drawn to the familiar interface and extensive features of Google Chrome. Whether you’re a seasoned tech enthusiast, a creative professional managing your brand online, or an individual focused on personal finance and online income streams, Chrome offers a powerful platform to support your digital endeavors. This comprehensive guide will walk you through the straightforward process of installing Google Chrome on your MacBook, ensuring you can leverage its capabilities for everything from researching the latest technology trends to managing your digital security and exploring online earning opportunities.

The ease with which Google Chrome integrates with other Google services, such as Gmail, Google Drive, and Google Docs, makes it a particularly attractive option for those who rely heavily on the Google ecosystem. Its cross-platform availability means your browsing experience, bookmarks, and extensions can seamlessly sync across all your devices, whether they are Macs, PCs, Android phones, or iPhones. This continuity is invaluable for maintaining productivity and accessing information efficiently, regardless of where you are or what device you’re using.
Furthermore, for individuals and businesses focused on brand building and marketing, Chrome’s robust developer tools and extension marketplace offer a wealth of resources. Designers can utilize extensions for color picking and layout analysis, marketers can track website performance and SEO with specialized tools, and entrepreneurs can streamline their workflow with productivity apps. For those venturing into personal finance and online income, Chrome’s security features and the ability to install extensions for budgeting, investment tracking, and e-commerce management are equally significant.
This article will not only guide you through the installation process but also touch upon why choosing Chrome might be beneficial for various aspects of your digital life, aligning with the core pillars of our website: Tech, Brand, and Money.
Downloading Google Chrome for macOS
The first and most crucial step in installing Google Chrome on your MacBook is to download the correct installer file. This process is designed to be intuitive, ensuring that users of all technical backgrounds can accomplish it without difficulty. It’s essential to download Chrome directly from Google’s official website to ensure you are getting a legitimate and secure version of the software, free from any potential malware or unwanted bundled programs.
Accessing the Official Download Page
To begin, open your current web browser – which is likely Safari if you haven’t installed Chrome yet. Navigate to the official Google Chrome download page. You can easily find this by performing a quick search on Google for “download Google Chrome” or by directly typing the URL: google.com/chrome. This is the safest and most reliable method to obtain the installer.
Upon landing on the Chrome download page, you will typically see a prominent button that says “Download Chrome.” Before clicking this button, the website usually detects your operating system, in this case, macOS. If it doesn’t, there might be an option to select your operating system manually. Ensure that “Mac” is selected.
Understanding the Installer File
Once you click the “Download Chrome” button, your MacBook will begin downloading a disk image file, commonly referred to as a .dmg file. This .dmg file acts as a container for the Chrome application and any necessary components. It’s similar to a compressed folder that you’ll “mount” to access the contents. The download size is typically a few hundred megabytes, so the time it takes will depend on your internet connection speed. You’ll usually find the downloaded file in your “Downloads” folder, which is accessible from the Finder.
It’s important to note that Google Chrome is available in different versions, with the most common being the stable channel. This is the version recommended for most users as it undergoes rigorous testing and provides the most reliable browsing experience. For advanced users or developers who wish to test upcoming features, there are also Beta, Dev, and Canary channels, but these are generally not recommended for everyday use due to potential instability. For the purpose of this guide, we will focus on downloading and installing the standard, stable version of Chrome.
This initial step of obtaining the correct installer is fundamental. By adhering to the official download source, you are safeguarding your MacBook’s security and ensuring a smooth installation process. This principle of seeking verified sources is also highly relevant when considering digital security aspects, such as downloading apps or software for financial management or productivity. Always prioritize official websites and reputable app stores to avoid compromising your system.
Installing Google Chrome on Your MacBook
After successfully downloading the Google Chrome .dmg file, the next phase involves the actual installation process. This is where the application is moved from the downloaded file to your MacBook’s Applications folder, making it readily accessible for use. The steps are designed to be user-friendly, requiring minimal interaction from your end.
Locating and Opening the DMG File
First, locate the downloaded .dmg file. As mentioned earlier, it will most likely be in your “Downloads” folder. You can access this folder by clicking on the Finder icon in your Dock, and then selecting “Downloads” from the sidebar. Once you’ve found the googlechrome.dmg file (or a similar name), double-click it.
Double-clicking the .dmg file will “mount” the disk image. This will open a new Finder window that typically displays the Google Chrome application icon and often an alias or shortcut to your “Applications” folder. Think of this as opening a virtual drive that contains the software you want to install.
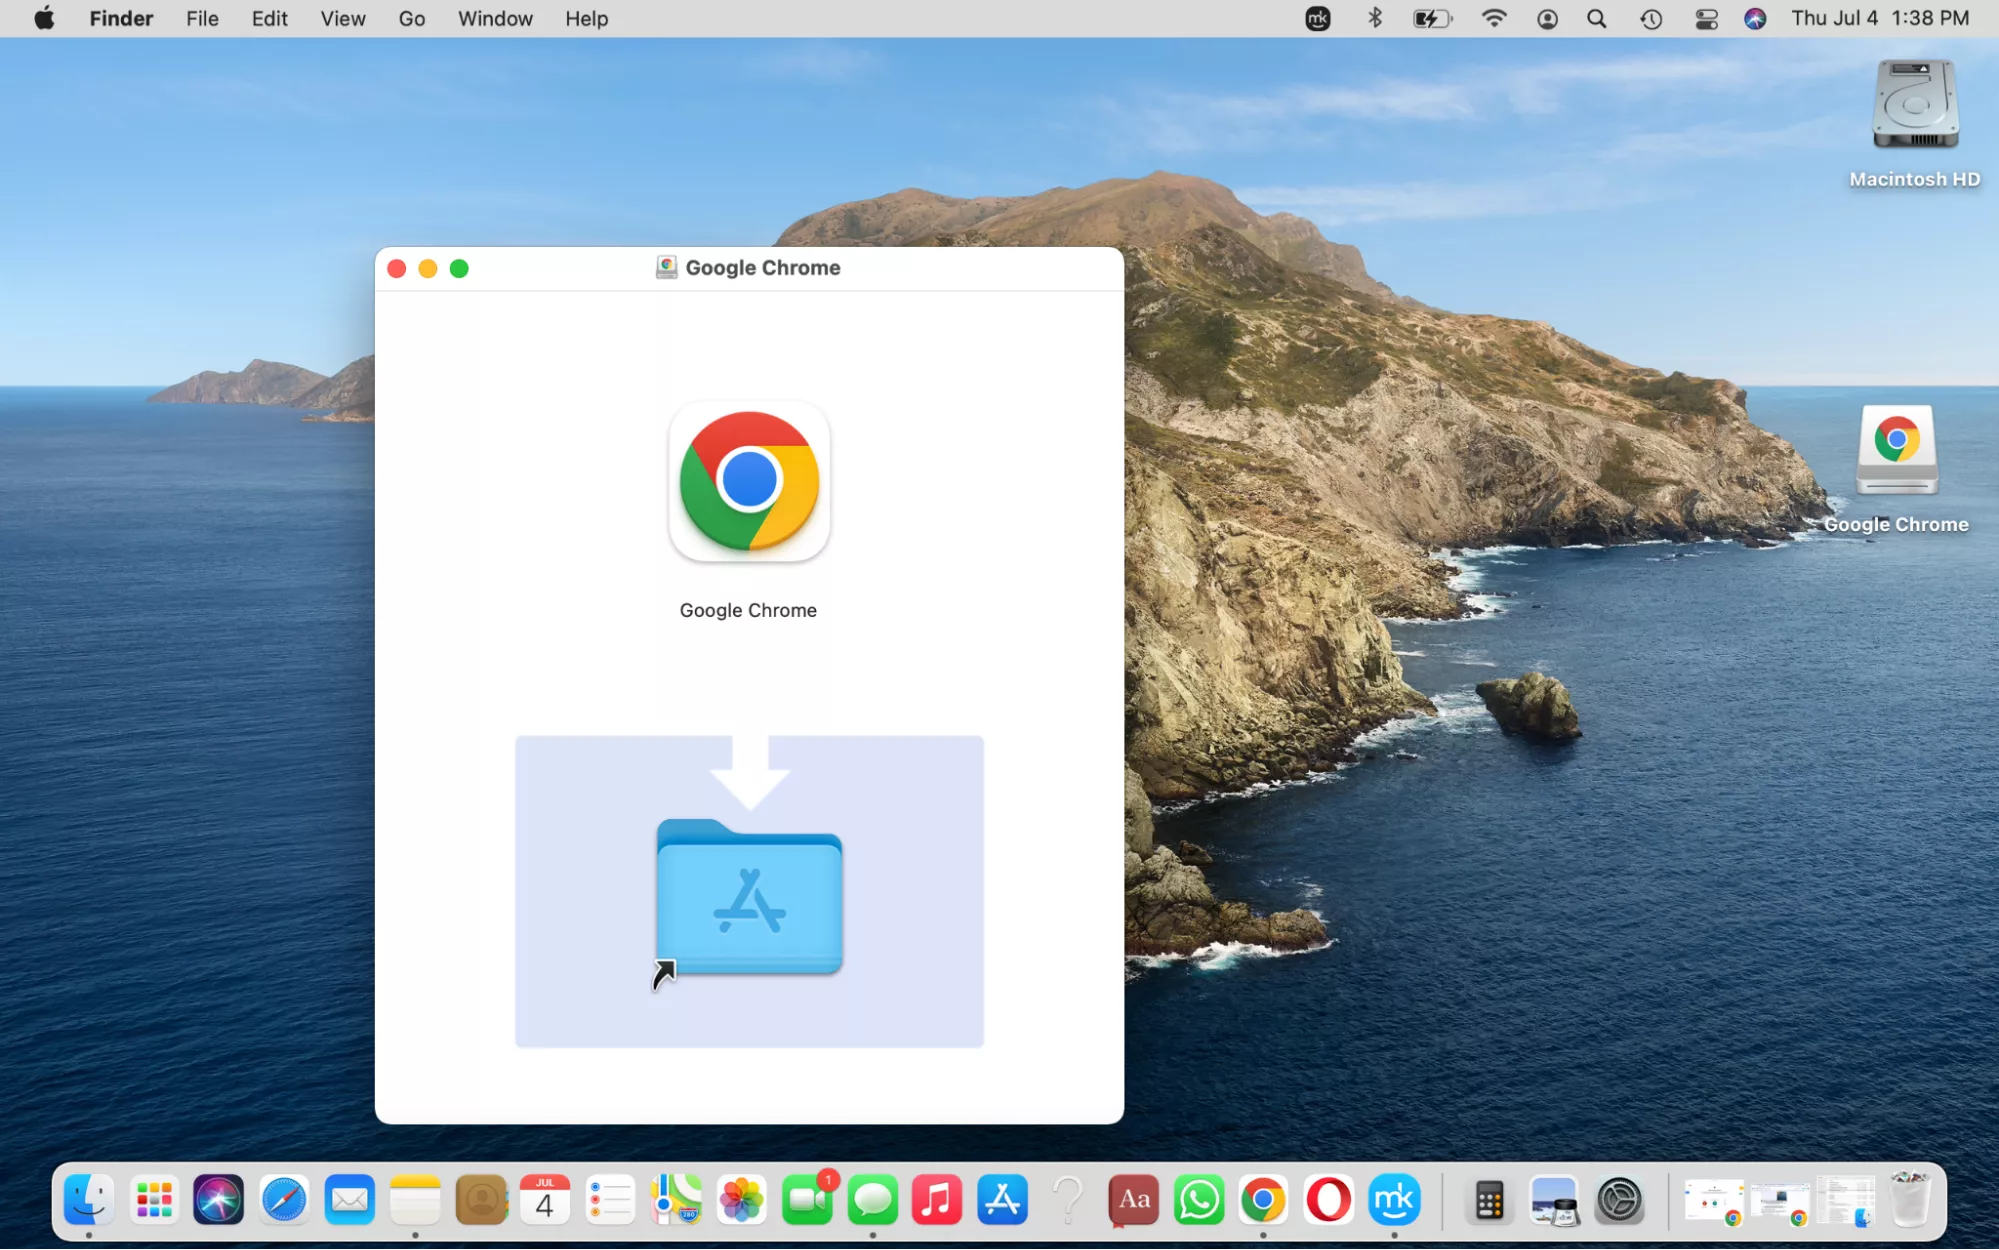
Dragging and Dropping the Application
Within the window that appears after mounting the .dmg file, you will see the Google Chrome application icon. You will also likely see a shortcut to your “Applications” folder. The installation process for most Mac applications, including Chrome, is as simple as dragging and dropping the application icon into the “Applications” folder.
Click and hold the Google Chrome icon, then drag it over to the “Applications” folder icon (or the alias within the same window) and release the mouse button. This action copies the Chrome application from the mounted disk image to your MacBook’s main applications directory.
This method of installation is a common convention on macOS, making it very intuitive. It ensures that all your applications are neatly organized in one central location, which aids in management and organization, a crucial aspect for productivity and maintaining a clean digital workspace. For those interested in personal branding, an organized applications folder reflects a meticulous approach to their digital presence.
Completing the Installation and Ejecting the DMG
Once the dragging and dropping process is complete, the Google Chrome application is now installed on your MacBook. You can close the Finder window that appeared when you mounted the .dmg file. You should then eject the disk image to free up system resources and remove the virtual drive from your desktop.
To eject the .dmg file, you can either:
- Drag to Trash: Find the mounted disk image icon on your Desktop (it might have “Google Chrome” in its name) and drag it to the Trash icon in your Dock.
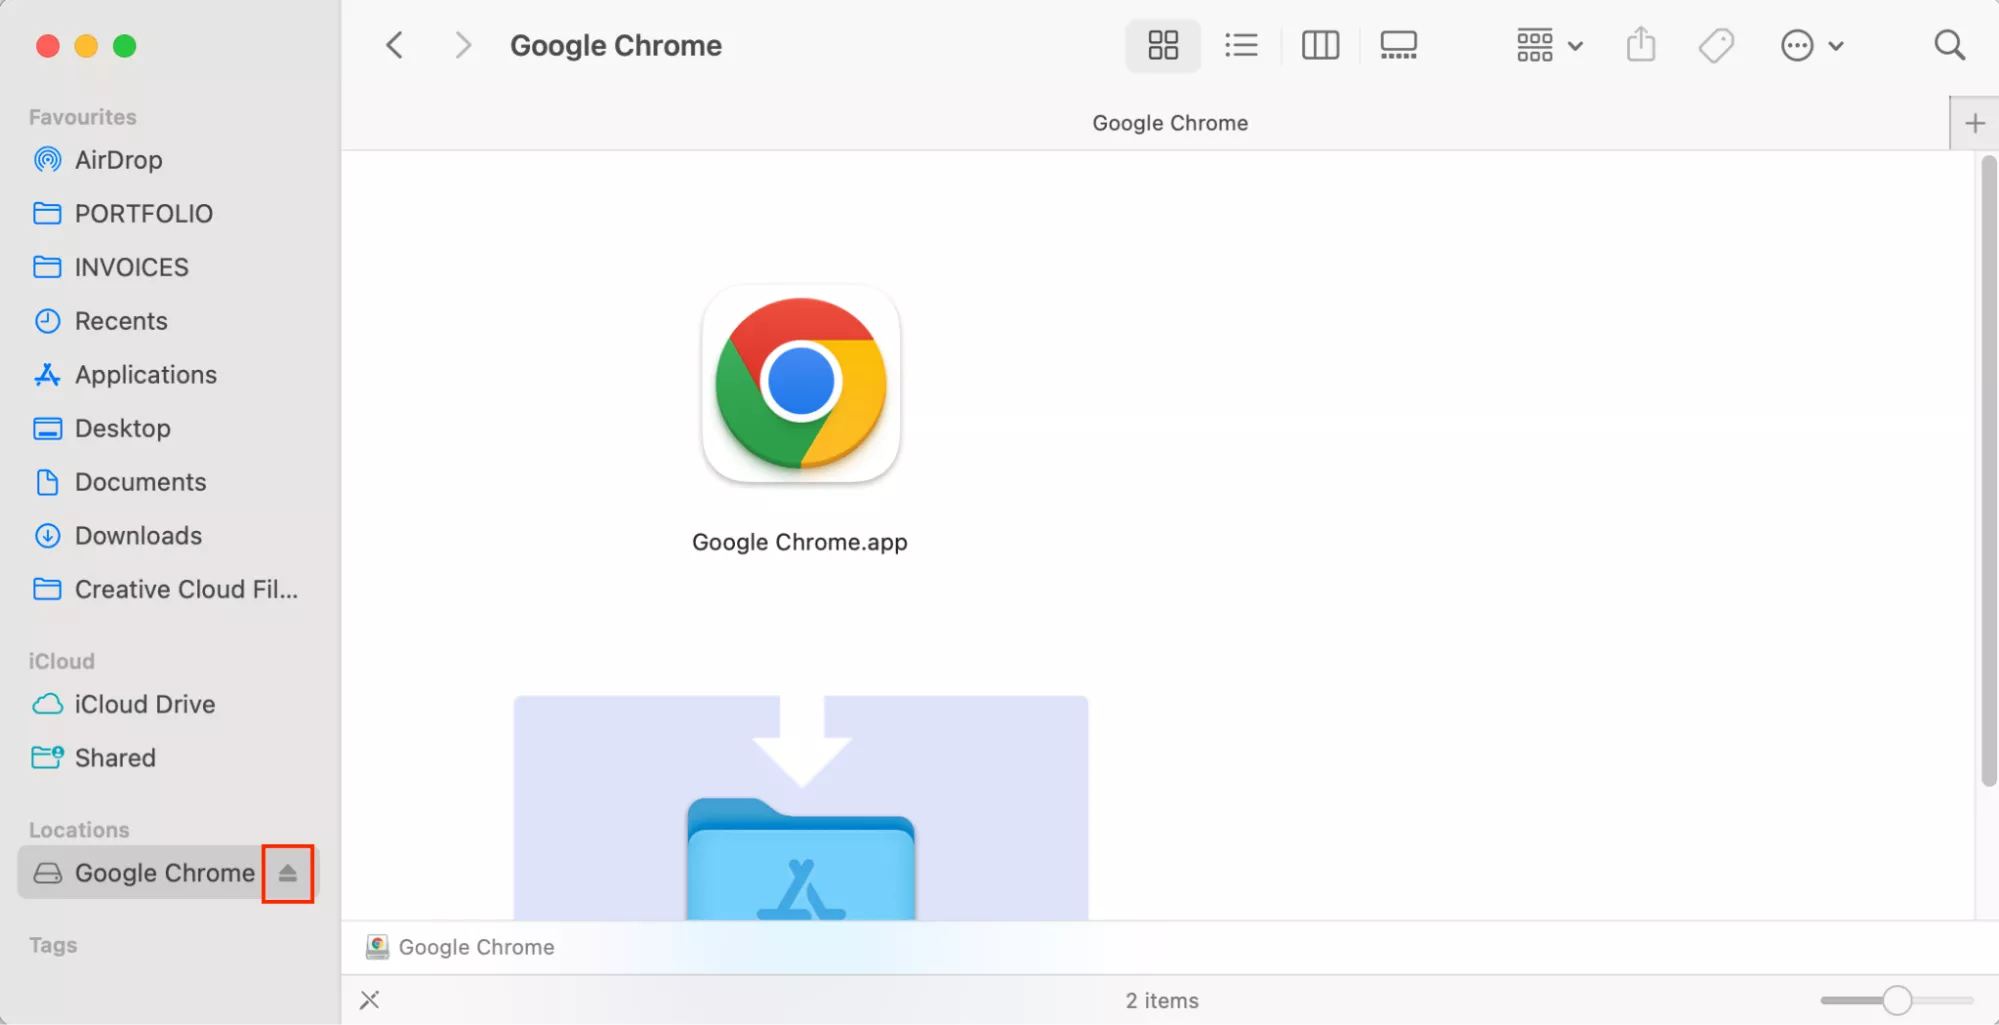
- Finder Sidebar: In the Finder sidebar, under the “Locations” section, you should see an icon representing the mounted disk image. Click the eject icon (an upward-pointing arrow) next to its name.
After ejecting, you can move the original downloaded .dmg file to the Trash if you wish to free up disk space, as it’s no longer needed for the installation.
Launching Google Chrome for the First Time
With Chrome installed, you can now launch it. You have several options:
- Launchpad: Click the Launchpad icon in your Dock, find the Google Chrome icon, and click it.
- Applications Folder: Open Finder, go to the “Applications” folder, and double-click the Google Chrome icon.
- Spotlight Search: Press
Command + Spacebarto open Spotlight search, type “Google Chrome,” and press Enter.
The first time you launch Chrome, macOS may ask for confirmation that you want to open an application downloaded from the internet. Click “Open.” You may also be prompted to set Chrome as your default browser. This means that whenever you click a web link in any application, it will open in Chrome. You can choose to do this now or later through Chrome’s settings.
This completes the installation phase. You now have Google Chrome ready to be used on your MacBook, opening up a world of possibilities for technology exploration, brand management, and financial management.
Optimizing Your Google Chrome Experience on MacBook
Installing Google Chrome is just the beginning. To truly harness its power and tailor it to your specific needs, optimizing its settings and exploring its vast ecosystem of extensions is key. This is particularly relevant for those focused on Tech trends, Brand building, and Money management, as Chrome offers tools that can significantly enhance productivity and efficiency in these areas.
Personalizing Chrome Settings
Upon first launch, you might want to customize Chrome to suit your preferences. This includes setting your homepage, managing search engines, and configuring privacy settings.
- Homepage and New Tab Page: You can decide what appears when you open Chrome or click the Home button. Go to Chrome’s Settings (three vertical dots in the top-right corner > Settings) and look for the “On startup” section. You can choose to open the New Tab page, continue where you left off, or open specific pages. For productivity, setting a custom homepage with quick links to your most-used sites can be very effective.
- Search Engine: Chrome integrates seamlessly with Google Search, but you can also choose other search engines like Bing, DuckDuckGo, or Yahoo. Under “Search engine,” you can select your preferred option. For those concerned with privacy, alternatives to Google are often preferred.
- Privacy and Security: Chrome offers robust privacy controls. In the “Privacy and security” section, you can manage cookies, clear browsing data, and control site permissions. For individuals dealing with sensitive financial information or managing their online reputation, understanding and configuring these settings is crucial for digital security.
- Syncing Your Data: If you have a Google account, you can sign in to Chrome to sync your bookmarks, history, passwords, and extensions across all your devices. This is invaluable for maintaining a consistent browsing experience, whether you’re on your MacBook, an iPad, or an Android phone.
Leveraging Chrome Extensions for Enhanced Functionality
The true power of Google Chrome lies in its extensive library of extensions, available through the Chrome Web Store. Extensions are small software programs that add new features and functionalities to your browser. They can be incredibly useful for a wide range of activities.
For Tech Enthusiasts and Productivity:
- Password Managers: Extensions like LastPass or 1Password can securely store and auto-fill your passwords, significantly enhancing your digital security and streamlining your login process across numerous websites.
- Ad Blockers: Extensions such as AdBlock Plus or uBlock Origin can block intrusive advertisements, making web pages load faster and providing a cleaner browsing experience. This is especially useful when researching technology trends or consuming online content.
- Productivity Tools: For those seeking to boost productivity, extensions like Todoist, Grammarly (for writing assistance), or momentum-style New Tab extensions can help manage tasks, improve writing, and provide motivational prompts.
For Brand Building and Marketing:
- SEO Tools: Extensions like SEOquake or MozBar provide valuable insights into website rankings, keyword analysis, and on-page SEO factors, essential for anyone involved in online marketing or managing a personal brand.
- Design Aids: For designers and marketers, extensions like ColorZilla (for color picking from webpages) or WhatFont (to identify fonts on a site) can be incredibly useful for maintaining brand consistency and inspiration.
- Social Media Management: Many extensions integrate with social media platforms, allowing for easier content scheduling, analytics tracking, and engagement management.
For Personal Finance and Online Income:
- Budgeting and Expense Trackers: Extensions that integrate with personal finance apps can help monitor spending, categorize expenses, and track financial goals directly from your browser.
- Investment Tools: Some extensions offer quick access to stock market data, portfolio tracking, or news aggregation relevant to investment decisions.
- E-commerce Aids: For those involved in online sales, extensions that assist with product research, price comparison, or managing listings on platforms like Amazon can be invaluable.
To install an extension, simply visit the Chrome Web Store, search for the extension you want, and click “Add to Chrome.” Always review the permissions an extension requests before installing it, especially if it deals with sensitive data.
By customizing Chrome’s settings and thoughtfully selecting extensions, you can transform your web browser into a powerful tool that supports your goals, whether they lie in the ever-evolving world of technology, the strategic development of your brand, or the diligent management of your personal finances.
This personalized approach to your browser ensures that your digital environment is not just functional, but also highly efficient and aligned with your specific objectives. Whether you’re a tech-savvy individual exploring the latest AI tools, a marketer refining a corporate identity, or someone looking to maximize their online income, Google Chrome on your MacBook is a gateway to enhanced digital capabilities.
aViewFromTheCave is a participant in the Amazon Services LLC Associates Program, an affiliate advertising program designed to provide a means for sites to earn advertising fees by advertising and linking to Amazon.com. Amazon, the Amazon logo, AmazonSupply, and the AmazonSupply logo are trademarks of Amazon.com, Inc. or its affiliates. As an Amazon Associate we earn affiliate commissions from qualifying purchases.