In the rapidly evolving landscape of technology, efficient version control is not just a luxury; it’s a fundamental necessity for developers, data scientists, content creators, and anyone collaborating on digital projects. At the heart of this efficiency lies Git, a distributed version control system that has become the de facto standard for tracking changes in source code during software development. Installing Git on your Windows machine is a crucial first step into a world of streamlined collaboration, robust project management, and enhanced productivity. This comprehensive guide will walk you through every stage of the installation process, explaining the nuances of each configuration option, and setting you up for success in your development journey.
Understanding Git: The Foundation of Modern Development
Before diving into the installation, it’s beneficial to grasp what Git is and why it holds such a pivotal position in the tech industry. This understanding will not only demystify the tool but also underscore its importance for anyone serious about building a career or managing projects in the digital realm.
What is Git? A Brief Overview of Version Control
Git is a free and open-source distributed version control system (DVCS) designed to handle everything from small to very large projects with speed and efficiency. Created by Linus Torvalds in 2005 for the development of the Linux kernel, Git’s primary purpose is to track changes in computer files and coordinate work among multiple people on a project.
Unlike older, centralized version control systems (CVCS) that rely on a single central server, Git’s distributed nature means every developer’s working copy of the code is a complete repository with full history and version-tracking capabilities. This redundancy offers several key advantages:
- Offline Work: Developers can work on their local repositories without constant network connectivity.
- Speed: Most operations are performed locally, making them incredibly fast.
- Robustness: If the central server fails in a CVCS, work can be lost. With Git, every clone is a full backup of the entire project history.
- Branching and Merging: Git excels at creating and managing branches, allowing developers to work on new features or bug fixes in isolation without affecting the main codebase, and then seamlessly merging their changes back in.
In essence, Git acts as a powerful safety net and a sophisticated organizational tool, providing a complete history of every change, who made it, and when. This meticulous tracking is invaluable for debugging, reverting errors, and understanding project evolution.
Why is Git Indispensable for Developers and Teams?
The widespread adoption of Git across virtually every sector of technology is no accident. Its capabilities translate directly into tangible benefits for individual developers and large teams alike, impacting productivity, project quality, and overall efficiency.
Firstly, for individual productivity, Git provides a personal time machine for your code. Made a mistake? Forget how a feature used to work? Git allows you to instantly revert to previous versions, compare changes, and explore the history of your project with ease. This freedom to experiment without fear of irrevocably breaking something is liberating and fosters a more agile development process. It significantly reduces the mental overhead of tracking changes manually, allowing developers to focus on problem-solving and innovation rather than worrying about file management.
Secondly, for team collaboration, Git is unmatched. In modern software development, projects are rarely solo endeavors. Teams of developers, often geographically dispersed, need to work concurrently on different parts of the same codebase. Git facilitates this through its robust branching and merging model. Developers can create separate branches for new features, work on them independently, and then integrate their changes back into the main branch, resolving conflicts cooperatively. This parallel development significantly speeds up the development cycle and ensures that everyone is working with the most up-to-date and consistent version of the project. Tools like GitHub, GitLab, and Bitbucket build upon Git to provide powerful platforms for hosting repositories, managing pull requests, and facilitating code reviews, further enhancing team dynamics.
Beyond just code, Git is also invaluable for managing any type of text-based project, from configuration files and documentation to scientific papers and website content. Its ability to track changes line-by-line makes it a powerful tool for maintaining integrity and managing revisions across various disciplines. For those looking to build a career in tech, proficiency in Git is not just recommended; it’s a non-negotiable skill that recruiters actively seek. It signifies an understanding of modern development workflows, collaboration, and robust project management, making it an essential part of a developer’s toolkit and a valuable asset for professional growth.
Preparing for Installation: Downloading the Git Installer
The first step in getting Git up and running on your Windows machine is to download the official installer. It’s crucial to obtain Git from its official source to ensure you receive a legitimate, secure, and up-to-date version.
Navigating to the Official Git Website
To begin, open your web browser and navigate to the official Git website: https://git-scm.com/.
This is the central hub for all things Git, offering documentation, tutorials, and, most importantly, the official downloads. Once on the homepage, you’ll typically see a prominent download button for your operating system. The website automatically detects your OS, so you should see a direct link to “Download for Windows.”
Choosing the Right Installer Version (32-bit vs. 64-bit)
Upon clicking the Windows download link, you might be presented with options for both 32-bit and 64-bit installers. Most modern Windows systems (Windows 7 and newer) are 64-bit. If you’re unsure, you can check your system type:
- Press
Windows Key + Rto open the Run dialog. - Type
msinfo32and press Enter. - Look for “System Type” in the System Summary. It will typically say “x64-based PC” for 64-bit systems or “x86-based PC” for 32-bit systems.
It’s highly recommended to download the 64-bit version if your system supports it, as it can leverage more memory and generally offers better performance. Once you’ve selected the appropriate version, the installer file (an .exe file) will begin downloading to your computer. For security best practices, you can also look for a checksum (SHA-256 or MD5) provided on the download page and compare it with the checksum of your downloaded file to verify its integrity, though this is often skipped by casual users.
Step-by-Step Installation: Navigating the Git Setup Wizard
With the installer downloaded, you’re ready to launch the Git Setup Wizard. This wizard will guide you through a series of configuration options. While the default settings are often sufficient for basic use, understanding each choice will empower you to tailor Git to your specific workflow and avoid potential issues down the line.
Double-click the downloaded .exe file to start the installation. You might be prompted by User Account Control (UAC) to allow the app to make changes to your device; click “Yes.”
Initial Setup & License Agreement
- Welcome to Git Setup: The first screen is a simple welcome message. Click “Next.”
- GNU General Public License: This screen displays the Git license. Read through it if you wish, then click “Next” to accept and proceed.
- Select Destination Location: This is where Git will be installed on your system. The default path (e.g.,
C:Program FilesGit) is usually perfectly fine. If you have specific reasons to change it, you can do so, but generally, it’s best to stick with the default. Click “Next.”
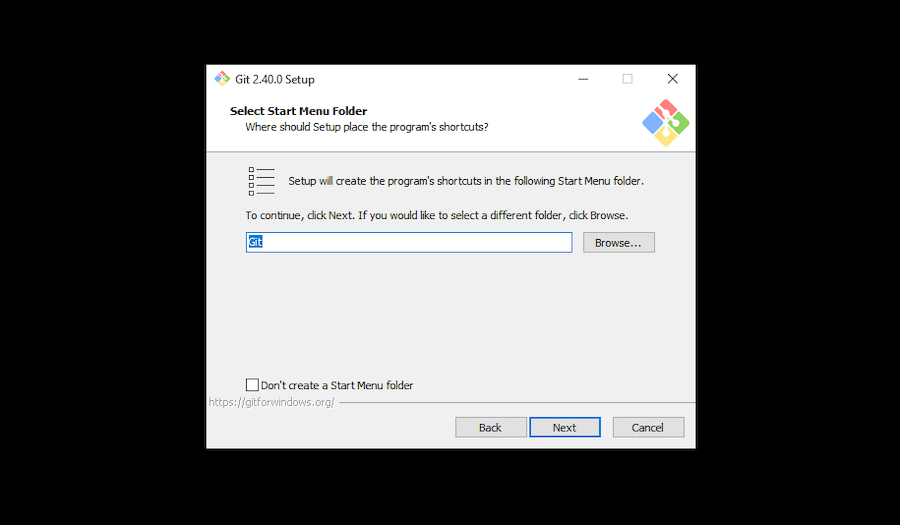
Selecting Components: What You Need and What You Don’t
This screen allows you to select which components of Git you want to install.
- Git Bash: Highly recommended. This provides a Bash emulation shell that comes with essential Unix commands (like
ls,cp,mv,ssh) and is the primary way many developers interact with Git from the command line. It offers a more powerful and consistent experience than the default Windows Command Prompt or PowerShell for Git operations. - Git GUI: A graphical user interface for Git. While many prefer the command line for its power and speed, the GUI can be helpful for visualizing changes, commits, and branches. Install if you prefer a visual tool.
- Git LFS (Large File Support): Useful if you plan to work with large binary files (e.g., videos, audio, large datasets) that Git isn’t optimized to handle directly. Git LFS replaces large files with text pointers in Git, storing the actual file content on a remote server.
- Associate .git* configuration files with the default text editor: Generally safe to enable.
- Associate .sh files to be run with Bash: Also generally safe and useful if you work with Bash scripts.
- Check daily for Git for Windows updates: Recommended to keep your Git version current.
- Add an icon to the Desktop: Optional, for quick access to Git Bash.
For most users, keeping the default selections (which usually include Git Bash, Git GUI, and shell integrations) is a good starting point. Click “Next.”
Choosing Your Default Editor: A Crucial Configuration Point
Git needs a default text editor to perform operations like writing commit messages or rebasing. This is one of the most important choices in the setup process.
- Vim (the default): Vim is a powerful, keyboard-driven text editor popular among experienced developers, especially in the Unix/Linux world. However, it has a steep learning curve and can be confusing for beginners. If you’re not familiar with Vim, you’ll likely want to change this.
- Notepad++: A popular, free, and open-source text editor for Windows with many features. A good choice for many users.
- Visual Studio Code: A highly popular, free, and open-source code editor from Microsoft, known for its extensive features, extensions, and excellent Git integration. If you use VS Code for development, this is an excellent choice.
- Sublime Text, Atom, etc.: Other popular editors may also be listed if installed on your system.
Recommendation: If you are new to Git and not comfortable with Vim, select an editor you already use and are familiar with, such as Visual Studio Code or Notepad++. This choice significantly impacts your initial experience with Git, making commit messages and other text-editing tasks much smoother. Click “Next.”
Adjusting Your PATH Environment: How Git Integrates with Your System
This is a critical step that determines how you interact with Git from your command line.
- Use Git from Git Bash only: This is the safest but most restrictive option. You can only use Git commands within the Git Bash terminal. Not generally recommended if you plan to use Git with other tools or from the Windows Command Prompt/PowerShell.
- Git from the command line and also from 3rd-party software (RECOMMENDED): This option adds Git’s directory to your Windows PATH environment variable. This means you can run
gitcommands from Git Bash, Windows Command Prompt, PowerShell, and any third-party IDEs (like VS Code, IntelliJ IDEA) without specific configurations. This is the most flexible and recommended option for most users. - Use Git and optional Unix tools from the Command Prompt: This option adds Git and a suite of Unix tools (like
find,sort,sed,awk) to your PATH. While this provides a rich Unix-like environment, it can potentially conflict with existing Windows tools or other software that uses similarly named commands. For beginners, the “Recommended” option is safer.
Recommendation: Choose “Git from the command line and also from 3rd-party software.” Click “Next.”

Configuring HTTPS Transport Backend & Line Ending Conversions
These options deal with how Git handles secure connections and how it manages line endings in text files, especially crucial in cross-platform collaboration.
-
Choose HTTPS transport backend:
- Use the OpenSSL library (RECOMMENDED): Git will use the OpenSSL library for HTTPS connections. This is generally robust and widely used.
- Use the native Windows Secure Channel library: Git will use Windows’ built-in TLS/SSL implementation. This can be beneficial if you operate in an environment with specific corporate proxies or certificates managed by Windows. For most individual users, OpenSSL is perfectly fine.
Recommendation: Stick with “Use the OpenSSL library.” Click “Next.”
-
Configuring the line ending conversions: This is a common source of confusion and issues when collaborating between Windows and Unix-like (Linux/macOS) systems.
- Checkout Windows-style, commit Unix-style line endings (RECOMMENDED): This is the default and generally the best option for Windows users. Git will convert Unix-style LF (Line Feed) line endings in your repository to Windows-style CRLF (Carriage Return Line Feed) when you check out files. When you commit, it will convert CRLF back to LF. This ensures that your files appear correctly in Windows text editors while maintaining a consistent LF standard in the repository, which is preferred by Unix-like systems.
- Checkout as-is, commit Unix-style line endings: Git will not perform any conversion on checkout. It will only convert CRLF to LF on commit. This can lead to issues if your Windows editor doesn’t handle LF endings gracefully.
- Checkout as-is, commit as-is: Git will not perform any line ending conversions at all. This option should only be used if you fully understand line endings and are committed to managing them manually for every file, often used for binary files or projects where conversions could corrupt data.
Recommendation: Stick with the “Checkout Windows-style, commit Unix-style line endings” option. Click “Next.”
Selecting Your Terminal Emulator and Credential Helper
-
Configuring the terminal emulator to use with Git Bash:
- Use MinTTY (the default terminal of MSYS2) (RECOMMENDED): MinTTY is a much more feature-rich and user-friendly terminal emulator than the standard Windows Console Host. It offers better rendering, copy-paste functionality, and generally a superior user experience for Git Bash.
- Use Windows’ default console window: This uses the standard Command Prompt or PowerShell window. While functional, it lacks many of MinTTY’s advantages.
Recommendation: Choose “Use MinTTY (the default terminal of MSYS2).” Click “Next.”
-
Configuring extra options:
- Enable file system caching: Improves performance by caching Git-related file system data. Recommended.
- Enable symbolic links: Allows Git to create symbolic links (symlinks), which are pointers to other files or directories. Useful in some development scenarios, but requires elevated permissions on Windows. Enable if your projects use symlinks, otherwise, it can be left unchecked.
Recommendation: Keep “Enable file system caching” checked. Consider “Enable symbolic links” if your projects require them. Click “Next.”
-
Configuring credential helper: This manages how Git stores and retrieves your credentials (username/password or tokens) for remote repositories, saving you from typing them repeatedly.
- Git Credential Manager Core (RECOMMENDED): This is the most modern and robust credential helper. It securely stores credentials in the Windows Credential Manager and supports various authentication methods, including OAuth tokens for GitHub/GitLab/Bitbucket. It’s user-friendly and highly recommended.
- None: You’ll have to enter credentials every time.
Recommendation: Choose “Git Credential Manager Core.” Click “Next.”
-
Configuring experimental options:
- Enable experimental support for pseudo consoles: This is an experimental feature for newer Windows console APIs. It might improve compatibility with certain terminals but can also introduce instability. For standard use, it’s best left unchecked unless you know you need it.
Recommendation: Leave this unchecked unless you have a specific reason to enable it. Click “Install.”
The installation process will now commence. This might take a few minutes. Once completed, you’ll see a “Completing the Git for Windows Setup Wizard” screen. You can choose to “Launch Git Bash” or “View Release Notes.” Click “Finish.”
Verifying Your Git Installation and Initial Configuration
After completing the installation, it’s essential to verify that Git has been installed correctly and to perform some basic initial configurations. These steps ensure Git is ready for use and correctly identifies you in your commits.
Confirming Git’s Presence with git --version
To verify the installation:
- Open Git Bash (you can find it in your Start Menu or on your Desktop if you created an icon).
- Alternatively, open the Windows Command Prompt or PowerShell.
- Type the following command and press Enter:
bash

git --version
You should see output similar togit version 2.x.x.windows.x. This confirms that Git is installed and accessible from your command line. If you receive an error like “git is not recognized as an internal or external command,” it likely indicates an issue with your PATH environment variable, which usually means the installation didn’t go as planned or you didn’t select the recommended PATH option. In such a case, you might need to re-run the installer or manually adjust your PATH.
Setting Up Your User Identity: Name and Email
Git uses your name and email address to identify you as the author of your commits. This information is embedded in every commit you make and is crucial for collaboration and tracking contributions. This setup is done globally, meaning it applies to all your Git repositories on your machine.
- In your Git Bash, Command Prompt, or PowerShell window, run the following commands, replacing “Your Name” with your actual name and “your_email@example.com” with your email address:
bash

git config --global user.name "Your Name"

git config --global user.email "your_email@example.com"
Importance: Using your real name and the email address associated with your Git hosting service (e.g., GitHub, GitLab) is highly recommended. This ensures your contributions are correctly attributed, which is vital for professional visibility, team recognition, and understanding project history.
Exploring Your Git Configuration
You can view your current Git configuration settings to confirm that your user identity has been set correctly and to inspect other global settings.
- To list all your global Git configurations:
bash

git config --list --global
You should seeuser.nameanduser.emailamong the listed settings. - To view all active configurations (global, system, and local to your current repository, if any):
bash

git config --list
- To directly open and edit your global configuration file (it’s a plain text file, typically located at
C:Users<YourUsername>.gitconfig):
bash

git config --global --edit
This will open the.gitconfigfile in your default text editor (the one you selected during installation). You can manually add or modify settings here if needed, but it’s generally safer to usegit configcommands.
Taking the Next Steps with Git: Your Journey Begins
Now that Git is successfully installed and configured, you’re ready to embark on your version control journey. While the full depth of Git is vast, understanding a few fundamental concepts and commands will allow you to start managing your projects immediately.
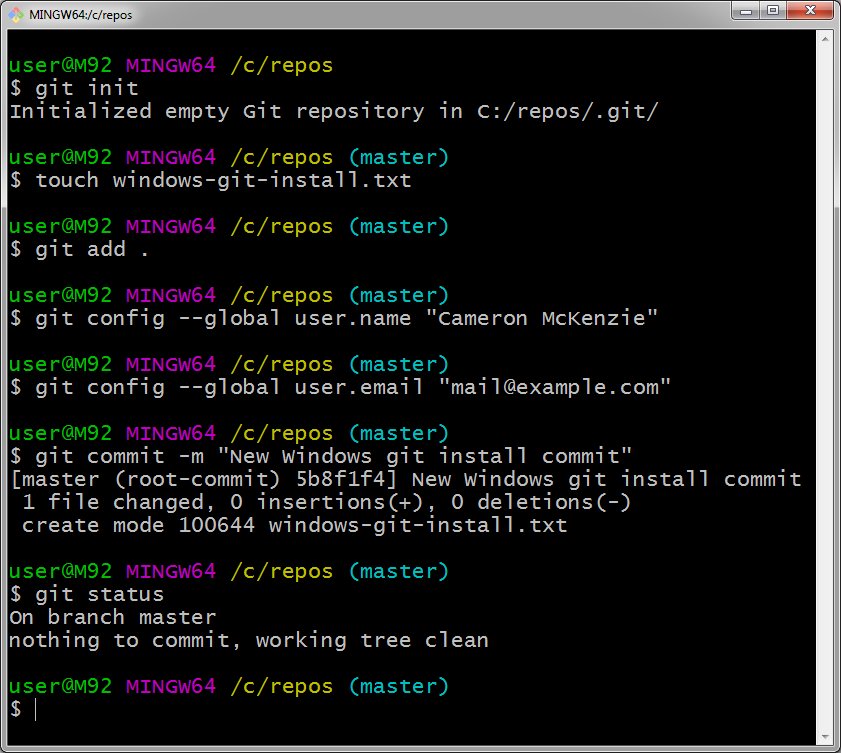
Basic Git Workflow: Initializing, Adding, Committing
The core workflow in Git involves these three essential steps for tracking changes in your local repository:
-
Initialize a Repository (
git init):
To start tracking a new project with Git, navigate to your project directory in Git Bash (or Command Prompt/PowerShell) and initialize a new Git repository:cd /path/to/your/project git initThis command creates a hidden
.gitdirectory within your project, which stores all the history and metadata for your repository. -
Add Files to the Staging Area (
git add):
After making changes to your files, you need to tell Git which changes you want to include in your next commit. This is done by adding them to the “staging area” (also known as the “index”):git add .The
.tells Git to add all changes in the current directory and its subdirectories. You can also specify individual files:git add my_file.txt. The staging area acts as a buffer, allowing you to carefully select exactly what goes into each commit. -
Commit Changes (
git commit):
Once files are in the staging area, you “commit” them. A commit is a snapshot of your repository at a specific point in time, along with a message describing the changes made.
bash

git commit -m "Initial commit of the project structure"
The-mflag allows you to provide a short, descriptive commit message directly. Good commit messages are crucial for understanding the project’s history later on.
This cycle of edit -> add -> commit forms the backbone of managing changes with Git. You will repeat these steps countless times as your project evolves.
Learning Resources and Best Practices
Installing Git is just the beginning. To truly harness its power, continuous learning and practice are key.
- Official Git Documentation: The
git-scm.comwebsite offers a wealth of resources, including a comprehensive book (“Pro Git”) that’s freely available online. - Interactive Tutorials: Websites like Learn Git Branching provide visual and interactive ways to understand Git concepts, especially branching and merging.
- Online Courses: Platforms like Coursera, Udemy, and freeCodeCamp offer structured courses on Git and GitHub, ranging from beginner to advanced.
- Practice, Practice, Practice: The best way to learn Git is by using it. Start applying Git to all your projects, even personal ones. Experiment with commands, create branches, merge, and resolve conflicts. The more you use it, the more intuitive it becomes.
- Version Control for Everything: Don’t limit Git to just code. Use it for your resume, configuration files, notes, or any text-based content where tracking changes and collaboration would be beneficial. This expands its utility beyond traditional development and makes you more productive across the board.
Troubleshooting Common Installation Issues
While the Git for Windows installer is generally robust, you might encounter a few common issues:
gitcommand not found: Ifgit --versiondoesn’t work outside of Git Bash, it’s almost always a PATH issue. Re-run the installer and ensure you select the “Git from the command line and also from 3rd-party software” option. If that doesn’t work, you might need to manually addC:Program FilesGitcmd(or wherever you installed Git) to your system’s PATH environment variable.- Editor issues during commit: If Git opens an editor you’re unfamiliar with (like Vim) for commit messages and you get stuck, remember that in Vim, you type
ito enter insert mode, write your message, then pressEsc, type:wq(write and quit), and press Enter. To quit without saving, type:q!and press Enter. If this is a persistent problem, you can change your default editor usinggit config --global core.editor "notepad.exe"(replacenotepad.exewith the path to your preferred editor). - Network or firewall issues during download: If the installer download fails, check your internet connection, try a different browser, or temporarily disable any restrictive firewall settings.
- Update problems: If Git Bash doesn’t automatically update, you can manually download and run the latest installer from
git-scm.comto upgrade your existing Git installation.
By following this guide, you’ve not only installed a powerful version control system but also laid a crucial foundation for effective collaboration, robust project management, and a highly productive workflow in your technical endeavors. Git is an indispensable skill in today’s digital age, empowering you to navigate complex projects with confidence and efficiency.
aViewFromTheCave is a participant in the Amazon Services LLC Associates Program, an affiliate advertising program designed to provide a means for sites to earn advertising fees by advertising and linking to Amazon.com. Amazon, the Amazon logo, AmazonSupply, and the AmazonSupply logo are trademarks of Amazon.com, Inc. or its affiliates. As an Amazon Associate we earn affiliate commissions from qualifying purchases.