In the dynamic world of technology and software development, a reliable compiler is an indispensable tool for anyone venturing into programming, system administration, or even just exploring how software works under the hood. At the heart of much of the open-source and professional software ecosystem lies the GNU Compiler Collection, universally known as GCC. For tech enthusiasts, aspiring developers, or seasoned professionals looking to enhance their toolkit, understanding how to install and leverage GCC is a fundamental step. This comprehensive guide will walk you through the process, ensuring you have this powerful compiler ready to transform your source code into executable programs across Windows, Linux, and macOS platforms.
Understanding GCC: The Foundation of Modern Software Development
Before diving into the installation process, it’s crucial to grasp what GCC is and why it holds such a pivotal position in the technology landscape. It’s not merely a utility; it’s a cornerstone that enables countless applications, operating systems, and specialized tools to function.
What is the GNU Compiler Collection (GCC)?
The GNU Compiler Collection (GCC) is a sophisticated and widely used set of compilers produced by the GNU Project. Initially released in 1987 by Richard Stallman, it was designed to be the compiler for the GNU operating system. Over the decades, it has evolved into a powerhouse, supporting a vast array of programming languages including C, C++, Objective-C, Fortran, Ada, Go, and D, among others.
At its core, a compiler acts as a translator. It takes human-readable source code, written in a high-level programming language, and converts it into machine code or other intermediate forms that a computer’s processor can understand and execute. GCC excels at this, optimizing the generated code for performance and efficiency, making it a preferred choice for developing everything from embedded systems to supercomputer applications. Its open-source nature means it’s continuously refined and improved by a global community of developers, ensuring its robustness and adaptability to new architectures and programming paradigms.
Why GCC is Indispensable for Developers and Tech Enthusiasts
The omnipresence of GCC isn’t accidental; it stems from its critical role in various aspects of software development and its broad utility across the tech spectrum.
- Core for System-Level Programming: Many operating systems, including Linux and a significant portion of macOS components, are built using GCC. If you’re doing any system-level programming, driver development, or kernel hacking, GCC is your go-to tool.
- Open-Source Development: The vast majority of open-source projects, especially those written in C or C++, rely on GCC for compilation. Installing GCC means you can compile, test, and contribute to these projects, directly participating in the global open-source community.
- Cross-Platform Compatibility: GCC supports a multitude of hardware architectures and operating systems. This cross-platform capability allows developers to write code once and compile it for different targets, a huge advantage in a diverse computing landscape.
- Educational Tool: For students and aspiring programmers, GCC provides an excellent environment to learn C, C++, and other languages. It offers clear error messages, robust debugging support (especially when paired with GDB, the GNU Debugger), and a deep understanding of the compilation process.
- Performance and Optimization: GCC is renowned for its powerful optimization capabilities. It can analyze your code and apply various techniques to make the resulting executable faster and more efficient, a crucial factor in performance-critical applications.
- Toolchain Integration: GCC is often part of a larger development toolchain, seamlessly integrating with build systems like Make and CMake, version control systems like Git, and integrated development environments (IDEs).
In essence, GCC isn’t just a piece of software; it’s a fundamental utility that empowers innovation, facilitates learning, and underpins a significant portion of the digital world we interact with daily. Installing it is not just about gaining access to a compiler, but about unlocking a world of development possibilities.
Preparing Your System for GCC Installation
Before initiating the installation process, a few preliminary checks and considerations can ensure a smoother experience, regardless of your operating system.
Essential Prerequisites and System Considerations
- Administrative Privileges: You will need administrator or root privileges to install software on your system, especially when dealing with system-wide installations like compilers.
- Internet Connection: A stable internet connection is required to download installer files, package updates, and any necessary dependencies.
- Sufficient Disk Space: While GCC itself isn’t massive, the entire build environment (especially on Windows with MinGW-w64 or macOS with Xcode Command Line Tools) can consume several gigabytes of disk space. Ensure you have ample room.
- Operating System Version: Ensure your operating system is reasonably up-to-date. While GCC is highly compatible, very old OS versions might have issues with newer compiler versions or their dependencies.
- Patience and Attention to Detail: Command-line installations, especially concerning environment variables on Windows, require careful execution. Double-checking each step can save significant troubleshooting time.
Step-by-Step Installation Guides for Major Operating Systems
The installation method for GCC varies significantly depending on your operating system. We’ll cover the most common approaches for Windows, Linux, and macOS.
Installing GCC on Windows: The MinGW-w64 Approach
Windows does not natively come with GCC. The most popular and recommended way to get GCC on Windows is by using MinGW-w64 (Minimalist GNU for Windows). MinGW-w64 provides a complete open-source native Windows development toolchain, including GCC.
-
Download MinGW-w64:
- Navigate to the MinGW-w64 project page on SourceForge: https://sourceforge.net/projects/mingw-w64/
- Look for the
x86_64-posix-sehorx86_64-win32-sehbuild, depending on your preference for POSIX threads or Windows native threads. For most users, either will work fine;posixthreads are often preferred for compatibility with Linux-like environments. - Download the latest stable version (usually a
.zipfile).
-
Extract the Files:
- Once downloaded, extract the contents of the
.zipfile to a simple, short path on your drive, such asC:MinGW. Avoid paths with spaces or special characters. - Inside
C:MinGW, you should find a folder named something likemingw64(orx86_64-xxxx-seh). This folder contains thebindirectory where the GCC executables reside. So the full path to yourbindirectory will beC:MinGWmingw64bin.
- Once downloaded, extract the contents of the
-
Add MinGW-w64 to Your System PATH Environment Variable:
This is the most crucial step on Windows. Adding thebindirectory to your PATH allows you to rungcccommands from any directory in your command prompt.- Search for “Environment Variables”: Type “environment variables” in the Windows search bar and select “Edit the system environment variables.”
- Open System Properties: In the System Properties window, click the “Environment Variables…” button.
- Edit System PATH: Under “System variables,” find the variable named
Pathand click “Edit…”. - Add New Path: Click “New” and add the full path to your MinGW-w64
bindirectory (e.g.,C:MinGWmingw64bin). - Confirm Changes: Click “OK” on all open windows to save the changes.
- Important: You might need to restart your command prompt or even your computer for the changes to take effect.
-
Verify the Installation: Open a new command prompt and type:
bash

gcc --version

g++ --version
You should see output indicating the GCC version, for example:
gcc (MinGW-W64 x86_64-posix-seh, built by Brecht Sanders) 13.2.0

Copyright (C) 2023 Free Software Foundation, Inc.

This is free software; see the source for copying conditions. There is NO

warranty; not even for MERCHANTABILITY or FITNESS FOR A PARTICULAR PURPOSE.
If you get an error like “gcc is not recognized as an internal or external command,” it means your PATH variable is not set correctly. Revisit step 3 carefully.
Installing GCC on Linux: Leveraging Package Managers for Efficiency
Installing GCC on most Linux distributions is straightforward due to their robust package management systems. The process typically involves a single command.
-
Update Package Lists: It’s always a good practice to update your package lists before installing new software.
- For Debian/Ubuntu-based systems:
bash

sudo apt update
- For Fedora/RHEL-based systems:
bash

sudo dnf check-update
- For Arch Linux:
bash

sudo pacman -Sy
- For Debian/Ubuntu-based systems:
-
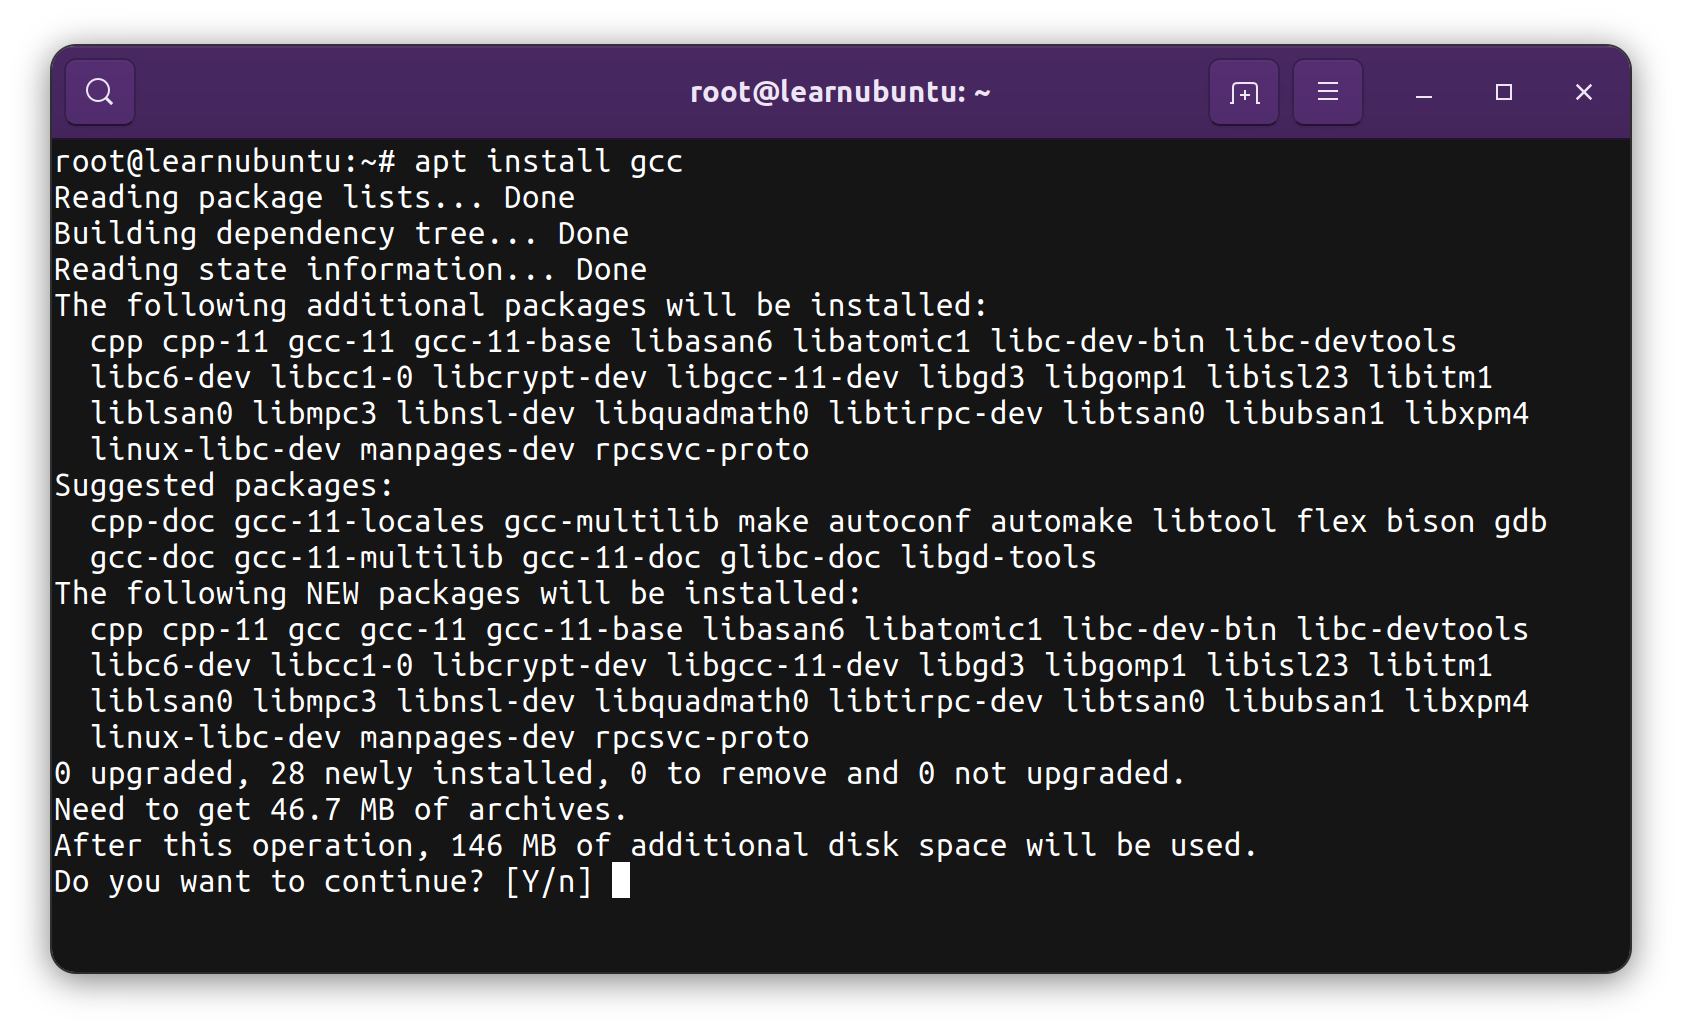
Install GCC: Most distributions provide a
build-essentialpackage (or similar) that includes GCC, G++, make, and other fundamental development tools. This is often the simplest way to get a complete development environment.- Debian/Ubuntu-based systems:
bash

sudo apt install build-essential
If you only need GCC and G++ specifically:
bash

sudo apt install gcc g++
- Fedora/RHEL-based systems:
bash

sudo dnf install @development-tools
Or specifically for GCC and G++:
bash

sudo dnf install gcc gcc-c++
- Arch Linux:
bash

sudo pacman -S base-devel
This metapackage typically includesgcc,make,binutils, and other essential tools.
- Debian/Ubuntu-based systems:
-
Verify the Installation: After the installation completes, open your terminal and type:
bash

gcc --version

g++ --version
You should see output similar to this:
gcc (Ubuntu 11.4.0-1ubuntu1~22.04) 11.4.0

Copyright (C) 2021 Free Software Foundation, Inc.

This is free software; see the source for copying conditions. There is NO

warranty; not even for MERCHANTABILITY or FITNESS FOR A PARTICULAR PURPOSE.
Installing GCC on macOS: The Role of Xcode Command Line Tools
On macOS, GCC is bundled as part of the Xcode Command Line Tools. You don’t need to install the full Xcode IDE, which is several gigabytes, unless you plan to develop iOS or macOS applications.

-
Open Terminal: Launch the Terminal application (found in
Applications/Utilities). -
Install Xcode Command Line Tools: Type the following command and press Enter:
xcode-select --install -
Follow Prompts: A software update dialog will appear, asking if you want to install the command line developer tools. Click “Install” and then “Agree” to the license terms. The download and installation process will begin. This might take some time depending on your internet connection.
-
Verify the Installation: Once the installation is complete, close and reopen your Terminal, then type:
bash

gcc --version

g++ --version
You should see output similar to:
Apple clang version 14.0.3 (clang-1403.0.22.14.1)

Target: x86_64-apple-darwin22.5.0

Thread model: posix

InstalledDir: /Applications/Xcode.app/Contents/Developer/Toolchains/XcodeDefault.xctoolchain/usr/bin
Note: On macOS,gccandg++are typically symbolic links toclang, Apple’s own C/C++/Objective-C compiler, which is largely compatible with GCC. For most development purposes, this will work perfectly. If you specifically need the actual GNU GCC (e.g., for certain Fortran compilers or very specific GNU extensions), you might need to install it via Homebrew (brew install gcc).
Verifying Your GCC Installation and First Compile
Once GCC is installed, it’s a good practice to compile a simple “Hello World!” program to ensure everything is working as expected. This also provides a basic understanding of the compilation workflow.
Confirming GCC Version via Command Line
As mentioned in the installation steps, running gcc --version and g++ --version from your command prompt or terminal is the quickest way to confirm the compiler’s presence and its version. A successful output indicates that your system can locate and execute the GCC binaries.
Compiling and Running Your First C Program (Hello World!)
This classic exercise validates your entire setup.
-
Create a Source File:
-
Open a plain text editor (Notepad on Windows, Gedit on Linux, TextEdit on macOS, or any code editor like VS Code).
-
Type or paste the following C code:
#include <stdio.h> int main() { printf("Hello, GCC World!n"); return 0; } -
Save the file as
hello.cin a convenient directory (e.g.,C:devon Windows,~/codeon Linux/macOS).
-
-
Navigate to the Directory:
- Open your command prompt (Windows) or terminal (Linux/macOS).
- Use the
cdcommand to navigate to the directory where you savedhello.c.- Example (Windows):
cd C:dev - Example (Linux/macOS):
cd ~/code
- Example (Windows):
-
Compile the Program:
-
Use the
gcccommand to compile your C source file:gcc hello.c -o hellogcc: Invokes the GNU C compiler.hello.c: Specifies the input source file.-o hello: Instructs the compiler to name the executable output filehello(orhello.exeon Windows automatically). If you omit-o, the default executable name isa.out(Linux/macOS) ora.exe(Windows).
-
If the compilation is successful, you will not see any output, and a new executable file named
hello(orhello.exe) will appear in your current directory. If there are errors, GCC will print diagnostic messages.
-
-
Run the Executable:
-
Execute your compiled program:
- On Windows:
.hello.exeor simplyhello - On Linux/macOS:
./hello
- On Windows:
-
You should see the output:
Hello, GCC World!
Congratulations! You have successfully installed GCC and compiled and run your first program. This small but significant achievement confirms your development environment is correctly set up.
-
Common Troubleshooting Tips and Best Practices
While the installation process is generally smooth, you might encounter issues. Here are some common problems and solutions.
Resolving PATH Environment Variable Issues
- Symptom: “gcc is not recognized as an internal or external command” (Windows) or “command not found” (Linux/macOS).
- Cause: The directory containing the
gccexecutable is not included in your system’s PATH environment variable, or your shell hasn’t refreshed the PATH. - Solution (Windows): Re-verify Step 3 under “Installing GCC on Windows.” Ensure the exact path to the
bindirectory (e.g.,C:MinGWmingw64bin) is added correctly to the systemPathvariable. Close and reopen your command prompt (or restart your machine) after making changes. - Solution (Linux/macOS): For Linux/macOS, if you installed via a package manager or
xcode-select, the PATH is usually set automatically. If you compiled GCC from source or installed it manually to a non-standard location, you might need to add it to your shell’s configuration file (.bashrc,.zshrc,.profile).
Dealing with Missing Dependencies and Installation Errors
- Symptom: Installation fails with errors about missing libraries, packages, or build tools.
- Cause: The package manager could not find required components, or there’s a network issue.
- Solution (Linux): Ensure your package lists are updated (
sudo apt update,sudo dnf check-update,sudo pacman -Sy) and try the installation again. Sometimes, specific development header files are in separate packages (e.g.,libc-devorglibc-devel). - Solution (Windows/MinGW-w64): Ensure your internet connection is stable during the download and extraction. If issues persist, try re-downloading the MinGW-w64 archive.
Keeping Your Compiler Up-to-Date
- Best Practice: Regularly update your GCC installation to benefit from bug fixes, performance improvements, and support for newer language standards.
- Windows (MinGW-w64): The most common way to update MinGW-w64 is to download a newer version and replace your existing installation (or extract it to a new directory and update your PATH). Some versions might include a
mingw-getupdater. - Linux: Simply run your distribution’s update command:
sudo apt upgrade(Debian/Ubuntu)sudo dnf upgrade(Fedora/RHEL)sudo pacman -Syu(Arch Linux)- These commands will typically update
build-essentialand its components, including GCC.
- macOS (Xcode Command Line Tools): Updates usually come through system software updates. You can check for updates in System Settings (or System Preferences on older macOS versions). Re-running
xcode-select --installmight also prompt for updates if available.
By carefully following these steps and keeping these troubleshooting tips in mind, you’ll be well-equipped to manage your GCC installation effectively.

Conclusion: Unlocking Your Coding Potential with GCC
Installing GCC is more than just adding a tool to your system; it’s about laying a foundational brick in your journey as a tech professional or enthusiast. With GCC successfully configured, you unlock the ability to compile a vast array of open-source projects, delve into system-level programming, develop your own applications, and learn the intricacies of how software truly works.
Whether you’re building a new command-line utility, contributing to a large-scale open-source project, or simply experimenting with C and C++, GCC stands as a powerful, reliable, and free compiler that empowers your creativity and productivity. Its widespread adoption across operating systems and hardware architectures makes it an essential skill in any developer’s arsenal.
Now that you have GCC up and running, the possibilities are endless. From here, you can explore build systems like Make, dive into debugging with GDB, or integrate GCC into your favorite IDE. The world of software development awaits your commands, and with GCC by your side, you’re ready to compile your ideas into reality. Embrace the power of the command line and let your coding journey begin!
aViewFromTheCave is a participant in the Amazon Services LLC Associates Program, an affiliate advertising program designed to provide a means for sites to earn advertising fees by advertising and linking to Amazon.com. Amazon, the Amazon logo, AmazonSupply, and the AmazonSupply logo are trademarks of Amazon.com, Inc. or its affiliates. As an Amazon Associate we earn affiliate commissions from qualifying purchases.