Minecraft, a cultural phenomenon in the gaming world, offers an unparalleled sandbox experience. Yet, for many seasoned players and creative minds, the vanilla game, while magnificent, eventually gives way to a yearning for more. This desire for expanded gameplay, new features, and innovative mechanics is where Minecraft Forge steps in. As a fundamental API (Application Programming Interface), Forge acts as a bridge, allowing the vibrant community of mod developers to create incredible content that integrates seamlessly with your game. Specifically, installing Forge for version 1.20.1 opens up the latest iteration of Minecraft to a burgeoning library of modifications, transforming your familiar blocky world into an entirely new adventure playground.
This comprehensive guide will walk you through every step of installing Forge 1.20.1, from initial preparations to integrating your first mods and troubleshooting common issues. Whether you’re a seasoned modding veteran or a curious newcomer, understanding this process is crucial for unlocking the full potential of your Minecraft experience. On a tech-centric platform like ours, focusing on digital security, productivity, and software tutorials, mastering tools like Forge isn’t just about gaming; it’s about empowering users to customize and optimize their digital environments, much like understanding the intricacies of new software or AI tools can enhance your daily workflow.
Understanding Minecraft Forge and Its Benefits
Before diving into the technicalities of installation, it’s essential to grasp what Minecraft Forge is and why it has become an indispensable tool for millions of players worldwide. This foundational understanding will help you appreciate its role and the enhancements it brings to your gaming setup.
What is Minecraft Forge?
At its core, Minecraft Forge is a free, open-source modification development API for Minecraft. In simpler terms, it’s a framework that simplifies the process of creating and installing mods. Without Forge, running multiple, complex mods together would be an almost impossible task, often leading to conflicts, crashes, and a broken game. Forge provides a standardized way for mods to interact with the game and with each other, minimizing compatibility issues and ensuring a smoother, more stable modded experience.
Developed by a dedicated community, Forge constantly updates to support new versions of Minecraft, ensuring that players can continue to enjoy their favorite modifications even as the base game evolves. It’s the backbone of virtually every major mod pack and countless individual mods, making it an essential utility for anyone serious about customizing their Minecraft adventure beyond the vanilla offerings. From intricate industrial machinery to fantastical creatures and new biomes, Forge makes it all possible by providing the necessary hooks and structures within the game’s code.
Why Install Forge 1.20.1?
The jump to Minecraft 1.20.1, often referred to as the “Trails & Tales” update, brought a host of exciting new features, including cherry blossom biomes, camels, archaeological digs, and armor trims. While these additions enhance the vanilla experience, Forge 1.20.1 allows you to combine these new elements with the creative power of the modding community. Installing Forge for this specific version offers several compelling advantages:
- Access to Latest Mods: As developers update their mods to be compatible with 1.20.1, having the corresponding Forge version ensures you can run them. This means you won’t miss out on the cutting-edge content and innovations from the modding scene.
- Enhanced Gameplay: Forge lets you transcend the boundaries of vanilla Minecraft. Want more challenging dungeons? New magic systems? Automated farming solutions? Forge provides the platform for these and thousands of other possibilities.
- Stability for Mod Packs: Many popular mod packs, which bundle dozens or even hundreds of mods together, are built upon Forge. Installing Forge 1.20.1 is the first step towards enjoying these curated, expansive experiences.
- Community Engagement: By diving into modded Minecraft, you become part of a larger community of enthusiasts who share tips, create content, and troubleshoot together. It’s a way to deepen your engagement with the game and discover new facets you never knew existed.
- Learning Opportunity: For those interested in the ‘Tech’ aspect, understanding how to install and manage mods can be an introduction to basic software management, file systems, and even command-line execution, skills valuable beyond gaming.
Essential Pre-Installation Steps
Before you even think about downloading Forge, there are a couple of crucial steps to ensure a smooth installation process. Skipping these can lead to frustrating errors or, worse, losing your progress. Treat these as the foundational “digital security” and “productivity” checks for your Minecraft environment.
Ensuring Java is Up-to-Date
Minecraft, and by extension, Minecraft Forge, relies heavily on Java to run. For Minecraft 1.17 and newer versions, including 1.20.1, you generally need Java 17 or later. The official Minecraft Launcher usually bundles its own version of Java, but for Forge and external .jar files (which the Forge installer is), having a correctly installed system-wide Java is paramount.
To check your Java version:
- Open your command prompt (Windows: search “cmd”; macOS: search “Terminal”).
- Type
java -versionand press Enter. - If you see “java version “17.x.x”” or higher, you’re likely good to go. If Java isn’t found, or the version is too old (e.g., Java 8 or 16), you’ll need to install or update it.
How to Install/Update Java:
- Navigate to the official Oracle Java SE Development Kit (JDK) website or Adoptium (formerly AdoptOpenJDK), which provides free, open-source builds. For Minecraft 1.20.1, look for JDK 17 or JDK 21.
- Download the installer appropriate for your operating system (Windows x64, macOS ARM/x64, Linux).
- Run the installer, following the on-screen prompts. It’s usually a straightforward “Next, Next, Finish” process.
- After installation, restart your computer to ensure the changes are applied to your system’s PATH environment variables.
Having the correct Java version isn’t just a requirement; it’s a performance and stability factor. An outdated Java can lead to crashes, slow loading times, and the inability to launch the Forge installer at all.
Backing Up Your Minecraft World
This step cannot be stressed enough. Whenever you’re making significant changes to your game’s files, especially involving mods, there’s a small but real risk of corruption. Backing up your saves ensures that even if something goes wrong, your cherished creations and progress remain safe. This is a fundamental principle of digital security and data management, applicable across all software.
How to Back Up Your Minecraft Worlds:
- Open the Minecraft Launcher.
- Go to “Installations.”
- Hover over your 1.20.1 installation (or any installation), click the folder icon that appears on the right. This will open your
.minecraftfolder. - Inside the
.minecraftfolder, locate thesavesfolder. This folder contains all your Minecraft worlds. - Copy the entire
savesfolder to a safe location outside your.minecraftdirectory, such as your desktop, a dedicated backup folder, or an external drive. You might also consider backing up yourresourcepacksandscreenshotsfolders if they contain valuable content.
This simple act takes only a few minutes but can save you hours of heartache. Think of it as investing in peace of mind – a priceless return on your time.
Step-by-Step Guide to Installing Forge 1.20.1
With your preparations complete, you’re now ready to tackle the main event: installing Forge itself. Follow these steps carefully to ensure a successful setup.
Downloading the Forge Installer
The first official step is to obtain the Forge installer from its legitimate source. Relying on unofficial sites can expose you to malware or outdated versions, compromising your digital security.
- Go to the Official Forge Website: Open your web browser and navigate to
files.minecraftforge.net. This is the only trusted source for Forge downloads. - Select Minecraft Version: On the left-hand side of the website, you’ll see a list of Minecraft versions. Click on
1.20.1. - Choose the Recommended Download: You will typically see two options: “Latest” and “Recommended.” Always go for the “Recommended” version. The “Latest” is the most recent build and may still have bugs, while “Recommended” has undergone more thorough testing and is generally more stable. Under the “Download Recommended” section, click on the “Installer” button.
- Navigate AdFoc.us (Warning): The Forge website uses
AdFoc.usfor downloads, which involves a brief advertisement page. DO NOT click on any ads or buttons on this page. Wait for 5-6 seconds for a “SKIP” button to appear in the top right corner. Click this “SKIP” button. - Save the Installer: Your browser will then prompt you to download a
.jarfile (e.g.,forge-1.20.1-47.2.20-installer.jar). Save this file to an easily accessible location, such as your Downloads folder or desktop.
Running the Forge Installer
Once you have the installer file, running it is usually a simple process.
- Locate the Installer: Go to the folder where you saved the Forge installer
.jarfile. - Double-Click the File: Simply double-click on the
forge-1.20.1-installer.jarfile. If Java is correctly installed, this should open the Forge Installer window.- Troubleshooting: If the file doesn’t open, or opens with an archiving program (like WinRAR or 7-Zip), it means your system isn’t associating
.jarfiles with Java.- Solution A: Right-click the
.jarfile, select “Open With,” then “Choose another app.” Browse to find your Java executable (usually located atC:Program FilesJavajdk-17.x.xbinjavaw.exeorC:Program FilesJavajre1.8.xbinjavaw.exefor older Java versions, but for 1.20.1 you should target Java 17+). Select it and check “Always use this app to open .jar files.” - Solution B (Command Line): Open Command Prompt in the directory where the installer is located (Shift + Right-click -> “Open PowerShell window here” or “Open command window here”). Type
java -jar forge-1.20.1-installer.jarand press Enter.
- Solution A: Right-click the
- Troubleshooting: If the file doesn’t open, or opens with an archiving program (like WinRAR or 7-Zip), it means your system isn’t associating
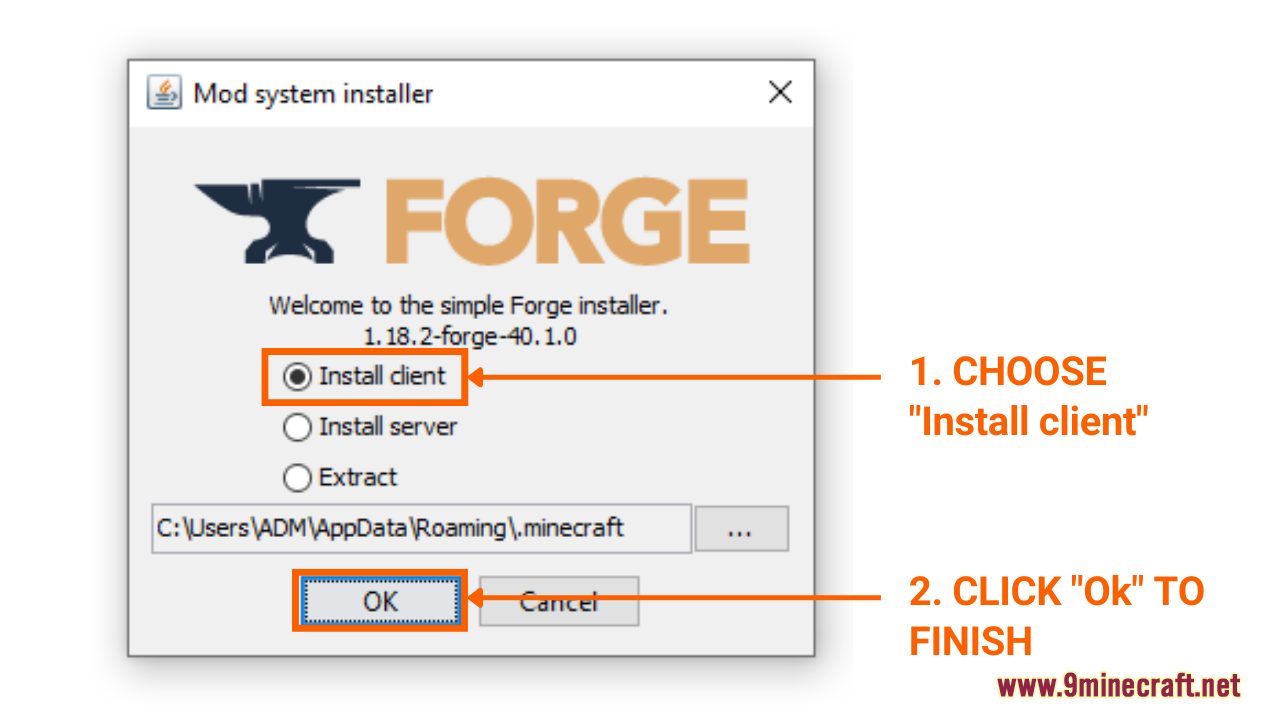
- Select “Install client”: In the Forge Installer window, ensure that “Install client” is selected. This is the default and correct option for installing Forge for single-player and client-side multiplayer.
- Verify Installation Path: The “Install client” option should automatically detect your default Minecraft
.minecraftdirectory. Double-check that this path is correct. If you have multiple Minecraft installations or a custom setup, you might need to click the “…” button to navigate to the correct.minecraftfolder. - Click “OK”: Once satisfied, click the “OK” button. The installer will then proceed to download necessary files and integrate Forge into your Minecraft setup. This process may take a few moments depending on your internet speed.
- Confirmation: A pop-up message will confirm that Forge has been successfully installed. Click “OK” to close it.
Verifying the Installation
After the installer reports success, it’s time to confirm that Forge is indeed ready to go within your Minecraft Launcher.
- Open Minecraft Launcher: Launch the official Minecraft Launcher.
- Check Profiles/Installations: Look for the profile selection dropdown menu, usually located on the bottom left next to the “PLAY” button. You should now see a new profile named “Forge” (or similar, like “forge-1.20.1”).
- Select the Forge Profile: Click on this “Forge” profile to select it.
- Click “Play”: With the Forge profile selected, click the “PLAY” button. The launcher might display a warning about playing modded versions; confirm that you understand the risks and proceed.
- Observe Game Loading: Minecraft should now launch. During the loading screens, you’ll typically see “Mojang Studios” and then a screen indicating that Forge is loading, often with a list of mods (even if none are installed yet, Forge itself counts as a modification).
- Main Menu Confirmation: Once the game reaches the main menu, look for subtle indicators that Forge is active. This is usually text in the bottom-left corner of the screen, stating “Minecraft 1.20.1” and “Forge” along with its version number. If you see this, congratulations! Forge is successfully installed.
Integrating Mods with Forge
Now that Forge is up and running, the real fun begins: adding mods! This is where you truly start to customize your Minecraft experience.
Finding Compatible Mods
The key to a stable modded game is compatibility. Not all mods work with all Minecraft versions or even with each other.
- Modding Websites: Reputable modding websites like CurseForge (
curseforge.com) are the best places to find mods. These sites often categorize mods by Minecraft version, making it easy to find what you need. - Filter by Version: When browsing for mods, always filter or search specifically for “1.20.1”. Trying to run a mod designed for 1.19.x or 1.20.x on 1.20.1 will almost certainly lead to crashes.
- Read Descriptions and Requirements: Before downloading, carefully read the mod’s description. Check for any specific requirements (e.g., other “dependency” mods like “JEI” or “CoFH Core”) and ensure they are also available for 1.20.1. Also, confirm the mod is designed for Forge, not Fabric or NeoForge, as these are different mod loaders.
- Download from Official Sources: Always download mods directly from the mod developer’s official CurseForge page or their direct website link provided there. Avoid obscure or untrusted sites to protect against malicious downloads.
Adding Mods to Your Game
Once you’ve downloaded compatible .jar mod files, integrating them is straightforward.
- Access the
modsFolder:- From Minecraft Launcher: Open the Minecraft Launcher, go to “Installations,” hover over your “Forge 1.20.1” profile, and click the folder icon. This opens your
.minecraftfolder. - Manual Navigation: Alternatively, you can navigate directly:
- Windows: Press
Win + R, type%appdata%and press Enter. Then open the.minecraftfolder. - macOS: Open Finder, press
Cmd + Shift + G, type~/Library/Application Support/minecraftand press Enter.
- Windows: Press
- From Minecraft Launcher: Open the Minecraft Launcher, go to “Installations,” hover over your “Forge 1.20.1” profile, and click the folder icon. This opens your
- Locate/Create
modsFolder: Inside your.minecraftfolder, you should find a folder namedmods. If it doesn’t exist (which is rare after running Forge for the first time), simply create a new folder and name itmods(all lowercase). - Place Mod Files: Drag and drop (or copy and paste) the downloaded mod
.jarfiles into thismodsfolder. Do not extract the.jarfiles; place them as-is. - Launch Minecraft with Forge: Close the
.minecraftfolder, open your Minecraft Launcher, select the “Forge 1.20.1” profile, and click “Play.” - Verify Mods In-Game: Once Minecraft loads to the main menu, you should often see a “Mods” button (usually between “Singleplayer” and “Multiplayer”). Click it to see a list of all loaded mods. If your newly added mods appear here, they are successfully installed and active!
Troubleshooting Common Installation Issues
Even with the best instructions, issues can arise. Here are solutions to some common problems you might encounter during or after installing Forge.
Forge Installer Not Opening
- No Java: The most common reason. Ensure Java 17 (or newer compatible version) is installed correctly and that your system’s PATH variable is updated. Restart your computer after installing Java.
- Wrong File Association: Your
.jarfiles might be associated with an archiving program (like WinRAR). Right-click the installer, choose “Open With,” select “Java Platform SE binary” or “javaw.exe.” Check the “Always use this app” box. - Corrupted Download: The installer file might be corrupted. Delete it and download a fresh copy from
files.minecraftforge.net. - Command Line: As mentioned earlier, try running it via command prompt:
java -jar forge-1.20.1-installer.jar(make sure you are in the directory where the installer is located).
Game Crashing on Startup
This is often indicated by an error message, usually beginning with Exit Code: 1 or Exit Code: -1.
- Incompatible Mods: This is the most frequent cause. If your game crashes after adding mods, remove them from the
modsfolder (temporarily move them to another folder) and try launching Forge again. If it launches, reintroduce mods one by one to identify the culprit. Check that all mods are for Minecraft 1.20.1 and Forge. - Outdated/Incorrect Java: While Forge itself installed, an incorrect Java version can still cause issues with mod loading. Verify your system Java version is 17+.
- Corrupted Forge Installation: If the game crashes even with no mods in the
modsfolder, your Forge installation might be corrupted.- Go to the “Installations” tab in the Minecraft Launcher.
- Hover over the “Forge 1.20.1” profile, click the three dots, and select “Delete.”
- Delete the
modsfolder within your.minecraftdirectory. - Repeat the Forge installation process from scratch.
- Allocate More RAM: Some mod packs or heavily modded instances require more RAM than the default allocation.
- In the Minecraft Launcher, go to “Installations.”
- Hover over your Forge profile, click the three dots, then “Edit.”
- Click “More Options.”
- Change the JVM arguments. Find
-Xmx2G(where2Gis 2 gigabytes). Increase this to-Xmx4Gor-Xmx6G(4GB or 6GB), but never exceed half of your total system RAM. Save changes.
- Check Logs: The crash report (usually found in the
crash-reportsfolder within.minecraft) often provides clues about what went wrong. Search for the error messages online or consult modding communities for help.
Mods Not Appearing In-Game
- Wrong
modsFolder: Ensure you placed the mod.jarfiles directly into themodsfolder located within your main.minecraftdirectory, not inside other folders withinmods. - Incorrect Minecraft/Forge Version: Double-check that the mods you downloaded are specifically for Minecraft 1.20.1 and compatible with Forge. Mods for Fabric or other loaders will not work.
- Dependency Issues: Some mods require other “core” or “library” mods to function. If a mod’s description lists dependencies, make sure you’ve downloaded and installed those as well, ensuring they are also 1.20.1 Forge versions.
- Unextracted Files: Mod files should remain as
.jararchives. Do not extract them. - Game Not Relaunched: After adding or removing mods, you must always close Minecraft and relaunch it through the Forge profile for changes to take effect.

Maximizing Your Modded Minecraft Experience
Installing Forge 1.20.1 is just the first step on a journey into an infinitely expandable Minecraft universe. To truly maximize your modded experience, consider these additional tips:
- Start Small: Don’t overload your game with dozens of mods right away. Begin with a few essential quality-of-life mods or a small thematic pack. This makes troubleshooting much easier if issues arise.
- Organize Your Mods: As your mod library grows, consider creating subfolders outside your
modsfolder to organize downloaded.jarfiles by category or mod pack. Only move the ones you want to use into the activemodsfolder. - Keep Forge Updated: Periodically check the official Forge website for updates. While not as frequent as mod updates, newer Forge versions can bring performance improvements or better mod compatibility.
- Learn About Mod Packs: Explore pre-made mod packs on platforms like CurseForge. These are curated collections of compatible mods, often with custom configurations, designed to offer a cohesive new experience. They can be installed easily through launchers like the CurseForge App or MultiMC.
- Resource Packs and Shaders: Forge also enhances compatibility with resource packs (texture packs) and shaders. Experiment with these to dramatically change the visual aesthetic of your game, pushing graphical boundaries and tailoring the look to your preference.
- Join Modding Communities: Websites like the Minecraft Forum, Reddit’s r/feedthebeast, and various Discord servers are excellent resources for discovering new mods, getting advice, and troubleshooting issues with experienced users.
- Consider Performance: Modded Minecraft can be resource-intensive. Invest in a good CPU, ample RAM, and a capable GPU for the best performance. Tools like OptiFine (often compatible with Forge) can help optimize your game for better frame rates.
By following this guide, you’ve equipped yourself with the knowledge and tools to transform your Minecraft 1.20.1 into a personalized masterpiece. From enhancing gameplay mechanics to completely overhauling the world, Forge empowers you to craft an experience that is truly your own. Happy modding!
aViewFromTheCave is a participant in the Amazon Services LLC Associates Program, an affiliate advertising program designed to provide a means for sites to earn advertising fees by advertising and linking to Amazon.com. Amazon, the Amazon logo, AmazonSupply, and the AmazonSupply logo are trademarks of Amazon.com, Inc. or its affiliates. As an Amazon Associate we earn affiliate commissions from qualifying purchases.