In the digital age, fonts are more than just characters on a screen; they are the silent communicators of style, brand identity, and readability. Whether you’re a graphic designer crafting a new logo, a content creator sprucing up your video captions, a student looking to make your presentations pop, or simply someone who appreciates aesthetic typography, knowing how to manage and install fonts on your Windows operating system is an essential skill. A well-chosen font can transform a plain document into a captivating visual, inject personality into a brand, or enhance the user experience of an application.

This comprehensive guide will walk you through various methods of installing fonts on Windows, from the simplest drag-and-drop techniques to using the modern Settings app and even leveraging the Microsoft Store. We’ll also delve into where to find high-quality fonts, how to manage your growing collection, and troubleshoot common issues, ensuring your digital canvas is always equipped with the perfect typeface. Given the Globalizethis website’s focus on Tech, Brand, and Money, mastering font management directly impacts your digital productivity, strengthens your personal or corporate brand identity, and can even contribute to professional success in design and content creation.
The Foundation of Visual Communication: Understanding Font Types and Why They Matter
Before diving into the “how-to,” it’s beneficial to understand the different types of font files you’ll commonly encounter and why their installation is crucial for various applications. Fonts are the backbone of visual communication, influencing everything from readability to emotional impact. For businesses and personal brands, consistent font usage across all platforms reinforces identity and professionalism, which is a core tenet of effective branding.
Demystifying Font File Formats: TTF, OTF, and Beyond
When you download a font, you’ll typically find it in one of a few common formats:
- TrueType Font (TTF): Developed by Apple and Microsoft, TTF is one of the oldest and most widely supported font formats. It contains both the screen and printer font data in a single file, making it highly versatile for both display and print. Most free fonts you find online will be in TTF format.
- OpenType Font (OTF): A successor to TTF, OpenType was developed by Microsoft and Adobe. OTF fonts offer enhanced typographic features, including ligatures, alternate characters (swashes), small caps, and old-style figures, making them a favorite among professional designers. They can also contain more characters than TTF, supporting a wider range of languages.
- Web Open Font Format (WOFF/WOFF2): While you might download these, WOFF and WOFF2 are primarily optimized for web use. They are essentially compressed versions of TTF or OTF files, designed to load faster on websites. You typically won’t install these directly into your operating system for general application use, but it’s good to be aware of them in the context of digital branding and web design.
The choice of font type matters not just for aesthetics but also for performance and functionality within different software. Ensuring your system has the correct fonts installed guarantees that your documents, presentations, and creative projects render correctly across various applications, maintaining brand consistency and design integrity. This attention to detail can directly impact how your brand is perceived, linking back to the “Brand” aspect of our website’s themes.
The Importance of Fonts in Professional and Personal Contexts
For anyone involved in content creation, marketing, or even just daily office tasks, fonts play a pivotal role:
- Branding & Identity: A consistent typeface across your website, marketing materials, and internal documents reinforces your brand’s personality and professionalism. Think about major brands – their logos and marketing often use custom or distinctive fonts that become instantly recognizable.
- Readability & User Experience: The right font enhances readability, making information easier to digest. This is crucial for reports, presentations, and any form of digital communication. Poor font choices can lead to eye strain and frustrate your audience.
- Creativity & Expression: Fonts empower designers and individuals to express creativity, set a mood, or evoke specific emotions. A playful font for a party invitation versus a serious serif for a legal document demonstrates the versatility and impact of typography.
- Productivity: Having readily available fonts that match your project requirements saves time. Instead of searching for alternatives or converting files, you can directly access the fonts you need, streamlining your workflow.
Mastering font installation is a foundational tech skill that underpins numerous creative and professional endeavors, directly contributing to productivity and the effectiveness of your brand communication.
Multiple Pathways to Typography: Installing Fonts on Windows
Windows offers several intuitive methods for installing fonts, catering to different user preferences and scenarios. From a quick drag-and-drop to using the system’s modern settings, here’s how to enrich your font library.
Method 1: The Classic Install – Using Windows Explorer (Recommended for Single/Few Fonts)
This is arguably the quickest and most straightforward method, ideal when you’re installing a handful of fonts.
- Download Your Fonts: First, obtain the font files (usually
.ttfor.otf) you wish to install. They often come compressed in a.zipfile. - Extract the Files: If the fonts are in a
.zipfile, right-click the file and select “Extract All…” Choose a destination (e.g., your Downloads folder or a temporary folder) and click “Extract.” You will now see the individual.ttfor.otffont files. - Preview and Install (Option A: Right-Click):
- Navigate to the folder containing your extracted font files.
- Right-click on the individual font file you want to install.
- From the context menu, select “Install.”
- If the font has multiple weights (e.g., Light, Regular, Bold), you’ll need to install each one individually using this method.
- Preview and Install (Option B: Double-Click):
- Double-click on the font file. This will open a font preview window, showing you what the font looks like.
- In the preview window, click the “Install” button located at the top.
- Admin Privileges: Windows might prompt you for administrator privileges, especially if you’re installing a font that requires system-wide access. Click “Yes” to proceed.
- “Install for all users”: Some fonts, particularly in newer Windows versions, might offer an “Install for all users” option when right-clicking. Selecting this is generally recommended to ensure all user accounts on your PC can access the font, which is beneficial in a shared work environment for consistent branding.
Once installed, the font will be available in most applications (Word, Photoshop, browsers, etc.). You may need to restart the application or, in some rare cases, your computer, for the font to appear.
Method 2: The Modern Approach – Using Windows Settings (Windows 10/11)
For users who prefer the modern Windows interface or need to install multiple fonts more systematically, the Settings app provides an elegant solution.
- Open Settings: Click the “Start” button and select the gear icon to open “Settings,” or press
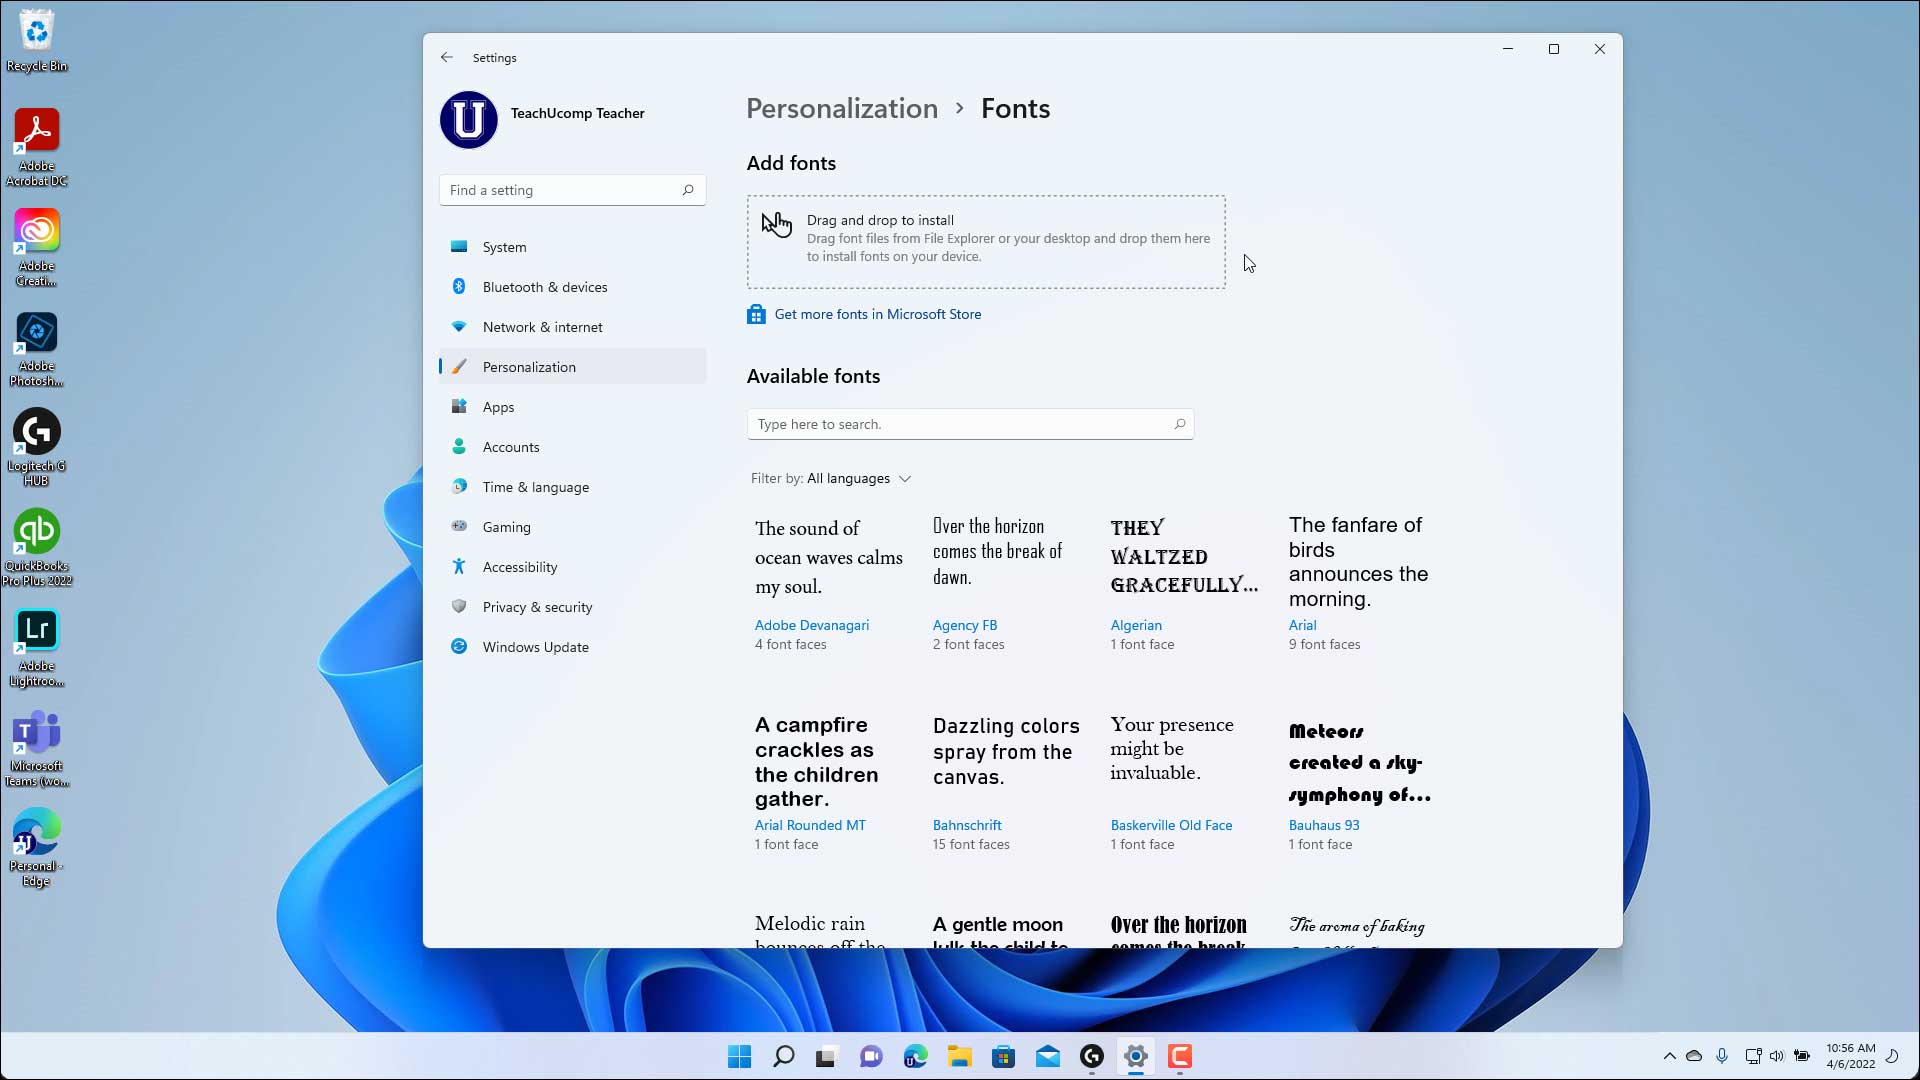
Windows Key + I. - Navigate to Personalization: In the Settings window, click on “Personalization.”
- Select Fonts: In the left-hand pane, click on “Fonts.”
- Drag and Drop to Install: You will see a section titled “Add fonts.” Simply drag your extracted
.ttfor.otffont files from File Explorer directly into this “Drag and drop to install” area. - Automatic Installation: Windows will automatically detect and install the fonts. You’ll see a progress indicator, and once complete, the fonts will be listed in your font library.
- Manual Installation (Alternative): If drag-and-drop isn’t convenient, you can click on “Browse” in the Fonts section of Settings to navigate to your font files and select them for installation.
This method is particularly efficient for installing several fonts at once and provides a centralized place to view and manage your font collection, contributing to better digital organization and productivity.
Method 3: Expanding Your Library – Using the Microsoft Store
The Microsoft Store offers a curated selection of fonts, including some premium options, font packs, and fonts optimized for specific languages or creative suites. This method ensures compatibility and often includes licensing benefits.
- Open Microsoft Store: Click the “Start” button and type “Microsoft Store,” then select the app.
- Search for Fonts: In the search bar at the top of the Store window, type “fonts” and press Enter.
- Browse and Select: You’ll see a variety of free and paid font packages. Browse through the options, read descriptions, and check reviews.
- Get/Buy: Once you find a font or font pack you like, click “Get” (for free fonts) or “Buy” (for paid fonts).
- Install: After the download is complete, the fonts will be automatically installed and integrated into your Windows system.
- Access in Settings: These fonts will also appear in the “Fonts” section of your Windows Settings, just like any other installed font.
Using the Microsoft Store for fonts is a reliable way to ensure you’re getting legitimate, often licensed, font files, which is crucial for professional branding and avoiding copyright issues, linking directly to the “Brand” and “Money” aspects of digital asset management.
Method 4: For the Tech-Savvy – Command Prompt/PowerShell (Bulk Installation)
While less common for individual users, IT professionals or power users might find command-line methods useful for automating font installations, especially in environments where many machines need the same set of fonts. This advanced technique emphasizes the “Tech” aspect of font management.
This method typically involves copying font files to the C:WindowsFonts directory and, sometimes, registering them with the system.
- Prepare Fonts: Place all the
.ttfor.otffiles you want to install into a single folder (e.g.,C:MyNewFonts). - Open Command Prompt/PowerShell as Administrator: Search for “cmd” or “powershell” in the Start menu, right-click, and select “Run as administrator.”
- Copy Files: Use the
copycommand to transfer your font files to the Windows Fonts directory.copy C:MyNewFonts*.ttf C:WindowsFontscopy C:MyNewFonts*.otf C:WindowsFonts- You might need to adjust paths and file extensions.
- Registering (Optional, often automatic with copy): For some older applications or specific scenarios, registering fonts through the registry might be required. However, simply copying to
C:WindowsFontsis usually sufficient for modern Windows versions to automatically register them.
This method is powerful for large-scale deployments or scripting, making font management more efficient for system administrators and tech enthusiasts.
Beyond Installation: Managing and Optimizing Your Font Library
Installing fonts is only the first step. A well-maintained font library is crucial for productivity, system performance, and ensuring your brand’s visual consistency. Neglecting font management can lead to system slowdowns or difficulty finding the right typeface when you need it most.
Previewing and Finding Fonts
Windows provides built-in tools to help you visualize your fonts:
- Windows Settings > Personalization > Fonts: This section lists all your installed fonts. Clicking on a font name will open a detailed preview, showing different sizes and styles. You can also type custom text to see how it looks. This is an excellent way to audit your collection and remember what you have.
- Double-Clicking a Font File: As mentioned earlier, double-clicking an
.ttfor.otffile (even if not installed) will open a preview window.
For finding new fonts:
- Google Fonts: An extensive library of free, open-source fonts. Excellent for web projects and general design.
- DaFont, Font Squirrel, 1001 Free Fonts: Popular repositories for free fonts, often including quirky and unique styles. Always check licensing for commercial use.
- Adobe Fonts (Creative Cloud Subscription): Offers a vast library of high-quality fonts included with Adobe Creative Cloud subscriptions, excellent for professional design workflows.
- MyFonts, Creative Market, Envato Elements: Platforms for purchasing premium fonts or subscribing to font libraries. These are often essential for high-end branding projects.
When sourcing fonts, pay close attention to licensing agreements. Free fonts often have restrictions on commercial use, while paid fonts come with specific usage terms. Understanding these terms is vital for businesses and professionals to avoid legal issues, directly relating to the “Money” and “Brand” aspects of digital asset management.
Uninstalling Fonts: Decluttering Your System
Just as important as installing fonts is knowing how to remove them. An excessive number of installed fonts can potentially slow down your system and make it harder to find the fonts you actually use.
- Through Windows Settings (Windows 10/11):
- Go to “Settings” > “Personalization” > “Fonts.”
- Scroll through the list of installed fonts.
- Click on the font you wish to uninstall.
- In the font’s detail view, click the “Uninstall” button.
- Confirm your choice when prompted.
- Through Control Panel (Older Windows versions or alternative):
- Open the “Control Panel” (search for it in the Start menu).
- Change “View by” to “Large icons” or “Small icons” for easier navigation.
- Click on “Fonts.” This will open the
C:WindowsFontsfolder. - Select the font(s) you want to remove.
- Click “Delete” from the menu bar at the top, or right-click the font and choose “Delete.”
Caution: Avoid uninstalling system fonts (e.g., Arial, Calibri, Segoe UI) as this can lead to display issues and application errors. Windows typically prevents the uninstallation of critical system fonts, but it’s good practice to be aware. Removing unused fonts is a good practice for digital hygiene and system optimization, aligning with productivity and tech maintenance.
Troubleshooting and Best Practices for Font Management
Even with straightforward installation processes, you might occasionally encounter issues. Here’s how to troubleshoot common problems and best practices to maintain a healthy font environment.
Common Troubleshooting Scenarios
- Font Not Appearing in Applications:
- Restart the Application: Most applications load fonts when they start. If you installed a font while an application (like Word or Photoshop) was open, you’ll need to close and reopen it for the new font to appear in its list.
- Restart Windows: In rare cases, especially after installing many fonts or if system-wide changes were made, a full Windows restart might be necessary.
- Check Installation Location: Ensure the font was installed correctly. Verify its presence in
C:WindowsFontsor through the Fonts section in Settings. - Font Cache Issue: Windows maintains a font cache. Sometimes, this cache can become corrupted. While there’s no direct “clear font cache” button for users, a system restart often refreshes it. More advanced users can look into services.msc to restart the “Windows Font Cache Service.”
- Corrupted Font File: If a font causes application crashes or displays strange characters, the file might be corrupted. Try redownloading the font from its source and reinstalling it.
- Permission Issues: If you’re unable to install a font, ensure you have administrative privileges on your computer. If you’re on a work or school computer, your IT department might have restricted font installations.
- Too Many Fonts Causing Slowdown: A large number of active fonts can consume system resources. If your applications or Windows itself feels sluggish, consider uninstalling rarely used fonts. Alternatively, for professional designers, font management software (e.g., FontBase, Suitcase Fusion) can activate/deactivate fonts on demand, preventing system overload.
Best Practices for a Seamless Font Experience
- Organize Your Downloads: Create a dedicated folder (e.g.,
C:Fonts_Downloaded) to store your downloaded font.zipand extracted.ttf/.otffiles. This makes it easy to reinstall them if needed or transfer them to another system, contributing to better digital asset management. - Check Licensing: Always verify the license for each font, especially if you plan to use it for commercial projects. Free fonts often have personal-use-only licenses. Misusing a font license can lead to legal complications and financial penalties, highlighting the “Money” and “Brand” implications.
- Install Only What You Need: Resist the urge to install every font you download. A cluttered font library can be overwhelming and impact system performance. Only install fonts that you genuinely intend to use regularly.
- Keep Backups: If you’ve invested in premium fonts, ensure you have backups of the original font files, separate from your installed system fonts.
- Use Font Management Software (for Professionals): For designers and power users with extensive font collections, dedicated font managers offer advanced features like font activation/deactivation, tagging, and conflict resolution, significantly enhancing productivity and system stability.
- Maintain Consistency: For brand identity, establish a core set of fonts and stick to them across all your materials. This consistency builds recognition and trust, a cornerstone of effective “Brand” strategy.

Conclusion: Empowering Your Digital Creations
Installing fonts on Windows is a fundamental skill that unlocks a world of creative possibilities. From personalizing your documents to crafting professional-grade designs, the right typeface can elevate your work and communicate your message more effectively. By understanding the different installation methods, knowing where to find quality fonts, and adopting best practices for management, you can build a robust and efficient font library that serves your needs.
Whether you’re leveraging the classic Windows Explorer method, the streamlined Settings app, or exploring curated collections in the Microsoft Store, Windows provides flexible options for every user. Remember the importance of licensing, the benefits of a tidy font collection, and the power of consistent typography in building a strong personal or corporate brand. In an increasingly visual world, mastering your font game is not just about aesthetics; it’s about enhancing productivity, strengthening your brand’s presence, and making a lasting visual impact. So go ahead, explore, experiment, and let your typography speak volumes.
aViewFromTheCave is a participant in the Amazon Services LLC Associates Program, an affiliate advertising program designed to provide a means for sites to earn advertising fees by advertising and linking to Amazon.com. Amazon, the Amazon logo, AmazonSupply, and the AmazonSupply logo are trademarks of Amazon.com, Inc. or its affiliates. As an Amazon Associate we earn affiliate commissions from qualifying purchases.