Windows 11, much like its predecessors, offers a highly customizable user experience, and a significant part of that personalization lies in the fonts you use. Whether you’re a graphic designer aiming for a specific aesthetic, a writer seeking a more readable typeface, or simply someone who enjoys a touch of visual flair in their documents and applications, knowing how to install and manage fonts on your Windows 11 system is an essential skill. This comprehensive guide will walk you through the entire process, from acquiring new fonts to seamlessly integrating them into your workflow.
The ability to change fonts isn’t just about aesthetics; it can profoundly impact the readability and professional presentation of your work. For businesses, font choices are intrinsically linked to brand identity. A consistent and appropriate typeface across all marketing materials, websites, and internal documents reinforces brand recognition and conveys a specific message – be it modern, classic, playful, or sophisticated. For individual creators, unique fonts can help their content stand out and establish a distinct personal brand. In the realm of technology, many applications, especially creative suites like Adobe Photoshop, Illustrator, or even Microsoft Word and PowerPoint, rely heavily on system fonts for their functionality and the visual output of your projects. Therefore, expanding your font library can unlock new creative possibilities and enhance the overall quality of your digital output.
This guide will delve into the various methods of installing fonts, covering both user-friendly drag-and-drop techniques and more traditional approaches. We’ll also touch upon managing your font library, ensuring you can easily find and utilize the fonts you’ve installed.
Where to Find and Download Fonts
Before you can install new fonts, you need to find them. Fortunately, the internet is a treasure trove of typographic resources, offering both free and premium font options. Understanding where to look and what to consider when choosing fonts is the first step in expanding your creative toolkit.
Free Font Resources
For those on a budget or exploring new styles, numerous websites offer high-quality fonts for free. These are often excellent for personal projects, experimentation, or even commercial use, provided you adhere to the licensing terms.
- Google Fonts: This is arguably the most popular and accessible platform for free fonts. Google Fonts boasts an extensive library of open-source fonts that are designed to be web-friendly and highly versatile. You can browse by category, popularity, or even by similarity to existing fonts. The beauty of Google Fonts is their simplicity: you can download individual font families or select multiple fonts and download them as a zip file. The licensing is typically very permissive, allowing for commercial and personal use without attribution.
- Font Squirrel: Font Squirrel is another fantastic resource for free, commercially-safe fonts. They curate a collection of high-quality fonts that have been meticulously checked for their licensing. Font Squirrel often provides web font kits, which are particularly useful if you’re a web developer looking to implement custom typography on a website.
- DaFont: While DaFont offers a vast selection of fonts, it’s crucial to pay close attention to the licensing information for each font. Many fonts on DaFont are free for personal use only, and using them commercially without purchasing a license can lead to legal issues. However, it’s an excellent place to discover unique and creative font styles for personal projects.
- 1001 Free Fonts: Similar to DaFont, 1001 Free Fonts offers a massive collection of free fonts. Again, always verify the licensing terms before using any font for commercial purposes.
- Microsoft Font Download: Microsoft itself offers a selection of free fonts that you can download directly from their website. These are often high-quality and professionally designed, ensuring good compatibility with Windows.
Premium Font Marketplaces
For professional designers, businesses requiring unique brand fonts, or those who need specialized font features (like extensive character sets, multiple weights, or OpenType features), premium font marketplaces are the way to go.
- MyFonts: This is one of the largest and most reputable marketplaces for both free and commercial fonts. You’ll find an incredible diversity of styles from foundries and independent designers worldwide. Prices vary significantly, and licensing is clearly outlined for each font.
- Fontspring: Fontspring is known for its excellent customer service and a curated selection of fonts, often focusing on quality over sheer quantity. They offer a flexible licensing model that is generally quite straightforward for various uses.
- Creative Market: While Creative Market offers a wide array of digital assets, their font selection is robust and often features unique, hand-drawn, or stylized fonts that can help your brand or projects stand out. Many designers offer bundles or discounted rates here.
- Adobe Fonts (formerly Typekit): If you subscribe to Adobe Creative Cloud, you get access to Adobe Fonts, a curated library of thousands of high-quality fonts that can be activated and used across your desktop applications and websites. This is an incredibly convenient option for designers already within the Adobe ecosystem.
When downloading fonts, especially from free resources, it’s always a good practice to download them from official sources or reputable websites to avoid malware or viruses. Most fonts are distributed in .zip or .ttf (TrueType Font) and .otf (OpenType Font) formats. .zip files will need to be extracted to access the font files.
Installing Fonts on Windows 11: The Easy Methods
Windows 11 makes installing new fonts remarkably simple, offering a few user-friendly approaches. The primary goal is to get the font files into the correct system directory so that all applications can recognize and use them.
Method 1: Drag and Drop (The Quickest Way)
This is the most intuitive and fastest method for installing fonts.
- Locate Your Font Files: Navigate to the folder where you’ve downloaded and extracted your font files. You should see files with extensions like
.ttf,.otf, or.fon. - Open the Fonts Folder: Open File Explorer and navigate to
C:WindowsFonts. This is the default system directory for all installed fonts. - Drag and Drop: Select the font files you wish to install (you can select multiple at once) and drag them directly into the
C:WindowsFontsfolder. - Automatic Installation: Windows 11 will automatically detect the font files and begin the installation process. You’ll see a progress bar indicating that the fonts are being installed. Once complete, the new fonts will appear in your application’s font lists.
Tip: You can also select font files, right-click, and choose “Install” for a single font. For multiple fonts, this drag-and-drop method into the Fonts folder is more efficient.
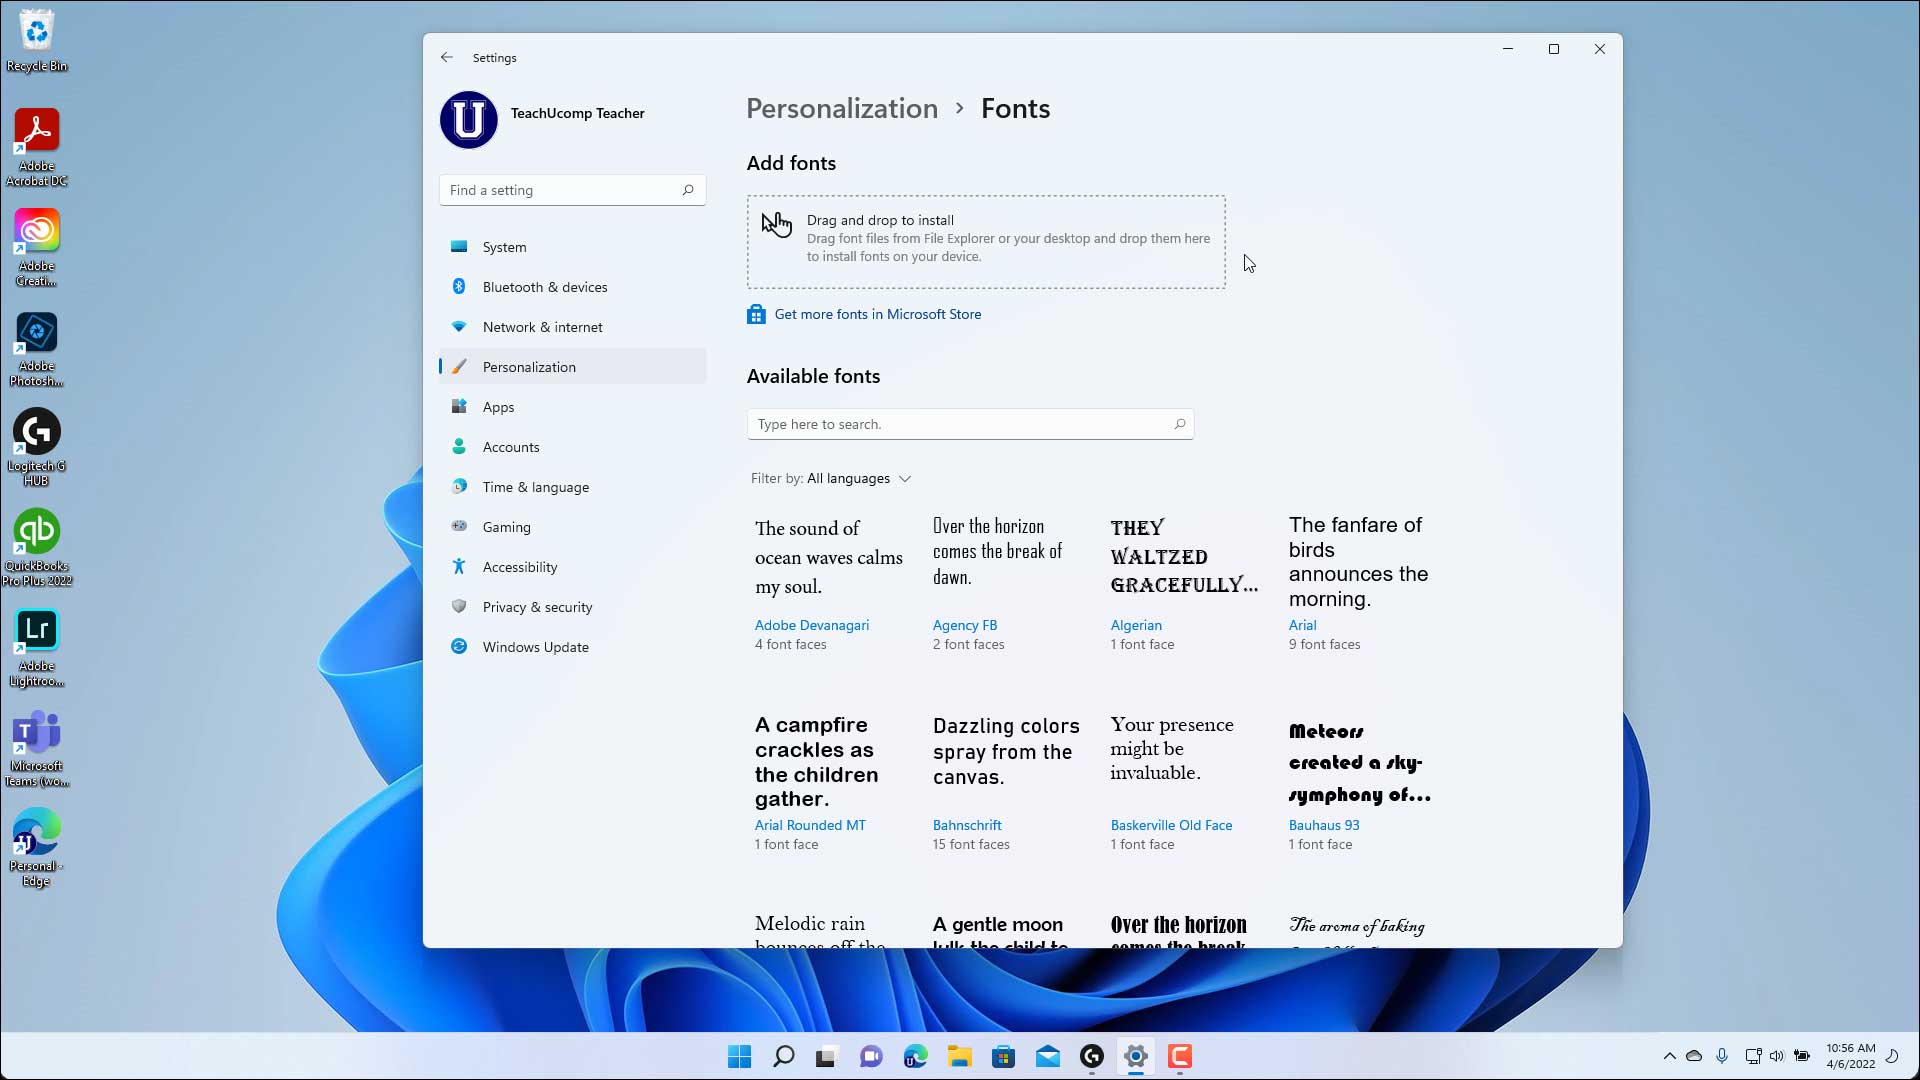
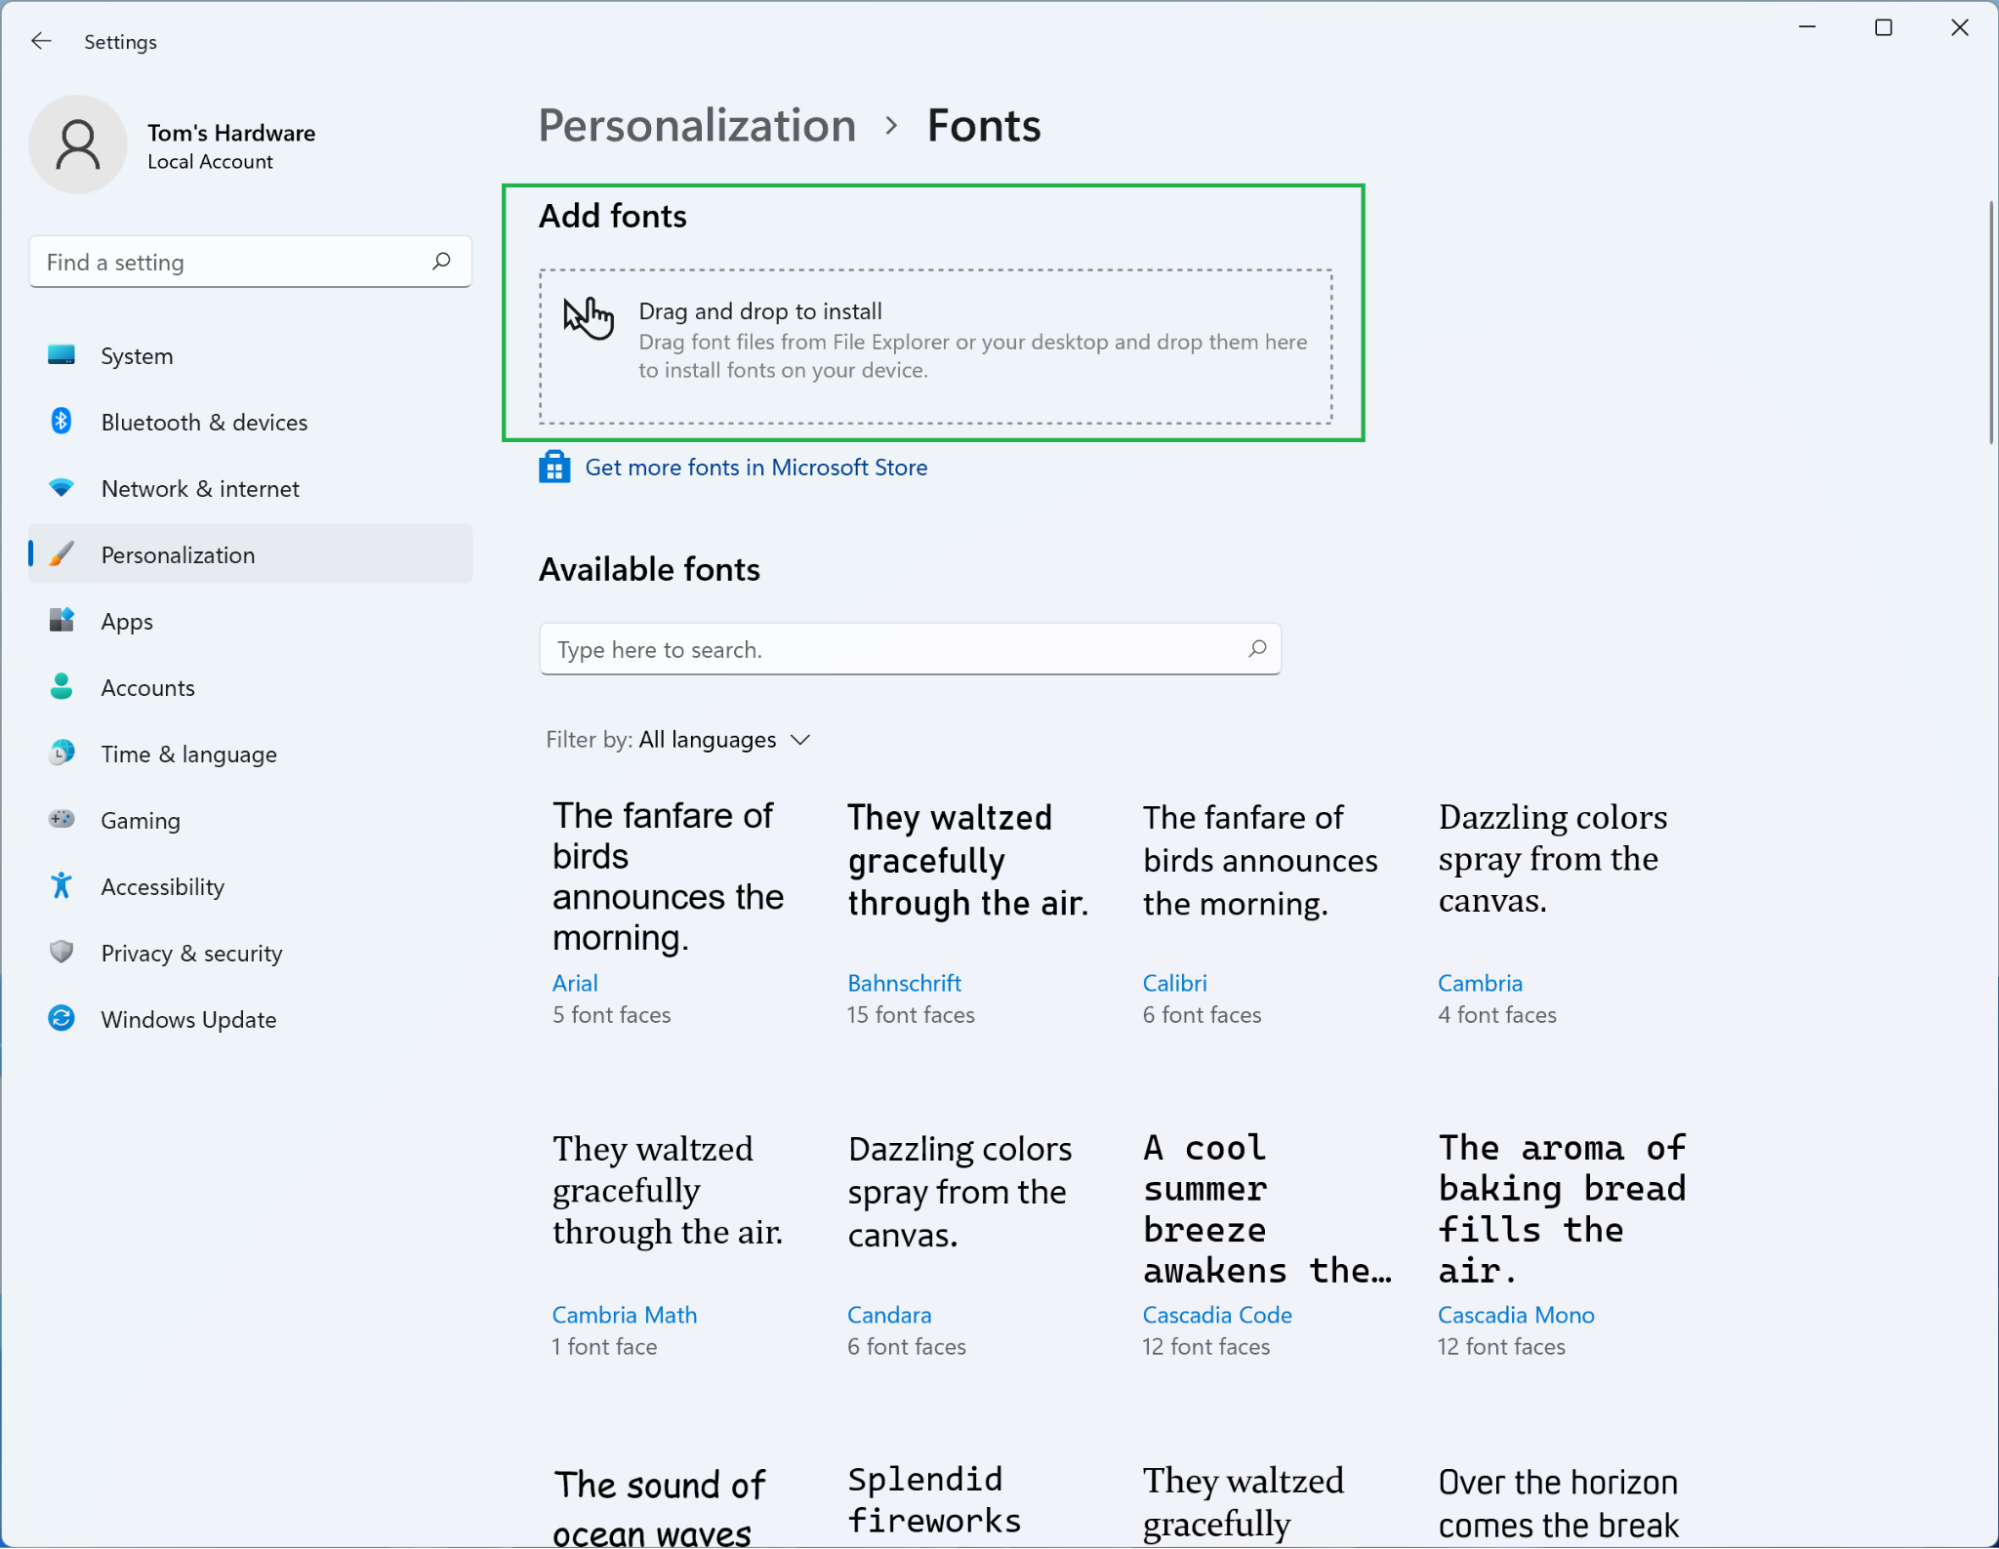
Method 2: Using the Settings App
The Windows 11 Settings app provides a dedicated section for managing fonts, offering a slightly more organized approach, especially if you want to install multiple fonts at once or if you prefer working within the system’s settings interface.
- Open Settings: Click the Start button and select “Settings” (or press
Windows key + I). - Navigate to Personalization: In the Settings window, click on “Personalization” in the left-hand sidebar.
- Select Fonts: On the Personalization page, scroll down and click on “Fonts.”
- Drag and Drop or Browse: You’ll see a section titled “Add fonts.” Here, you have two options:
- Drag and Drop: You can drag and drop your font files directly into the designated box within the Settings app.
- Browse Button: Click the “Browse” button to open a File Explorer window. Navigate to the location of your font files, select them, and click “Open.”
- Installation: Windows 11 will install the selected fonts. You’ll see them appear in the list of available fonts under “Manage font settings.”

This method is particularly useful because it consolidates all font management in one place, making it easy to see what fonts you have installed and to uninstall them later if needed.
Method 3: Right-Click “Install” Option
For individual font files, a quick and direct method is available through the context menu.
- Locate Font File: Find the
.ttfor.otffont file you want to install using File Explorer. - Right-Click: Right-click on the font file.
- Select “Install”: From the context menu, choose “Install.”
- Administrator Permission: You might be prompted for administrator permission. Click “Yes” or “Continue.”
The font will be installed immediately. This is great for installing just one or two fonts quickly without opening any additional windows.
Managing Your Font Library in Windows 11
Once you’ve installed your fonts, you’ll want to be able to manage them effectively. Windows 11 offers built-in tools to help you keep your font library organized, prevent conflicts, and remove fonts you no longer use. Proper font management not only keeps your system clean but also helps you locate the right font for your needs quickly.
Accessing and Viewing Installed Fonts
The primary place to manage your fonts is through the Settings app.
- Open Settings: Go to
Settings > Personalization > Fonts. - Font List: Here, you’ll see a comprehensive list of all fonts currently installed on your system. Each font will have a preview showing how it looks.
- Font Information: Clicking on a font in the list will provide more details, including its various styles (e.g., Bold, Italic, Light) and sometimes a brief description or the designer’s information.
This visual representation is crucial for designers and anyone who relies on a diverse font collection, allowing for quick visual checks and comparisons.
Uninstalling Fonts
As your font library grows, you may find that you no longer need some of the fonts you’ve installed. Uninstalling them can free up disk space and prevent your font menus from becoming cluttered.
- Open Settings: Navigate to
Settings > Personalization > Fonts. - Select the Font: Find the font you wish to uninstall in the list.
- Click “Uninstall”: Click on the font to open its details page, and then click the “Uninstall” button.
- Confirm: Windows will ask you to confirm your decision. Click “Uninstall” again.
Important Considerations:
- System Fonts: Be very careful when uninstalling fonts. Windows comes with a set of essential system fonts that are required for the operating system and many applications to function correctly. Uninstalling these can cause display issues or even system instability. Generally, it’s best to avoid uninstalling any fonts that appear to be core system fonts unless you are absolutely certain you know what you are doing. Fonts that you’ve installed yourself are generally safe to remove.
- Application Dependencies: Some applications might rely on specific fonts. If you uninstall a font that an application heavily uses, that application might revert to a default font or display text incorrectly.
Font Previews and Organization
The Settings app’s font management interface is designed for user convenience.
- Font Previews: The visual previews are invaluable. You can see how a font looks before you decide to use it in a document, presentation, or design project.
- Search Functionality: While not explicitly a “search” button, the list in Settings is scrollable, and you can quickly scan it. If you have a very large library, you might consider organizing your font files in folders outside of the main
C:WindowsFontsdirectory before installation, making it easier to manage them in File Explorer.
Font Licensing and Brand Consistency
Beyond the technical installation, it’s worth reiterating the importance of font licensing, especially when dealing with professional projects or brand development.
- Brand Strategy: For businesses, font choices are a critical component of brand strategy. A consistent typeface across all touchpoints builds brand recognition and reinforces the company’s identity. Choosing a font that is available across all platforms and devices is crucial for maintaining this consistency.
- Personal Branding: For individuals, a unique font can help establish a personal brand, whether it’s for a blog, a YouTube channel, or freelance design work. However, always ensure you have the appropriate license for any font used in your branding.
- Commercial Use: Many free fonts are only licensed for personal use. Using them commercially without purchasing a license can result in legal action. Always check the End User License Agreement (EULA) for any font you download. Premium font marketplaces provide clear licensing terms for various uses, including commercial, desktop, and web embedding.
By understanding how to install and manage fonts, you unlock a powerful tool for enhancing the visual appeal, professionalism, and brand identity of your digital creations on Windows 11. Whether you’re a tech enthusiast exploring new software, a brand manager curating a company’s visual identity, or an individual looking to personalize your digital space, a well-managed font library is an indispensable asset.
aViewFromTheCave is a participant in the Amazon Services LLC Associates Program, an affiliate advertising program designed to provide a means for sites to earn advertising fees by advertising and linking to Amazon.com. Amazon, the Amazon logo, AmazonSupply, and the AmazonSupply logo are trademarks of Amazon.com, Inc. or its affiliates. As an Amazon Associate we earn affiliate commissions from qualifying purchases.