In today’s visually driven digital landscape, the ability to customize your operating system’s appearance is a powerful tool for both personal expression and professional branding. Fonts, the very building blocks of written communication, play a crucial role in this. Whether you’re a graphic designer looking to add unique typographic elements to your projects, a content creator aiming to establish a distinct visual identity, or simply someone who wants to personalize their Windows experience, understanding how to install new fonts is an essential skill. This comprehensive guide will walk you through the straightforward process of installing fonts on your Windows computer, ensuring you can effortlessly enhance your documents, presentations, and overall digital aesthetic.

Our website delves into various facets of the modern digital world, encompassing cutting-edge technology trends, insightful reviews of software and gadgets, and practical tutorials designed to boost your productivity and digital security. We also explore the intricacies of branding, from crafting compelling personal brands to shaping corporate identities and mastering marketing strategies. Furthermore, we provide valuable resources for navigating the world of personal finance, investing, and building online income streams. Within this broad scope, the ability to manage and utilize fonts effectively touches upon both the “Tech” and “Brand” pillars of our content, empowering you to leverage visual elements to their full potential.
Understanding Font Types and Acquisition
Before diving into the installation process, it’s beneficial to have a basic understanding of the common font file types you’ll encounter and where to find them. This knowledge will make the installation itself smoother and help you make informed choices about the fonts you use.
Common Font File Formats
Windows primarily supports a few key font file formats. Knowing these will help you identify compatible files:
- TrueType Fonts (.ttf): This is one of the most widely used font formats. TrueType fonts offer excellent scalability, meaning they remain sharp and clear at any size, from tiny body text to large headlines. They are also well-supported across different operating systems and applications.
- OpenType Fonts (.otf): Developed as a successor to TrueType, OpenType fonts offer even greater flexibility and advanced typographic features. These can include ligatures (connected letterforms), stylistic alternates, swashes, and more. OpenType fonts are also highly scalable and are increasingly becoming the standard for professional design work.
- Font Collections (.ttc): A TrueType Collection file contains multiple TrueType fonts within a single file. This is often used by font foundries to bundle different styles (like regular, bold, italic) of a single typeface.
While other formats like PostScript Type 1 exist, .ttf and .otf are the most common and straightforward for general Windows users.
Where to Find Fonts
The internet is a vast repository of fonts, offering both free and premium options. Here are some popular and reliable sources:
- Free Font Websites:
- Google Fonts: A fantastic resource offering a huge library of open-source fonts that are free to use for both personal and commercial projects. They are generally well-designed, extensively tested, and easy to download.
- DaFont: A long-standing popular site with a massive collection of free fonts, categorized by style. While many are free for personal use, always check the licensing agreement for commercial use.
- Font Squirrel: Curates high-quality free fonts specifically for commercial use, making it a go-to for designers and businesses.
- 1001 Free Fonts: As the name suggests, this site offers a wide variety of free fonts. Again, check licensing.
- Premium Font Marketplaces:
- Adobe Fonts (formerly Typekit): Included with an Adobe Creative Cloud subscription, this service offers a curated selection of high-quality, professional fonts.
- MyFonts: One of the largest marketplaces for commercially licensed fonts, offering an extensive selection from various foundries.
- Fontspring: Another popular destination for purchasing professional fonts with flexible licensing options.
- Creative Market: A vibrant marketplace where independent designers sell fonts, graphics, and other creative assets.
When downloading fonts, especially from free repositories, it’s crucial to pay attention to the licensing. Some fonts are free for personal use only, while others allow for commercial use without attribution or payment. Always read the license agreement to avoid any copyright issues.
Installing Fonts on Windows: The Primary Method
The most common and direct way to install fonts on Windows is through the built-in File Explorer. This method is intuitive and works for most font file types.
Method 1: Using File Explorer (Drag and Drop or Right-Click Install)
This is the simplest and most recommended method for installing single fonts or small collections.
Step 1: Locate Your Font Files
First, you need to have your font files downloaded and unzipped (if they came in a compressed .zip folder). Navigate to the folder where you have saved these font files. They will typically have the .ttf or .otf extensions.
Step 2: Select the Font File(s)
Click on the font file you want to install. If you have multiple fonts from the same family (e.g., Arial Regular, Arial Bold, Arial Italic), you can select them all by holding down the Ctrl key while clicking on each file, or by clicking and dragging a selection box around them.
Step 3: Install the Font
There are two quick ways to proceed from here:
-
Right-Click and Install:
- With the font file(s) selected, right-click on any of them.
- A context menu will appear. Look for an option that says “Install” or “Install for all users.”
- “Install” typically installs the font for the current user profile.
- “Install for all users” installs the font system-wide, making it available to all user accounts on that computer. This is often the preferred choice if multiple people use the computer or if you want the font to be universally accessible.
- Click on your preferred installation option.
-
Drag and Drop:
- Open another File Explorer window and navigate to the Windows Fonts folder. You can usually find this by typing
C:WindowsFontsinto the address bar and pressing Enter. - With your font files still selected in the first window, drag them and drop them directly into the
C:WindowsFontsfolder.
- Open another File Explorer window and navigate to the Windows Fonts folder. You can usually find this by typing
Step 4: Confirmation
Windows will now install the font(s). You might see a progress bar or a brief notification. Once complete, the font will be available for use in most applications.
Important Considerations for Method 1:
- Administrator Privileges: Installing fonts for all users might require administrator privileges. If prompted, provide your administrator password.
- Application Restart: For newly installed fonts to appear in applications that were already open during the installation, you might need to close and reopen those applications. For instance, if you install a font while Microsoft Word is open, Word might not show the new font until you restart it.
- Duplicate Fonts: Windows will usually detect if you’re trying to install a font that’s already present. It will typically prompt you with an option to replace the existing font or skip the installation.
This method is efficient for adding individual fonts or small batches, and it’s the most common way users interact with the font installation process on Windows.
Alternative Installation Methods and Font Management
While the File Explorer method is the most prevalent, Windows offers other ways to manage fonts, particularly through the Settings app. Understanding these alternatives can be useful for more comprehensive font management.
Method 2: Using the Windows Settings App
The Settings app provides a more centralized and organized interface for managing installed fonts.
Step 1: Open Windows Settings
You can open Settings by clicking the Start button and then clicking the gear icon (Settings), or by pressing Windows Key + I.
Step 2: Navigate to Personalization
In the Settings window, click on “Personalization.”
Step 3: Select Fonts
On the left-hand sidebar, click on “Fonts.”
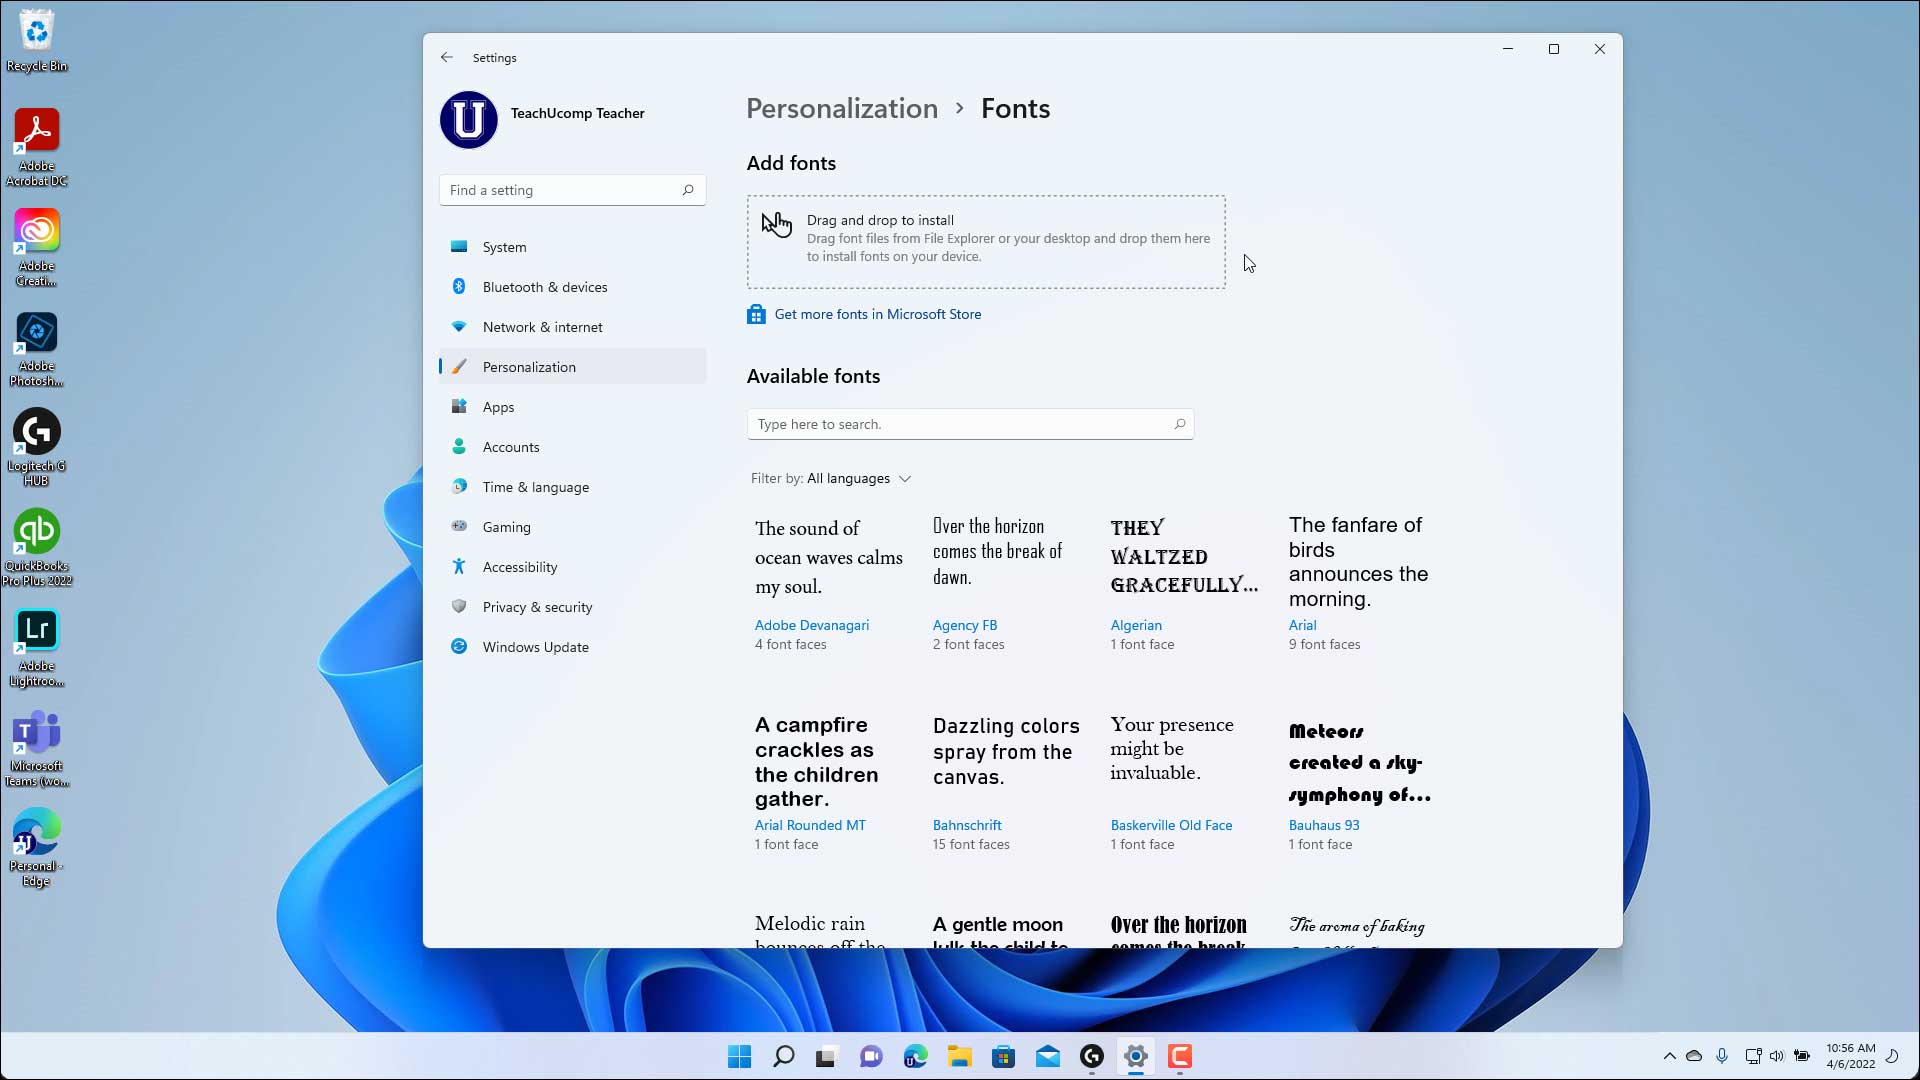
Step 4: Install Fonts via Drag and Drop in Settings
This Fonts section offers a familiar interface. You will see a box labeled “Add fonts” with an instruction to “Drag and drop to install.”
- Open a File Explorer window and locate your downloaded font files.
- Drag the font files from the File Explorer window and drop them into the designated “Add fonts” area within the Settings app.
Windows will then process and install the fonts. You can also see a list of all your currently installed fonts here, along with their previews and basic information. Clicking on an installed font will show you more details, including its metadata and available styles.
Managing Installed Fonts
The Settings > Personalization > Fonts screen is also your central hub for managing your font library. Here, you can:
- Preview Fonts: Click on any installed font to see a preview of how it looks.
- Uninstall Fonts: To remove a font you no longer need, simply click on the font in the list, and then click the “Uninstall” button. Uninstalling fonts can help free up system resources and keep your font menu cleaner.
- View Font Details: The font details page provides information like the font family, designer, version, and licensing.
- Font Search: For users with a large number of installed fonts, the search bar at the top of the Fonts section is invaluable for quickly finding a specific font.
Using the Settings app offers a more structured approach to font management and is ideal for users who want to keep their system tidy and easily access information about their installed typefaces.
Troubleshooting Common Font Installation Issues
While installing fonts on Windows is generally a smooth process, you might occasionally encounter problems. Here are some common issues and how to resolve them.
Font Not Appearing in Applications
This is the most frequent concern. If you’ve installed a font, but it doesn’t show up in your application’s font list, try the following:
- Restart the Application: As mentioned earlier, many applications load their font lists when they start. Close and reopen the application for the new font to be recognized.
- Restart Your Computer: In some cases, a full system restart might be necessary to refresh the font cache and make the font available system-wide.
- Check Installation Location: Ensure the font was installed correctly. If you installed it for the current user, it might not appear in applications running with different user privileges. Try installing it “for all users” next time.
- Corrupted Font File: The font file itself might be corrupted. Try downloading it again from the original source or try another font file to see if the installation process works for other files.
Font Installation Fails with an Error Message
If you receive an error message during installation:
- Run as Administrator: Right-click on the font file(s) and select “Run as administrator” before attempting to install. This can resolve permission-related issues.
- Check File Integrity: Ensure the font file is not damaged. If it’s a downloaded file, try re-downloading it. If it’s part of a ZIP archive, make sure it was extracted correctly.
- Antivirus Interference: Sometimes, overly aggressive antivirus software might interfere with font installations. Temporarily disable your antivirus (at your own risk and with caution) and try installing the font again. Remember to re-enable it afterward.
- Unsupported Font Format: While less common with .ttf and .otf, ensure you are not trying to install an obscure or unsupported font format.

Duplicate Fonts
Windows usually handles duplicates well, but if you’re experiencing unusual behavior with font rendering or if you see multiple instances of the same font name:
- Uninstall Duplicates: Use the Settings app to locate and uninstall any duplicate font entries. Be sure to keep the version that is most recently installed or from a trusted source.
- Font Cache Issues: Sometimes, the font cache can become corrupted. There are advanced troubleshooting steps involving clearing the font cache, but this is typically a last resort and should be approached with care, following specific guides for your Windows version.
By understanding these common issues and their solutions, you can ensure a seamless font installation experience and enjoy the full typographic potential of your Windows system. This capability, whether used for personal creative projects or to solidify a brand’s visual identity, significantly enhances your digital presence.
aViewFromTheCave is a participant in the Amazon Services LLC Associates Program, an affiliate advertising program designed to provide a means for sites to earn advertising fees by advertising and linking to Amazon.com. Amazon, the Amazon logo, AmazonSupply, and the AmazonSupply logo are trademarks of Amazon.com, Inc. or its affiliates. As an Amazon Associate we earn affiliate commissions from qualifying purchases.