In today’s fast-paced digital landscape, where multimedia content reigns supreme, the ability to seamlessly manipulate audio and video files is not just a luxury—it’s a necessity. From burgeoning YouTubers and podcasters to professional video editors, software developers, and even casual users looking to convert a video format, a powerful, versatile, and free tool stands out: FFmpeg. This command-line utility is the Swiss Army knife of multimedia processing, capable of transcoding, streaming, playing, and recording virtually any audio or video format you can imagine. Its robust capabilities underpin countless applications and services, making it an indispensable asset in any tech-savvy individual’s toolkit.
This guide is designed to walk you through the process of installing FFmpeg on the most popular operating systems: Windows, macOS, and various Linux distributions. Whether you’re a seasoned developer, a digital marketing specialist looking to optimize media for brand campaigns, or an aspiring content creator aiming for peak productivity, mastering FFmpeg installation is your first step towards unlocking unparalleled control over your multimedia projects. We’ll delve into various installation methods, from simple package managers to manual configurations, ensuring you find the approach that best suits your technical comfort level and specific needs. By the end of this article, you’ll not only have FFmpeg up and running but also a solid understanding of how to verify its installation and begin leveraging its immense power.
Unlocking Multimedia Power: What is FFmpeg and Why You Need It?
At its core, FFmpeg is a free and open-source project consisting of a vast suite of libraries and programs for handling video, audio, and other multimedia files and streams. It’s a command-line tool, which might sound intimidating to newcomers, but its power lies in its flexibility and efficiency. Developed by a global community of developers, FFmpeg supports an astonishing array of formats, codecs, and protocols, making it the de facto standard for multimedia manipulation.
The Indispensable Tool for Digital Content
Imagine needing to convert a video from an obscure format to MP4 for web compatibility, extract audio from a video file, resize footage for different social media platforms, or even create a GIF from a video clip. FFmpeg can do all this and much more. It’s not just about conversion; it’s about giving you granular control over every aspect of your media. You can adjust bitrates, frame rates, resolutions, aspect ratios, add watermarks, concatenate files, stream content, and perform complex filtering operations with a few lines of command. This level of control is paramount for anyone involved in digital content creation, ensuring brand consistency and optimal performance across various platforms.
Why FFmpeg is Crucial for Your Digital Workflow
For those operating in the “Tech” and “Brand” spheres, FFmpeg translates directly into enhanced productivity and creative freedom.
- Productivity: Automating repetitive media tasks saves countless hours. Instead of using resource-heavy GUI editors for simple conversions or adjustments, FFmpeg allows for quick, scriptable operations. This is particularly valuable for batch processing, handling large volumes of content efficiently, which is a common challenge for digital marketers and content strategists.
- Efficiency and Cost Savings: As an open-source tool, FFmpeg is completely free. This eliminates licensing costs associated with proprietary software, making it an attractive option for startups, small businesses, and individual creators. Furthermore, its lightweight nature means it can often perform tasks faster than bulkier software, optimizing system resources.
- Versatility for Branding: Ensuring your multimedia content adheres to specific brand guidelines often involves precise resizing, watermarking, or format conversions. FFmpeg provides the precision needed to maintain visual integrity across all digital assets, from social media videos to website backgrounds and promotional materials. Its ability to handle various codecs also means your brand’s message can reach a wider audience without compatibility issues.
- Foundation for AI Tools and Apps: Many modern AI-powered media processing tools, video conferencing applications, and streaming platforms use FFmpeg libraries under the hood. Understanding FFmpeg gives you insight into the foundational technologies that power many contemporary “AI Tools” and “Apps,” making you a more knowledgeable and capable technologist.
In essence, installing FFmpeg isn’t just about getting a piece of software; it’s about empowering yourself with a foundational skill that enhances your digital capabilities, streamlines your workflow, and provides a cost-effective solution for a myriad of multimedia challenges.
Getting Started: Preparing for Your FFmpeg Installation
Before diving into the actual installation steps, a little preparation can save you potential headaches and ensure a smooth process. Understanding the prerequisites and choosing the right installation method for your operating system are crucial first steps.
Before You Begin: System Requirements and Best Practices
FFmpeg is remarkably lightweight and doesn’t demand significant system resources for basic operations. However, for intensive tasks like 4K video encoding, a more powerful CPU and ample RAM will certainly speed things up. Generally, if your computer can run your operating system comfortably, it can handle FFmpeg.
Here are a few best practices to consider:
- Administrator/Root Privileges: Many installation methods, especially those involving package managers, will require administrator rights on Windows or
sudoprivileges on macOS and Linux. Ensure you have these permissions before starting. - Internet Connection: You’ll need an active internet connection to download FFmpeg binaries or source code, and for package managers to fetch dependencies.
- Check for Existing Installations: While not common, you might have an older version of FFmpeg installed if you’ve previously used other multimedia software. It’s generally good practice to remove or update any outdated versions to avoid conflicts.
- Backup (Optional but Recommended): For more complex installations, especially when compiling from source, it’s always wise to have a system backup or at least be prepared to troubleshoot if something goes awry.
- Understand Your OS: Be aware of your operating system’s version and architecture (32-bit vs. 64-bit), as this can influence which FFmpeg build you should download. Modern systems are predominantly 64-bit.
Choosing Your Installation Method: A Strategic Decision
The method you choose for installing FFmpeg will largely depend on your operating system and your comfort level with command-line tools and system configurations.
- Package Managers: These are generally the easiest and most recommended methods. Tools like Chocolatey and Scoop for Windows, Homebrew for macOS, and
apt,dnf, orpacmanfor Linux handle the download, installation, and dependency management automatically. They also simplify updates. This choice aligns with “Tech” productivity, as it’s the most efficient route. - Direct Download (Binaries): For Windows users, downloading pre-compiled binaries offers a straightforward, manual approach if you prefer not to use a package manager. It requires manual PATH configuration.
- Compiling from Source: This is the most advanced method, primarily for Linux users or those who need specific, custom features or optimizations not available in pre-compiled binaries. It gives you maximum control but requires more technical expertise and time. This falls under advanced “Tech” skills and can be a strategic choice for specialized “Brand” applications requiring specific customizations.
By taking a moment to understand these foundational aspects, you’re setting yourself up for a successful and frustration-free FFmpeg installation, paving the way for more efficient “Money” management through saved time and enhanced “Brand” content creation.
Step-by-Step Installation Guides for Major Operating Systems
Here, we’ll break down the FFmpeg installation process for Windows, macOS, and Linux, providing clear instructions for the most common and recommended methods.
Installing FFmpeg on Windows: Your Options Explored
Windows users have several viable options, ranging from user-friendly package managers to manual setup.
Method 1: Installing with Chocolatey (Recommended for Package Management)
Chocolatey is a popular package manager for Windows, simplifying software installation and updates. It’s highly recommended for its ease of use and ability to manage dependencies.
- Install Chocolatey (if you haven’t already):
- Open PowerShell as an administrator. You can do this by searching for “PowerShell,” right-clicking on “Windows PowerShell,” and selecting “Run as administrator.”
- Paste the following command and press Enter. Follow any prompts:
powershell

Set-ExecutionPolicy Bypass -Scope Process -Force; [System.Net.ServicePointManager]::SecurityProtocol = [System.Net.ServicePointManager]::SecurityProtocol -bor 3072; iex ((New-Object System.Net.WebClient).DownloadString('https://chocolatey.org/install.ps1'))
- After installation, close and reopen PowerShell as administrator to ensure Chocolatey is initialized.
- Install FFmpeg:
- In the administrative PowerShell window, run:
powershell

choco install ffmpeg
- Type
Yand press Enter when prompted to proceed with the installation. Chocolatey will download FFmpeg and automatically add it to your system’s PATH.
- In the administrative PowerShell window, run:
Method 2: Installing with Scoop (An Alternative Package Manager)
Scoop is another excellent command-line installer for Windows, especially favored by developers for its portable installations (it installs software into a user-specific directory, avoiding PATH conflicts).
- Install Scoop (if you haven’t already):
- Open PowerShell (you don’t necessarily need administrator privileges for Scoop itself, but you might for enabling
Set-ExecutionPolicy). - First, ensure your PowerShell execution policy allows local scripts:
powershell

Set-ExecutionPolicy RemoteSigned -Scope CurrentUser
TypeYand press Enter if prompted. - Then, install Scoop:
powershell

Invoke-Expression (New-Object System.Net.WebClient).DownloadString('https://get.scoop.sh')
- Open PowerShell (you don’t necessarily need administrator privileges for Scoop itself, but you might for enabling
- Install FFmpeg:
- Once Scoop is installed, simply run:
powershell

scoop install ffmpeg
- Scoop will download and install FFmpeg. It automatically handles adding FFmpeg to your user PATH.
- Once Scoop is installed, simply run:
Method 3: Manual Installation (For Those Who Prefer Direct Control)
This method involves downloading pre-compiled binaries and manually configuring your system’s PATH.
- Download FFmpeg Binaries:
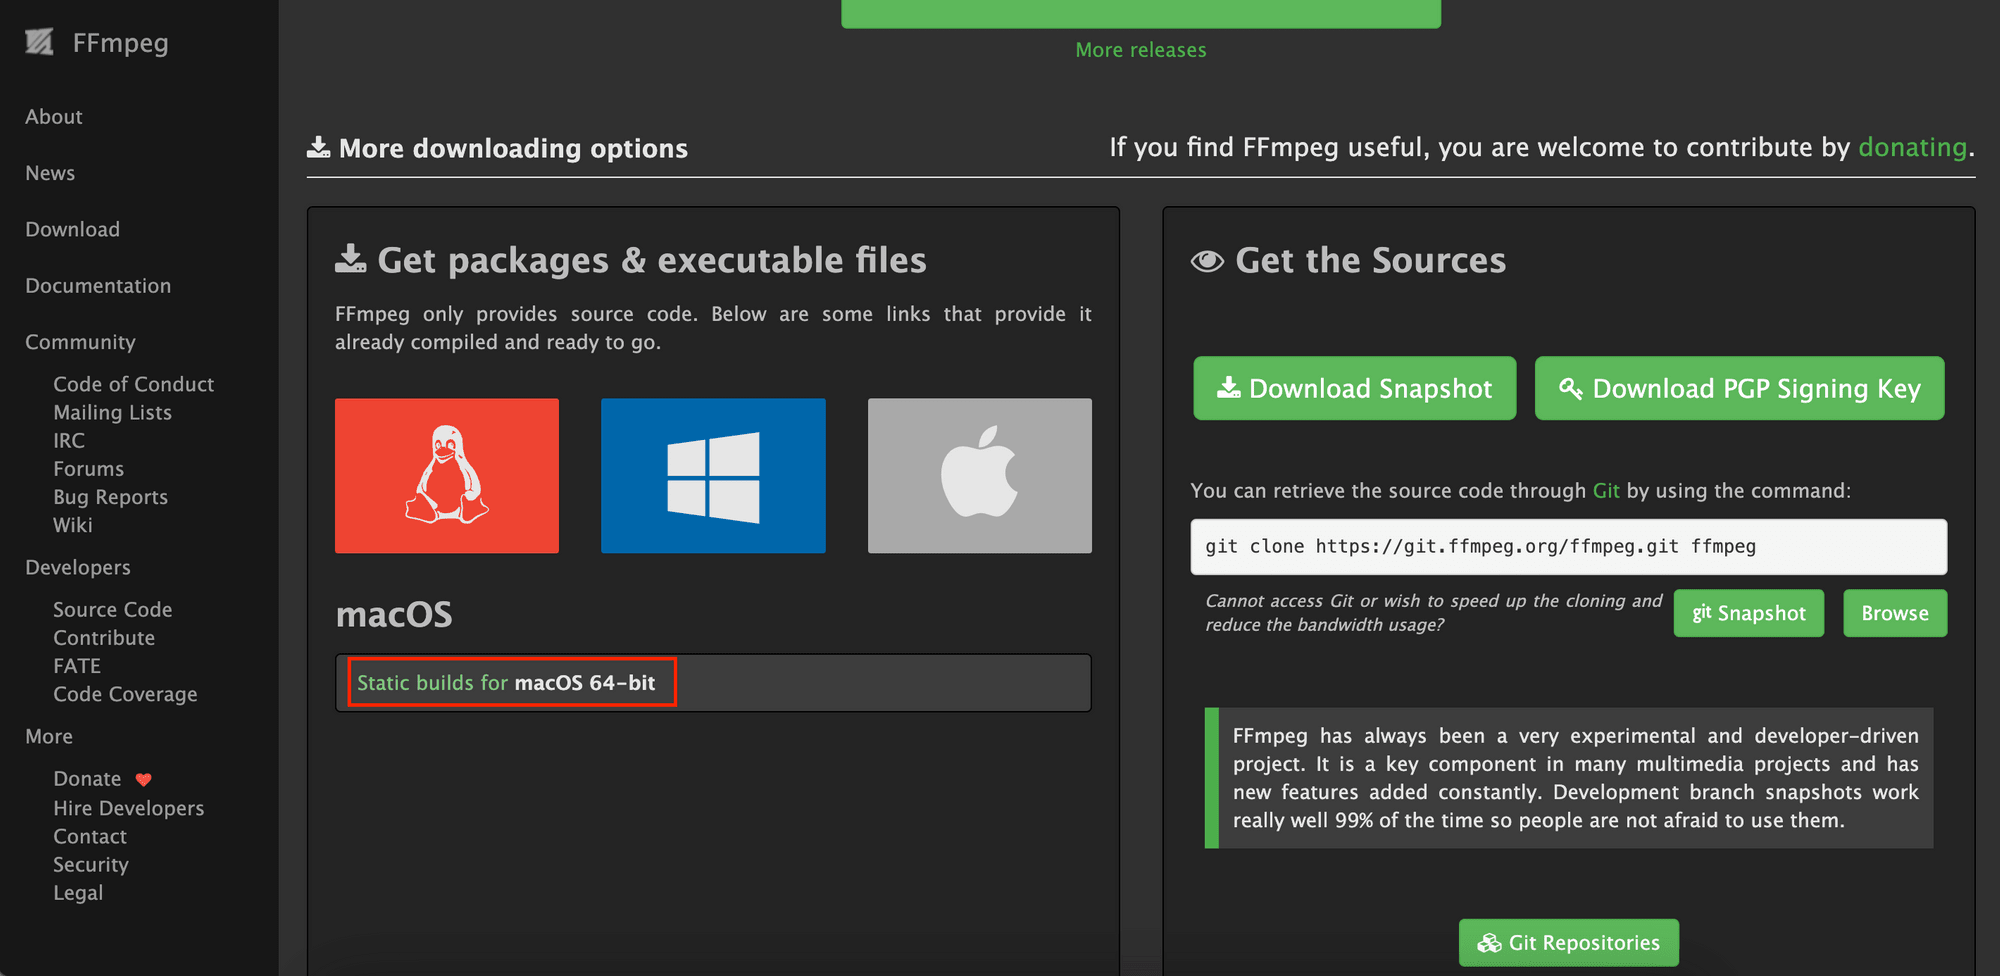
- Go to the official FFmpeg download page:
ffmpeg.org/download.html. - Under the “Windows” section, click on a link that provides
git masterbuilds (e.g.,gyan.dev/ffmpeg/builds/orwww.btbn.fun/ffmpeg-gyan/). - On the chosen mirror site, download the
ffmpeg-master-latest-win64-gpl.zipor similar file (ensure it’s a “release build” or “full build” to get all necessary components).
- Go to the official FFmpeg download page:
- Extract and Place FFmpeg:
- Create a new folder in a stable location, e.g.,
C:Program Filesffmpeg. - Extract the contents of the downloaded ZIP file into this new folder. You should see a folder named something like
ffmpeg-master-latest-win64-gplinside, containingbin,doc, andpresetsfolders. Move the contents of that inner folder directly intoC:Program Filesffmpegso thatC:Program Filesffmpegbinexists.
- Create a new folder in a stable location, e.g.,
- Add FFmpeg to System PATH:
- Search for “Environment Variables” in the Windows search bar and select “Edit the system environment variables.”
- Click the “Environment Variables…” button.
- Under “System variables,” find and select the “Path” variable, then click “Edit…”
- Click “New” and add the path to the
binfolder within your FFmpeg installation. For example,C:Program Filesffmpegbin. - Click “OK” on all windows to save the changes.
- Important: Close and reopen any Command Prompt or PowerShell windows you have open for the changes to take effect.
Installing FFmpeg on macOS: Harnessing Homebrew’s Simplicity
Homebrew is the unofficial package manager for macOS and is by far the easiest and most recommended way to install FFmpeg.
- Install Homebrew (if you haven’t already):
- Open your Terminal application (found in
Applications/Utilities). - Paste the following command and press Enter:
bash

/bin/bash -c "$(curl -fsSL https://raw.githubusercontent.com/Homebrew/install/HEAD/install.sh)"
- Follow the on-screen instructions, which may include entering your password and pressing Enter to install Xcode Command Line Tools if they are not already present.
- Once Homebrew is installed, follow any instructions it provides to add Homebrew to your PATH (usually
echo 'eval "$(/opt/homebrew/bin/brew shellenv)"' >> ~/.zprofilefor Apple Silicon or~/.bash_profilefor Intel Macs, followed byeval "$(/opt/homebrew/bin/brew shellenv)").
- Open your Terminal application (found in
- Install FFmpeg:
- Once Homebrew is set up, simply run:
bash

brew install ffmpeg
- Homebrew will download FFmpeg and all its necessary dependencies, then install it. This may take a few minutes depending on your internet speed and system.
- Once Homebrew is set up, simply run:
Installing FFmpeg on Linux: Distribution-Specific Approaches
Linux users benefit from robust package managers that make FFmpeg installation incredibly straightforward.
For Debian/Ubuntu-based Systems (apt)
This applies to Ubuntu, Debian, Linux Mint, and other derivatives.
- Update Package Lists: Open a terminal and run:
bash

sudo apt update
- Install FFmpeg:
bash

sudo apt install ffmpeg
Confirm withYwhen prompted. This will install the officially packaged version of FFmpeg.
For Fedora/RHEL-based Systems (dnf)
This applies to Fedora, CentOS (Stream), AlmaLinux, Rocky Linux, etc.
- Enable RPM Fusion Repository (if not already enabled): FFmpeg is typically not in the default Fedora repositories due to patent concerns, so you’ll need RPM Fusion.
- For Fedora:
bash

sudo dnf install https://download1.rpmfusion.org/free/fedora/rpmfusion-free-release-$(rpm -E %fedora).noarch.rpm https://download1.rpmfusion.org/nonfree/fedora/rpmfusion-nonfree-release-$(rpm -E %fedora).noarch.rpm
- For CentOS/RHEL/Rocky/AlmaLinux (replace
el7orel8with your system’s version):
bash

sudo dnf install https://dl.fedoraproject.org/pub/epel/epel-release-latest-X.noarch.rpm  # X is 7 or 8

sudo dnf install --nogpgcheck https://download1.rpmfusion.org/free/el/rpmfusion-free-release-X.noarch.rpm

sudo dnf install --nogpgcheck https://download1.rpmfusion.org/nonfree/el/rpmfusion-nonfree-release-X.noarch.rpm
- For Fedora:
- Install FFmpeg:
bash

sudo dnf install ffmpeg
Confirm withYwhen prompted.
For Arch Linux (pacman)
This applies to Arch Linux and its derivatives like Manjaro.
- Update System:
bash

sudo pacman -Syu
- Install FFmpeg:
bash

sudo pacman -S ffmpeg
Confirm withYwhen prompted.
Compiling FFmpeg from Source (For Advanced Users and Customization)
Compiling FFmpeg from source offers the latest features and optimal performance for your specific hardware, but it is more complex and time-consuming. This is usually reserved for developers who need cutting-edge features or custom build configurations. The general steps involve installing build tools, cloning the FFmpeg Git repository, configuring with desired options, and then compiling. The official FFmpeg Wiki (ffmpeg.org/download.html) provides excellent, up-to-date guides for compiling on various Linux distributions. This approach embodies advanced “Tech” mastery and can be essential for specific “Brand” related development work.
Verifying Your FFmpeg Installation and Taking the First Steps
After going through the installation process, it’s crucial to confirm that FFmpeg is correctly installed and accessible from your command line.
Confirming Successful Setup
To verify your FFmpeg installation, open a new command prompt or terminal window (ensure you open a new one after installation, especially for manual PATH changes) and type:
ffmpeg -version
If FFmpeg is installed correctly and its path is configured, you should see output similar to this, detailing the FFmpeg version, build configuration, and supported libraries:
ffmpeg version N-112345-g67890abcdef Copyright (c) 2000-2023 the FFmpeg developers
built with gcc 12.2.0 (Rev5, Built by MSYS2 project)
configuration: --enable-gpl --enable-version3 --enable-static ... (and many more lines)
...
If you receive an error message like “command not found” or “ffmpeg is not recognized as an internal or external command,” it indicates an issue with your installation or, more commonly, your system’s PATH variable. Double-check your installation steps, especially the PATH configuration for manual installations, or try restarting your terminal/computer.
Basic FFmpeg Commands: A Glimpse into its Capabilities
Now that FFmpeg is installed, let’s explore a couple of basic commands to show its power. This quick dive into “Tech” functionality immediately translates into “Productivity” gains for any “Brand” content creator.
-
Convert a Video to MP4:
ffmpeg -i input.mov output.mp4This command takes an
input.movfile and converts it tooutput.mp4. FFmpeg intelligently chooses reasonable defaults for codecs. -
Extract Audio from a Video:
ffmpeg -i video.mp4 -vn audio.mp3Here,
-vnmeans “no video” (disable video recording), effectively extracting the audio stream fromvideo.mp4and saving it asaudio.mp3. This is invaluable for podcasters or those needing audio excerpts. -
Resize a Video:
bash

ffmpeg -i input.mp4 -vf scale=640:-1 output_640x.mp4
This resizesinput.mp4to a width of 640 pixels, with-1maintaining the aspect ratio for the height. Essential for optimizing videos for different social media platforms or web embedding.
These simple examples barely scratch the surface of FFmpeg’s capabilities, but they illustrate how this command-line tool can significantly streamline your multimedia workflow, enhance your “Brand” content, and save “Money” by offering a free, powerful alternative to commercial software.
Troubleshooting Common FFmpeg Installation Issues
Even with careful planning, you might encounter issues during installation. Here are some common problems and their solutions.
Navigating Potential Roadblocks
- “ffmpeg: command not found” (or similar error):
- Cause: This is almost always a PATH environment variable issue. Your operating system doesn’t know where to find the
ffmpegexecutable. - Solution (Windows Manual): Revisit “Method 3: Manual Installation” and ensure you correctly added
C:Program Filesffmpegbin(or your chosen path) to your system’s PATH. Remember to open a new Command Prompt/PowerShell window after making changes. - Solution (macOS/Linux): For Homebrew or package manager installations, this is less common but could mean Homebrew/package manager wasn’t added to your shell’s profile (e.g.,
~/.zprofile,~/.bashrc). Consult Homebrew’s post-installation messages or your distro’s documentation. Restarting your terminal or even your computer can sometimes resolve this.
- Cause: This is almost always a PATH environment variable issue. Your operating system doesn’t know where to find the
- “Permission denied” errors:
- Cause: You’re attempting an action that requires elevated privileges without
sudo(Linux/macOS) or “Run as administrator” (Windows). - Solution: Ensure you’re running your terminal/PowerShell as an administrator or prefixing commands with
sudowhere necessary.
- Cause: You’re attempting an action that requires elevated privileges without
- Installation fails with dependency errors (Linux/macOS package managers):
- Cause: Your system’s package list might be out of date, or there are conflicts.
- Solution:
- Linux: Run
sudo apt update(Debian/Ubuntu),sudo dnf update(Fedora), orsudo pacman -Syu(Arch) before trying to install FFmpeg again. - macOS (Homebrew): Run
brew updateandbrew upgradebeforebrew install ffmpeg.
- Linux: Run
- FFmpeg builds are missing certain features/codecs:
- Cause: Pre-compiled binaries or default package manager installations might not include every possible codec due to licensing restrictions (e.g., non-free codecs like H.264, AAC).
- Solution:
- Windows/macOS: Look for “full builds” or “gpl builds” if downloading manually. Homebrew’s FFmpeg usually includes most common codecs.
- Linux: Ensure you’ve enabled non-free repositories if you need proprietary codecs (e.g., RPM Fusion on Fedora, Multiverse on Ubuntu). If still missing, compiling from source with specific flags is the ultimate solution.
- Slow performance or crashes:
- Cause: While FFmpeg is efficient, very demanding tasks (e.g., 4K video encoding) require substantial system resources. Outdated FFmpeg versions or buggy builds can also contribute.
- Solution: Ensure you have enough RAM and a capable CPU. Update FFmpeg to the latest stable version. If compiling from source, ensure your build flags are optimized for your hardware. Check FFmpeg’s official documentation or forums for known issues related to specific codecs or hardware.
Troubleshooting is a natural part of working with powerful “Tech” tools. By systematically checking these common issues, you’ll likely resolve most installation problems and regain control over your “Digital Security” and media workflow.
Conclusion: Empowering Your Digital Journey with FFmpeg
Congratulations! You’ve successfully navigated the intricacies of installing FFmpeg, a foundational tool that will profoundly impact your ability to manage and manipulate multimedia content. From the moment you run that first ffmpeg -version command and see the robust output, you’re not just confirming an installation; you’re unlocking a world of creative and technical possibilities.
FFmpeg stands as a testament to the power of open-source “Technology Trends,” providing a free, versatile, and incredibly powerful solution that would otherwise cost significant “Money” in proprietary software licenses. For “Brand” strategists, content creators, and “Digital Security” professionals handling video forensics, its command-line nature means unparalleled precision and the ability to automate tasks, directly boosting “Productivity” and ensuring consistency across all digital assets. Whether you’re optimizing videos for a marketing campaign, automating batch conversions for a large dataset, or simply extracting an audio track for a personal project, FFmpeg is an indispensable ally.
As you become more comfortable with basic commands, we encourage you to explore the vast documentation and community resources available for FFmpeg. Its depth is immense, offering solutions for virtually any multimedia challenge you might encounter. Embrace the power of the command line, and let FFmpeg be the engine that drives your digital creativity and efficiency forward, cementing its place as an essential component of your modern digital toolkit.