In an increasingly connected world, the way we manage our mobile connectivity is evolving rapidly. Gone are the days when a tiny physical chip was the sole gateway to cellular networks. Enter the eSIM – an embedded SIM card that’s revolutionizing how we connect, especially for global travelers, tech enthusiasts, and anyone seeking greater flexibility from their mobile devices. This guide will walk you through everything you need to know about installing an eSIM, from understanding its core technology to step-by-step instructions across various devices, ensuring you harness the full power of this innovative connectivity solution.
Understanding eSIM Technology: The Future of Connectivity
The shift from physical SIM cards to embedded SIMs represents a significant leap in mobile technology. It streamlines device design, enhances user flexibility, and offers a more secure and sustainable approach to staying connected. Before diving into the installation process, it’s crucial to grasp what an eSIM is and why it’s becoming an indispensable feature for modern smartphone users.
What Exactly is an eSIM?
An eSIM, short for “embedded Subscriber Identity Module,” is a digital version of the traditional plastic SIM card. Instead of a physical card that you insert into a tray, an eSIM is a small chip permanently embedded into your device’s hardware during manufacturing. This chip is reprogrammable, meaning you can download and store multiple carrier profiles on it, switching between them digitally without needing to swap physical cards.
Think of it as a universal digital passport for your phone. When you purchase a cellular plan with eSIM support, your carrier sends a digital profile to your device, which is then stored on this embedded chip. This profile contains all the necessary information to authenticate your device on the network, just like a physical SIM, but with unparalleled convenience.
Why Make the Switch? Key Benefits of eSIMs
The advantages of eSIM technology extend far beyond merely eliminating a physical component. They offer tangible benefits that enhance convenience, security, and versatility for users.
- Unrivaled Convenience for Travelers: For frequent travelers, eSIMs are a game-changer. Instead of hunting for local SIM cards at airports or paying exorbitant roaming fees, you can purchase an eSIM data plan for your destination country before you even leave home. Upon arrival, a few taps on your phone are all it takes to activate local service, saving time, money, and hassle. You can store multiple eSIM profiles, making it easy to switch between plans for different countries or even different networks within the same country.
- Enhanced Security: A physical SIM card can be stolen or removed from a lost or stolen phone, making it harder to track. An eSIM, being embedded, cannot be physically removed. This adds a layer of security, as your phone’s connection remains active, potentially aiding in recovery efforts.
- Dual SIM Functionality Made Easy: Many modern smartphones now offer dual SIM capabilities, often combining one physical SIM slot with an eSIM. This allows you to have two active numbers simultaneously – perfect for separating work and personal calls, or for maintaining your home number while using a local data plan abroad. With eSIMs, you can manage these profiles digitally, easily designating which line is used for calls, texts, or data.
- Environmental Benefits: By eliminating the need for plastic SIM cards and their packaging, eSIMs contribute to reducing electronic waste. While individual impact may seem small, the collective reduction of billions of plastic cards has a significant positive environmental footprint.
- Space-Saving for Device Manufacturers: From a manufacturing perspective, the absence of a SIM card tray allows for more internal space, which can be utilized for larger batteries, more advanced camera sensors, or slimmer device designs. This subtle change pushes the boundaries of smartphone innovation.
Before You Begin: Essential Prerequisites for eSIM Installation
While the installation process for an eSIM is generally straightforward, a few key prerequisites must be met to ensure a smooth and successful setup. Addressing these points upfront will save you time and potential frustration.
Device Compatibility Check
Not all devices support eSIM technology. It’s crucial to confirm that your smartphone, tablet, or smartwatch is eSIM-compatible before proceeding.
- Popular eSIM-Compatible Devices:
- Apple: iPhone XS, iPhone XS Max, iPhone XR, and later models (e.g., iPhone 11, 12, 13, 14 series, including Pro, Max, and Mini variants). Certain iPad models (iPad Air, Pro, Mini with cellular capabilities) also support eSIM.
- Google: Google Pixel 3, Pixel 3 XL, and all subsequent Pixel models (e.g., Pixel 4, 5, 6, 7, 8 series, including ‘a’ and ‘Pro’ variants).
- Samsung: Galaxy S20, S20+, S20 Ultra, and all later S series models (e.g., S21, S22, S23, S24 series). Also supported by certain Galaxy Note series (Note 20 and later), Galaxy Fold, Z Fold, and Z Flip series.
- Other Brands: Various models from Huawei (P40, P40 Pro), Motorola (Razr), Sony (Xperia 10 III Lite), Oppo (Find X3, X5 series), and others are increasingly incorporating eSIM support.
- How to Check Your Device:
- In Settings: Navigate to your device’s settings menu and look for “Cellular,” “Mobile Data,” “Network & Internet,” or “Connections.” If you see an option like “Add eSIM,” “Add Data Plan,” or “Download a SIM,” your device likely supports it.
- Manufacturer Website: The most reliable method is to visit your device manufacturer’s official website and check the specifications for your specific model.
- Carrier Information: Your current mobile carrier can also confirm if your device, purchased through them, is eSIM compatible and whether it’s locked to their network (which might affect eSIM installation from another provider).
Obtaining Your eSIM Profile
Once you’ve confirmed compatibility, the next step is to acquire an eSIM profile from a service provider.
- From Your Current Carrier: Many traditional mobile carriers now offer eSIM services. You can often request an eSIM instead of a physical SIM for new activations or convert your existing physical SIM to an eSIM. This typically involves contacting their customer service or visiting a retail store. They will provide you with an activation code, usually in the form of a QR code or manual details.
- From Third-Party eSIM Providers: For international travel or flexible data plans, dedicated eSIM marketplaces are an excellent option. Companies like Airalo, Holafly, Nomad, and GigSky specialize in offering eSIM data plans for hundreds of countries. You can purchase a plan directly through their websites or apps, and they’ll instantly provide you with the necessary QR code or activation details. These plans are often more cost-effective for short-term international data than traditional roaming.
- What You Will Receive: Regardless of the provider, you’ll typically receive either:
- A QR Code: This is the most common and easiest method. The QR code contains all the necessary information for your device to download the eSIM profile.
- Manual Activation Details: Sometimes, particularly for business accounts or if QR code scanning is not feasible, you’ll receive a set of alphanumeric codes (e.g., SM-DP+ Address, Activation Code) that you’ll manually enter into your device.
- Via an App: Some providers or device manufacturers might offer an in-app activation process that automates much of the setup.
Stable Internet Connection
An active and stable internet connection (Wi-Fi or existing cellular data) is essential during the eSIM installation process. Your device needs to connect to the internet to download the eSIM profile from the carrier’s servers. Attempting to install an eSIM without a reliable connection will likely result in errors. Ensure you are connected to a strong Wi-Fi signal or have an active data connection before you begin.
Step-by-Step: How to Install Your eSIM
The installation process for an eSIM is designed to be user-friendly, largely relying on scanning a QR code or entering a few details. While the exact steps can vary slightly between operating systems and device manufacturers, the core principles remain the same.
General Installation Methods
Most eSIM installations follow one of these primary methods:
-
QR Code Method (Most Common and Recommended): This is by far the simplest and most widely used method. Your carrier or eSIM provider will supply a unique QR code.
- Access Cellular Settings: Go to your device’s Settings, then navigate to “Cellular,” “Mobile Data,” “Network & internet,” or “Connections.”
- Add eSIM/Cellular Plan: Look for an option like “Add eSIM,” “Add Data Plan,” “Download a SIM,” or “Add Cellular Plan.”
- Scan QR Code: Your device’s camera will activate. Position your device so that the QR code is centered in the frame. The device will automatically detect and scan the code.
- Follow On-Screen Prompts: After scanning, your device will guide you through a few steps, such as confirming the plan, labeling your new cellular line (e.g., “Travel,” “Work,” “Personal”), and setting a default line for data, calls, or texts.
- Activation: Once configured, the eSIM profile will be downloaded and activated. You should see a new network indicator for your eSIM.
-
Manual Entry Method: If you don’t have a QR code or are experiencing issues scanning, you can manually enter the eSIM details.
- Access Cellular Settings: Similar to the QR code method, navigate to your device’s cellular settings.
- Add eSIM/Cellular Plan: Select the option to add an eSIM or cellular plan.
- Choose Manual Entry: Look for an option like “Enter Details Manually” or “Use Activation Code.”
- Input Details: You will be prompted to enter specific information, typically the SM-DP+ Address (or activation code) and sometimes a Confirmation Code. These details are provided by your eSIM carrier.
- Follow On-Screen Prompts: Complete the setup by following any additional instructions, such as labeling the line and setting preferences.
-
Carrier App Method: Some mobile carriers or eSIM providers offer dedicated mobile applications that simplify the eSIM activation process.
- Download App: Download the specific carrier or eSIM provider app from your device’s app store.
- Login/Purchase: Log in to your account or purchase a new eSIM plan directly through the app.
- Activate eSIM: The app will often have a clear “Activate eSIM” button or section. It might initiate the process directly within the app or provide you with a QR code/manual details to use with your device’s native settings.
Device-Specific Installation Guides
While the general methods apply, the exact menu navigation can differ based on your device’s operating system and model.
For iOS Devices (iPhone/iPad)
Apple has been a strong proponent of eSIM technology, making the installation process quite intuitive.
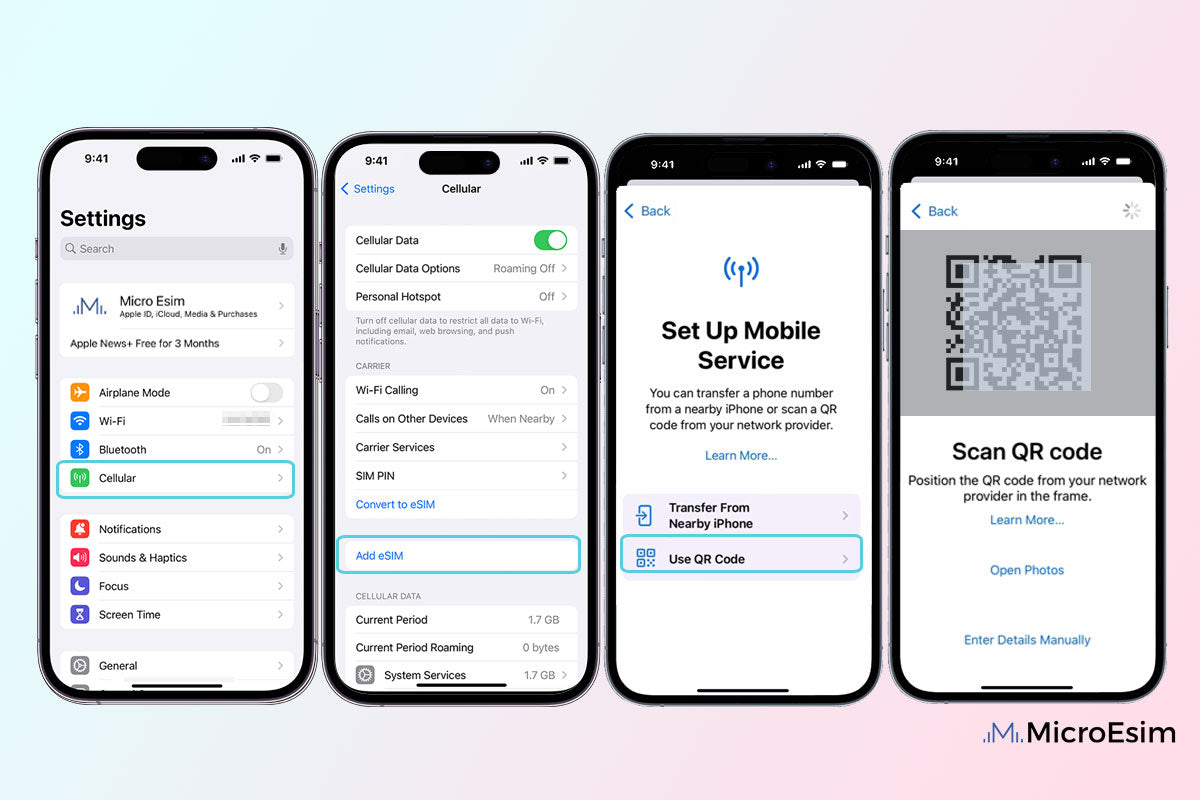
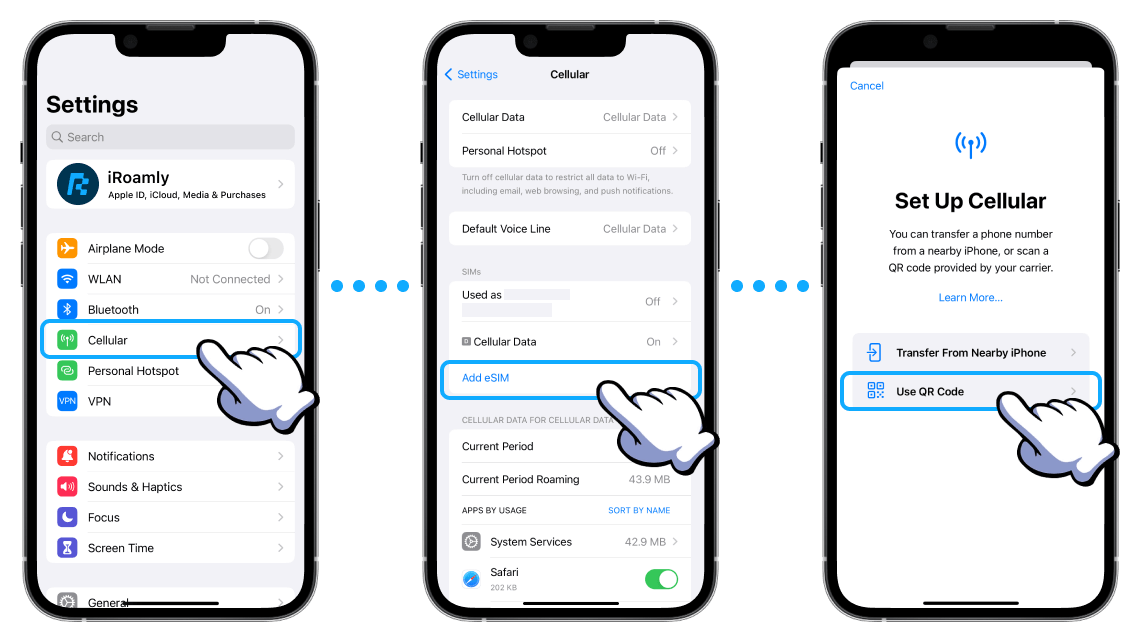
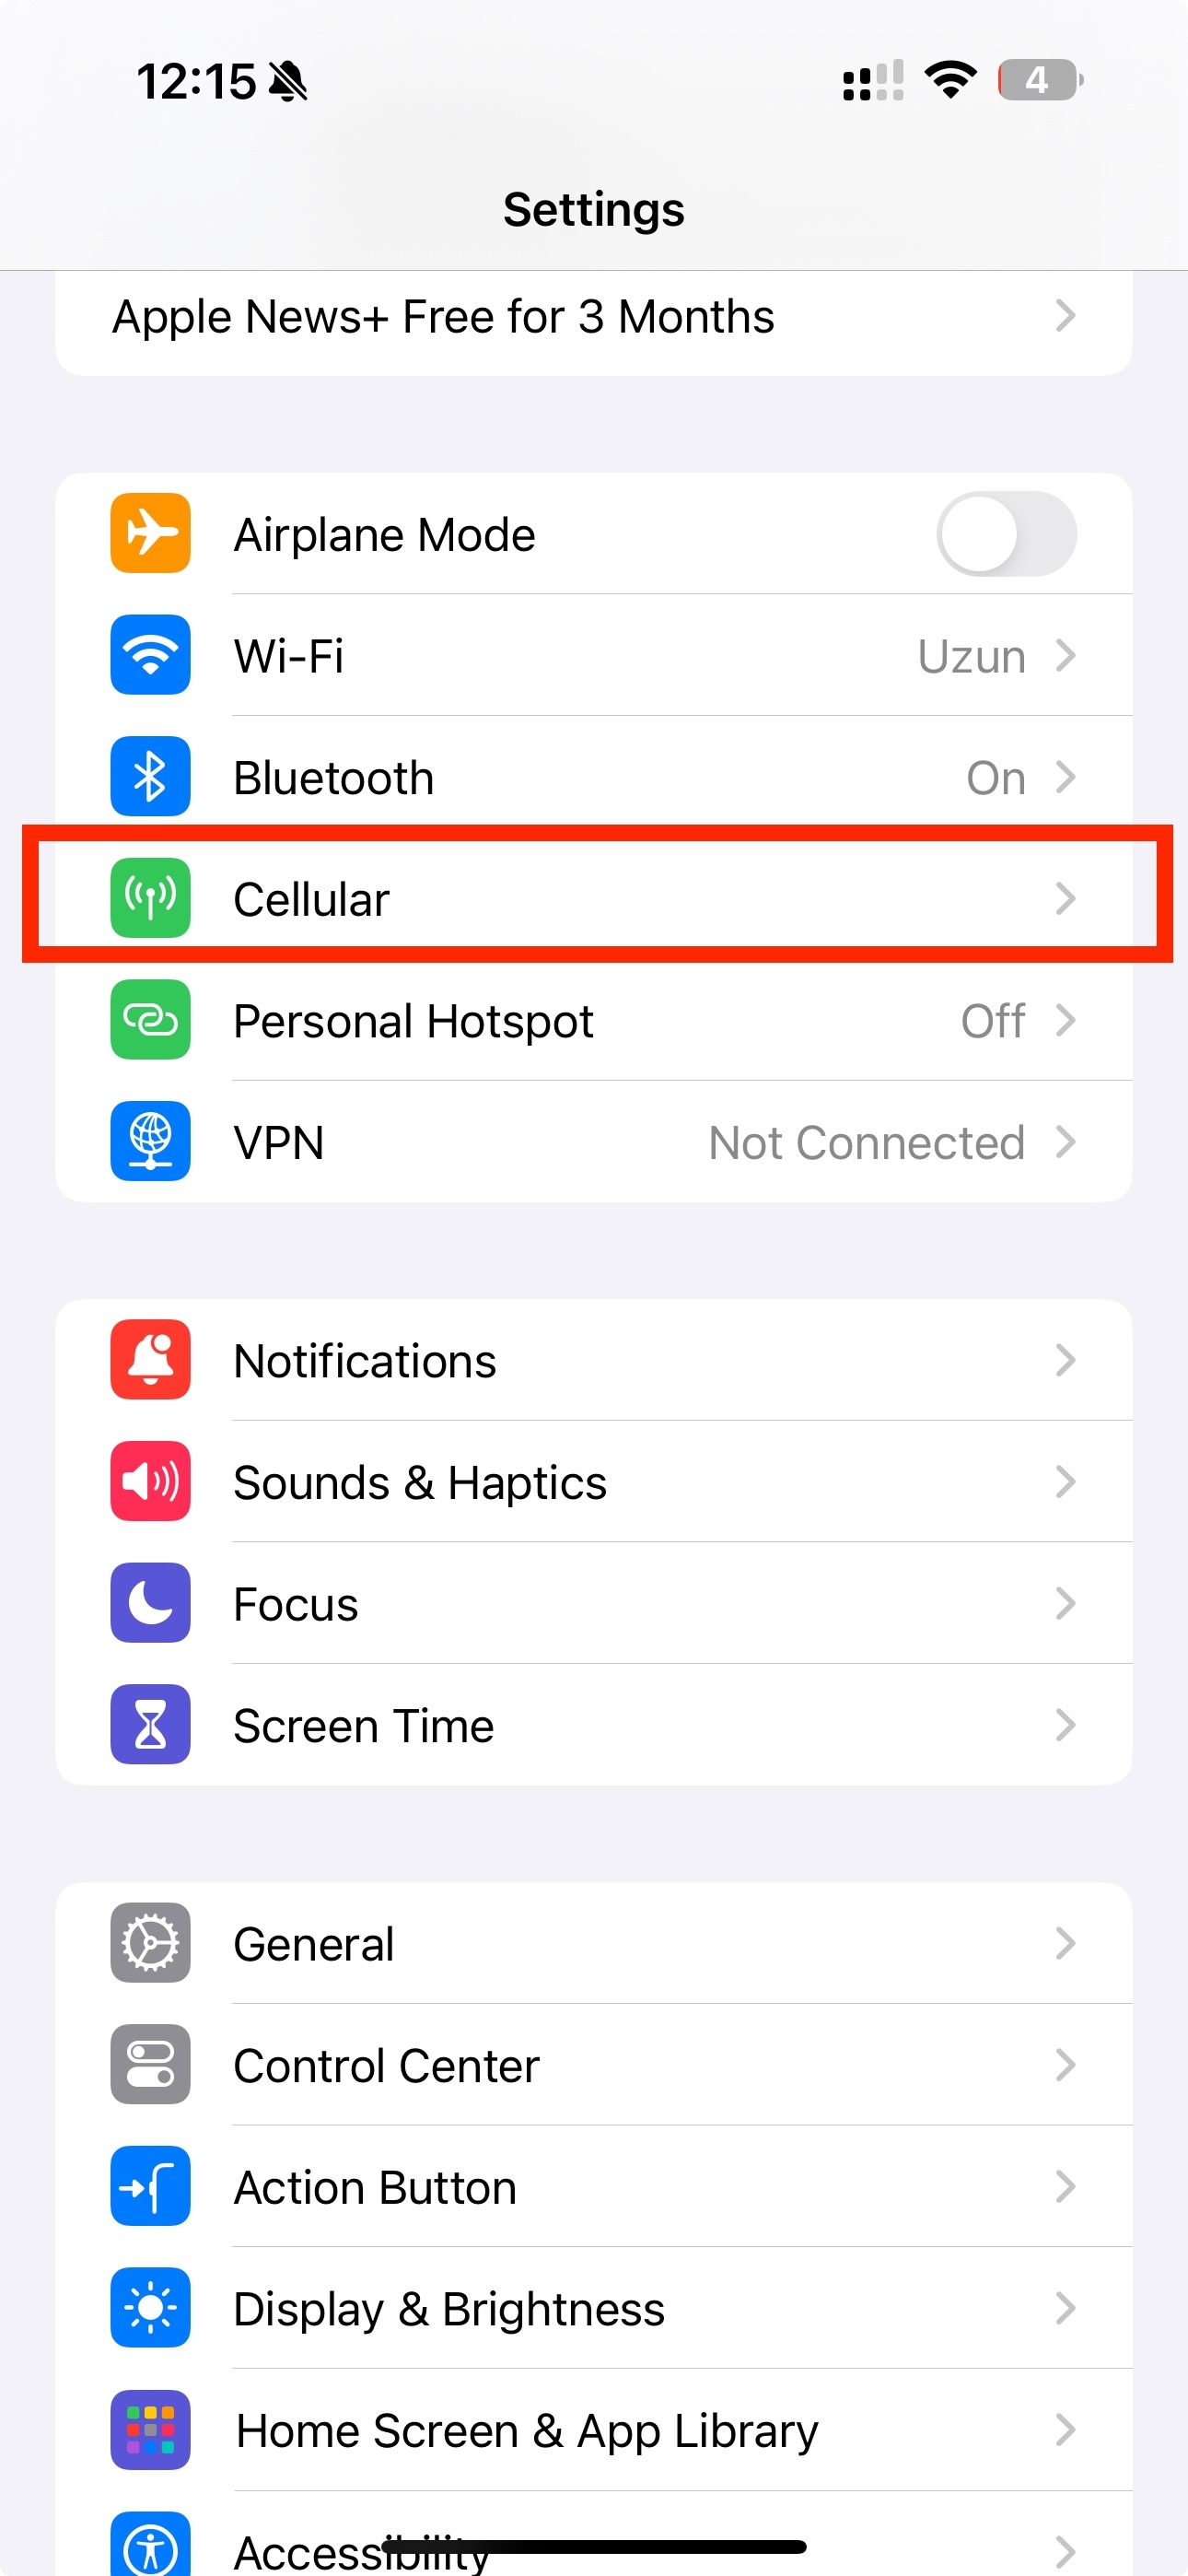
- Go to Settings: Tap the “Settings” icon on your home screen.
- Select Cellular/Mobile Data: Scroll down and tap “Cellular” or “Mobile Data.”
- Add eSIM/Cellular Plan: Tap “Add eSIM” (on newer models) or “Add Cellular Plan.”
- Choose Your Method:
- “Use QR Code”: This is the easiest. Your camera will open. Align your phone to scan the QR code provided by your carrier or eSIM provider.
- “Enter Details Manually”: If you have manual activation details (SM-DP+ Address and Activation Code), select this option and input them accurately.
- Label Your eSIM: After the eSIM profile downloads, you’ll be prompted to label your new cellular plan (e.g., “Business,” “Travel,” “Secondary”). This helps you identify it easily.
- Configure Defaults: Decide which line you want as your “Primary” for calls and texts, and which one will be your “Default Voice Line.” You can also choose which line will be used for “Cellular Data” and whether to allow “Cellular Data Switching” (useful for leveraging the strongest signal).
- Activate: Your eSIM is now installed and should show signal bars.
For Android Devices (Google Pixel/Samsung Galaxy and others)
Android’s interface can vary between manufacturers, but the core steps are similar.
- Open Settings: Tap the “Settings” icon.
- Navigate to Network Settings:
- Google Pixel: Go to “Network & internet” > “SIMs” or “Mobile network.”
- Samsung Galaxy: Go to “Connections” > “SIM manager” or “Mobile networks.”
- Other Androids: Look for similar options like “SIM cards & mobile networks” or “Mobile plan.”
- Add eSIM/Mobile Plan: Look for an option like “Add eSIM,” “Download a SIM,” “Add mobile plan,” or a “+” icon next to “SIMs.”
- Choose Your Method:
- “Scan QR code”: Select this and use your device’s camera to scan the QR code.
- “Enter it manually”: If you have manual details, choose this option and input the SM-DP+ Address and other required information.
- Confirm and Activate: Follow the on-screen instructions to confirm your plan details. You may be asked to give the eSIM a name or label.
- Set Preferences: Configure settings like which SIM is preferred for calls, SMS messages, and mobile data.
- Complete: Your eSIM should now be active and ready for use.
Activating and Managing Your eSIM
Installing the eSIM is just the first step. To get the most out of your digital connectivity, you’ll need to know how to manage its settings, switch between profiles, and handle common scenarios like deleting or transferring an eSIM.
Post-Installation Configuration
After your eSIM is installed, your device will typically prompt you to configure some initial settings. These are crucial for making sure your device uses the eSIM as intended.
- Setting Default Line: If you have multiple SIMs (physical + eSIM, or multiple eSIMs), you’ll need to specify which line is your primary for various functions:
- Default Voice Line: Which number do you want to use for outgoing calls?
- Default Text Line: Which number for outgoing SMS messages?
- Default Cellular Data Line: This is critical, especially for travel eSIMs. Ensure you set the correct eSIM as your data source when you want to use its data plan.
- Data Roaming Settings: For international eSIMs, ensure that “Data Roaming” is enabled for that specific eSIM profile in your device’s cellular settings. Many travel eSIMs function by leveraging roaming agreements, and without this enabled, you might not get service.
- Switching Between eSIM Profiles: One of the greatest advantages of eSIMs is the ability to easily switch between multiple stored profiles. In your cellular settings, you can simply tap on the desired eSIM profile and activate or deactivate it, or set it as the default for data, calls, or texts. This is invaluable when moving between countries or managing personal and professional lines.
Deleting or Transferring an eSIM
Managing your eSIM profiles also includes knowing when and how to remove them, or if possible, transfer them.
- How to Remove an eSIM Profile:
- Navigate to Cellular Settings: Go to “Settings” > “Cellular” or “Mobile Data” (iOS) or “Network & internet” > “SIMs” (Android).
- Select the eSIM: Tap on the eSIM profile you wish to remove.
- Remove/Delete eSIM: You’ll find an option like “Remove Cellular Plan,” “Delete eSIM,” or “Remove SIM.” Confirm your action.
- Important Note: Removing an eSIM profile from your device is a permanent action for that specific device. If you delete a travel eSIM that has remaining data, you typically cannot recover that data or reinstall it on the same or another device unless explicitly allowed by the provider (which is rare). Only delete an eSIM if you are certain you no longer need it.
- Transfer Limitations: Unlike physical SIM cards, eSIM profiles generally cannot be “transferred” between devices in the same way. Most eSIMs are tied to the device they are initially activated on for security reasons. Some newer devices and carriers are introducing “eSIM Quick Transfer” features, particularly within the same ecosystem (e.g., iPhone to iPhone), but this is not universally supported. Always check with your eSIM provider about their policy on transfers before attempting to move an eSIM to a new device. If you get a new phone, you will usually need a new eSIM profile for your existing plan or simply download it on the new device if your carrier supports multi-device eSIMs.
Troubleshooting Common eSIM Installation Issues
While eSIM installation is designed to be smooth, occasionally you might encounter issues. Here’s how to troubleshoot some common problems:
QR Code Not Scanning / Invalid
- Check Internet Connection: Ensure your device has a stable Wi-Fi or active cellular data connection. The QR code contains information, but the actual profile needs to be downloaded over the internet.
- Good Lighting and Angle: Make sure the QR code is well-lit and not blurry or distorted. Hold your phone steady and ensure the entire QR code is within the camera’s frame.
- Code Integrity: Verify that the QR code itself is not damaged, creased, or partially obscured. If you received it digitally, try displaying it on a larger screen or printing it clearly.
- Re-request QR Code: If repeated attempts fail, the QR code might have expired or be invalid. Contact your eSIM provider to request a new one.
“Cannot Add eSIM” / Activation Errors
- Device Compatibility: Double-check that your device is indeed eSIM compatible. Refer to the prerequisites section.
- Carrier Lock: If your phone is locked to a specific carrier, it might prevent you from adding an eSIM from a different provider. You may need to contact your original carrier to unlock your device.
- Software Update: Ensure your device’s operating system is up to date. Older software versions might have bugs or lack full eSIM support.
- Restart Device: A simple restart can often resolve temporary software glitches that prevent installation.
- Contact Provider: If you’re still facing errors, the issue might be on the carrier’s side. Contact your eSIM provider’s customer support with the exact error message.
No Service After Installation
- Enable Data Roaming: If you’re using an international eSIM, go to your device’s cellular settings and ensure “Data Roaming” is enabled for that specific eSIM profile.
- APN Settings: Sometimes, particularly with specific Android devices or smaller carriers, you might need to manually configure the Access Point Name (APN) settings. Your eSIM provider should supply these if they are required. Navigate to the eSIM’s settings under cellular data and look for APN options.
- Network Selection: In your cellular settings, try manually selecting the network instead of relying on automatic selection. Your eSIM provider can tell you which networks they partner with in your location.
- Signal Strength: Are you in an area with network coverage? Move to a location with better signal.
- Restart Device: Again, a quick restart can often refresh network connections.
- Contact Support: If all else fails, reach out to your eSIM provider. They can check the status of your plan on their end and provide specific troubleshooting steps.
Conclusion
The evolution of the SIM card from a removable plastic chip to an embedded digital profile marks a significant milestone in mobile technology. eSIMs offer a powerful combination of flexibility, convenience, and security, making them an increasingly attractive option for modern users. Whether you’re a globetrotter seeking seamless connectivity across borders, a professional juggling multiple phone numbers, or simply someone who appreciates technological innovation, embracing eSIM technology is a step towards a more connected and efficient digital life.
By understanding the basics of eSIMs, checking for device compatibility, and following the straightforward installation steps outlined in this guide, you can unlock a new realm of mobile freedom. While minor hiccups might occur, the troubleshooting tips provided should help you overcome them quickly. As more devices and carriers adopt this standard, eSIMs are set to become the default for mobile connectivity, simplifying our digital lives and paving the way for even more innovative uses in the future. Embrace the change, and enjoy the effortless connectivity that an eSIM brings.
aViewFromTheCave is a participant in the Amazon Services LLC Associates Program, an affiliate advertising program designed to provide a means for sites to earn advertising fees by advertising and linking to Amazon.com. Amazon, the Amazon logo, AmazonSupply, and the AmazonSupply logo are trademarks of Amazon.com, Inc. or its affiliates. As an Amazon Associate we earn affiliate commissions from qualifying purchases.