In today’s increasingly connected world, a robust and reliable Wi-Fi network is no longer a luxury; it’s a necessity. From streaming high-definition content and participating in video conferences to powering smart home devices and ensuring seamless online gaming, our lives are inextricably linked to the quality of our internet connection. While many of us are familiar with traditional routers, the landscape of home networking has been revolutionized by mesh Wi-Fi systems, and at the forefront of this innovation is Eero.
Eero systems are designed to eliminate Wi-Fi dead zones and provide consistent, high-speed internet throughout your entire home. Unlike single routers that can struggle to broadcast a strong signal across larger spaces or through multiple walls, Eero utilizes a network of interconnected “beacons” or “nodes” to create a unified Wi-Fi network. This intelligent system ensures that your devices automatically connect to the strongest signal, delivering an optimal online experience no matter where you are in your home.
This comprehensive guide will walk you through the entire process of installing your Eero system, from unboxing to optimizing. Whether you’re a tech novice or a seasoned enthusiast, we’ll break down each step, making it easy to achieve the flawless Wi-Fi you’ve been dreaming of.
Getting Started: What You Need and What to Expect
Before you embark on your Eero installation journey, it’s crucial to understand what’s involved and to have the necessary components ready. This section will cover the essentials, ensuring a smooth and hassle-free setup.
Unboxing Your Eero System
When your Eero package arrives, you’ll typically find the Eero devices themselves (the number depends on the kit you purchased – usually one Eero router and one or more Eero Beacons or additional Eero routers), a power adapter for each Eero device, and an Ethernet cable. Take a moment to identify each component. The primary Eero device, the one you’ll connect directly to your modem, is often slightly different in appearance or might be explicitly labeled as the “router” or the first Eero. The subsequent devices are usually referred to as “Beacons” or simply additional Eeros, designed to extend the network.
It’s also a good idea to have your smartphone or tablet readily available, as the entire Eero setup process is managed through the Eero app. Ensure you have a stable internet connection on your mobile device for the initial configuration.
Understanding Your Internet Setup
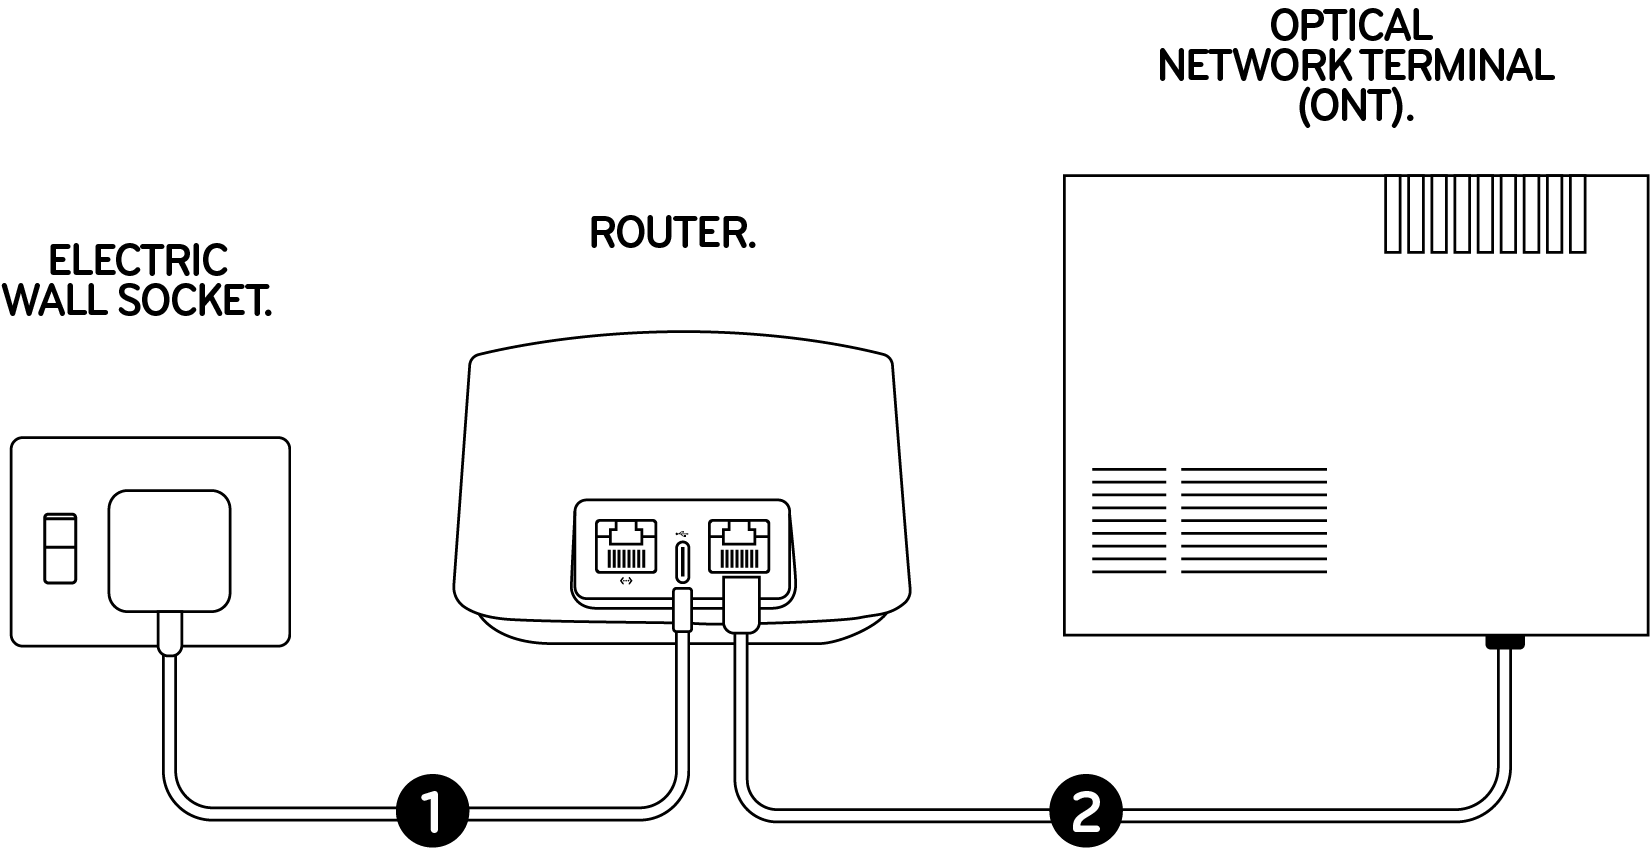
Your Eero system will replace your existing router, but it will connect to your modem. Identify your modem and ensure it’s powered on and functioning correctly. If you have a combined modem-router unit (often provided by your Internet Service Provider or ISP), you’ll need to put it into “bridge mode.” This essentially disables its routing capabilities, allowing your Eero system to take over as the primary network manager.
What is Bridge Mode?
Bridge mode is a crucial step if you have a modem-router combo device. In this mode, the device acts solely as a modem, passing the internet connection directly to your Eero router. This prevents potential network conflicts and ensures that your Eero system can manage your network effectively, including features like parental controls and network security.
How to Enable Bridge Mode:
The process for enabling bridge mode varies depending on your ISP and the specific modem-router model. Generally, you’ll need to:
- Access your modem-router’s administrative interface: This is typically done by typing an IP address (often 192.168.0.1 or 192.168.1.1) into a web browser on a device connected to your modem-router’s network. Consult your modem-router’s manual or your ISP’s website for the correct IP address and login credentials.
- Locate the routing or gateway settings: Look for options like “Advanced Settings,” “WAN Settings,” “Gateway Settings,” or “Routing.”
- Find and enable “Bridge Mode” or “IP Passthrough”: The exact wording can differ. Select this option and save your changes.
- Restart your modem-router: It’s essential to restart the device for the changes to take effect.
Important Note: If you’re unsure about enabling bridge mode, it’s highly recommended to contact your ISP. They can guide you through the process or even perform it remotely for you. Incorrectly configuring bridge mode can temporarily disrupt your internet access.
Step-by-Step Eero Installation
The beauty of Eero lies in its user-friendly installation process. The Eero app guides you through every step, making it accessible even for those new to network setups.
The Eero App: Your Setup Command Center
The Eero app is the central hub for managing your entire Eero network. It’s available for free on both iOS and Android devices.
- Download the Eero App: Search for “Eero” in your device’s app store and download the official application.
- Create an Account or Log In: If you’re a new Eero user, you’ll need to create an Eero account. This account will be used to manage your network settings and settings from anywhere. If you already have an Eero account, simply log in.
- Start the Setup Process: Once logged in, the app will prompt you to begin setting up a new Eero network.
Connecting Your First Eero Device
This is where you’ll connect your primary Eero router to your modem.
- Disconnect Your Current Router (if applicable): If you’re replacing an existing router, unplug it from the power outlet and disconnect the Ethernet cable that connects it to your modem.
- Power Up Your Modem: Ensure your modem is powered on and has a stable internet connection (look for the indicator lights on your modem to confirm this).
- Connect the Eero Router: Take the included Ethernet cable and plug one end into the WAN port on your Eero router (this is usually the only Ethernet port on the back of the first Eero device). Plug the other end into your modem.
- Power Up Your Eero Router: Connect the power adapter to your Eero router and plug it into a power outlet. The Eero device will illuminate, indicating it’s booting up.
- Follow App Prompts: Return to the Eero app on your smartphone or tablet. The app will detect the new Eero device and guide you through the next steps. This typically involves:
- Identifying the Eero: The app might ask you to confirm you see the device’s LED light.
- Connecting to the Eero’s Temporary Network: You might be asked to temporarily connect your phone or tablet to a Wi-Fi network broadcast by the Eero itself for initial configuration. The app will provide the network name (SSID) and password.
- Creating Your New Wi-Fi Network Name and Password: This is a crucial step. You’ll choose the name (SSID) for your new Wi-Fi network and create a strong, secure password. You can choose to use your existing Wi-Fi name and password to make it easier for your devices to reconnect, or create a new one.
- Firmware Update: The Eero app will check for and install any available firmware updates for your Eero device. This is essential for security and performance.
Adding Additional Eero Devices (Beacons or Routers)
Once your primary Eero router is set up and broadcasting your new Wi-Fi network, it’s time to expand your coverage.
- Placement is Key: Before plugging in your additional Eero devices, consider their placement. Eero Beacons are designed to be plugged directly into wall outlets and are best placed roughly halfway between your primary Eero router and any areas with weak Wi-Fi signals. For additional Eero routers, the same principle applies – aim for strategic placement to create a seamless mesh.
- Avoid Obstructions: Try to place them in open areas, away from thick walls, large metal objects, and other electronics that might cause interference.
- Consider Your Needs: Think about the areas in your home where you experience the worst Wi-Fi performance and place your Eero devices accordingly.
- Plug In the Additional Eero: Once you’ve decided on the location, plug your additional Eero device into a power outlet. It will power on and begin broadcasting.
- Add to the App: Return to the Eero app.
- Select “Add Eero”: The app should detect the new Eero device. If not, you can manually select “Add Eero” or “Add a new device” from the app’s menu.
- Follow On-Screen Instructions: The app will guide you through the process of pairing the new Eero device with your existing network. This typically involves the app confirming the device’s presence and integrating it into your mesh network.
- Repeat for All Devices: Follow these steps for each additional Eero Beacon or router you have.
Optimizing Your Eero Network for Peak Performance
Installation is just the beginning. Eero offers a suite of features within its app that allow you to fine-tune your network for the best possible performance and security.
Leveraging Eero’s Advanced Features
The Eero app is more than just a setup tool; it’s your network management dashboard.
- Network Speed Test: The Eero app includes a built-in speed test. Run this test from different locations in your home to verify that you’re getting the speeds you expect. If speeds are consistently low in certain areas, you might need to reposition your Eero devices.
- Device Management: See all the devices connected to your Eero network. You can even assign profiles to family members, allowing for easier management of internet access.
- Guest Network: Eero makes it incredibly easy to set up a separate guest Wi-Fi network. This is a great security feature, as it keeps your main network and its devices isolated from visitors. You can set a unique SSID and password for your guest network and even set time limits for guest access.
- Parental Controls: Eero offers robust parental controls through the app. You can pause internet access for specific devices, set internet “bedtimes,” and even filter content to block access to inappropriate websites. This feature is invaluable for families with children, allowing you to manage screen time and ensure a safe online environment.
- Eero Secure: Eero offers a subscription service called Eero Secure (and Eero Secure+). Eero Secure provides enhanced network security features like advanced ad blocking, malware protection, and VPN services (with Eero Secure+). Consider this upgrade if digital security and a cleaner browsing experience are high priorities.
- Automatic Updates: One of the significant advantages of Eero is its automatic firmware updates. The system will download and install updates in the background, ensuring your network is always running the latest, most secure software without you having to do anything.

Troubleshooting Common Issues
While Eero is known for its ease of use, occasional hiccups can occur. Here are a few common issues and their solutions:
- Slow Speeds:
- Check Modem: Ensure your modem is functioning correctly and is not the bottleneck.
- Reposition Eeros: Move your Eero devices closer together or to a more central location.
- Run Speed Test: Use the app’s speed test to pinpoint the area with the issue.
- Minimize Interference: Ensure Eeros are not placed near microwaves, cordless phones, or thick walls.
- Check ISP Plan: Confirm your internet plan from your ISP is delivering the speeds you expect.
- Eero Device Not Connecting:
- Restart Devices: Power cycle your modem, Eero router, and the problematic Eero device.
- Check Ethernet Cable: Ensure the Ethernet cable is securely plugged into both the modem and the Eero router.
- App Assistance: The Eero app often has troubleshooting guides for specific connection issues.
- Wi-Fi Dead Zones Persist:
- Add More Eeros: If you have a very large home or many walls, you might need an additional Eero device to extend coverage further.
- Optimize Placement: Experiment with different placements for your Eero devices. Sometimes a slight adjustment can make a significant difference.
By following these steps and utilizing the powerful features within the Eero app, you can confidently install and optimize your Eero system, ensuring a fast, reliable, and secure Wi-Fi experience throughout your entire home. Say goodbye to frustrating dead zones and hello to seamless connectivity.
aViewFromTheCave is a participant in the Amazon Services LLC Associates Program, an affiliate advertising program designed to provide a means for sites to earn advertising fees by advertising and linking to Amazon.com. Amazon, the Amazon logo, AmazonSupply, and the AmazonSupply logo are trademarks of Amazon.com, Inc. or its affiliates. As an Amazon Associate we earn affiliate commissions from qualifying purchases.