In the rapidly evolving landscape of technology, particularly within the realms of data science, artificial intelligence, and software development, managing your software environment can quickly become a complex and time-consuming challenge. As projects grow in scope and dependency, ensuring consistency across different machines, replicating environments for collaboration, and avoiding version conflicts are paramount. This is where a powerful package and environment management system like Conda becomes indispensable.
Conda, developed by Anaconda, Inc., is an open-source, cross-platform system that streamlines the process of installing, running, and updating packages and their dependencies. While often associated with Python, Conda can manage libraries and dependencies for many other languages as well. Its key strength lies in its ability to create isolated environments, preventing conflicts between different software versions required by various projects. This tutorial will guide you through the straightforward process of installing Conda, empowering you to build and maintain robust, reproducible data science and software development workflows.
The decision to install Conda is often driven by the need for a more organized and efficient approach to managing your computational tools. Whether you’re a seasoned data scientist working with intricate machine learning models, a developer building complex applications, or a student embarking on your journey into the world of programming, Conda offers a solution to common frustrations. The ability to create a separate environment for each project, with its own specific set of packages and their versions, is a game-changer. This means that a project requiring Python 3.7 and a specific version of NumPy won’t interfere with another project that needs Python 3.9 and a different NumPy version. This isolation is the cornerstone of reproducible research and development, a concept that resonates deeply within the technology sector.
From a Tech perspective, Conda is a vital tool for any serious Python developer or data scientist. It simplifies the installation of complex scientific libraries like NumPy, SciPy, Pandas, Scikit-learn, TensorFlow, and PyTorch, which often have intricate dependencies that can be difficult to resolve manually. By handling these dependencies automatically, Conda saves valuable development time and reduces the likelihood of “dependency hell.” Furthermore, its ability to create virtual environments fosters better Productivity by allowing developers to switch between project requirements seamlessly without needing to reinstall everything. The focus on Tutorials within the tech community often highlights Conda as a foundational tool for learning and implementing advanced concepts.
While not directly related to Brand strategy in its core function, the efficient management of development environments enabled by Conda can indirectly impact a brand’s reputation. Reliable and reproducible software, a direct consequence of using tools like Conda, contributes to a stronger and more trustworthy brand image. In the Money aspect, for individuals and businesses alike, efficient development processes translate to cost savings. Faster development cycles, reduced debugging time due to environment issues, and the ability to onboard new team members quickly all contribute to a more profitable and financially sound operation. For those engaged in Online Income streams related to software development or data analysis, a streamlined workflow is crucial for delivering projects on time and maintaining client satisfaction.
This guide will cover the essential steps, ensuring you can get Conda up and running on your system with minimal fuss.
Understanding Conda: More Than Just a Package Manager
Before diving into the installation process, it’s beneficial to understand what makes Conda such a powerful tool. Conda is often referred to as a package manager, but its capabilities extend far beyond that.
What is Conda?
At its heart, Conda is an environment manager and a package manager.
-
Package Management: Conda can install, update, and remove software packages. Unlike pip, Python’s default package manager, Conda can manage packages written in any language, not just Python. This is particularly useful in scientific computing where you might need libraries written in C, R, or other languages that are critical to your workflow. Conda ensures that all the necessary dependencies for a package are installed correctly, regardless of their origin.
-
Environment Management: This is arguably Conda’s most significant advantage. Conda allows you to create isolated “environments.” Think of an environment as a self-contained directory that holds a specific collection of packages, including a particular version of Python. This isolation is crucial for several reasons:
- Project Isolation: Each project can have its own environment with specific dependencies. This prevents version conflicts between projects that might require different versions of the same library.
- Reproducibility: You can easily share your environment’s configuration with others, allowing them to recreate your exact setup. This is vital for collaborative projects and for ensuring that your work can be reproduced by others (or yourself at a later date).
- Testing: You can test new packages or different versions of existing packages in a separate environment without risking the stability of your main development setup.
- System Cleanliness: It keeps your base system installation clean, as project-specific packages are not installed globally.
Conda vs. Pip
It’s common to hear about Pip when discussing Python package management. While Pip is excellent for managing Python packages, Conda offers a broader scope and distinct advantages:
- Scope: Pip is Python-specific. Conda can manage packages for Python, R, Ruby, Java, JavaScript, Scala, Java, C/C++, and more.
- Dependencies: Conda can resolve complex non-Python dependencies (e.g., C libraries, CUDA toolkits for GPU computing) that Pip cannot handle.
- Environment Management: While Python’s
venvandvirtualenvare excellent for managing Python environments, Conda’s environment management is more powerful and can also manage the Python interpreter itself within an environment. - Package Sources: Conda can install packages from various channels, including the default Anaconda channel,
conda-forge(a community-led collection of packages), and private channels. Pip primarily installs from the Python Package Index (PyPI).
For data science and AI, where complex libraries and specific hardware dependencies (like NVIDIA CUDA for GPU acceleration) are common, Conda’s comprehensive capabilities make it the preferred choice.
Installing Conda: Step-by-Step Guide
Installing Conda is a straightforward process. You have two primary options: installing the full Anaconda Distribution or the lighter Miniconda.
Option 1: Installing Anaconda Distribution
Anaconda Distribution is a comprehensive suite that includes Conda, Python, and a vast collection of pre-installed data science and machine learning packages (over 250). It’s an excellent choice for beginners and those who want a ready-to-use environment for data science.
Step 1: Download the Installer
- Visit the Anaconda Distribution Download Page: Navigate to the official Anaconda Distribution download page: https://www.anaconda.com/download
- Choose Your Operating System: Select the installer for your operating system (Windows, macOS, or Linux).
- Select Python Version: Choose between the latest Python 3 version or Python 2 (though Python 3 is highly recommended).
- Download the Graphical Installer or Command-Line Installer: For most users, the graphical installer is the easiest to use. If you prefer working in the terminal, you can choose the command-line installer.
Step 2: Run the Installer
-
On Windows:
- Double-click the downloaded
.exefile. - Follow the on-screen prompts.
- Important: During installation, you will be asked whether to “Add Anaconda to my PATH environment variable.” For most users, especially beginners, it is recommended NOT to add Anaconda to the PATH. Instead, you will launch Anaconda applications through the Anaconda Navigator or by using Anaconda Prompt from the Start Menu. This avoids potential conflicts with other software. If you are an advanced user and understand the implications, you can choose to add it to the PATH.
- Accept the license agreement.
- Choose the installation type: “Just Me” (recommended) or “All Users” (requires administrator privileges).
- Select an installation location or use the default.
- Complete the installation.
- Double-click the downloaded
-
On macOS:
- Double-click the downloaded
.pkgfile. - Follow the on-screen prompts.
- Accept the license agreement.
- Choose the installation location (usually your home directory).
- Complete the installation.
- The installer will usually prompt you to run
conda init. It’s generally recommended to say “yes” to this, which will configure your shell to recognizecondacommands.
- Double-click the downloaded
-
On Linux:
- Open your terminal.
- Navigate to the directory where you downloaded the installer (e.g.,
cd Downloads). - Run the installer script using
bash:
bash

bash Anaconda3-2023.07-2-Linux-x86_64.sh  # Replace with your downloaded filename
- Follow the prompts.
- Read and accept the license agreement.
- Choose an installation location or use the default.
- When prompted to initialize Anaconda by running
conda init, it is recommended to typeyes. This adds Anaconda to your system’s PATH. - Close and re-open your terminal for the changes to take effect.
Step 3: Verify the Installation
- Open Anaconda Prompt (Windows) or Terminal (macOS/Linux):
- Windows: Search for “Anaconda Prompt” in the Start Menu.
- macOS/Linux: Open your regular terminal application.
- Check Conda Version: Type the following command and press Enter:
bash

conda --version
You should see the installed Conda version printed. - Check Python Version: Type:
bash

python --version
This will show the Python version managed by your base Conda environment. - Check Installed Packages: Type:
bash

conda list
This will display a list of all packages installed in your current environment.
Option 2: Installing Miniconda
Miniconda is a minimal installer that includes Conda, Python, the packages they depend on, and a few other helpful packages like Pip and zlib. It’s much smaller than Anaconda Distribution and is ideal if you prefer to install only the packages you need.
The installation process for Miniconda is very similar to that of Anaconda Distribution.
Step 1: Download the Installer
- Visit the Miniconda Download Page: Navigate to the official Miniconda download page: https://docs.conda.io/en/latest/miniconda.html
- Choose Your Operating System and Python Version: Select the installer for your OS (Windows, macOS, Linux) and your preferred Python version (Python 3 is recommended). Download either the Python 3.x version (64-bit or 32-bit, depending on your system).
Step 2: Run the Installer
The steps for running the installer are identical to those described in “Option 1: Installing Anaconda Distribution” above for each operating system. Pay close attention to the PATH environment variable recommendation and the conda init prompt.
Step 3: Verify the Installation
Follow the same verification steps as described in “Option 1: Installing Anaconda Distribution” above.
Managing Environments and Packages with Conda
Once Conda is installed, you’ll want to leverage its environment and package management capabilities.
Creating and Activating Environments
Creating isolated environments is Conda’s superpower.
-
Create a new environment:
To create a new environment, specify a name and optionally the Python version and other packages you want to include.conda create --name myenv python=3.9 numpy pandasThis command creates an environment named
myenv, installs Python version 3.9, and also installs thenumpyandpandaspackages. -
Activate an environment:
Before you can use an environment, you need to activate it.conda activate myenvYour terminal prompt will change to indicate that
myenvis now active (e.g.,(myenv) user@hostname:~/$). When an environment is active, any Python commands or package installations will occur within that environment. -
Deactivate an environment:
To exit an environment and return to your base environment, use:conda deactivate
Installing and Managing Packages within an Environment
With an environment activated, you can install, update, or remove packages.
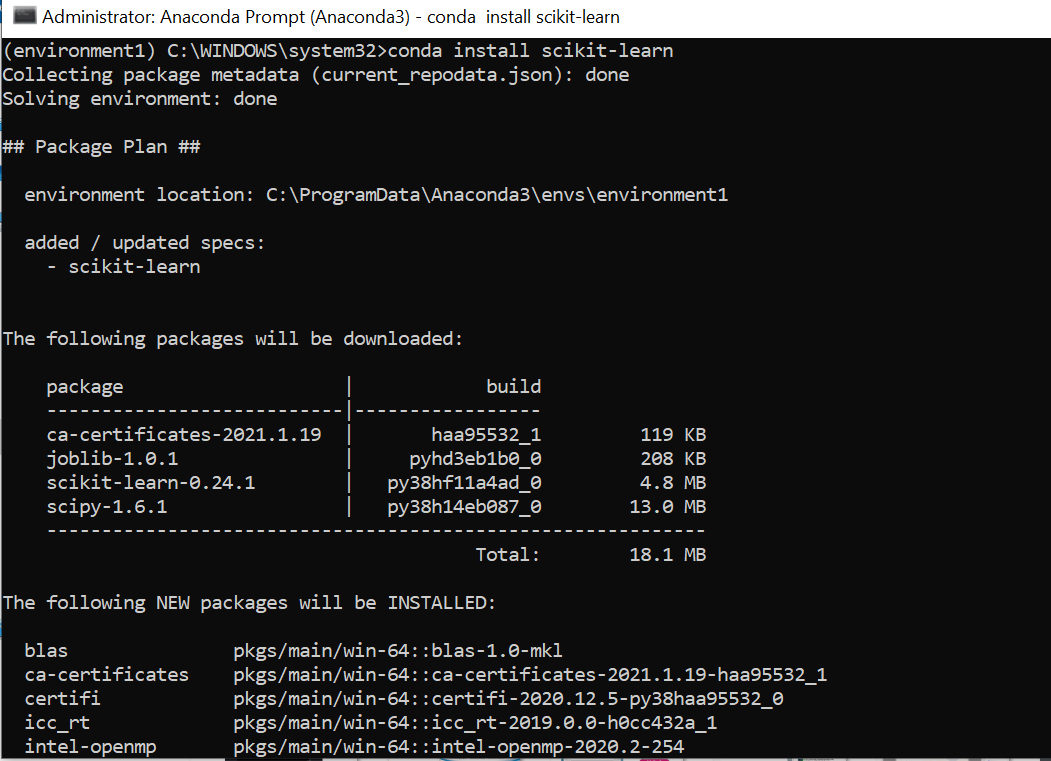
-
Install a package:
conda install scipy -
Install a specific version of a package:
conda install matplotlib=3.5.1 -
Update a package:
conda update scikit-learn -
Update all packages in the current environment:
conda update --all -
Remove a package:
conda remove pillow -
List packages in the current environment:
bash

conda list
Sharing Environments
Reproducibility is key. Conda allows you to export your environment’s configuration to a file.
-
Export environment to a file:
With an environment activated, run:conda env export > environment.ymlThis creates an
environment.ymlfile that lists all packages and their exact versions. -
Create an environment from a file:
To recreate an environment from anenvironment.ymlfile (on another machine or for a colleague):
bash

conda env create -f environment.yml
This will create a new environment with the exact specifications from the file.

Conclusion: Embracing an Organized Workflow
Installing Conda is the first, crucial step towards a more organized, reproducible, and efficient development workflow. Whether you choose the comprehensive Anaconda Distribution or the leaner Miniconda, the underlying power of Conda’s environment and package management will significantly enhance your productivity and reduce the common frustrations associated with managing software dependencies.
By mastering Conda, you are investing in a robust foundation for your Tech projects. This directly contributes to better Productivity, allowing you to focus more on innovation and less on technical hurdles. For those building businesses or pursuing Online Income streams that rely on software development or data analysis, efficient workflows facilitated by Conda translate into tangible Money benefits – reduced development time, fewer errors, and faster time-to-market. In essence, installing Conda is not just about installing software; it’s about adopting a best practice that underpins successful and scalable technology endeavors. Start experimenting with environments today, and unlock the full potential of your development journey.
aViewFromTheCave is a participant in the Amazon Services LLC Associates Program, an affiliate advertising program designed to provide a means for sites to earn advertising fees by advertising and linking to Amazon.com. Amazon, the Amazon logo, AmazonSupply, and the AmazonSupply logo are trademarks of Amazon.com, Inc. or its affiliates. As an Amazon Associate we earn affiliate commissions from qualifying purchases.