In the intricate world of computing, where powerful processors and vast storage often steal the limelight, it’s easy to overlook the unsung heroes—the small, seemingly insignificant components that keep everything ticking along smoothly. Among these crucial yet often forgotten elements is the Complementary Metal-Oxide-Semiconductor (CMOS) battery. This tiny power source plays a vital role in maintaining your computer’s essential settings, from the system clock to crucial BIOS/UEFI configurations. When this battery begins to fail, it can lead to a cascade of annoying and potentially disruptive issues, impacting your productivity and even your system’s security.

For anyone who has experienced their computer forgetting the correct date and time upon every startup, or encountering persistent boot errors, the CMOS battery is often the culprit. Replacing it is a straightforward, empowering task that most computer users can accomplish with minimal tools and a little guidance. This comprehensive guide will walk you through everything you need to know about the CMOS battery, why it’s important, how to identify when it needs replacing, and a detailed, step-by-step process to install a new one, ensuring your system remains reliable and efficient. Embrace the opportunity to understand and maintain your technology, saving yourself time, money, and frustration.
Understanding the CMOS Battery and Its Role
Before diving into the replacement process, it’s crucial to grasp what a CMOS battery is, what it does, and why its proper functioning is paramount to your computer’s health. This foundational knowledge will not only help you troubleshoot future issues but also reinforce the importance of this small but mighty component within your tech ecosystem.
What is a CMOS Battery?
The CMOS battery, often a coin-cell battery similar to those found in watches or remote controls (most commonly a CR2032), is mounted directly on your computer’s motherboard. Its primary function is to power the CMOS chip, a small, non-volatile memory chip that stores vital system information. This information includes:
- System Date and Time: This is perhaps the most noticeable function. The CMOS battery ensures your computer keeps accurate track of the current date and time, even when the computer is powered off and unplugged.
- BIOS/UEFI Settings: The Basic Input/Output System (BIOS) or its modern successor, Unified Extensible Firmware Interface (UEFI), is the firmware that initiates your computer’s hardware during the booting process. The CMOS chip stores the customized settings for your BIOS/UEFI, such as boot order (which drive to start from), hardware configurations, security passwords, and other low-level system parameters.
- Hardware Configurations: Information about installed drives, memory modules, and other peripherals can also be stored and maintained by the CMOS, helping the system recognize and utilize its components correctly from startup.
Without the CMOS battery providing a constant trickle of power, the CMOS chip would lose this data whenever the main power supply is disconnected. This would force your computer to revert to default factory settings, leading to a host of operational problems.
Signs of a Failing CMOS Battery
Identifying a failing CMOS battery is often straightforward, as the symptoms are quite distinctive. Recognizing these signs early can save you from more complex troubleshooting and unnecessary anxiety. Here are the most common indicators that your CMOS battery might be at the end of its life:
- Incorrect System Date and Time: This is the quintessential symptom. If your computer consistently resets its date and time to a default value (e.g., January 1, 2000, or the date of manufacture) every time you power it on, or after it has been unplugged for a period, a dying CMOS battery is almost certainly the cause.
- BIOS/UEFI Settings Reset: You might notice that your custom BIOS/UEFI settings (like boot order preferences, overclocking profiles, or specific hardware configurations) are lost, and the system reverts to factory defaults upon reboot. This can manifest as your computer failing to boot from your preferred drive, or other unexpected startup behaviors.
- Persistent Boot Errors: While not exclusively due to a CMOS battery, persistent messages like “CMOS Checksum Error,” “CMOS Read Error,” “CMOS Battery Low,” or “Press F1 to Resume” during startup can directly point to battery failure. These errors indicate that the system is unable to read or verify the data stored in the CMOS chip.
- Inability to Connect to Secure Websites: Incorrect system time can lead to issues with SSL/TLS certificates, making it difficult or impossible to browse secure websites (HTTPS) as your browser may report certificate validation errors. This impacts your digital security and online productivity.
- Hardware Detection Issues: In some cases, a failing CMOS battery can cause your system to intermittently “forget” about certain hardware components, such as secondary hard drives or expansion cards, leading to instability or performance issues.
Why Replacing It Matters
Replacing a failing CMOS battery isn’t just about convenience; it’s about maintaining the stability, security, and overall health of your computing experience.
- System Stability: A properly functioning CMOS battery ensures your system starts up correctly, recognizes all its components, and adheres to your preferred configurations. This prevents frustrating boot loops, configuration errors, and unexpected behavior.
- Security: As mentioned, incorrect time and date can wreak havoc with secure connections and digital certificates. For businesses, or individuals managing sensitive data, ensuring system time is accurate is a fundamental aspect of digital security. It also ensures that system logs and timestamps are correct, which is vital for auditing and incident response.
- Productivity: Constantly having to reset your date and time or reconfigure your BIOS settings wastes valuable time. A new CMOS battery eliminates these distractions, allowing you to get straight to work or play.
- Extending Hardware Lifespan: While not directly extending the life of your major components, ensuring your system boots and operates within its intended parameters can prevent unnecessary stress and potential damage from incorrect configurations.
- Cost-Effectiveness: Replacing a CMOS battery is an inexpensive fix. Neglecting it can lead to perceived “major” issues that might prompt unnecessary and costly professional diagnoses or even lead users to consider replacing entire motherboards or systems when a simple, cheap battery swap is all that’s needed.
Essential Preparations Before You Begin
Approaching any internal computer repair, no matter how minor, requires careful preparation. Taking the necessary steps beforehand ensures your safety, protects your computer from accidental damage, and streamlines the installation process, making it a smooth and successful endeavor.
Gathering Your Tools
You won’t need an elaborate toolkit for this task, but having the right implements at hand makes a world of difference.
- Phillips Head Screwdriver: This is the most common type of screwdriver needed to open computer cases and remove internal components. A set with various sizes (especially a small to medium one) is ideal.
- New CMOS Battery (CR2032): This is the star of the show. The vast majority of desktop and laptop computers use a CR2032 3V lithium coin-cell battery. They are widely available and inexpensive. Double-check your computer’s manual or current battery if you want to be absolutely certain, but CR2032 is the industry standard.
- Anti-Static Wrist Strap (Recommended): While not strictly mandatory for experienced users in a static-controlled environment, an anti-static wrist strap is highly recommended, especially for beginners. It grounds you, preventing electrostatic discharge (ESD) that can permanently damage sensitive computer components.
- Small Pliers or Tweezers (Optional but Helpful): In some tight spaces or with stubborn battery clips, a pair of small needle-nose pliers or tweezers can assist in gently dislodging the old battery or securing the new one.
- Flashlight (Optional but Helpful): Computer cases can be dark, and motherboards have many small components. A flashlight will help you locate the CMOS battery and see the clips clearly.
- Small Non-Conductive Pry Tool (Optional): Sometimes the battery is in a plastic holder or has a stubborn clip. A plastic spudger or guitar pick can be useful for gently levering it out without scratching the motherboard or causing a short.
Safety First: Crucial Precautions
Working inside a computer carries certain risks if proper safety measures are not observed. Your safety and the integrity of your hardware are paramount.
- Disconnect All Power: This is the most critical step. Shut down your computer completely, then unplug the power cord from the wall outlet and from the power supply unit on the back of your computer. For laptops, remove the main battery as well. Even with the system off, residual power can remain, and live circuits are dangerous.
- Discharge Residual Power: After unplugging, press and hold the power button on your computer for 10-15 seconds. This helps to discharge any remaining power stored in capacitors on the motherboard, further reducing the risk of electric shock or damage.
- Ground Yourself to Prevent ESD: Electrostatic Discharge (ESD) is invisible but can severely damage electronic components.
- Anti-Static Wrist Strap: Connect one end to your wrist and the other to a bare, unpainted metal part of the computer chassis (e.g., the power supply housing). This continuously grounds you.
- Alternative Grounding: If you don’t have a wrist strap, frequently touch a bare, unpainted metal part of the computer chassis before and during handling components. Avoid working on carpet, and consider working on a wooden or non-static-generating surface.
- Work in a Clean, Well-Lit Area: Ensure your workspace is free of clutter, well-lit, and non-carpeted. This prevents losing small screws or dropping components and reduces static buildup.
- Handle Components with Care: Always hold circuit boards and components by their edges, avoiding touching the exposed circuitry or connectors. Finger oils and static can be detrimental.
- Observe Cable Management: Pay attention to how cables are routed before you unplug them. This will make reassembly much easier.
- Document Your Steps (Optional): For complex cases, taking photos with your smartphone at various stages can be invaluable for remembering where everything goes, especially cable connections.
Choosing the Right CMOS Battery
As noted, the CR2032 is the industry standard for CMOS batteries in most desktop and laptop motherboards. It’s a 3-volt lithium coin cell, about 20mm in diameter and 3.2mm thick. You can find these at most electronics stores, supermarkets, or online retailers. They are generally inexpensive, costing only a few dollars.
While the CR2032 is dominant, some older or specialized systems might use different types like CR2025 or CR2016, though these are rare for CMOS applications. If in doubt, visually inspect the existing battery for its markings or consult your motherboard’s manual. Purchasing a reputable brand ensures better longevity and performance. Avoid no-name or extremely cheap batteries, as their lifespan might be shorter.
Step-by-Step Guide to CMOS Battery Installation
With your tools ready and safety precautions in mind, you’re now prepared to embark on the core task: replacing the CMOS battery. This section details the process from opening your computer to reassembling it and ensuring everything works correctly.
Disconnecting and Opening Your Computer
The first physical step is to gain access to the computer’s internals.
- Power Down Completely: Ensure your operating system is fully shut down. Do not just put it to sleep.
- Unplug All Cables: Disconnect the power cable from the wall and the computer. Then, unplug all other peripherals: monitor, keyboard, mouse, USB devices, Ethernet cable, speakers, etc. For a laptop, remove the main battery pack if it’s external.
- Move to Your Workspace: Carefully move your computer tower or laptop to your prepared, clean, and well-lit workspace.
- Open the Computer Case (Desktop):
- Most desktop cases have thumb screws or standard Phillips head screws on the rear panel that secure the side panel(s).
- Typically, you’ll need to remove the left-side panel (when looking at the front of the tower) to access the motherboard.
- Once screws are removed, gently slide the panel backward and then lift it away. Set it aside safely.
- For Laptops: Opening a laptop can be more complex and varies greatly by model. It usually involves unscrewing several screws from the bottom casing, carefully prying open clips with a plastic tool, and often disconnecting ribbon cables if the keyboard or top shell needs to be removed. Consult your laptop’s service manual or a specific disassembly guide for your model if you’re unsure.
- Ground Yourself: If you haven’t already, put on your anti-static wrist strap and connect it to an unpainted metal part of the computer chassis. If not using a strap, frequently touch the metal chassis throughout the process.
Locating and Removing the Old Battery
Once the case is open, your mission is to find the small coin-cell battery on the motherboard.
- Identify the Motherboard: This is the large circuit board where most of your computer’s components (CPU, RAM, expansion cards) are connected.
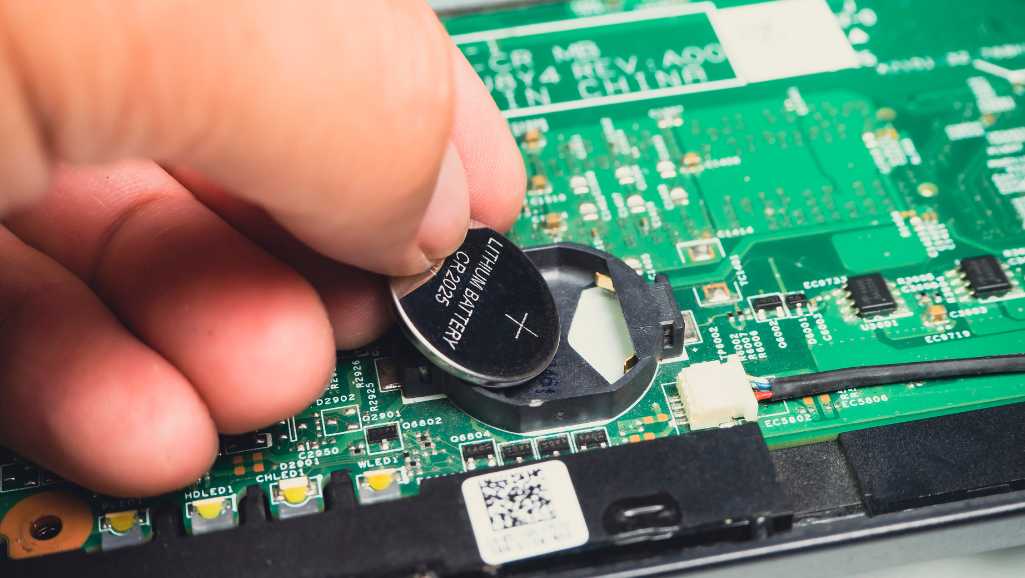
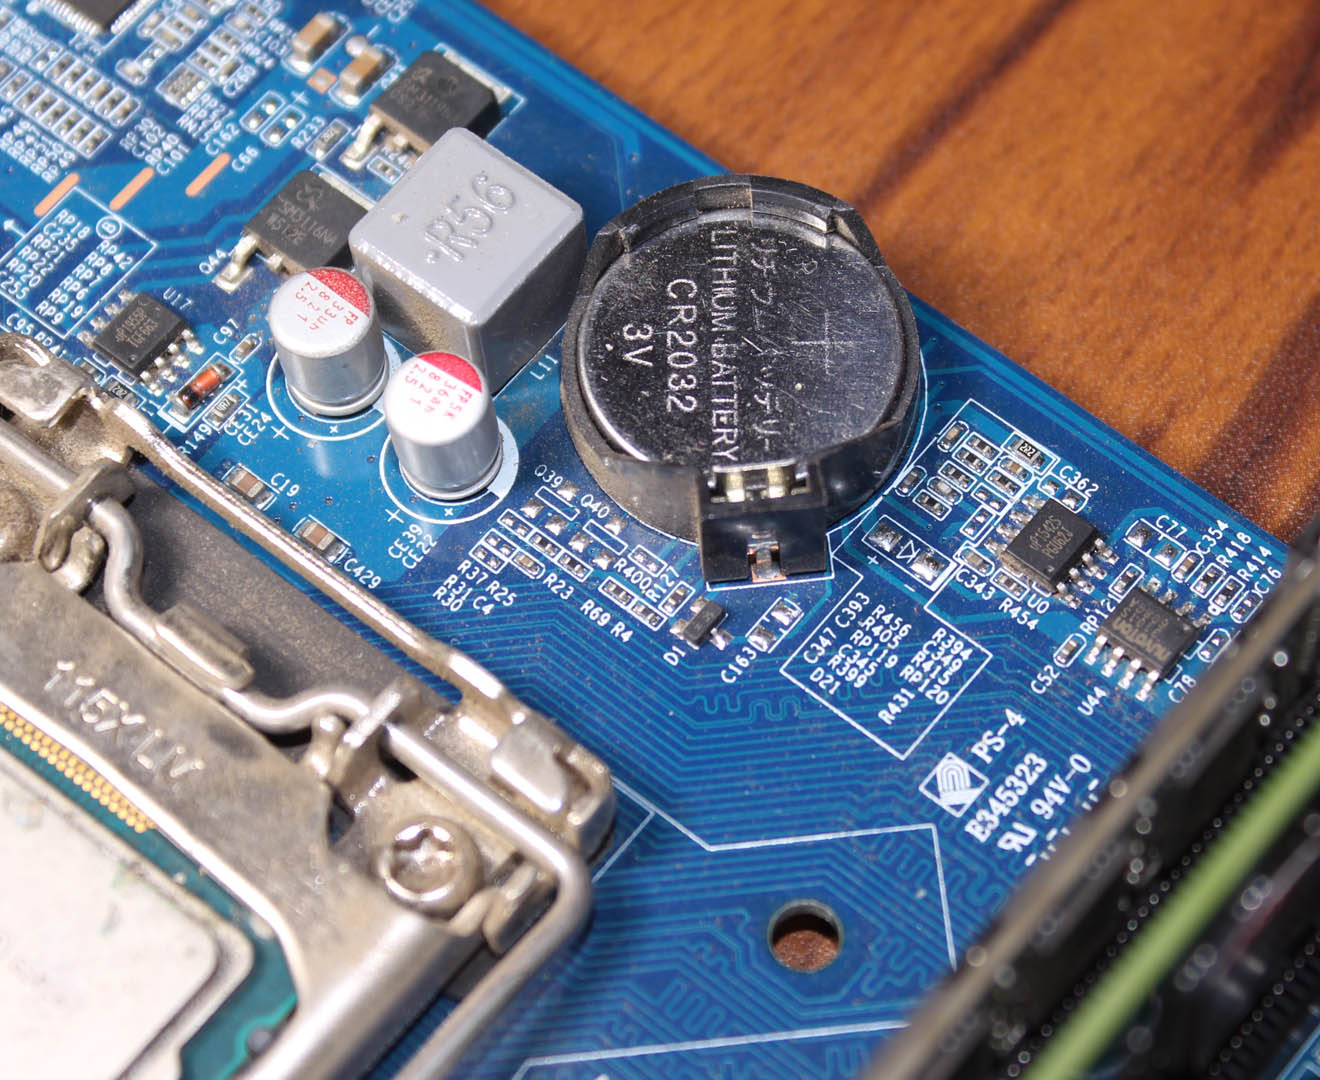
- Locate the CMOS Battery: The battery is almost always a shiny, circular coin cell, typically silver, marked with “CR2032” and “3V.” It can be located in various places on the motherboard:
- Often near the PCI-E slots.
- Sometimes near the bottom edge of the motherboard.
- Occasionally partially obscured by larger components like the graphics card. Use your flashlight if needed.
- For Laptops: The battery can be hidden under components, sometimes even soldered in place or connected via a small two-wire connector. If it’s soldered, professional help might be needed, or you might need a specific soldering guide. If it’s connected via wires, it might be tucked into a plastic sleeve.
- Observe the Battery Orientation: Before removal, take note of which side is facing up (usually the positive side, marked with a ‘+’). The new battery must be inserted in the same orientation.
- Remove the Old Battery:
- Clip Mechanism (Most Common): Most CMOS batteries are held in place by a small metal clip. Gently push the clip to the side or carefully pry it up with a small screwdriver (using the flat side, not the point, to avoid scratching). The battery should pop up slightly or become loose.
- Spring-Loaded Holder: Some holders are simpler, with just a spring tension clip. You might be able to simply push it down and slide the battery out.
- Socketed Holder: A few motherboards have a socket where the battery simply presses in. You would gently pry it out from one side.
- Wired Connector (Laptops/Small Form Factors): If the battery is connected via two wires to a small white plastic connector, carefully grasp the connector (not the wires) and pull it straight up to disconnect it from the motherboard. The battery might be glued or taped to the chassis; gently peel it off.
- Exercise Caution: Be gentle. Do not force anything. The clips can be delicate, and scratching the motherboard can cause damage.
Installing the New CMOS Battery
With the old battery out, installing the new one is usually even simpler.
- Unpack the New Battery: Remove the new CR2032 battery from its packaging.
- Orient Correctly: Ensure the new battery is oriented with the positive (+) side facing up, matching the orientation of the old battery and the markings on the motherboard holder.
- Insert the New Battery:
- Clip Mechanism: Slide one edge of the battery under the fixed part of the holder, then gently push the other side down until the clip snaps over it, securing the battery in place. You should hear a faint click or feel it lock.
- Spring-Loaded/Socketed Holder: Simply press the battery firmly into the holder until it sits flush and feels secure.
- Wired Connector (Laptops): If you disconnected a wired battery, plug the new wired battery’s connector back into the motherboard header, ensuring it’s oriented correctly (there’s usually a notch or specific pin configuration). Then, secure the battery (which is usually in a plastic sleeve) in its designated spot, often with adhesive.
- Verify Secure Fit: Gently wiggle the battery to ensure it’s firmly seated and won’t come loose.
Reassembly and Initial Power-Up
You’re almost there! Now it’s time to put your computer back together and test your work.
- Re-attach Components (if removed): If you had to remove a graphics card or other components to access the battery, carefully re-install them now. Ensure they are fully seated and secured.
- Close the Computer Case:
- Desktop: Carefully slide the side panel back into place, ensuring all tabs align. Secure it with the screws you removed earlier.
- Laptop: Carefully re-seat the bottom casing, ensuring all clips engage. Reinstall all screws. Take care not to pinch any internal cables.
- Reconnect Peripherals: Plug all your peripherals back in: power cord, monitor, keyboard, mouse, etc.
- Initial Power-Up:
- Power on your computer.
- You might initially see a “CMOS Checksum Error” or “BIOS has been reset” message. This is normal, as the CMOS settings were cleared.
- The system might prompt you to press a key (often F1, F2, DEL) to enter BIOS/UEFI setup. Do so.
Post-Installation Checks and Optimization
Replacing the CMOS battery is only half the battle. The next crucial steps involve configuring your system’s BIOS/UEFI settings and ensuring everything is functioning as expected. This guarantees your computer not only starts up but also operates optimally and securely.
Configuring BIOS/UEFI Settings
Since the CMOS memory was cleared, your system’s BIOS/UEFI settings have reverted to their factory defaults. You’ll need to reconfigure them to suit your preferences and ensure proper operation.
- Enter BIOS/UEFI Setup: As mentioned, upon the first boot after battery replacement, your computer will likely prompt you to enter setup by pressing a specific key (commonly DEL, F2, F10, or F12) during the initial startup screen. If you miss it, restart your computer and try again.
- Set Date and Time: This is the most important step. Navigate to the “Standard CMOS Features,” “Main,” or a similar section within the BIOS/UEFI setup. Find the “System Date” and “System Time” options and accurately set them. Ensure the year, month, day, hour, minute, and second are correct. This is critical for system functionality and digital security.
- Configure Boot Order: If you have multiple drives or want to boot from a specific operating system or partition, navigate to the “Boot,” “Boot Options,” or “Boot Priority” section. Arrange your boot devices in the desired order (e.g., your primary SSD/HDD first, then optical drive, then USB drives).
- Restore Other Custom Settings: If you had any other specific BIOS/UEFI configurations (e.g., virtualization settings, fan controls, SATA mode, XMP profile for RAM, security passwords, specific power management settings), navigate to the relevant sections and reapply them. If you don’t recall specific custom settings, sticking with defaults is usually fine, but ensure the system time and boot order are correct.
- Save Changes and Exit: Before exiting, ensure you save your changes. There will usually be an option like “Save and Exit Setup” or “Exit Saving Changes.” Confirm your choice, and the computer will restart.
Troubleshooting Common Issues
While replacing a CMOS battery is generally straightforward, minor issues can arise. Here’s how to address some common post-installation problems:
- Computer Doesn’t Power On:
- Check Power Connections: Double-check that all power cables (main power, CPU power, motherboard power) are firmly connected.
- Check Case Connections: Ensure the front panel connectors (power button, reset button, LED lights) are correctly connected to the motherboard.
- Verify Internal Components: Ensure RAM modules are fully seated, and any expansion cards (like a graphics card) are securely in their slots.
- Re-seat CMOS Battery: Ensure the new CMOS battery is correctly oriented and firmly seated in its holder.
- Date/Time Still Incorrect:
- Recheck BIOS Settings: Go back into BIOS/UEFI and ensure you correctly saved the date and time settings.
- Check Battery Orientation: Power down, unplug, and open the case to visually inspect if the new battery is inserted with the correct polarity (+ side up).
- Faulty New Battery: Although rare, a new battery could be faulty. Try another new CR2032 if the issue persists.
- Motherboard Issue: In very rare cases, the CMOS circuit on the motherboard itself might be damaged, requiring professional repair or motherboard replacement.
- System Boots to a Black Screen or Errors:
- Clear CMOS (Jumper Method): Most motherboards have a “Clear CMOS” jumper (usually labeled CLR_CMOS or JBAT1). With the computer unplugged, move the jumper from pins 1-2 to 2-3 for 5-10 seconds, then move it back. This can help reset the BIOS completely. Consult your motherboard manual for the exact location and procedure.
- Check Graphics Card: If you have a dedicated graphics card, ensure it’s fully seated and its power connectors (if any) are attached. Try connecting your monitor to the integrated graphics port (if available) to rule out the dedicated card.
- RAM Issues: Reseat your RAM modules. If you have multiple sticks, try booting with only one at a time.
- Peripheral Not Working (e.g., USB Ports): After setting the date and time, update your operating system and drivers. Sometimes, default BIOS settings can affect how certain ports or devices are initialized.
When to Consider Professional Help
While most CMOS battery replacements are DIY-friendly, there are situations where seeking professional assistance is advisable:
- Uncertainty or Lack of Confidence: If you’re uncomfortable opening your computer, or are worried about damaging components, a professional technician can perform the replacement safely.
- Complex Laptop Disassembly: Some laptops require extensive disassembly, potentially involving delicate ribbon cables and tiny screws. If your laptop model proves particularly challenging to open, a professional can prevent damage.
- Persistent Issues After Replacement: If you’ve replaced the battery, reconfigured BIOS, and troubleshooting steps haven’t resolved the problem, there might be a more fundamental issue with your motherboard or other components that requires expert diagnosis.
- Soldered Battery: If your laptop or device has a soldered CMOS battery (rather than a removable coin cell or wired connector), replacement requires soldering skills and specialized tools. Unless you are proficient in micro-soldering, this is best left to a professional.
- Warranty Concerns: If your computer is still under warranty, performing internal repairs yourself might void it. Check your manufacturer’s policy before proceeding.
The Benefits of DIY CMOS Battery Replacement
Empowering yourself with the knowledge and skills to perform minor computer maintenance tasks like replacing a CMOS battery offers a multitude of benefits, extending beyond just fixing an immediate problem. It aligns perfectly with a proactive approach to technology management and personal finance.
Cost-Effectiveness and Convenience
- Significant Savings: The cost of a new CR2032 battery is typically just a few dollars. In contrast, taking your computer to a repair shop for this issue could cost anywhere from $50 to $100 or more, factoring in labor and diagnostic fees. Performing the repair yourself means keeping that money in your pocket.
- Time Savings: You don’t have to pack up your computer, drive it to a shop, wait for diagnostics, and then pick it up again. The entire process of replacing a CMOS battery yourself, from start to finish, rarely takes more than 30 minutes for a desktop and perhaps an hour or two for a more complex laptop. This convenience allows for minimal disruption to your daily routine.
- Immediate Resolution: As soon as you complete the installation and configure the BIOS, your problem is solved. There’s no waiting period, allowing you to get back to work or entertainment without delay.
Extending Your System’s Lifespan
- Preventing Minor Annoyances from Becoming Major Headaches: A failing CMOS battery, if left unaddressed, can lead to persistent boot errors, an inability to access secure websites, and general system instability. While these issues don’t directly damage hardware, they can certainly degrade the user experience to the point where one might consider replacing the entire system out of frustration. A simple battery swap can restore full functionality and make your older system feel new again.
- Maintaining Optimal Performance and Security: By ensuring your BIOS/UEFI settings are consistent and your system clock is accurate, you contribute to the overall stability and security of your computer. This prevents issues with software installations, security certificate validations, and system logging, all of which are crucial for a healthy operating environment. It’s a small but vital investment in the long-term viability of your hardware.
Empowering Your Tech Skills
- Building Confidence and Technical Literacy: Successfully performing a computer repair, even a minor one, significantly boosts your confidence in dealing with technology. It demystifies the “black box” of your computer and encourages you to learn more about how it works. This newfound confidence can extend to tackling other DIY repairs and upgrades.
- Understanding Your Hardware: The process of opening your computer and locating components like the CMOS battery provides valuable insight into your system’s architecture. You learn to identify the motherboard, RAM, expansion slots, and other vital parts, deepening your understanding of computer hardware. This knowledge is invaluable for future upgrades, troubleshooting, or even when considering purchasing new tech.
- A Stepping Stone to More Complex Repairs: Replacing a CMOS battery is an excellent entry point into PC maintenance. The skills learned—like safely opening a case, grounding yourself, handling components gently, and navigating BIOS settings—are foundational and transferable to more complex tasks such as installing RAM, upgrading a hard drive, or replacing a graphics card. It transforms you from a passive user into an active maintainer of your valuable tech assets.
In conclusion, the humble CMOS battery is a testament to how crucial even the smallest components are in the vast landscape of modern technology. Its proper functioning underpins basic system stability and security. By taking the initiative to understand its role and mastering its replacement, you not only resolve a common computer issue efficiently and economically but also empower yourself with practical tech skills. This DIY approach not only saves you money and time but also fosters a deeper connection with your technology, allowing you to maintain and extend the life of your valuable devices with confidence and competence.