In today’s digital landscape, securing your website with SSL/TLS encryption is not just a best practice; it’s a fundamental requirement. From protecting sensitive user data to boosting SEO rankings and building user trust, SSL certificates are indispensable. Cloudflare, a leading content delivery network (CDN) and web security company, offers robust solutions to enhance website performance and security, including its powerful Edge SSL. While Cloudflare provides an Edge certificate that encrypts traffic between your users and Cloudflare’s servers, ensuring end-to-end encryption requires an SSL certificate on your origin server as well.
This comprehensive guide will walk you through the process of installing a Cloudflare-compatible Edge SSL setup on an Ubuntu server, specifically focusing on securing your origin server with a free Let’s Encrypt certificate via Certbot. By the end of this tutorial, you will have a fully encrypted website, leveraging Cloudflare’s powerful features while ensuring maximum security for your visitors. This not only bolsters your digital security posture but also positively impacts your brand’s reputation and can even influence your online income by fostering greater user trust and improving search engine visibility.

Understanding Cloudflare SSL and Its Importance
Before diving into the technical steps, it’s crucial to grasp the different types of SSL provided by Cloudflare and why a “Full (Strict)” configuration is the gold standard for security.
The Role of SSL/TLS in Web Security
SSL (Secure Sockets Layer) and its successor TLS (Transport Layer Security) are cryptographic protocols designed to provide communication security over a computer network. When a user connects to a website with an SSL certificate, the data exchanged between their browser and the server is encrypted, preventing eavesdropping, tampering, and message forgery. This encryption is vital for protecting personal information, login credentials, and transactional data, making it a cornerstone of digital security. Search engines like Google also prioritize secure websites, meaning an SSL certificate is crucial for good SEO and organic traffic, directly impacting a website’s visibility and potential for online income.
Cloudflare’s SSL Options: Flexible, Full, and Full (Strict)
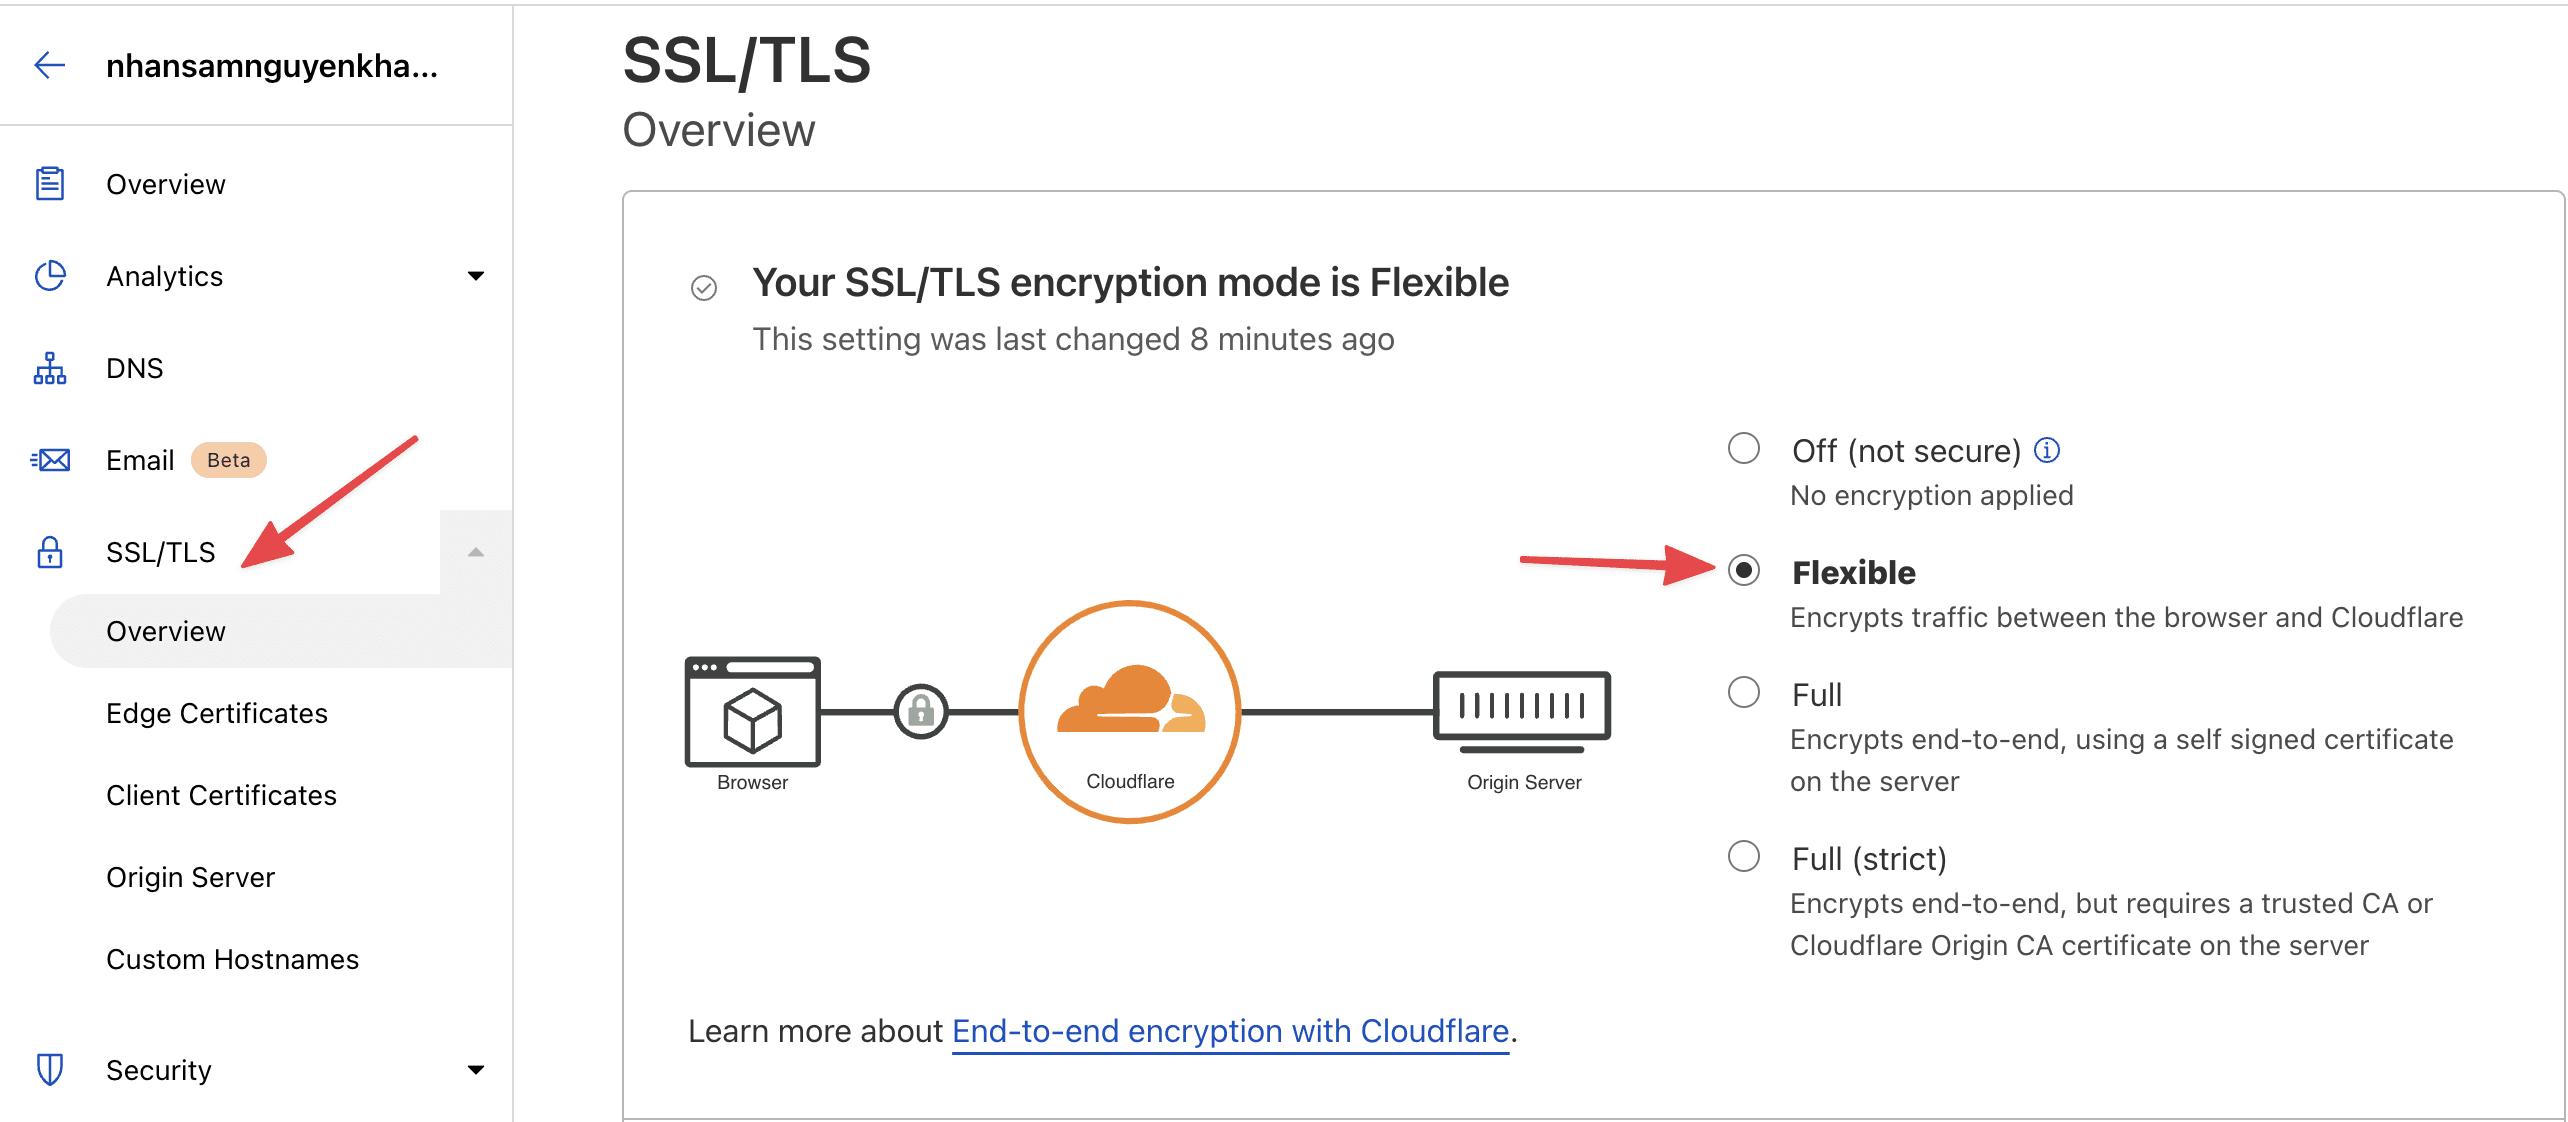
Cloudflare offers three primary SSL modes, each providing a different level of security for the connection between the user, Cloudflare’s edge servers, and your origin server:
- Flexible SSL: This mode encrypts traffic between the user and Cloudflare, but the connection between Cloudflare and your origin server is unencrypted (HTTP). While it’s easy to set up, it leaves your origin server vulnerable to attacks and eavesdropping, as the traffic from Cloudflare to your server is plaintext. This mode is generally discouraged for any serious website.
- Full SSL: In this mode, traffic is encrypted between the user and Cloudflare, and also between Cloudflare and your origin server. However, Cloudflare does not validate the SSL certificate on your origin server. This means you could be using a self-signed or expired certificate, which is better than Flexible SSL but still carries security risks.
- Full (Strict) SSL: This is the most secure option and the one we aim for in this guide. With Full (Strict) SSL, all traffic is encrypted end-to-end, and Cloudflare also validates the SSL certificate on your origin server. This ensures that your origin server has a valid, trusted certificate (like one from Let’s Encrypt or a commercial CA), eliminating man-in-the-middle attacks between Cloudflare and your server. Implementing Full (Strict) SSL significantly enhances your website’s digital security, protects your brand’s reputation, and provides the highest level of trust for your users.
Prerequisites for a Seamless Installation
Before you begin the installation process, ensure your Ubuntu server meets the following requirements. Having these in place will streamline the process and prevent common errors.
Server and Domain Configuration
- Ubuntu Server: An active Ubuntu 18.04, 20.04, or 22.04 LTS server instance. This guide assumes you have root or sudo privileges.
- Web Server Installed: You should have either Nginx or Apache installed and configured to serve your website. This tutorial will primarily focus on Nginx, but the Certbot steps are similar for Apache.
- Domain Name: A registered domain name (e.g.,
yourdomain.com) pointing to your Ubuntu server’s IP address. This typically involves configuring A/AAAA records in your domain’s DNS settings. - Cloudflare Account: An active Cloudflare account with your domain added and its DNS managed by Cloudflare. Ensure your DNS records in Cloudflare correctly point to your origin server’s IP address. The Cloudflare proxy status (orange cloud icon) should initially be set to “DNS only” (grey cloud) for the records you intend to secure with Certbot, as Certbot needs direct access to your server for domain verification. You will re-enable the proxy after certificate installation.
System Updates and Essential Tools
It’s always a good practice to start with an updated system. Open your terminal and run the following commands:
sudo apt update
sudo apt upgrade -y
These commands refresh your package lists and upgrade all installed packages to their latest versions, ensuring you have the most stable and secure environment.
Additionally, we’ll need software-properties-common to add new repositories, which is usually pre-installed but good to verify:
sudo apt install software-properties-common -y
Step-by-Step Origin SSL Certificate Installation with Certbot
This section outlines the process of obtaining and installing a free, trusted SSL certificate from Let’s Encrypt using Certbot. This certificate will secure the connection between Cloudflare’s edge servers and your Ubuntu origin server.
1. Install Certbot
Certbot is a free, open-source tool that automates the process of obtaining and renewing Let’s Encrypt SSL certificates.
For Nginx Users:
First, add the Certbot PPA (Personal Package Archive) to your system. This ensures you get the latest version of Certbot:
sudo add-apt-repository ppa:certbot/certbot -y
Press ENTER if prompted.
Next, install Certbot’s Nginx plugin:
sudo apt install certbot python3-certbot-nginx -y
For Apache Users:
If you are using Apache, the installation command would be slightly different:
sudo add-apt-repository ppa:certbot/certbot -y
sudo apt install certbot python3-certbot-apache -y
2. Configure Your Web Server for Certbot
Before requesting the certificate, ensure your web server configuration for your domain is correct. Certbot typically looks for a server_name directive in Nginx or ServerName in Apache to identify the domain it needs to secure.
Nginx Configuration Check:
Open your Nginx configuration file for your domain (usually found in /etc/nginx/sites-available/yourdomain.com):
sudo nano /etc/nginx/sites-available/yourdomain.com
Ensure you have a server_name directive that includes both yourdomain.com and www.yourdomain.com (if applicable) within your server block. For example:
server {
    listen 80;
    listen [::]:80;
    server_name yourdomain.com www.yourdomain.com;
    root /var/www/yourdomain.com/html;
    index index.html index.htm index.nginx-debian.html;

    location / {
        try_files $uri $uri/ =404;
    }
}
Save and close the file (Ctrl+X, Y, Enter). Then, test your Nginx configuration and reload Nginx:
sudo nginx -t
sudo systemctl reload nginx
3. Obtain the SSL Certificate
Now, use Certbot to obtain your SSL certificate.
For Nginx Users:
Run Certbot with the Nginx plugin:
sudo certbot --nginx -d yourdomain.com -d www.yourdomain.com
Replace yourdomain.com and www.yourdomain.com with your actual domain name(s).
Certbot will interactively guide you through the process:
- It will ask for your email address for urgent renewal notices and security warnings.
- You’ll need to agree to the Let’s Encrypt Terms of Service.
- You might be asked if you want to redirect HTTP traffic to HTTPS. For Cloudflare’s “Full (Strict)” mode, it’s generally best to let Certbot handle this redirection initially or configure it manually later. Certbot can automatically modify your Nginx configuration to include the SSL directives and handle the redirection. Choose option 2 to redirect HTTP to HTTPS.
If everything is successful, Certbot will congratulate you and show you where your certificates are stored (e.g., /etc/letsencrypt/live/yourdomain.com/).
For Apache Users:
The command for Apache is similar:
sudo certbot --apache -d yourdomain.com -d www.yourdomain.com
Again, follow the interactive prompts. Certbot will modify your Apache virtual host configuration to enable SSL.
4. Verify Automatic Renewal
Let’s Encrypt certificates are valid for 90 days. Certbot automatically sets up a cron job or systemd timer to renew your certificates before they expire. You can test this renewal process:
sudo certbot renew --dry-run
If the dry run completes without errors, your automatic renewal is correctly configured.
5. Finalize Nginx Configuration (if Certbot didn’t auto-configure fully)
Although Certbot for Nginx is quite good at auto-configuring, it’s worth reviewing. Open your Nginx configuration file again:
sudo nano /etc/nginx/sites-available/yourdomain.com
You should see a new server block for port 443 (HTTPS) and directives like ssl_certificate and ssl_certificate_key pointing to your Let’s Encrypt certificates. A typical SSL configuration within Nginx might look like this:
server {
    listen 443 ssl http2;
    listen [::]:443 ssl http2;
    server_name yourdomain.com www.yourdomain.com;

    ssl_certificate /etc/letsencrypt/live/yourdomain.com/fullchain.pem;
    ssl_certificate_key /etc/letsencrypt/live/yourdomain.com/privkey.pem;
    ssl_trusted_certificate /etc/letsencrypt/live/yourdomain.com/chain.pem;

    ssl_session_cache shared:SSL:10m;
    ssl_session_timeout 10m;
    ssl_protocols TLSv1.2 TLSv1.3;
    ssl_ciphers "ECDHE-ECDSA-AES128-GCM-SHA256:ECDHE-RSA-AES128-GCM-SHA256:ECDHE-ECDSA-AES256-GCM-SHA384:ECDHE-RSA-AES256-GCM-SHA384:ECDHE-ECDSA-CHACHA20-POLY1305:ECDHE-RSA-CHACHA20-POLY1305:DHE-RSA-AES128-GCM-SHA256:DHE-RSA-AES256-GCM-SHA384";
    ssl_prefer_server_ciphers on;

    add_header X-Frame-Options "SAMEORIGIN" always;
    add_header X-Content-Type-Options "nosniff" always;
    add_header X-XSS-Protection "1; mode=block" always;
    add_header Referrer-Policy "no-referrer-when-downgrade" always;
    add_header Content-Security-Policy "frame-ancestors 'self';" always;

    root /var/www/yourdomain.com/html;
    index index.html index.htm index.nginx-debian.html;

    location / {
        try_files $uri $uri/ =404;
    }

    # Optional: If you enabled HTTP to HTTPS redirect with Certbot, you might have a separate server block for port 80
    # server {
    #     listen 80;
    #     listen [::]:80;
    #     server_name yourdomain.com www.yourdomain.com;
    #     return 301 https://$host$request_uri;
    # }
}
Ensure these directives are present. Test your Nginx configuration and reload:
sudo nginx -t
sudo systemctl reload nginx
Configuring Cloudflare for Optimal SSL
With your origin server now secured with a valid SSL certificate, the next step is to configure Cloudflare to utilize this for end-to-end encryption.
1. Set SSL/TLS Encryption Mode to Full (Strict)
Log in to your Cloudflare dashboard and select your domain.
Navigate to the SSL/TLS section from the left sidebar.
Under the Overview tab, select Full (Strict) as your encryption mode. This is crucial for ensuring Cloudflare validates your origin server’s Let’s Encrypt certificate, providing the highest level of security.
2. Enable Cloudflare Proxy for DNS Records
Go to the DNS section in your Cloudflare dashboard. For all A/AAAA records that point to your web server (e.g., for yourdomain.com and www.yourdomain.com), ensure the proxy status is set to “Proxied” (orange cloud icon). This routes your traffic through Cloudflare’s network, enabling their CDN, security features, and, importantly, their Edge SSL. If you set it to DNS only initially for Certbot, now is the time to switch it back.
3. Optional: Configure “Always Use HTTPS”
To ensure all visitors are automatically redirected to the HTTPS version of your site, even if they type http:// or click an old http:// link, you can configure Cloudflare to force HTTPS.
Navigate to SSL/TLS > Edge Certificates.
Toggle “Always Use HTTPS” to On. This automatically redirects all incoming http requests for your domain to https.
4. Optional: Enable HSTS (HTTP Strict Transport Security)
For an even stronger security posture, consider enabling HSTS. HSTS forces browsers to interact with your website only over HTTPS, even if the user explicitly tries to use HTTP. It also helps protect against certain types of SSL stripping attacks.
Go to SSL/TLS > Edge Certificates.
Scroll down to “HTTP Strict Transport Security (HSTS)” and click “Enable HSTS.”
Review the options carefully. Start with a shorter max-age (e.g., 6 months) and select “Include subdomains (preload optional)” if applicable. Understand that enabling HSTS with a long max-age can be hard to undo, as browsers will remember to connect via HTTPS for that period.
Verifying Your SSL Installation and Troubleshooting
After completing all the steps, it’s essential to verify that your SSL setup is working correctly and troubleshoot any potential issues.
1. Test Your Website
Open your web browser and navigate to your domain using https://yourdomain.com.
Check for the padlock icon in the browser’s address bar. Clicking on it should show that the connection is secure and the certificate is valid.
You can use online SSL checker tools like SSL Labs’ SSL Server Test (https://www.ssllabs.com/ssltest/) to perform a deep analysis of your SSL configuration. This tool will grade your server’s SSL setup and provide detailed insights into your certificates, protocols, and cipher suites. Aim for an A or A+ rating.
2. Check Cloudflare Dashboard
Ensure your SSL/TLS encryption mode is still set to Full (Strict).
Confirm that the DNS records for your domain are Proxied (orange cloud).
Common Issues and Troubleshooting Tips:
- Mixed Content Warnings: These occur when your HTTPS page tries to load resources (images, scripts, CSS) over HTTP.
- Solution: Cloudflare has an “Automatic HTTPS Rewrites” feature under SSL/TLS > Edge Certificates that can often fix this. Ensure it’s enabled. Alternatively, manually inspect your website’s source code and update all
http://URLs for assets tohttps://or relative paths.
- Solution: Cloudflare has an “Automatic HTTPS Rewrites” feature under SSL/TLS > Edge Certificates that can often fix this. Ensure it’s enabled. Alternatively, manually inspect your website’s source code and update all
- Too Many Redirects: This can happen if both Cloudflare and your origin server are trying to redirect HTTP to HTTPS, or if your Nginx/Apache configuration is incorrect.
- Solution: If using Cloudflare’s “Always Use HTTPS,” disable HTTP to HTTPS redirects in your Nginx/Apache configuration. If you enabled Certbot’s redirect option, ensure it’s not conflicting with Cloudflare’s setting. Test one at a time.
ERR_SSL_VERSION_OR_CIPHER_MISMATCHorNET::ERR_CERT_AUTHORITY_INVALID: These errors usually indicate an issue with your origin certificate.- Solution: Double-check that Certbot successfully obtained and installed the certificate. Ensure your Nginx/Apache configuration correctly points to the
fullchain.pemandprivkey.pemfiles. Verify that Cloudflare’s SSL mode is “Full (Strict).” If you just set up Certbot, ensure your DNS records in Cloudflare were set to “DNS only” (grey cloud) during the Certbot run, and then switched back to “Proxied” (orange cloud) afterwards.
- Solution: Double-check that Certbot successfully obtained and installed the certificate. Ensure your Nginx/Apache configuration correctly points to the
Conclusion
By following this detailed guide, you have successfully implemented a robust, end-to-end encrypted SSL setup for your Ubuntu server using Cloudflare Edge SSL and a Let’s Encrypt origin certificate. This “Full (Strict)” configuration is the pinnacle of web security, ensuring that all traffic between your users, Cloudflare’s global network, and your origin server remains encrypted and verified.
The benefits extend far beyond mere technical compliance. You’ve significantly enhanced your website’s digital security, protecting sensitive data and mitigating cyber threats. This, in turn, strengthens your brand’s reputation, building trust and credibility with your audience. For businesses, a secure website is a non-negotiable asset that can positively impact customer acquisition, retention, and ultimately, your online income. With a secure, high-performing website, you’re not just adhering to modern web standards; you’re building a foundation for sustainable digital success in an increasingly security-conscious world.
aViewFromTheCave is a participant in the Amazon Services LLC Associates Program, an affiliate advertising program designed to provide a means for sites to earn advertising fees by advertising and linking to Amazon.com. Amazon, the Amazon logo, AmazonSupply, and the AmazonSupply logo are trademarks of Amazon.com, Inc. or its affiliates. As an Amazon Associate we earn affiliate commissions from qualifying purchases.