With the release of Windows 11, Microsoft introduced a sleek, modern interface and a host of productivity-focused features. However, despite the significant improvements made to the native Microsoft Edge browser, Google Chrome remains the preferred gateway to the internet for billions of users worldwide. Whether it is for the seamless integration with the Google ecosystem, the vast library of extensions, or the high-speed Chromium engine, installing Chrome is often the first task users perform on a new Windows 11 machine.
In this comprehensive guide, we will explore the technical nuances of installing Google Chrome on Windows 11, optimizing its performance, and navigating the specific UI hurdles Microsoft has implemented to encourage the use of its own browser.
Why Google Chrome Remains the Go-To Browser for Windows 11 Users
While Microsoft Edge and Google Chrome share the same underlying Chromium engine, the user experience differs significantly. For many tech enthusiasts and professionals, Chrome is more than just a browser; it is a productivity hub that bridges the gap between desktop and mobile environments.
Performance and Speed Benchmarks
Google Chrome’s reputation for speed is rooted in its V8 JavaScript engine, which is constantly updated to handle the increasingly complex demands of modern web applications. On Windows 11, Chrome leverages hardware acceleration to offload rendering tasks to the GPU, ensuring smooth scrolling and fast video playback. Furthermore, Google recently introduced “Memory Saver” and “Energy Saver” modes. These technical optimizations allow Chrome to freeze inactive tabs, significantly reducing RAM consumption—a historical pain point for the browser—and extending battery life on Windows 11 laptops.
The Ecosystem Advantage: Syncing Across Devices
For users who rely on Gmail, Google Drive, and Android devices, Chrome offers a level of integration that is difficult to match. By signing into a Google Account, your bookmarks, history, passwords, and open tabs are synchronized across all platforms. In a professional environment, this allows for a “seamless handoff.” You can start researching a topic on your Windows 11 workstation and pick up exactly where you left off on your smartphone or tablet. This cross-platform continuity is a cornerstone of digital productivity in the modern age.
Step-by-Step Guide to Installing Google Chrome on Windows 11
Installing Chrome is a straightforward process, but it requires navigating through the pre-installed Microsoft Edge browser. Below is the technical workflow to get Chrome up and running on your system.
Downloading the Installer via Microsoft Edge
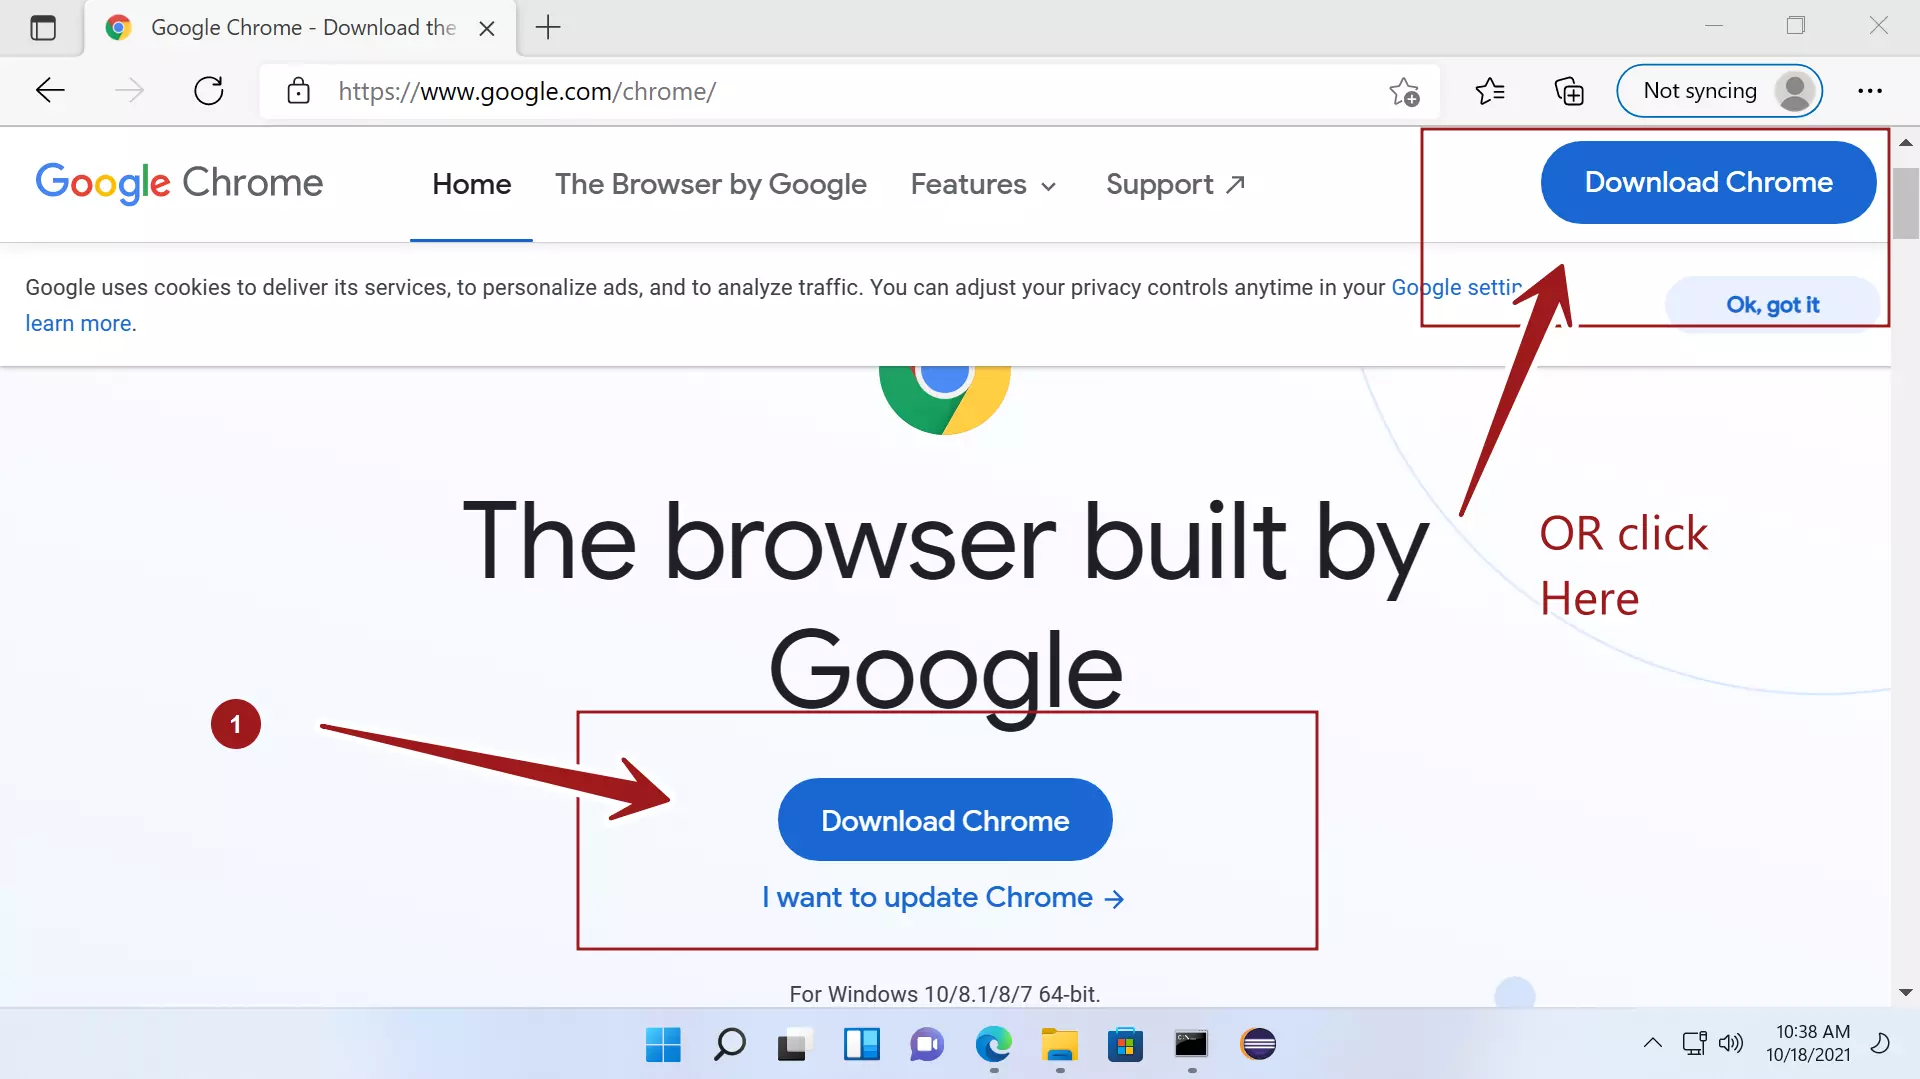
Windows 11 comes with Microsoft Edge as the default web browser. To begin, launch Edge from the Taskbar or Start Menu. Navigate to the official Google Chrome download page (google.com/chrome). It is critical to ensure you are downloading from the official source to avoid “repackaged” installers that might contain bloatware or malware.
Once on the site, the page will automatically detect that you are using Windows 11. Click the “Download Chrome” button. A small setup file, typically named ChromeSetup.exe, will be downloaded to your “Downloads” folder. This is a “stub installer,” meaning it is a small file that, when executed, will pull the full browser data from Google’s servers.
Running the Installation Package
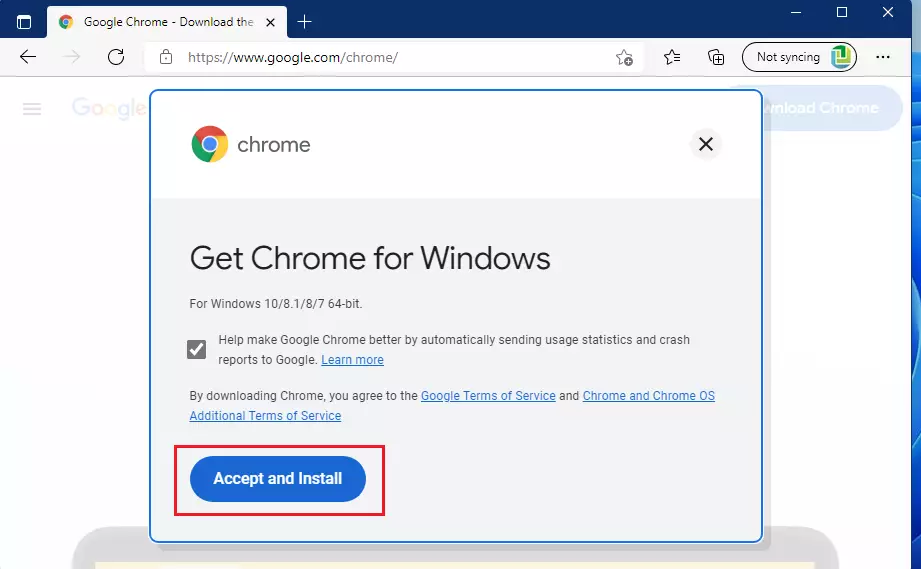
Locate the ChromeSetup.exe file and double-click it. Windows 11’s User Account Control (UAC) will likely prompt you with a security warning, asking if you want to allow this app to make changes to your device. Click “Yes.”
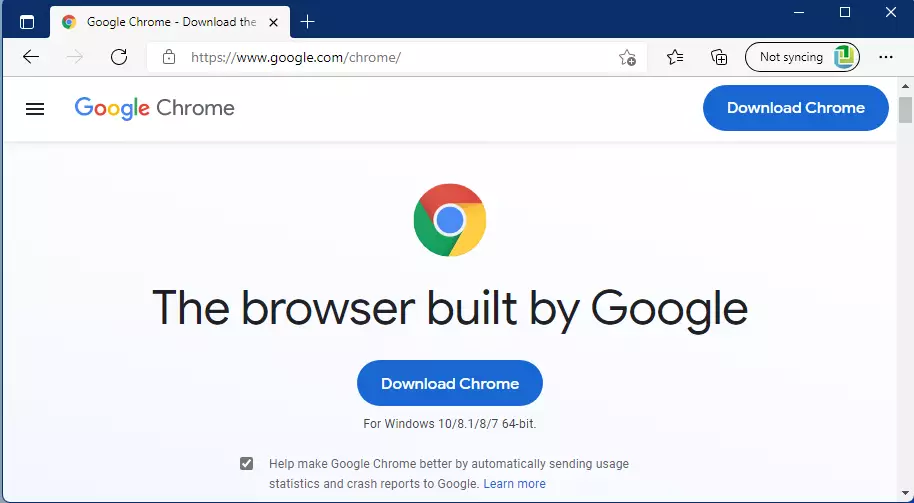
The installation process is largely automated. The installer will download the necessary files and unpack them into the Program Files directory. Unlike older versions of Windows, Windows 11 handles these background processes very efficiently, and the installation usually completes within a minute, depending on your internet speed. Once finished, Google Chrome will launch automatically.
Initial Configuration and Sign-in
Upon the first launch, Chrome will invite you to “Make Chrome your own.” This is the stage where you can sign in with your Google Account to sync your data. You will also be prompted to choose whether you want to send usage statistics and crash reports to Google. From a technical privacy standpoint, users who prefer minimal data sharing may choose to uncheck this box. Following the sign-in, Chrome will ask if you want to set it as your default browser—a process that has become slightly more complex in the Windows 11 environment.
Optimizing Your Experience: Setting Chrome as Your Default Browser
Microsoft has designed Windows 11 to favor Edge, making it a multi-step process to switch your default browser compared to previous iterations of Windows. However, following these steps ensures that every link you click—whether in an email or a document—opens in Chrome.
Navigating the Windows 11 Settings Menu
To set Chrome as the default, you must go through the Windows Settings app. Press Windows Key + I on your keyboard to open Settings. From the left-hand sidebar, click on “Apps,” and then select “Default apps.” In the search bar under “Set defaults for applications,” type “Google Chrome” and click on the result.
Overcoming Microsoft’s “Default Browser” Hurdle
At the top of the Google Chrome settings page, you will see a button that says “Set default.” Clicking this will automatically change the default associations for the most common web file types, such as .HTM, .HTML, and the HTTP/HTTPS protocols.
In earlier versions of Windows 11, users had to manually change the default for every single file extension. While the “Set default” button has simplified this, it is still worth scrolling down the list to ensure that PDFs or SHTML files are also associated with Chrome if you prefer. This ensures a consistent technical experience across all file types handled by the browser.
Advanced Configuration and Security Enhancements
Once Chrome is installed, tech-savvy users should look toward optimizing the browser for security and efficiency. Chrome’s modular nature allows for deep customization that can significantly enhance the Windows 11 experience.
Managing Extensions for Productivity
The Chrome Web Store is the browser’s greatest asset. Extensions like uBlock Origin for ad-blocking, LastPass or Bitwarden for password management, and Grammarly for writing assistance can transform your browsing experience. However, from a technical perspective, it is important to manage these extensions wisely. Each extension runs as a separate process in Windows Task Manager, consuming CPU and RAM. Periodically auditing your extensions and removing those you no longer use will keep your browser lean and fast.
Privacy Settings and Safe Browsing
Navigate to Chrome Settings > Privacy and Security to fine-tune your digital footprint. Here, you can enable “Enhanced Protection,” which provides proactive protection against dangerous websites and downloads. It uses real-time data from Google’s Safe Browsing service to warn you about phishing attempts before they happen. Additionally, you can configure “Site Settings” to control which websites have access to your camera, microphone, and location, ensuring that your Windows 11 hardware is only used when you explicitly permit it.
Troubleshooting Common Installation Issues
Sometimes, the installation process doesn’t go as planned. Understanding the technical reasons behind these roadblocks can help you resolve them quickly.
S-Mode Restrictions and How to Bypass Them
Many new Windows 11 laptops, particularly budget-friendly models, ship with “Windows 11 in S Mode.” S Mode is a restricted version of Windows that only allows apps to be installed from the Microsoft Store. Because Google Chrome is a third-party .exe installer, it cannot be installed while S Mode is active.
To fix this, you must “Switch out of S Mode.” Go to Settings > System > Activation. Find the “S Mode” section and select “Go to the Store.” You will be taken to a page in the Microsoft Store where you can click “Get” to disable S Mode. This is a one-way process; once you switch out, you cannot go back to S Mode, but you will have the freedom to install any software, including Google Chrome.
Network and Administrative Permission Errors
If the installer fails to start, it is often due to a lack of administrative privileges or an aggressive firewall. Ensure you are logged into an account with administrator rights. If the “stub installer” fails to download the full browser data, it might be blocked by a network firewall or a VPN. In such cases, you can search for the “Chrome Offline Installer.” This is a much larger file (approx. 100MB) that contains all the necessary data to install Chrome without needing a persistent internet connection during the setup process.
Conclusion
Installing Google Chrome on Windows 11 is a foundational step for many users in setting up their digital environment. While Microsoft has made strides with its native browser, Chrome’s technical flexibility, vast extension ecosystem, and superior cross-device synchronization continue to make it a top choice. By following the correct installation path and taking the time to configure default settings and security features, you can ensure that your Windows 11 experience is as fast, secure, and productive as possible. Whether you are a casual surfer or a power user, Chrome provides the robust framework needed to navigate the modern web with ease.
aViewFromTheCave is a participant in the Amazon Services LLC Associates Program, an affiliate advertising program designed to provide a means for sites to earn advertising fees by advertising and linking to Amazon.com. Amazon, the Amazon logo, AmazonSupply, and the AmazonSupply logo are trademarks of Amazon.com, Inc. or its affiliates. As an Amazon Associate we earn affiliate commissions from qualifying purchases.