In the ever-evolving landscape of technology, developers, system administrators, and even enthusiastic power users constantly seek tools that streamline their workflow, enhance productivity, and provide access to the latest software. For users of macOS and Linux, one such indispensable tool stands out: Homebrew. Often referred to as “the missing package manager for macOS” (and now officially supported on Linux as Linuxbrew), Homebrew transforms the way you install, update, and manage software on your system. This comprehensive guide will walk you through the entire process of installing Homebrew, detailing its benefits, practical applications, and best practices to ensure a smooth and efficient experience.
Unlocking Potential: What is Homebrew and Why You Need It
Before diving into the installation process, it’s crucial to understand what Homebrew is and why it has become a cornerstone for millions of tech professionals and hobbyists worldwide. Imagine needing to install a new command-line utility, a programming language runtime, or a development tool. Without a package manager, you’d typically have to search for the software’s official website, download a .dmg or .tar.gz file, follow often-complex manual installation instructions, handle dependencies yourself, and then repeat this cumbersome process for every update. Homebrew eradicates this friction, offering a seamless, command-line driven solution.
The Power of Package Management
At its core, Homebrew is a free and open-source package management system. A package manager automates the process of installing, configuring, upgrading, and removing computer programs. For macOS and Linux users, Homebrew provides a centralized, consistent, and highly efficient way to handle thousands of software packages that are primarily command-line tools or developer libraries. It leverages the command line to fetch software from its source, compile it if necessary, and place it in the correct locations on your system, all while managing its dependencies automatically. This means less time spent wrestling with installations and more time dedicated to coding, creating, or innovating.
Benefits for Developers, IT Pros, and Power Users
The advantages of integrating Homebrew into your digital toolkit are manifold, touching upon aspects of technology, personal branding, and even financial efficiency.
- Efficiency and Productivity (Tech & Money): For developers and IT professionals, time is a critical asset. Homebrew drastically reduces the time and effort required to set up development environments or provision servers. A single
brew install <package>command can replace hours of manual downloading, compiling, and dependency resolution. This direct boost in productivity translates into faster project completion, more agile development cycles, and ultimately, a better return on investment for your time and resources. For freelancers and side hustlers, this efficiency directly impacts their ability to take on more projects and increase their online income potential. - Access to Cutting-Edge Software (Tech): Homebrew’s vast repository of “formulae” (recipes for installing packages) and “casks” (for GUI applications) ensures you have access to the latest versions of popular tools like Python, Node.js, Git, Docker, and countless others. Staying current with technology is vital for security, performance, and leveraging new features.
- System Cleanliness and Organization (Tech): Homebrew installs packages into their own directories and then symlinks them into
/usr/local(or/opt/homebrewon Apple Silicon Macs), keeping your system’s core directories tidy and preventing conflicts. This organized approach makes it easy to track what’s installed and to uninstall software cleanly without leaving orphaned files. - Enhanced Personal and Corporate Branding (Brand): For individuals, proficiency with tools like Homebrew signals a level of technical sophistication. It shows a commitment to efficient, modern workflows, which can enhance one’s professional brand in the tech industry. For organizations, adopting Homebrew for internal tool management or developer onboarding can contribute to a positive “developer experience,” reinforcing an employer brand that values efficiency, innovation, and empowers its technical talent.
- Cost-Effectiveness (Money): Homebrew primarily manages free and open-source software. By providing easy access to robust, community-driven tools, it can help reduce reliance on expensive proprietary solutions, offering significant cost savings for individuals and businesses alike.
In essence, Homebrew isn’t just a utility; it’s a gateway to a more efficient, organized, and powerful computing experience, empowering you to build more, faster, and with greater confidence.
Preparing Your System: Essential Prerequisites for Homebrew
Before you can unleash the power of Homebrew, your macOS or Linux system needs a couple of fundamental components in place. These prerequisites ensure that Homebrew has the necessary tools to compile and install software effectively. The primary requirement is Apple’s Xcode Command Line Tools for macOS, and a C compiler (often GCC) for Linux.
Installing Xcode Command Line Tools (macOS Specific)
On macOS, Homebrew relies heavily on the git version control system and a C/C++ compiler suite, which are part of Apple’s Xcode Command Line Tools. While Xcode itself is a massive integrated development environment (IDE), the Command Line Tools package is a lightweight installation containing essential Unix tools, including git, make, gcc, and other utilities crucial for compiling software from source.
To install them, open your Terminal application (you can find it in Applications/Utilities/Terminal or by searching with Spotlight Cmd + Space and typing “Terminal”) and execute the following command:
xcode-select --install
Upon running this command, a software update pop-up window will appear, asking if you want to install the command-line developer tools. Click “Install” and then “Agree” to the terms and conditions. The download and installation process may take a few minutes, depending on your internet speed. Be patient and ensure your system remains connected to the internet.
Note for Linux Users: On most Linux distributions, essential build tools like git and gcc are either pre-installed or easily installable via your distribution’s native package manager (e.g., apt for Debian/Ubuntu, yum/dnf for Fedora/RHEL, pacman for Arch Linux). Homebrew for Linux (Linuxbrew) will typically check for these during its own installation process, and prompt you if anything is missing. For example, on Ubuntu, you might run sudo apt update && sudo apt install build-essential curl file git to cover most bases.
Verifying Your Setup
Once the Xcode Command Line Tools installation (or equivalent on Linux) is complete, it’s a good practice to verify that the necessary components are accessible. You can do this by checking the version of git and gcc in your Terminal:
git --version
gcc --version
If these commands return version numbers, you’re all set! This indicates that your system has the fundamental tools Homebrew needs to operate correctly. If you encounter errors, double-check that the installation completed successfully and that your system’s PATH variable is correctly configured (though xcode-select --install usually handles this automatically on macOS).
With these prerequisites in place, your system is now primed and ready for the core Homebrew installation.
The Installation Process: A Step-by-Step Guide
Installing Homebrew is surprisingly straightforward, thanks to a single, well-maintained installation script. This section will walk you through executing that script, understanding what it does, and finally verifying your installation.
Executing the Homebrew Installation Command
The official method to install Homebrew involves running a simple command in your Terminal. This command downloads and executes a shell script hosted on Homebrew’s official GitHub repository. It’s designed to be idempotent, meaning you can run it multiple times without causing issues.
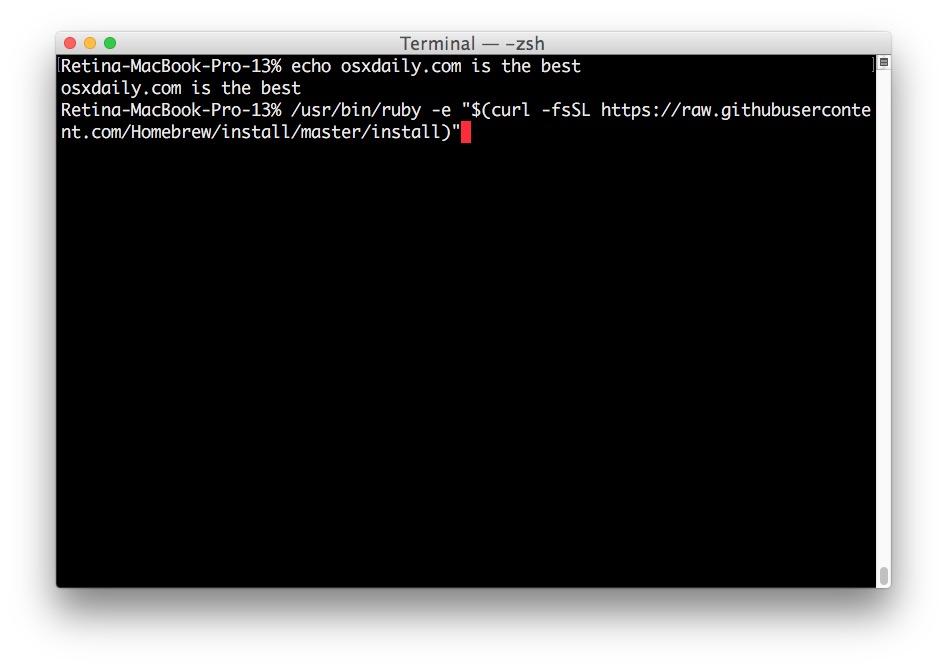
Open your Terminal and paste the following command, then press Enter:
/bin/bash -c "$(curl -fsSL https://raw.githubusercontent.com/Homebrew/install/HEAD/install.sh)"
Let’s break down this command:
/bin/bash -c: This tells your system to execute the following string as a Bash command."$(curl -fsSL https://raw.githubusercontent.com/Homebrew/install/HEAD/install.sh)":curl -fsSL: This command is used to transfer data from URLs.-f: Fail silently (no HTTP error output).-s: Silent mode (don’t show progress meter or error messages).-S: Show error messages even if in silent mode.-L: Follow redirects.
https://raw.githubusercontent.com/Homebrew/install/HEAD/install.sh: This is the URL to the latest Homebrew installation script hosted on GitHub.$(): This is command substitution, meaning the output of thecurlcommand (the content of the installation script) is executed directly bybash.
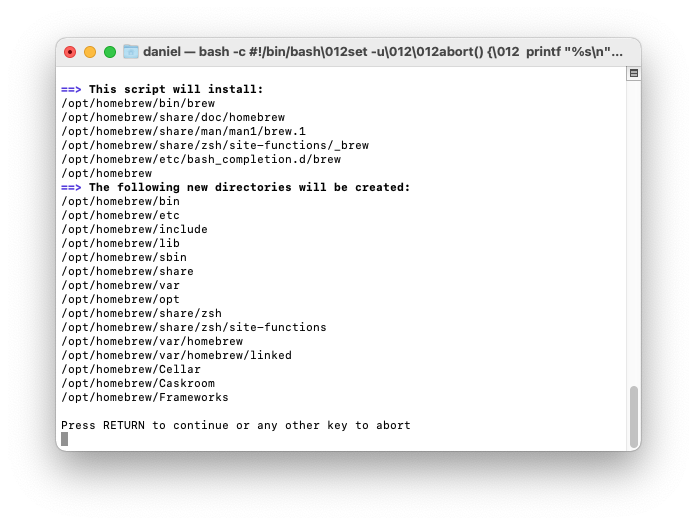
Once you press Enter, the script will prompt you to enter your user password. This is required because Homebrew needs to create directories in /usr/local (or /opt/homebrew for Apple Silicon) and adjust permissions. The script will also inform you about what it’s going to install and where. Review the information, enter your password, and let the script run its course.
Security Best Practice (Tech & Brand): While the Homebrew installation script is widely trusted and maintained by a reputable open-source community, it’s always good practice, especially for production systems or those handling sensitive data, to review any script downloaded directly from the internet before executing it. You could curl the script without the | bash part, read it, and then execute it if you’re comfortable. This demonstrates a commitment to digital security and responsible system administration, strengthening your professional brand.
Understanding the Installation Script’s Actions
The installation script performs several key operations:
- Checks for Prerequisites: It verifies if Xcode Command Line Tools (or equivalent build tools on Linux) are installed.
- Creates Directory Structure: It creates the necessary directory structure for Homebrew, typically
/usr/localon Intel Macs and Linux, or/opt/homebrewon Apple Silicon Macs. This location is crucial as it keeps Homebrew separate from the system’s default directories, preventing conflicts. - Clones Homebrew’s Repository: It clones the main Homebrew Git repository (containing all the “formulae” and core logic) into its designated directory.
- Sets Permissions: It sets the correct file permissions to allow your user account to install and manage packages without needing
sudofor everyday operations, which is a major security and convenience benefit. - Configures PATH (Potentially): It might suggest or automatically add Homebrew’s binary directory to your shell’s
PATHenvironment variable. This step is critical for your system to find and executebrewcommands.
The entire process usually takes a few minutes, depending on your internet connection and system speed.
Adding Homebrew to Your PATH
For Homebrew commands to work correctly from any directory in your Terminal, its executable path needs to be included in your shell’s PATH environment variable. The Homebrew installer often guides you through this or even does it automatically.
After installation on Apple Silicon Macs, the installer will explicitly tell you to add Homebrew to your PATH by adding these lines to your shell profile file (e.g., .zprofile, .zshrc, or .bash_profile):
echo 'eval "$(/opt/homebrew/bin/brew shellenv)"' >> ~/.zprofile
eval "$(/opt/homebrew/bin/brew shellenv)"
On Intel Macs and Linux, Homebrew typically installs into /usr/local/bin, which is often already in your PATH. However, it’s good to ensure it’s there. The installer might suggest adding something like:
echo 'eval "$(/usr/local/bin/brew shellenv)"' >> ~/.bash_profile # Or ~/.zshrc
eval "$(/usr/local/bin/brew shellenv)"
What is brew shellenv? This command outputs the necessary shell environment variables (like PATH) that Homebrew needs. eval executes this output in your current shell. Appending it to your shell profile file (.zprofile, .zshrc, .bash_profile) ensures it runs every time you open a new terminal session.
After adding the line to your profile file, you must source the file or open a new Terminal window/tab for the changes to take effect.
To source: source ~/.zprofile (or your respective file).
Verifying a Successful Installation
Once the script has finished and you’ve configured your PATH, it’s time to verify that Homebrew is correctly installed and ready for use.
Run the following command in your Terminal:
brew doctor
brew doctor is Homebrew’s built-in diagnostic tool. It checks for potential issues, missing dependencies, incorrect permissions, or anything else that might prevent Homebrew from functioning optimally. If everything is in order, it will happily report:
Your system is ready to brew.
If brew doctor reports any warnings or errors, pay close attention to the suggestions it provides. These usually offer clear instructions on how to resolve common problems, such as updating your PATH, fixing permissions, or cleaning up old files. Addressing these warnings ensures a stable and reliable Homebrew environment.
You can also check the Homebrew version:
brew --version
This should display the installed version of Homebrew and potentially its core components (Homebrew/brew, Homebrew/cask, Homebrew/core). If these commands work, congratulations! You have successfully installed Homebrew.
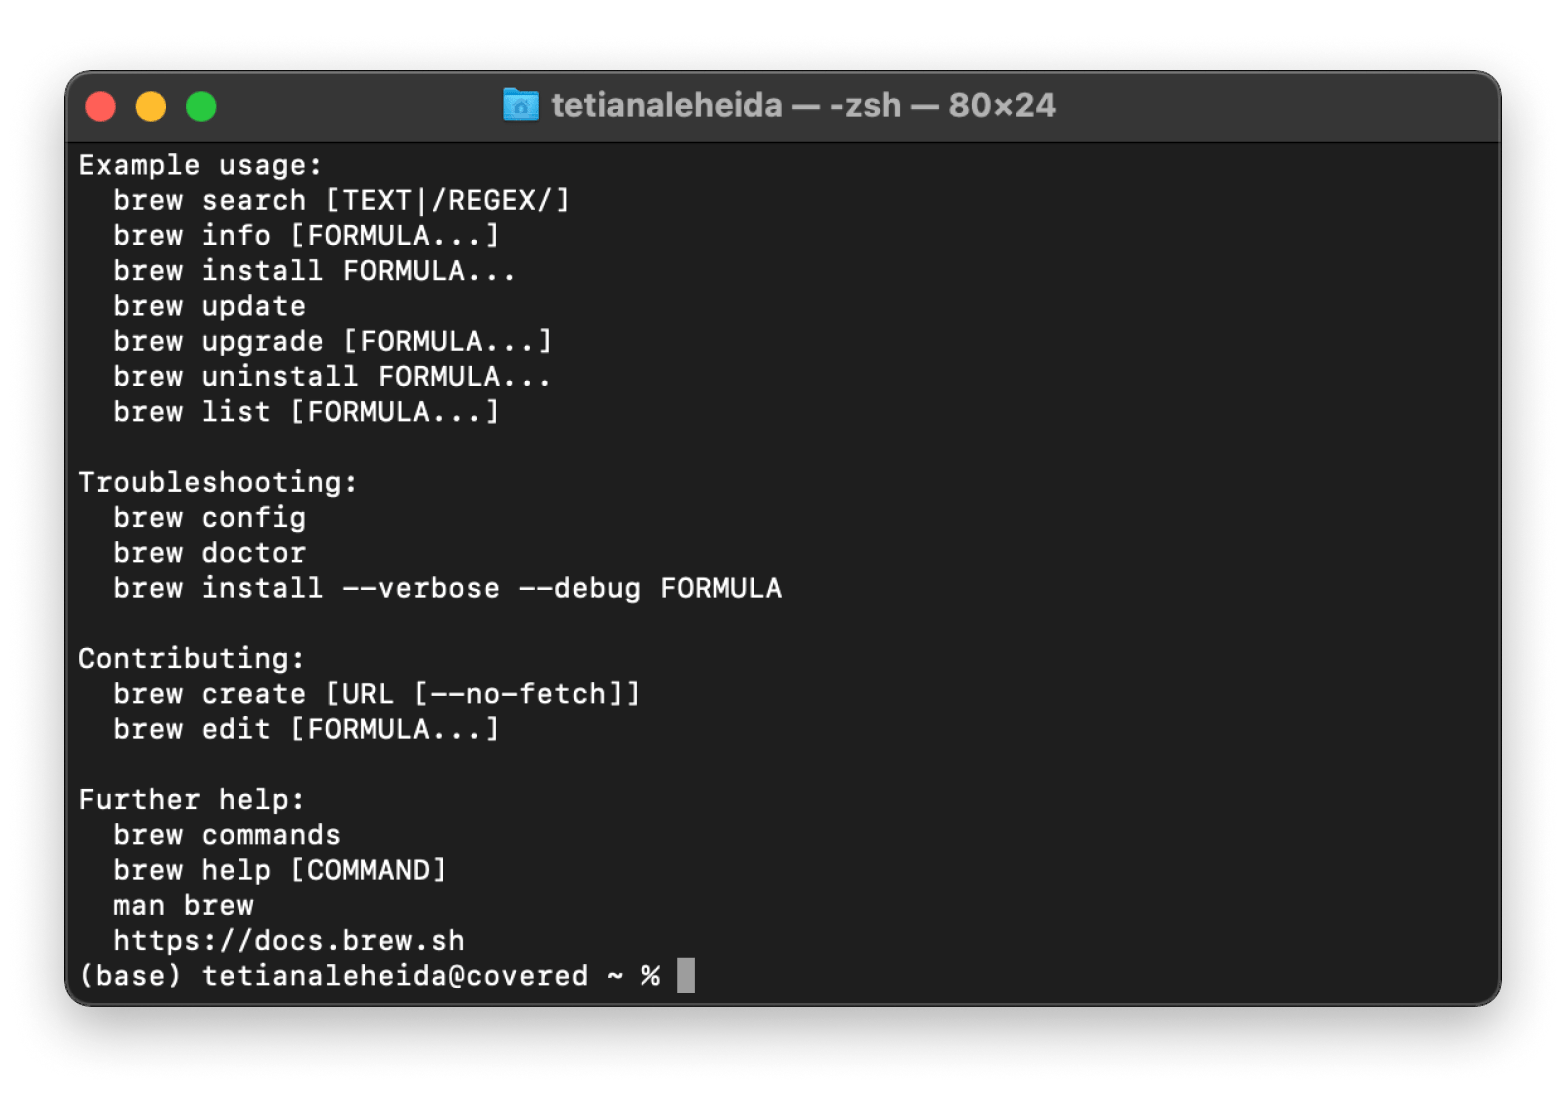
Mastering Homebrew: Basic Usage and Management
With Homebrew successfully installed, the real power begins. This section will guide you through the fundamental commands for installing, updating, searching, and managing software, along with an introduction to Homebrew’s extended ecosystem.
Installing Your First Package
The core command for Homebrew is brew install. Let’s install a common utility like htop, an interactive process viewer:
brew install htop
Homebrew will download the htop formula, compile it if necessary, resolve any dependencies, and install it to its designated location. Once complete, you can simply type htop in your terminal and press Enter to run the application.
You can install multiple packages at once:
brew install python nodejs git
Updating and Upgrading Packages
Keeping your software up-to-date is crucial for security, performance, and accessing the latest features. Homebrew makes this process incredibly simple.
-
Update Homebrew itself (Formulae and Casks):
brew updateThis command fetches the latest formulae and casks from Homebrew’s repositories. It doesn’t upgrade your installed software but updates Homebrew’s knowledge of what can be upgraded.
-
Upgrade Installed Packages:
brew upgradeAfter running
brew update,brew upgradewill go through all your currently installed packages and upgrade them to their latest stable versions according to the updated formulae. -
Upgrade a specific package:
bash

brew upgrade <package_name>
Searching for Software
Not sure if a package is available through Homebrew? Use the brew search command:
brew search docker
This will list all formulae and casks that match “docker” or contain “docker” in their description, helping you discover new tools.
Uninstalling Packages
Removing software is as easy as installing it, and Homebrew ensures a clean uninstallation:
brew uninstall htop
This command removes the specified package and any files it installed, without leaving lingering configurations that can clutter your system.
Exploring Homebrew’s Ecosystem: Casks and Services
Homebrew isn’t limited to command-line tools. Its ecosystem extends to managing graphical applications and background services.
-
Homebrew Cask: This extension allows you to install macOS desktop applications (like Chrome, Visual Studio Code, Spotify, etc.) using Homebrew.
brew install --cask google-chrome
brew install --cask visual-studio-code
Homebrew Cask simplifies the management of GUI apps, keeping them organized and easy to update.
-
Homebrew Services: For applications that run as background services (e.g., databases like PostgreSQL, web servers like Nginx), Homebrew can manage their lifecycle.
brew services start postgresql
brew services stop nginx
brew services list
This feature is incredibly useful for developers setting up local development environments, saving time and complexity compared to manual service management.
-
Cleaning Up: Over time, Homebrew accumulates old versions of formulae and cached downloads. You can free up disk space with:
bash

brew cleanup
It’s good practice to runbrew cleanupperiodically to keep your system tidy.
Mastering these basic commands will significantly enhance your productivity, allowing you to manage your software like a seasoned professional. This efficiency not only saves you time but also enables you to focus on more complex tasks, potentially contributing to faster project delivery and greater earning potential in your tech endeavors.
Troubleshooting and Best Practices for a Smooth Experience
While Homebrew is generally robust and user-friendly, occasional issues can arise. Knowing how to troubleshoot common problems and adhering to best practices will ensure a consistently smooth experience and maintain the integrity of your development environment.
Common Installation Issues and Solutions
-
“Xcode Command Line Tools not installed” error:
- Solution: Re-run
xcode-select --installand ensure the installation completes successfully. Verify withgit --version.
- Solution: Re-run
-
Permissions errors (e.g.,
Permission denied @ dir_s_mkdir - /usr/local/Cellar):- Reason: Homebrew needs appropriate write permissions in its installation directory.
- Solution: Follow
brew doctor‘s advice. Often, it involves running commands likesudo chown -R $(whoami) $(brew --prefix)/*to ensure your user owns the Homebrew directories. Be cautious withsudoand only apply it as recommended.
-
brew: command not found:- Reason: Homebrew’s executable directory is not in your shell’s
PATH. - Solution: Revisit the “Adding Homebrew to Your PATH” section. Ensure the
eval "$(/opt/homebrew/bin/brew shellenv)"or equivalent line is in your shell profile (.zshrc,.bash_profile, etc.) and that you’ve sourced the file or opened a new terminal.
- Reason: Homebrew’s executable directory is not in your shell’s
-
Slow
brew updateorbrew install:- Reason: This could be due to a slow internet connection, or issues with GitHub’s servers, or even outdated DNS settings.
- Solution: Check your internet connection. If you frequently experience slow
brew updates, consider changing your DNS settings to a faster public DNS (e.g., Google DNS or Cloudflare DNS).
-
Formulae installation failing due to compilation errors:
- Reason: This often indicates missing build dependencies, outdated Xcode Command Line Tools, or conflicts with other software.
- Solution: Run
brew doctorto identify underlying issues. Ensure your Xcode Command Line Tools are up to date. Sometimes, reinstalling a problematic package withbrew reinstall <package>can resolve transient issues.
Maintaining Homebrew for Optimal Performance
Regular maintenance ensures Homebrew continues to serve you efficiently.
- Regular
brew updateandbrew upgrade: Make it a habit to run these commands weekly or bi-weekly. This keeps your software current, patching security vulnerabilities and providing access to new features. Proactive updates are a cornerstone of good digital security. brew cleanup: Periodically runbrew cleanupto remove old versions of installed formulae and downloaded archives. This frees up valuable disk space and keeps your Homebrew installation lean.brew doctor: Runbrew doctorfrequently, especially if you encounter unexpected behavior. It’s your first line of defense for diagnosing and resolving issues.- Understand
brew linkandbrew unlink: If you encounter conflicts with system-installed versions of software or need to manage different versions of the same tool,brew linkandbrew unlinkallow you to control which executables are accessible in your PATH. Use them carefully as manual linking can sometimes cause unexpected behavior if not understood. - Backup your Dotfiles: Your shell profile files (
.zshrc,.bash_profile) and other configuration files (often called “dotfiles”) are crucial. Consider version-controlling them with Git and backing them up to a cloud service. This allows for quick setup on new machines and recovery from mishaps, which is a valuable strategy for any tech professional and contributes to a robust personal brand.
Security Considerations and Best Practices
While Homebrew is generally secure, awareness and best practices are essential.
- Only use trusted sources: The official Homebrew formulae and casks are vetted by the community. Be cautious if you encounter third-party “taps” (external repositories) that aren’t well-known or trusted. Unofficial taps can introduce security risks.
- Keep
gitupdated: Homebrew relies heavily on Git. Ensuring yourgitinstallation is up-to-date helps mitigate potential vulnerabilities in the version control system itself. - Review installation scripts (as mentioned before): While the official Homebrew installer is safe, developing a habit of at least glancing at scripts you execute (especially those directly piped from
curl | bash) is a good security practice. - Regular System Updates: Homebrew packages run on your operating system. Keep your macOS or Linux distribution itself updated to ensure the underlying environment is secure.
By following these troubleshooting tips and best practices, you can ensure that Homebrew remains a reliable and powerful asset in your technical toolkit, contributing to a stable, secure, and highly productive computing environment.
Beyond Installation: Homebrew’s Impact on Productivity and Innovation
Installing Homebrew is more than just a one-time setup; it’s an investment in a more efficient and powerful workflow that resonates across various facets of the modern digital landscape, from individual productivity to broader innovation and financial implications.
Enhancing Developer Workflow and Efficiency
For software developers, Homebrew is arguably one of the most impactful tools. It frees up precious time often lost in manual software management, allowing developers to concentrate on writing code and solving complex problems. Imagine onboarding a new team member: instead of spending a day installing various programming languages, databases, and tools, a well-curated Brewfile (a list of packages to install) can set up a complete development environment in minutes. This drastically reduces ramp-up time, lowers operational overhead, and ensures consistency across development machines. For businesses, this translates directly into cost savings and faster time-to-market for new features or products, influencing business finance positively.
Furthermore, Homebrew provides easy access to a vast array of niche tools that might otherwise be difficult to compile or find, such as specific command-line utilities for network analysis, image manipulation, or data processing. This expanded toolkit empowers developers to be more versatile and creative in their problem-solving.
A Foundation for Digital Innovation
Homebrew acts as a foundational layer for innovation. By democratizing access to powerful open-source technologies, it lowers the barrier to entry for aspiring developers and startups. Want to experiment with a new programming language like Go or Rust? brew install it in seconds. Need to spin up a local Redis server for a proof-of-concept? Homebrew handles it. This ease of access encourages experimentation, rapid prototyping, and the exploration of new technologies, which are all vital ingredients for digital innovation.
From a brand perspective, organizations that embrace such efficient toolchains signal a progressive, tech-forward culture. This not only attracts top talent but also solidifies their reputation as innovators in the industry.
Future-Proofing Your Digital Toolkit
The tech world is constantly evolving. New tools emerge, existing ones are updated, and security threats adapt. Homebrew’s active community and frequent updates mean you’re never left behind. Regular brew update and brew upgrade commands ensure your development environment is always current, mitigating security risks and allowing you to leverage the latest features. This proactive approach to software management future-proofs your digital toolkit, making it adaptable to new projects, technologies, and challenges.
In an era where personal finance and online income are increasingly tied to digital skills and efficiency, Homebrew plays a subtle yet significant role. By optimizing your computing environment, it helps you maximize your output, whether you’re building a side hustle, contributing to a major open-source project, or driving innovation within a corporate setting. The time saved, the access to powerful tools, and the streamlined workflow all contribute to a more productive, secure, and financially intelligent approach to technology.
In conclusion, installing Homebrew is a foundational step towards building a highly efficient, organized, and powerful macOS or Linux workstation. It’s an essential skill for anyone serious about leveraging the full potential of their operating system for development, system administration, or simply elevating their everyday tech experience. Embrace the power of Homebrew, and unlock a new level of digital mastery.
aViewFromTheCave is a participant in the Amazon Services LLC Associates Program, an affiliate advertising program designed to provide a means for sites to earn advertising fees by advertising and linking to Amazon.com. Amazon, the Amazon logo, AmazonSupply, and the AmazonSupply logo are trademarks of Amazon.com, Inc. or its affiliates. As an Amazon Associate we earn affiliate commissions from qualifying purchases.