In the dynamic world of technology, flexibility is often key. For Mac users, this means having the ability to run not just macOS, but also Windows, unlocking a broader spectrum of software and gaming options. This is where Apple’s Boot Camp utility comes into play. Boot Camp Assistant is a built-in macOS tool that allows you to partition your Mac’s hard drive and install a separate copy of Windows. Once installed, you can choose to boot into either macOS or Windows at startup, giving you the best of both worlds.
This comprehensive guide will walk you through the entire process of installing Boot Camp on your Mac, from understanding the prerequisites to successfully booting into your new Windows installation. We’ll cover everything you need to know to make this transition as smooth as possible, ensuring you can leverage the full power of both operating systems on your Apple hardware.
Understanding Boot Camp and Its Prerequisites
Before diving into the installation process, it’s crucial to understand what Boot Camp is and what you’ll need to have in place. Boot Camp is not a virtual machine; it’s a native installation of Windows on your Mac’s hardware. This means Windows will have direct access to your Mac’s resources, offering optimal performance for demanding applications and games. However, this also means you can only run one operating system at a time.
What You’ll Need for a Successful Boot Camp Installation
To embark on your Boot Camp journey, gather these essential items:
- A Compatible Mac: Not all Macs support Boot Camp. Generally, Macs released after 2012 are compatible. You can check Apple’s support website for a definitive list of compatible models. Your Mac should also have sufficient storage space. Apple recommends at least 64GB of free space for Windows, but 128GB or more is highly recommended for a comfortable user experience, especially if you plan to install many applications or games.
- A Windows License: You’ll need a valid license key for the version of Windows you intend to install. While you can download a Windows ISO file for free from Microsoft’s website, you’ll need a license to activate it fully and use all its features. Boot Camp supports Windows 10 and Windows 11.
- A Windows ISO Image: This is the installation media for Windows. You can download a 64-bit Windows 10 or Windows 11 ISO file directly from Microsoft’s official website. Make sure to download the correct version (e.g., Home or Pro) that matches your license.
- Sufficient Free Storage Space: As mentioned, at least 64GB is the minimum for Windows, but aim for 128GB or more to avoid performance issues and allow for application installations. Check your Mac’s storage by going to Apple menu > About This Mac > Storage.
- A Stable Internet Connection: The Boot Camp Assistant may download necessary drivers and support software from Apple’s servers. A reliable internet connection is essential for this process.
- A USB Flash Drive (Optional, depending on Mac model): For older Mac models, a USB flash drive of at least 16GB may be required by Boot Camp Assistant to create the Windows installation media. Newer Macs often don’t require a USB drive as the assistant handles the installation directly. The Boot Camp Assistant will inform you if a USB drive is needed.
- Time and Patience: While Boot Camp Assistant simplifies the process, it’s still an operating system installation. Allocate a few hours for the entire procedure, including downloading files, partitioning, installation, and driver setup.
Understanding the Partitioning Process
When you use Boot Camp Assistant, it will guide you through partitioning your Mac’s internal storage. This involves creating a separate space on your drive where Windows will reside. macOS will remain on its own partition, and Boot Camp creates a new partition specifically for Windows. This separation ensures that each operating system operates independently, with its own file system and settings.
The Boot Camp Assistant will present a slider that allows you to allocate storage space between macOS and the Windows partition. You can adjust this slider to determine how much space each operating system will have. It’s important to make this decision carefully, as resizing partitions later can be a more complex process. Remember that once Windows is installed, its partition will be formatted, and any data on it will be erased.
Preparing Your Mac for Boot Camp Installation
Before you launch Boot Camp Assistant, it’s essential to prepare your Mac to ensure a smooth and error-free installation. This preparatory phase involves updating your macOS, backing up your data, and downloading the necessary Windows files.
Updating macOS and Ensuring Full Disk Access
The first step in preparing your Mac is to ensure that you are running the latest version of macOS. This not only provides you with the most up-to-date features and security patches but also ensures compatibility with the Boot Camp Assistant.
- Check for macOS Updates: Go to the Apple menu > System Settings (or System Preferences) > General > Software Update. If an update is available, download and install it. Restart your Mac after the update is complete.
- Grant Full Disk Access to Boot Camp Assistant: For Boot Camp Assistant to function correctly, it needs full disk access.
- Go to Apple menu > System Settings (or System Preferences).
- Click on “Privacy & Security” (or “Security & Privacy”).
- Scroll down and click on “Full Disk Access.”
- Click the “+” button and navigate to your Applications folder, then select “Utilities” and choose “Boot Camp Assistant.”
- If “Boot Camp Assistant” is not listed, you might need to search for it.
- Enter your administrator password when prompted.
- Toggle the switch next to “Boot Camp Assistant” to enable it.
Downloading Windows and Creating Installation Media (if needed)
The next crucial step is to obtain the Windows ISO image and, if your Mac requires it, prepare a bootable USB drive.
Downloading the Windows ISO Image
You can download the latest Windows 10 or Windows 11 ISO file directly from Microsoft’s official website.
- Visit Microsoft’s Download Page: Search for “Download Windows 10” or “Download Windows 11” on your preferred search engine and navigate to the official Microsoft download page.
- Select Your Edition and Language: Choose the version of Windows you wish to install (e.g., Windows 10 Home/Pro, Windows 11 Home/Pro) and your preferred language.
- Download the ISO File: Microsoft will provide a link to download the 64-bit ISO file. Save this file to a location you can easily find, such as your Downloads folder or Desktop.
Creating a Bootable USB Drive (for older Macs)
As mentioned, newer Macs often don’t require a USB drive. Boot Camp Assistant will prompt you if one is needed. If it is, follow these steps:
- Format the USB Drive: Insert your USB flash drive into your Mac. Open “Disk Utility” (Applications > Utilities). Select your USB drive from the sidebar, click “Erase,” choose “Mac OS Extended (Journaled)” or “MS-DOS (FAT32)” as the format, and “GUID Partition Map” as the scheme. Click “Erase.”
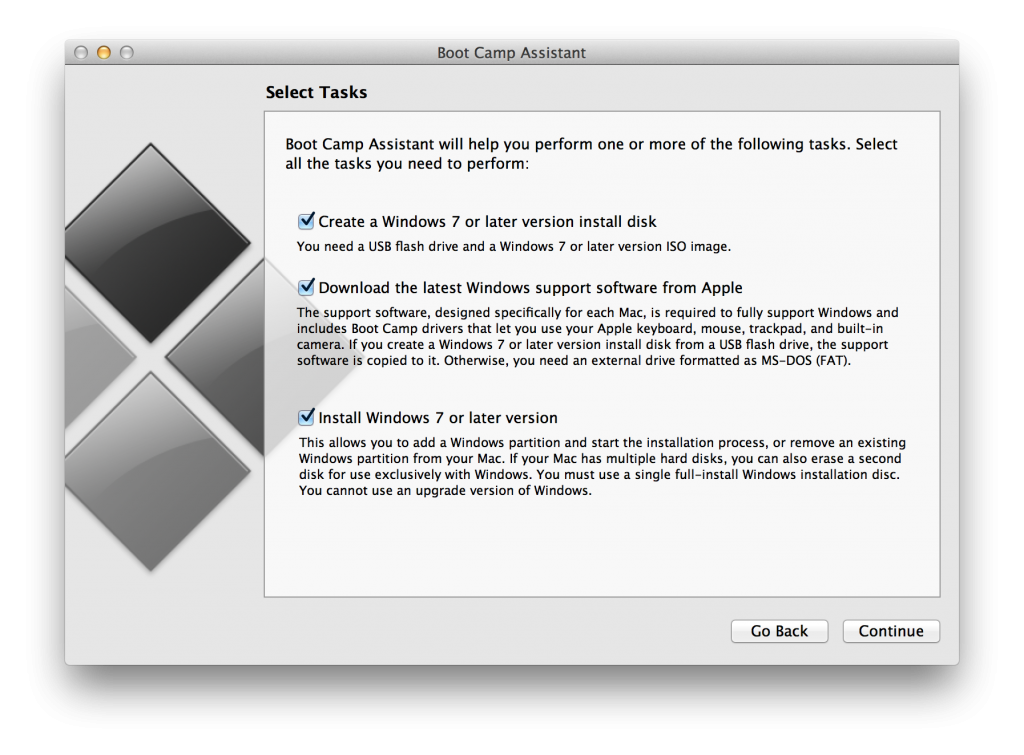
- Use Boot Camp Assistant: Once Boot Camp Assistant is launched, it will have an option to “Create a Windows 7 or later install disk.” Select this option.
- Select ISO and USB: Boot Camp Assistant will then ask you to locate the Windows ISO file you downloaded and select the USB drive you just formatted.
- Start the Process: Boot Camp Assistant will copy the Windows files to the USB drive and make it bootable. This process can take some time.
Installing Windows Using Boot Camp Assistant
With all the prerequisites met and your Mac prepared, you’re ready to run Boot Camp Assistant and begin the installation of Windows. This process is largely automated by the assistant, but it’s important to understand each step.
Launching Boot Camp Assistant and Partitioning Your Drive
Boot Camp Assistant is your primary tool for setting up Windows.
- Open Boot Camp Assistant: Navigate to Applications > Utilities and open “Boot Camp Assistant.”
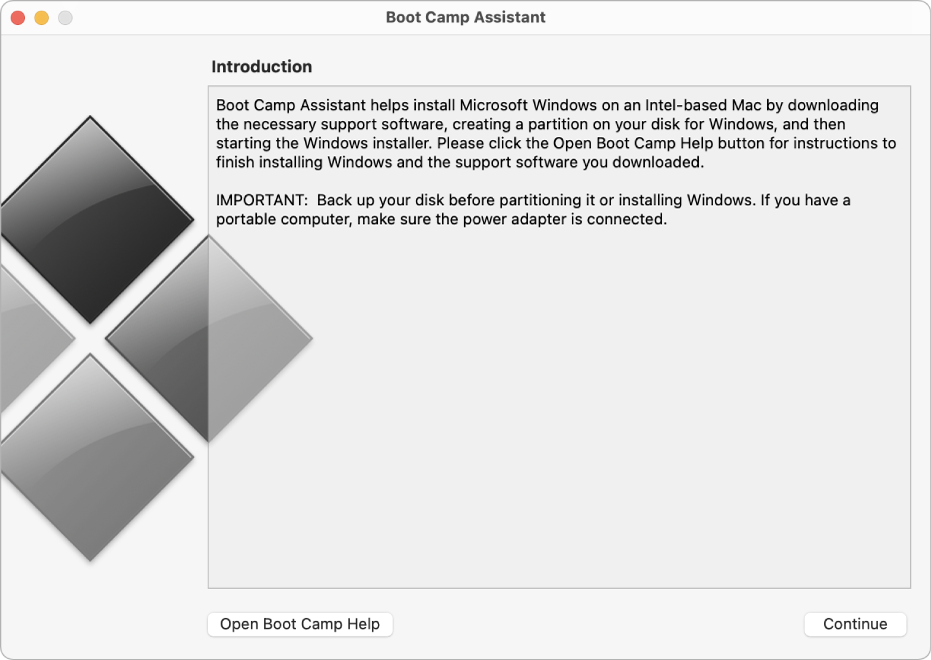
- Introduction and Options: The first screen will introduce Boot Camp Assistant. Click “Continue.” You will then see options to “Create a Windows 10 or later install disk,” “Install Windows 10 or later version,” and “Restore disk image to this Mac.” For a new installation, ensure “Install Windows 10 or later version” is selected. If a USB drive is required, the “Create a Windows 7 or later install disk” option will also be checked or will be the only option available.
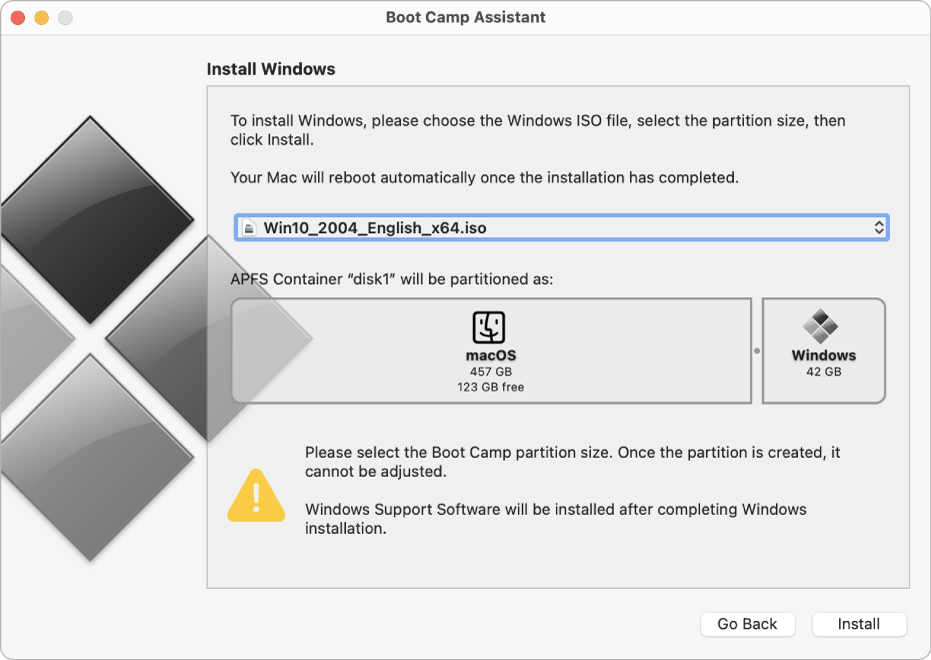
- Select the ISO Image (if applicable): If you’re using a USB drive, you’ll be prompted to select the Windows ISO file you downloaded.
- Partition Your Drive: A slider will appear allowing you to adjust the size of the Windows partition. Drag the divider to allocate the desired space. Remember, a larger partition is generally better for a smoother Windows experience. Click “Install.”
Boot Camp Assistant will now proceed to:
- Download the latest Windows support software from Apple.
- Create the Windows partition on your hard drive.
- Make your Mac bootable from the Windows installation media (either the USB drive or the internal Windows partition).
Your Mac will then restart.
The Windows Installation Process
After your Mac restarts, you will be presented with the standard Windows installer.
- Windows Setup: The Windows installer will begin. You may see a prompt to “Install Now.” Click it.
- Enter Product Key (or Skip): You’ll be asked to enter your Windows product key. You can enter it now if you have it, or you can click “I don’t have a product key” to proceed and activate Windows later.
- Select Windows Edition: Choose the edition of Windows (e.g., Home, Pro) that matches your license.
- Accept License Terms: Read and accept the Microsoft license terms.
- Choose Installation Type: Select “Custom: Install Windows only (advanced).” This is crucial for a clean installation.
- Select the Boot Camp Partition: You will see a list of drives and partitions. Identify the partition labeled “BOOTCAMP.” Select it and click “Format.” This will prepare the partition for Windows installation. Be very careful not to select or format any other partition.
- Begin Installation: Click “Next.” Windows will now begin installing on your Mac. Your Mac will restart several times during this process.
Installing Windows Support Software
Once Windows is installed and you’ve completed the initial Windows setup (like creating a user account), your Mac will boot into the Windows environment. However, you’re not quite finished. You need to install the Boot Camp drivers to ensure that all your Mac’s hardware functions correctly in Windows.
- Automatic Driver Installation: In most cases, the Boot Camp installer will launch automatically once Windows boots for the first time. It will guide you through installing essential drivers for your Mac’s graphics card, Wi-Fi, Bluetooth, trackpad, keyboard, and other hardware components.
- Manual Driver Installation (if needed): If the Boot Camp installer doesn’t launch automatically:
- Open File Explorer in Windows.
- Navigate to the USB drive (if you used one) or the partition labeled “OSXRESERVED” or similar.
- Find the “BootCamp” folder.
- Run the “Setup.exe” file within the BootCamp folder.
- Follow On-Screen Instructions: The Boot Camp driver installation is straightforward. Follow the prompts to complete the installation. You will likely need to restart your Mac after the drivers are installed.
Switching Between macOS and Windows
One of the most significant advantages of Boot Camp is the ability to switch between macOS and Windows. This allows you to leverage the strengths of each operating system as needed.
Changing Your Startup Disk
To choose which operating system boots when you turn on your Mac, you need to set your default startup disk.
From macOS:
- Restart Your Mac: Go to the Apple menu > Restart.
- Hold the Option (Alt) Key: Immediately after your Mac restarts and before the Apple logo appears, press and hold the “Option” (or “Alt”) key on your keyboard.
- Select Startup Disk: You will see icons for your available operating systems. Click on the Windows icon (usually labeled “Windows” or “BOOTCAMP”) to boot into Windows, or the macOS icon to boot into macOS. Release the Option key.
From Windows:
- Access Boot Camp Control Panel: In Windows, find the “Boot Camp” icon in the system tray (near the clock). Right-click on it and select “Boot Camp Control Panel.”
- Select Startup Disk: In the Boot Camp Control Panel, go to the “Startup Disk” tab. Select either your macOS volume or your Windows partition as the default startup disk.
- Click “Apply” and “OK”: Then, click “Apply” and “OK.”
- Restart: You will be prompted to restart your computer for the changes to take effect.
Understanding the Startup Manager
Holding down the Option key during startup brings up the “Startup Manager,” which is a graphical interface that shows all bootable volumes connected to your Mac. This is the most direct way to choose which operating system to boot into on any given startup.
Important Considerations:
- Performance: Boot Camp offers native performance for Windows. This means applications and games will run as well as they would on a dedicated Windows PC of similar hardware specifications.
- Storage Management: Be mindful of your partition sizes. If you find yourself running out of space on either macOS or Windows, resizing partitions can be complex and may require backing up and reformatting.
- Driver Updates: Periodically check for updated Boot Camp drivers from Apple’s support website to ensure optimal hardware performance and compatibility with newer Windows updates.
By following these steps, you can successfully install Boot Camp on your Mac and enjoy the flexibility of running both macOS and Windows on a single machine. This empowers you to tackle a wider range of tasks, from professional software development to the latest gaming titles, all from your familiar Apple hardware.
aViewFromTheCave is a participant in the Amazon Services LLC Associates Program, an affiliate advertising program designed to provide a means for sites to earn advertising fees by advertising and linking to Amazon.com. Amazon, the Amazon logo, AmazonSupply, and the AmazonSupply logo are trademarks of Amazon.com, Inc. or its affiliates. As an Amazon Associate we earn affiliate commissions from qualifying purchases.