In the dynamic world of computing, keeping your system’s components updated is crucial for optimal performance, security, and compatibility. While we frequently update operating systems, applications, and hardware drivers, one fundamental element often goes overlooked: your system’s firmware. Often mistakenly referred to as “BIOS drivers,” the correct terminology is BIOS (Basic Input/Output System) or UEFI (Unified Extensible Firmware Interface) firmware updates. This core software is the very first thing that runs when you power on your computer, bridging the gap between your hardware and the operating system.
Understanding, maintaining, and occasionally updating this firmware is a vital skill for any tech enthusiast, PC builder, or power user aiming to maximize their system’s potential and longevity. This comprehensive guide will demystify the process, explain its importance, walk you through the necessary preparations, and provide a clear, step-by-step roadmap for safely updating your BIOS or UEFI firmware. By following these instructions, you’ll ensure your system remains robust, secure, and ready to tackle future technological advancements.
Understanding Your System’s Firmware: BIOS vs. UEFI
Before diving into the “how-to,” it’s essential to grasp what BIOS and UEFI are and why they play such a critical role in your computer’s operation. This foundational knowledge will empower you to approach firmware updates with confidence and a clear understanding of their implications.
What is BIOS and UEFI?
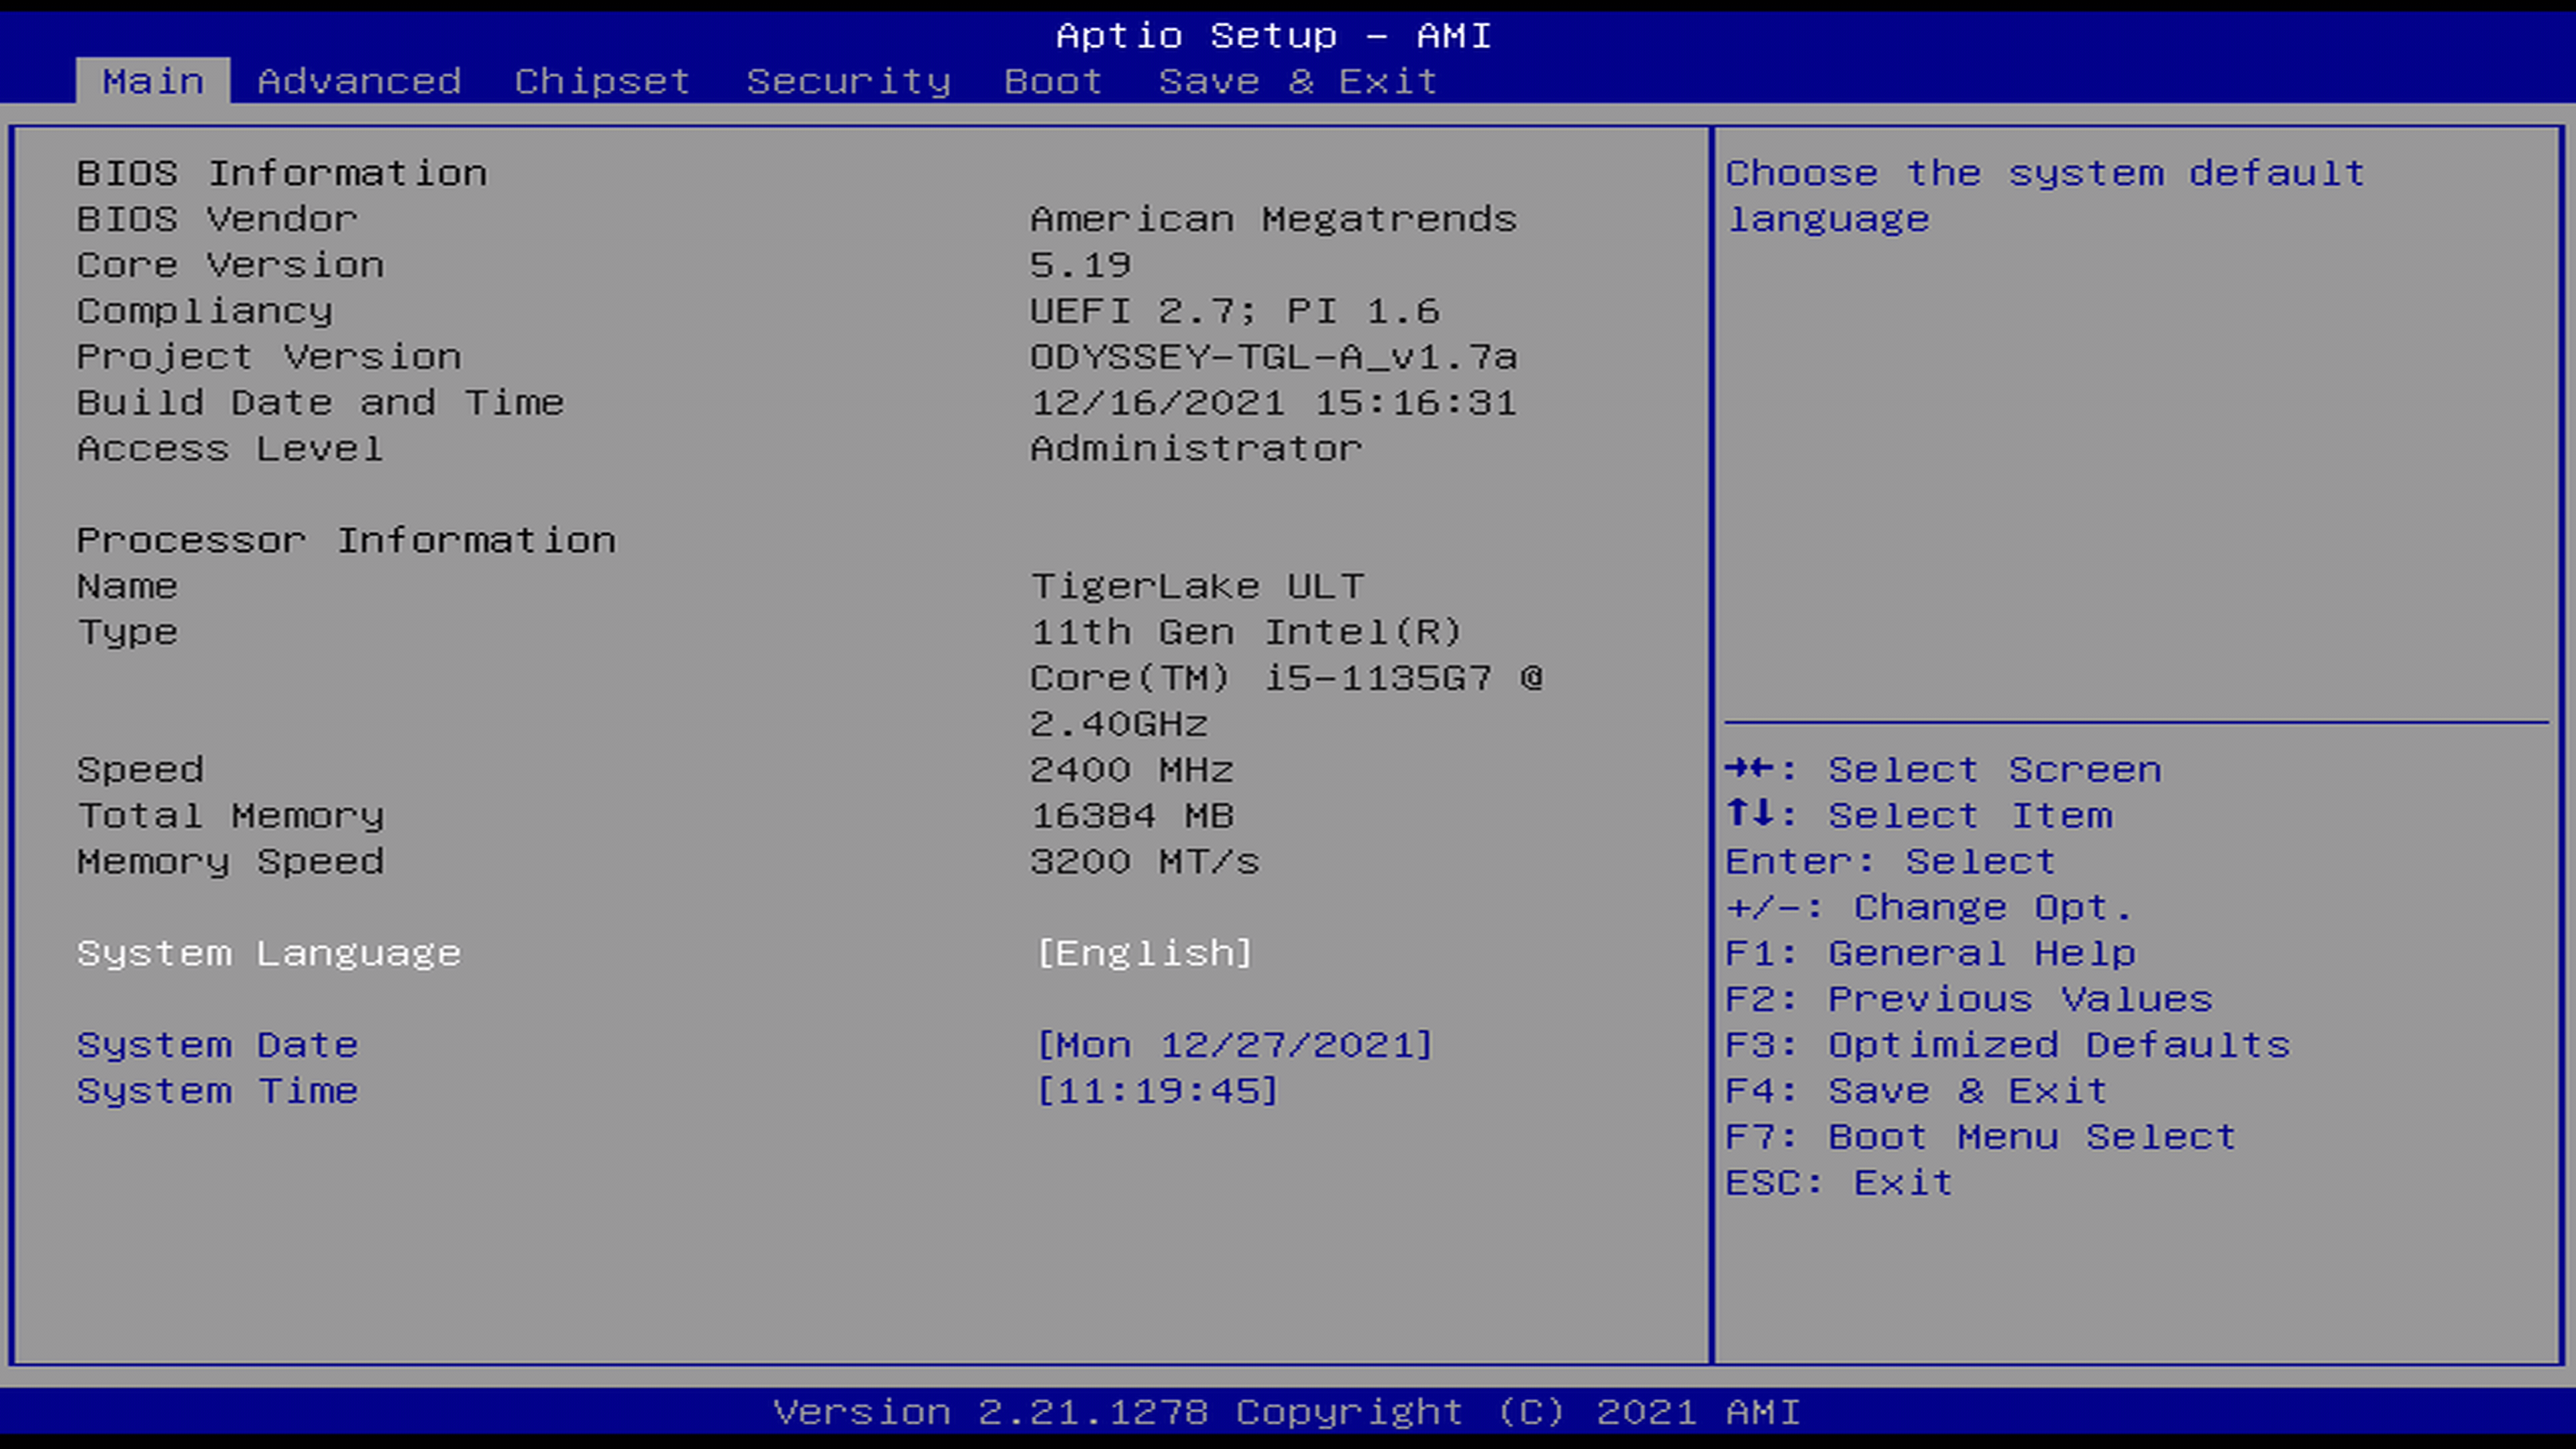
At its most fundamental level, BIOS is a firmware interface that initializes hardware during the booting process and provides runtime services for the operating system and programs. It’s a small program stored on a chip on your motherboard, responsible for performing a Power-On Self-Test (POST) to ensure all hardware components are functioning correctly before handing control over to the operating system. Think of it as your computer’s brain, waking up all the other parts and making sure they’re ready to work together.
However, BIOS, being an older technology, has several limitations, including a 16-bit processor mode, limited hard drive support (up to 2TB), and text-only interfaces. To overcome these constraints, UEFI was introduced as a modern replacement. UEFI offers several advantages:
- Graphical Interface: Most UEFI firmware comes with a user-friendly graphical interface that can be navigated with a mouse, making configuration much easier than the traditional text-based BIOS.
- Larger Drive Support: UEFI supports hard drives larger than 2TB, thanks to its use of the GUID Partition Table (GPT) instead of the Master Boot Record (MBR).
- Faster Boot Times: UEFI can initialize hardware and boot the operating system much faster than BIOS.
- Enhanced Security: Features like Secure Boot help prevent malicious software from loading during the boot process, significantly enhancing your system’s security posture.
- Networking Capability: Some UEFI implementations include networking capabilities, allowing for remote diagnostics or even firmware updates directly from the internet.
While modern systems predominantly use UEFI, the term “BIOS update” is often still used colloquially to refer to updating your system’s firmware, regardless of whether it’s traditional BIOS or UEFI. For the purposes of this guide, we’ll use “firmware update” to encompass both, but specifically focus on the more prevalent UEFI update process.
Why Firmware Updates Matter
Updating your system’s firmware might seem like an advanced task, and it often is. Unlike updating a graphics driver or an application, a botched firmware update can potentially “brick” your motherboard, rendering your computer inoperable. So, if the risks are significant, why bother?
There are several compelling reasons why a firmware update might be necessary or highly beneficial:
- Bug Fixes and Stability Improvements: Just like any other software, BIOS/UEFI firmware can have bugs. Manufacturers frequently release updates to address stability issues, resolve conflicts with certain hardware components, or fix subtle performance bottlenecks. An update can make your system more reliable and prevent unexpected crashes.
- Hardware Compatibility: As new processors, RAM modules, or other peripherals are released, older motherboards might require a firmware update to recognize and fully support them. For instance, if you’re upgrading your CPU within the same motherboard generation, a firmware update might be essential to ensure compatibility with the newer chip.
- Security Patches: Firmware vulnerabilities can expose your system to low-level attacks that bypass traditional operating system security measures. Manufacturers regularly release security patches to address these vulnerabilities, protecting your system from potential exploits.
- Performance Enhancements: Sometimes, firmware updates can include optimizations that improve system performance, such as better memory timings, enhanced power management, or faster boot sequences.
- New Features: UEFI updates, in particular, can introduce new features or improve existing ones, like more granular fan control options, improved overclocking capabilities, or additional security settings.
While the benefits are clear, it’s crucial to approach firmware updates with caution. It’s generally advised not to update your firmware unless you have a specific reason to do so, such as addressing a known issue you’re experiencing, improving hardware compatibility, or patching a critical security vulnerability. “If it ain’t broke, don’t fix it” is a golden rule here. However, when a specific need arises, knowing how to perform the update correctly is invaluable.
Essential Preparations Before You Begin
The success of a firmware update hinges significantly on thorough preparation. Skipping any of these steps dramatically increases the risk of complications. This section will guide you through identifying your system’s specifications, locating the correct update, and implementing vital safety measures.
Identifying Your Motherboard and Current Firmware Version
The first and most critical step is to accurately identify your motherboard’s make and model, along with your current BIOS/UEFI firmware version. Installing the wrong firmware version for your motherboard can lead to catastrophic failure.
Here’s how to gather this information:
-
For Windows Users:
- Using System Information: Press
Windows key + R, typemsinfo32, and press Enter. In the System Information window, look for “BaseBoard Manufacturer,” “BaseBoard Product,” and “BIOS Version/Date” or “UEFI Version/Date.” This will give you your motherboard model and the current firmware version. - Using Command Prompt: Open Command Prompt as an administrator (search for
cmd, right-click, and select “Run as administrator”). Typewmic baseboard get product,manufacturer,version,serialnumberand press Enter to get motherboard details. For BIOS version, typewmic bios get smbiosbiosversionand press Enter. - Third-Party Tools: Utilities like CPU-Z (under the “Mainboard” tab) can also provide comprehensive motherboard and BIOS/UEFI information.
- Using System Information: Press
-
For Linux Users:
- Open a terminal and type
sudo dmidecode -t baseboardfor motherboard details. - For BIOS/UEFI version, type
sudo dmidecode -t bios.
- Open a terminal and type
-
Physical Inspection: If your system isn’t booting or for confirmation, you can physically inspect the motherboard. The manufacturer and model number are typically printed on the board itself, usually between expansion slots or near the CPU socket.
Once you have this information, write it down accurately. This is your primary reference point for the next step.
Locating the Correct Firmware Update
With your motherboard model and current firmware version in hand, you can now safely search for the update.
- Visit the Manufacturer’s Website: This is the ONLY trusted source for firmware updates. Navigate to the official website of your motherboard manufacturer (e.g., ASUS, Gigabyte, MSI, ASRock, Dell, HP, Lenovo for pre-built systems).
- Find the Support Section: Look for a “Support,” “Downloads,” or “Drivers” section.
- Search for Your Model: Use the search bar or navigate through categories to find your exact motherboard model. Be extremely precise; even a slight variation in model number (e.g., “Z690-A” vs. “Z690-E”) can mean different firmware.
- Locate BIOS/UEFI Downloads: Within your motherboard’s support page, find the “BIOS,” “Firmware,” or “UEFI” download section.
- Identify the Latest Version: Look for the latest firmware version available. Cross-reference it with your current version. If the latest version number is lower than or the same as yours, you don’t need to update (unless there’s a specific, critical patch released out-of-sequence). Read the release notes or changelog for each firmware version. This will tell you what improvements, bug fixes, or new features each update provides and whether it addresses your specific reason for updating.
- Download the Correct File: Download the appropriate firmware file. It will typically be a ZIP archive containing the firmware image file (often with a
.CAP,.ROM, or.BINextension) and sometimes a flashing utility or a README file.
Crucial Advice: Never download firmware from unofficial sources. Malicious firmware can compromise your system at the deepest level. Always stick to the official manufacturer’s website.
Critical Safety Precautions
Before proceeding with the actual flashing process, several critical safety precautions must be observed. These steps are designed to minimize the risk of failure and protect your hardware.
- Stable Power Supply: This is arguably the most important precaution. A power interruption during a firmware update will almost certainly corrupt the firmware, rendering your motherboard unusable.
- Desktop Users: Use an Uninterruptible Power Supply (UPS) if available. If not, ensure your power source is stable and avoid performing the update during storms or known power grid instabilities. Avoid turning off or restarting your computer manually during the update process.
- Laptop Users: Ensure your laptop is plugged directly into a wall outlet (not a power strip that could be accidentally turned off) and that its battery is fully charged. Do not rely solely on battery power.
- Backup Your Data: While a firmware update shouldn’t directly affect your data, any unforeseen issues or a completely failed update could lead to data loss if your system becomes unbootable. Always perform a full backup of all critical data before initiating a firmware update.
- Disconnect Unnecessary Peripherals: Unplug any non-essential USB devices, external hard drives, or expansion cards. This reduces potential conflicts during the update process. Keep only the keyboard, mouse, and monitor connected.
- Read the Manufacturer’s Instructions: Every motherboard manufacturer has specific instructions for updating firmware. These might differ slightly from the general guide provided here. Always read the README file included with the firmware download or the instructions on the manufacturer’s support page. These instructions often contain crucial model-specific details.
- Prepare a USB Flash Drive (for most methods): Format a small, empty USB flash drive (8GB or 16GB is usually sufficient) to FAT32. This is the most widely compatible file system for BIOS/UEFI utilities. Copy the extracted firmware file (e.g.,
YOUR_MODEL.CAP) directly to the root directory of the USB drive. Do not put it in a folder unless specifically instructed by the manufacturer. Some manufacturers require renaming the file to a specific format (e.g.,MSI.ROMorASUS.CAP) for their flashing utility to recognize it. Check the instructions!
By diligently following these preparatory steps, you significantly increase your chances of a successful and uneventful firmware update.
Step-by-Step Guide to Updating Your Firmware
With all preparations complete, you are now ready to proceed with the actual firmware update process. There are typically two main methods, with the USB flash drive method being the most common and recommended for modern motherboards.
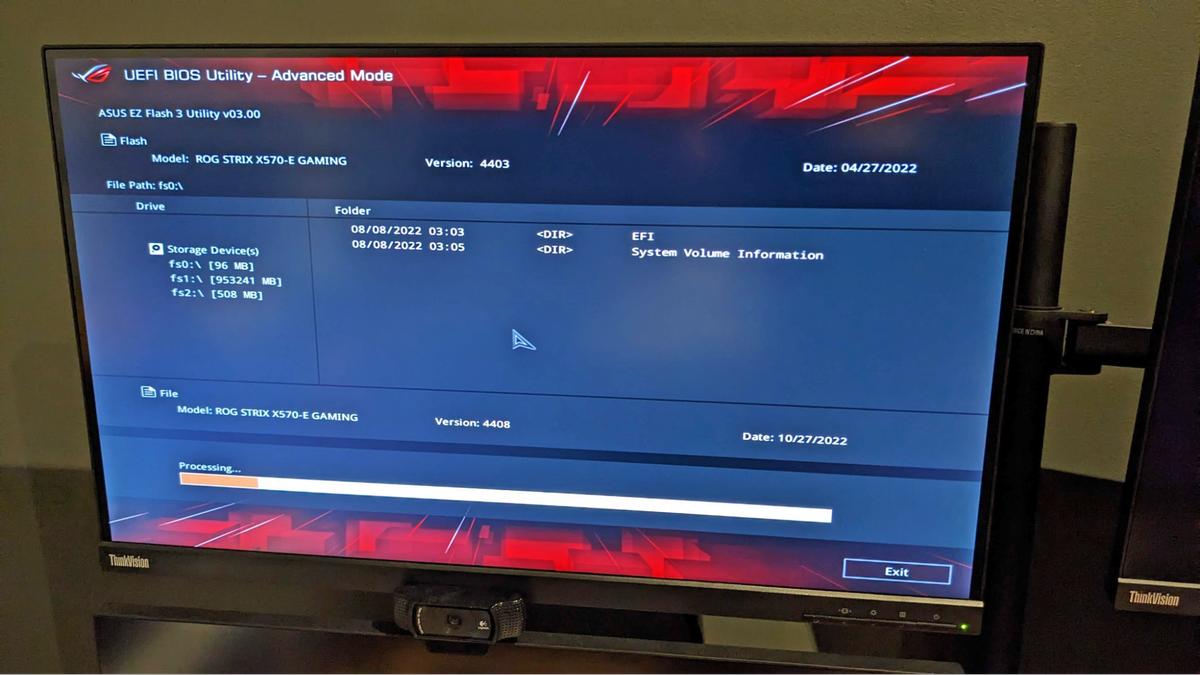
Method 1: Updating via a USB Flash Drive (The Recommended Approach)
This method involves using a utility built into your motherboard’s UEFI firmware itself, which reads the update file from a USB drive. It’s generally the safest and most reliable method as it operates outside the operating system environment, reducing the chance of software conflicts.
- Save and Close All Applications: Before restarting, ensure all your work is saved, and all applications are closed.
- Insert the Prepared USB Flash Drive: Plug the USB drive containing the firmware file into an available USB port on your computer. Ideally, use a USB 2.0 port if your motherboard has one, as they sometimes offer better compatibility than USB 3.0 ports during the pre-boot environment.
- Reboot Your Computer and Enter BIOS/UEFI Setup: Restart your computer. As it boots, repeatedly press the designated key to enter the BIOS/UEFI setup utility. Common keys include
Del,F2,F10, orF12. The exact key is usually displayed briefly on the screen during startup. - Locate the Flashing Utility: Once inside the UEFI interface, navigate to the section that contains the flashing utility. The name varies by manufacturer:
- ASUS: Often called “EZ Flash 3” (or similar version) in the “Tool” menu.
- Gigabyte: Typically named “Q-Flash” and can be accessed by pressing
F8from within the UEFI setup or found under “BIOS Features.” - MSI: Look for “M-Flash” in the “Tool” or “Settings” menu.
- ASRock: Usually “Instant Flash” under the “Tools” menu.
- Other/Pre-built systems: Look for terms like “Flash Utility,” “BIOS Update,” or “Firmware Update.”
- Select the Firmware File: Follow the on-screen prompts of the flashing utility. It will usually ask you to select the storage device (your USB drive) and then the firmware file (.CAP, .ROM, .BIN). Select the correct firmware file you downloaded earlier.
- Initiate the Update: The utility will typically display information about the current and new firmware versions and ask for confirmation. Double-check that you are updating to the correct version for your motherboard. Confirm to start the flashing process.
- DO NOT INTERRUPT: This is the most critical phase. The screen might go blank, or the system might appear to freeze. DO NOT power off, restart, or otherwise interrupt the computer. The update process can take several minutes. Your system might restart multiple times automatically during this process.
- Completion and Reboot: Once the update is complete, the utility will notify you, and the system will likely restart. Remove the USB drive after the system reboots.
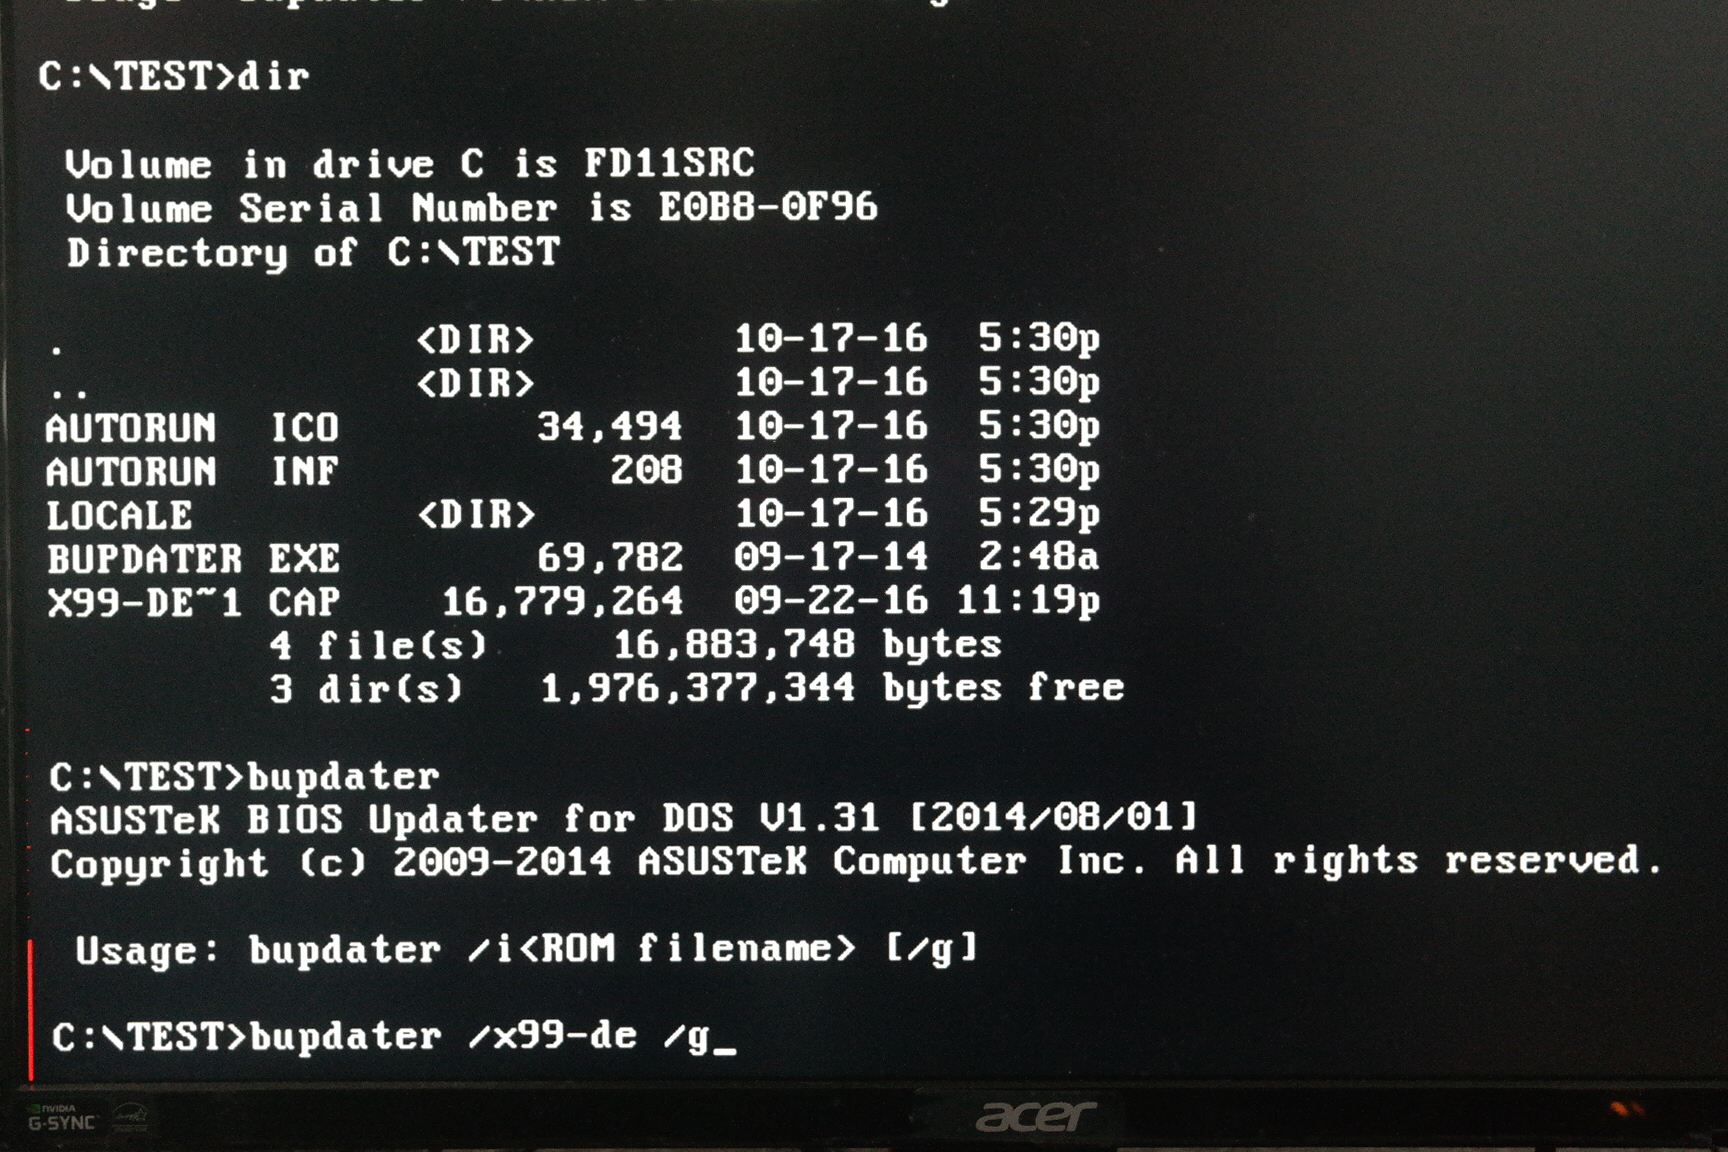
Method 2: Using Manufacturer-Provided Utilities (Less Common, but Available)
Some manufacturers provide Windows-based or Linux-based utilities that can flash the firmware directly from within the operating system. While convenient, this method carries a slightly higher risk due to potential conflicts with the operating system, background processes, or driver issues. Use this method only if the manufacturer explicitly recommends it or if the USB method is not feasible for your specific motherboard.
- Download and Install the Utility: From your motherboard manufacturer’s support page, download and install their dedicated firmware flashing utility (e.g., ASUS AI Suite, MSI Live Update, Gigabyte APP Center).
- Prepare the Firmware File: Download the firmware file as described previously and extract it if necessary.
- Close All Unnecessary Programs: Ensure no other applications are running in the background, especially antivirus software or any programs that might interfere with system processes.
- Run the Utility: Launch the manufacturer’s utility. Look for the “BIOS Update” or “Firmware Update” section.
- Select the Firmware File: The utility will prompt you to select the firmware file you downloaded.
- Initiate the Update: Follow the on-screen instructions. The utility will likely warn you about not interrupting the process. Confirm to proceed.
- DO NOT INTERRUPT: Similar to the USB method, let the process complete without interruption. Your system will restart automatically.
- Completion and Reboot: Once complete, the utility will confirm, and your system will reboot.
Post-Update Verification and Configuration
After your system has rebooted following a successful firmware update, there are a few final steps to ensure everything is working as expected.
- Verify the New Firmware Version: Re-enter your BIOS/UEFI setup utility (by pressing the designated key during boot) and check the “BIOS Version/Date” or “UEFI Version/Date” to confirm that the new version is correctly installed.
- Reset BIOS/UEFI Settings (Recommended): Many manufacturers recommend loading the “Optimized Defaults” or “Factory Defaults” after a firmware update. This ensures that any old, potentially incompatible settings are cleared, and the system starts with stable parameters for the new firmware. Save these defaults and exit.
- Reconfigure Custom Settings: If you had any specific custom settings (e.g., XMP/DOCP for RAM, boot order, fan curves, overclocking profiles), you will need to re-apply them manually after loading the defaults. Take your time to re-enter these settings carefully. Do not load saved profiles from previous firmware versions, as these might contain incompatible configurations.
- Test System Stability: Boot into your operating system and use your computer as usual. Monitor for any instability, crashes, or unexpected behavior. If you experience issues, you might need to revert to a previous firmware version (if available and supported by your manufacturer) or troubleshoot further.
Troubleshooting Common Firmware Update Issues
Even with careful preparation, issues can sometimes arise during or after a firmware update. Knowing how to react can potentially save your system.
What to Do If the Update Fails
A failed firmware update typically results in a system that won’t boot, often referred to as a “bricked” motherboard. This can be a daunting situation, but several motherboards have built-in recovery options.
-
CMOS Reset: The simplest first step is to perform a CMOS clear. This resets all BIOS/UEFI settings to factory defaults.
- Method 1 (Jumper/Button): Unplug your computer from power. Locate the “CLR_CMOS” or “JBAT1” jumper on your motherboard. Move the jumper cap from pins 1-2 to 2-3 for 5-10 seconds, then move it back. Some motherboards have a dedicated “Clear CMOS” button on the rear I/O panel or directly on the board itself.
- Method 2 (Battery Removal): Unplug your computer from power. Remove the small coin-cell battery (CR2032) from the motherboard for a few minutes, then reinsert it.
- After a CMOS clear, attempt to boot your system.
-
BIOS Flashback / Q-Flash Plus / USB BIOS Flashback (Manufacturer-Specific Features): Many modern high-end and even mid-range motherboards feature a recovery option that allows you to flash firmware without a CPU, RAM, or even a working firmware.
- These features typically involve a specific USB port (often labeled “BIOS Flashback” or similar), a dedicated button, and a specifically named firmware file on a USB drive.
- Consult your motherboard manual immediately if your system won’t boot after a failed update. These manuals will provide detailed instructions for using such recovery features, which can often revive a bricked board.
-
Dual BIOS: Some Gigabyte motherboards (and a few others) feature “Dual BIOS,” meaning they have a main BIOS chip and a backup BIOS chip. If the main BIOS becomes corrupted, the system can automatically boot from the backup BIOS. Sometimes, you can manually force it to boot from the backup or copy the backup to the main chip. Again, refer to your manual.
-
Professional Help: If none of these methods work, and your motherboard lacks advanced recovery features, it’s likely that the motherboard is truly bricked. In this scenario, your options are to replace the motherboard or seek professional repair services from a specialized electronics repair shop, though the cost might be prohibitive.
Preventing Future Complications
While it’s impossible to eliminate all risks, you can significantly reduce the chances of future firmware update issues:
- Only Update When Necessary: Reiterate the “if it ain’t broke, don’t fix it” principle. Only update for specific reasons (compatibility, security, bug fixes).
- Stay Informed: Follow tech news outlets and your motherboard manufacturer’s support pages for critical firmware advisories, especially for security vulnerabilities or widespread compatibility issues.
- Maintain a Stable Environment: Always ensure a stable power supply during updates.
- Keep a Recovery USB: If your motherboard supports a “BIOS Flashback” type feature, it’s a good practice to keep a USB drive with the latest stable firmware version (or even the factory default version) formatted correctly for recovery, just in case.
- Document Your Settings: Before any major update, take photos or notes of your critical BIOS/UEFI settings so you can easily reconfigure them if you have to reset to defaults.
Updating your BIOS/UEFI firmware is a powerful maintenance task that, when performed correctly, can enhance your system’s performance, stability, and security. While it demands careful attention and adherence to specific steps, the knowledge and confidence gained from successfully performing this operation are invaluable for any tech-savvy individual. By understanding the importance, preparing diligently, and executing precisely, you ensure your system’s foundation remains robust and future-proof.
aViewFromTheCave is a participant in the Amazon Services LLC Associates Program, an affiliate advertising program designed to provide a means for sites to earn advertising fees by advertising and linking to Amazon.com. Amazon, the Amazon logo, AmazonSupply, and the AmazonSupply logo are trademarks of Amazon.com, Inc. or its affiliates. As an Amazon Associate we earn affiliate commissions from qualifying purchases.