In the intricate world of computing, where software meets hardware, there exists a foundational layer that dictates how your computer boots up and interacts with its essential components. This critical piece of firmware is known as the BIOS (Basic Input/Output System) or its modern successor, UEFI (Unified Extensible Firmware Interface). For anyone navigating the complexities of PC ownership, from casual users to seasoned tech enthusiasts and business professionals, understanding how to manage and, when necessary, install or update your system’s BIOS/UEFI is not just a technicality – it’s a fundamental aspect of system maintenance, security, and performance optimization.
This guide will demystify the process of BIOS installation and updates, providing you with a step-by-step roadmap to ensure your system operates efficiently and securely. Whether you’re troubleshooting an issue, upgrading hardware, or simply seeking to future-proof your investment, mastering BIOS management is a skill that pays dividends in stability, compatibility, and peace of mind.
Understanding BIOS/UEFI: The Digital Foundation of Your PC
Before diving into the “how,” it’s crucial to grasp the “what” and “why.” The BIOS, and more commonly today, UEFI, is the first software your computer runs when you power it on. It’s stored on a small chip on your motherboard, distinct from your operating system, and serves several vital functions:
- POST (Power-On Self-Test): It checks if essential hardware components like the CPU, RAM, and graphics card are present and functioning correctly.
- Hardware Initialization: It prepares the hardware to communicate with the operating system, assigning resources and configuring basic settings.
- Bootloader Handover: It locates the operating system on your storage drive and hands over control, allowing Windows, macOS, or Linux to load.
- Basic Settings Interface: It provides an interface (often a text-based blue screen or a graphical menu) where you can configure fundamental system settings, such as boot order, date/time, fan speeds, and even CPU/RAM frequencies.
Why is it important to manage or update your BIOS/UEFI?
The reasons are multi-faceted, touching upon performance, security, and compatibility – all critical elements for effective technology utilization, whether for personal productivity or business operations.
- Enhanced Hardware Compatibility: New CPUs, RAM modules, or even graphics cards often require a specific BIOS/UEFI version to be recognized and function correctly. An update can unlock support for the latest components.
- Bug Fixes and Stability Improvements: Like any software, BIOS/UEFI can have bugs. Updates often contain critical fixes that resolve stability issues, address system freezes, or improve overall reliability.
- Performance Optimization: Manufacturers frequently release updates that fine-tune system performance, optimize power consumption, or improve boot times.
- Security Patches: In an era of escalating cyber threats, BIOS/UEFI can be a target for malicious attacks (e.g., rootkits). Updates often include crucial security patches that mitigate vulnerabilities, safeguarding your system from low-level exploits. This is especially pertinent to digital security, a key concern in the Tech landscape.
- New Features: Some updates introduce new functionalities, such as improved fan control, additional overclocking options, or better support for storage technologies like NVMe.
Considering these points, treating your BIOS/UEFI as a static, “set-it-and-forget-it” component can leave your system vulnerable and underperforming. Proactive management ensures you’re leveraging the full potential of your hardware and maintaining a secure computing environment.
Comprehensive Preparation for a BIOS Update/Installation
The process of updating or “flashing” your BIOS/UEFI is not inherently difficult, but it is one of the most critical and potentially risky operations you can perform on your computer. A single misstep, an incorrect file, or an untimely power interruption can “brick” your motherboard, rendering your system inoperable. Therefore, thorough preparation is paramount.
Identifying Your Current BIOS Version and Motherboard Model
The first and most crucial step is to know precisely what motherboard you have and what BIOS/UEFI version it’s currently running. This information is vital for downloading the correct update file.
- Using System Information (Windows): Press
Win + R, typemsinfo32, and hit Enter. Look for “BaseBoard Manufacturer,” “BaseBoard Product,” and “BIOS Version/Date.” This provides a quick overview. - Using Command Prompt (Windows): Open Command Prompt as an administrator. Type
wmic baseboard get product,manufacturer,version,serialnumberand press Enter for motherboard details. For BIOS info, typewmic bios get smbiosbiosversionand Enter. - Third-Party Utilities: Tools like CPU-Z or HWInfo can provide detailed information about your motherboard, chipset, and current BIOS version in a user-friendly interface.
- Physical Inspection: If your system isn’t booting or you prefer a direct approach, physically inspect your motherboard. The model name is usually printed clearly near the CPU socket or PCIe slots.
Once you have your motherboard model (e.g., ASUS ROG Strix B550-F Gaming) and current BIOS version (e.g., F14), you can proceed to the next steps.
Backing Up Your Data and Current BIOS Settings
Before any significant system alteration, data backup is non-negotiable. While a BIOS update doesn’t directly touch your hard drive, unforeseen issues during the process could potentially lead to data loss if your system becomes unbootable and requires more drastic recovery efforts.
- Data Backup: Use cloud services (OneDrive, Google Drive), external hard drives, or network-attached storage (NAS) to back up all important documents, photos, videos, and project files.
- Current BIOS Settings: Take photos or write down all your current BIOS/UEFI settings, especially if you’ve made custom adjustments (e.g., XMP profiles for RAM, boot order, fan curves, overclocking settings). After a successful update, the BIOS typically resets to default (“optimized defaults”), and you’ll need to reapply your preferred configurations.
Ensuring Power Stability
This is perhaps the single most critical precaution. A power outage or fluctuation during a BIOS flash can irreversibly corrupt the firmware, making your motherboard unusable.
- Desktop PCs: Use an Uninterruptible Power Supply (UPS) that can sustain your PC long enough to complete the update and safely shut down if power is lost. If a UPS is unavailable, ensure the update is performed when power is stable, avoiding storms or known grid instabilities.
- Laptops: Ensure your laptop is plugged into a reliable power source and its battery is fully charged (preferably 100%). A laptop running on battery power during an update is incredibly risky, as a sudden battery drain could have catastrophic consequences.
Downloading the Correct BIOS/UEFI Update File
This step cannot be overstated: always download the BIOS/UEFI update directly from your motherboard manufacturer’s official website. Never use third-party sites, as they may offer incorrect, outdated, or even malicious firmware.
- Navigate to the Manufacturer’s Website: Go to the support section of brands like ASUS, MSI, Gigabyte, ASRock, Dell, HP, Lenovo, etc.
- Locate Your Specific Model: Use the exact model name identified earlier. Be extremely precise, as even minor variations (e.g., “Pro” vs. “Max” or different revision numbers) can use different firmware.
- Find the BIOS/Firmware Section: Look for a “Drivers & Utilities,” “Support,” or “Downloads” section, then specifically for “BIOS” or “Firmware.”
- Download the Latest Version: Compare the version number on the website with your current version. If the website has a newer version, download it. Read the release notes to understand what the update addresses and if there are any prerequisites (e.g., updating to an intermediate version first).
- Extract the File: BIOS files are often compressed (ZIP, RAR). Extract the contents to an easily accessible location, typically a USB flash drive formatted to FAT32. The actual BIOS file might have an
.ROM,.BIN, or other proprietary extension. Some manufacturers provide a flashing utility within the download package.
Step-by-Step Guide to Installing/Updating BIOS/UEFI
With thorough preparation complete, you’re ready to proceed with the actual update. There are generally a few methods, largely depending on your motherboard manufacturer and model. The most common methods are via a USB flash drive using the BIOS’s built-in utility or, less commonly today, through a Windows-based utility.
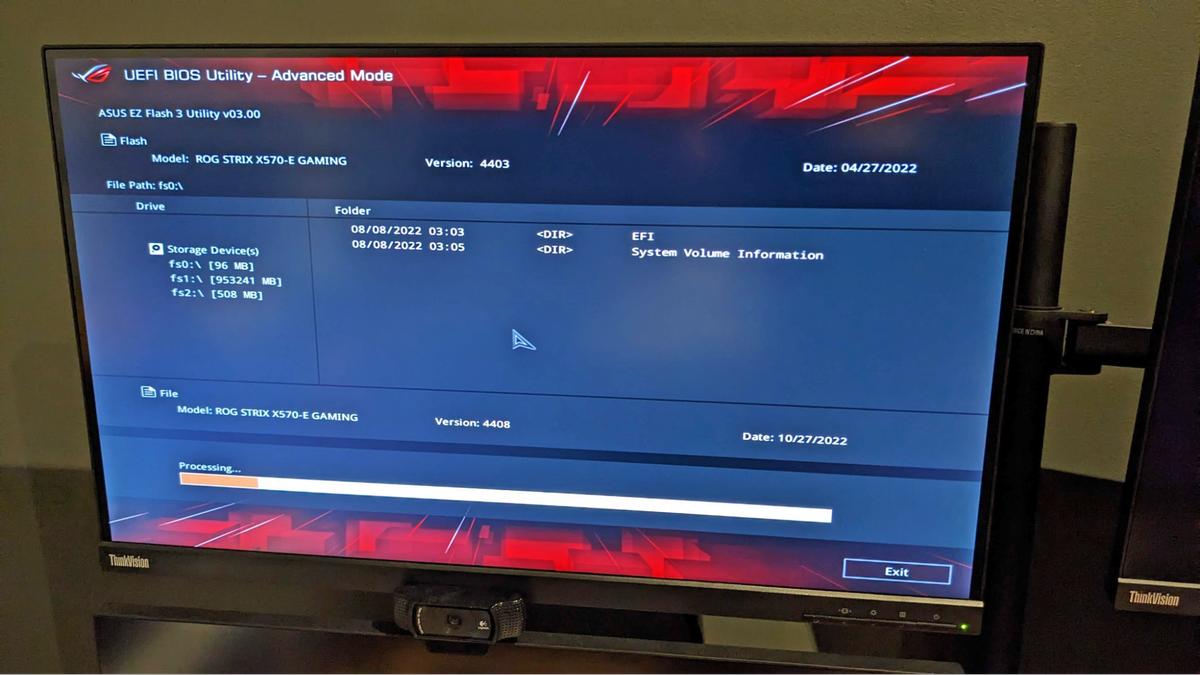
Method 1: Using a USB Flash Drive (Recommended and Most Common)

This method involves flashing the BIOS from within the BIOS/UEFI environment itself, which is generally safer than OS-based methods as it’s not subject to OS conflicts or running processes.
-
Prepare the USB Drive:
- Use a small capacity USB 2.0 or 3.0 flash drive (8GB-16GB is usually more than enough).
- Format it to FAT32. This is crucial as many BIOS utilities only recognize FAT32 partitions. (Right-click drive in “This PC” > Format > File system: FAT32).
- Copy the extracted BIOS file (e.g.,
Z790A.CAP,F14.BIN,E7C97AMS.1C0) directly to the root directory of the USB drive. Do not put it in a folder unless specifically instructed by your manufacturer. Some manufacturers (e.g., ASUS with “BIOS Flashback,” MSI with “Flash BIOS Button”) require renaming the file to a specific name (e.g.,MB.CAPfor ASUS,MSI.ROMfor MSI). Consult your motherboard manual for exact instructions.
-
Access Your BIOS/UEFI Settings:
- Restart your computer.
- Immediately and repeatedly press the designated key to enter BIOS/UEFI setup. Common keys include
Del,F2,F10,F12,Esc. The specific key is usually displayed briefly on the screen during boot-up or found in your motherboard manual. - If you’re using Windows 10/11 and can’t catch the key, go to
Settings > System > Recovery > Advanced startup > Restart now. ThenTroubleshoot > Advanced options > UEFI Firmware Settings > Restart.
-
Locate the BIOS Flash Utility:
- Once in the BIOS/UEFI interface, navigate to the “Tool,” “EZ Flash,” “M-Flash,” “Q-Flash,” or similarly named section. This utility is designed specifically for updating the firmware.
- The interface will typically allow you to select the BIOS file from your USB drive.
-
Perform the Flash/Update:
- Select the BIOS file you placed on your USB drive.
- The utility will likely verify the file and prompt you to confirm the update. Read all on-screen instructions carefully.
- Initiate the update. Your screen may go blank, or a progress bar might appear.
- CRITICAL WARNING: Do not turn off, restart, or interrupt the computer during this process, even if it appears to be frozen or takes a long time. Any interruption can corrupt the BIOS. The system will typically restart automatically once the flash is complete.
Method 2: Using a Windows-Based Utility (Less Recommended)
Some manufacturers provide a utility that allows you to update the BIOS directly from within Windows. While seemingly convenient, this method carries slightly more risk due to potential conflicts with background applications, drivers, or system instabilities within the OS.
- Download and Extract: Download the Windows-based flashing utility and the BIOS file from your manufacturer’s website. They are often bundled together.
- Close All Applications: Close all unnecessary programs, especially antivirus software, and background processes to minimize conflicts.
- Run as Administrator: Right-click the utility’s executable file and select “Run as administrator.”
- Follow On-Screen Prompts: The utility will guide you through selecting the BIOS file and initiating the update.
- Reboot: The system will typically restart after the update is complete.
Note on BIOS Flashback/Q-Flash Plus (USB without CPU/RAM/GPU):
Many modern motherboards offer a feature that allows you to flash the BIOS without a CPU, RAM, or even a graphics card installed. This is invaluable for supporting new CPUs that aren’t natively recognized by older BIOS versions.
- Consult your manual for specific instructions.
- Typically involves a specific USB port, a dedicated “Flash BIOS” button, and a specifically renamed BIOS file on the USB drive.
- Power needs to be connected to the motherboard, but the system doesn’t need to fully boot.
Post-Installation Procedures and Troubleshooting
Once your system restarts after a successful BIOS update, there are a few final steps to ensure everything is in order.
Verifying the New BIOS Version
After the system boots up, either enter the BIOS/UEFI setup again or use msinfo32 (Windows) to confirm that the new BIOS version number is correctly displayed. This confirms the update was successful.
Restoring Optimal Settings
As mentioned, the BIOS typically resets to default settings after a flash.
- Load Optimized Defaults: Enter the BIOS/UEFI settings and look for an option like “Load Optimized Defaults” or “Load Setup Defaults.” Select this to ensure all settings are at their recommended factory configurations.
- Reapply Custom Settings: If you backed up your custom settings (XMP, boot order, fan curves, overclocking), carefully reapply them one by one. Do not just re-enter everything without thought. Test stability after each major change.
- Save and Exit: Save your changes and exit the BIOS. Your system should now boot into your operating system with the updated firmware.
Common Issues and Solutions
Even with careful preparation, issues can sometimes arise.
- System Not Booting/Black Screen:
- Check Cables: Ensure all power cables, RAM, and graphics card are properly seated.
- Clear CMOS: This resets the BIOS to its factory defaults by clearing the settings stored in volatile memory. This can be done by removing the CMOS battery for a few minutes or using a dedicated “CMOS Clear” jumper/button on your motherboard (refer to your manual).
- Re-flash (if possible): If your motherboard has a dual BIOS or a dedicated BIOS flashback feature, you might be able to re-flash the BIOS.
- Seek Professional Help: If none of these work, your motherboard might be bricked, and you’ll need to contact the manufacturer’s support or a professional repair service.
- System Instability/Crashes:
- Load Optimized Defaults: If you’ve reapplied custom settings, try loading optimized defaults first to see if stability returns. If it does, reintroduce your custom settings one by one.
- Check Drivers: Ensure all your device drivers are up to date, as new BIOS versions might have better compatibility with newer drivers.
- Rollback (if possible): Some manufacturers allow rolling back to a previous BIOS version. This is usually a last resort.
- “Incorrect BIOS File” Error: You likely downloaded the wrong file for your specific motherboard model or revision. Double-check your model number and try again.
The Broader Implications of BIOS Management: Tech, Security, and Your Investment
Beyond the immediate technical steps, understanding and managing your BIOS/UEFI ties directly into broader themes relevant to technology, digital security, and even financial prudence.
Enhancing System Performance and Compatibility
Regular BIOS updates aren’t just about fixing problems; they’re about unlocking potential. Newer firmware can optimize how your CPU interacts with RAM, improve the efficiency of power delivery, and provide better support for high-speed storage devices. This translates into snappier performance, more stable overclocking (if you dabble in it), and the ability to seamlessly integrate the latest hardware components into your existing setup. For professionals, this means a more reliable workstation and fewer interruptions, directly contributing to productivity. For gamers, it means a smoother, more responsive experience.
Addressing Security Vulnerabilities
In the interconnected digital landscape, security is paramount. BIOS/UEFI firmware, operating at a level below the operating system, is a prime target for sophisticated malware and rootkits. Such threats can persist even after an OS reinstall, making them incredibly difficult to detect and remove. Manufacturers frequently release BIOS updates that patch critical security vulnerabilities, protecting your system from these low-level attacks. Proactive BIOS management is therefore a crucial component of a comprehensive digital security strategy, helping to safeguard not just your data but the very integrity of your computing environment. This aligns perfectly with the “Digital Security” aspect of our Tech category.

Future-Proofing Your Hardware Investment
Technology evolves rapidly, but strategically updating your BIOS/UEFI can extend the useful life of your existing hardware. By enabling support for newer generations of CPUs, optimizing compatibility with faster RAM kits, or improving power efficiency, a simple firmware update can breathe new life into an aging system. This intelligent approach to hardware management can defer the need for costly full system upgrades, making it a sound financial decision. It’s about maximizing the return on your initial investment by ensuring your hardware remains relevant and capable for longer, a shrewd move for personal finance and business alike.
In conclusion, installing or updating your BIOS/UEFI is more than just a technical chore; it’s a vital aspect of maintaining a healthy, secure, and high-performing computer. While the process demands careful attention and adherence to instructions, the benefits—from enhanced compatibility and improved performance to robust security and extended hardware longevity—make it an indispensable skill for anyone serious about managing their technology effectively. By following this comprehensive guide, you’re not just flashing firmware; you’re investing in the stability and future of your digital world.
aViewFromTheCave is a participant in the Amazon Services LLC Associates Program, an affiliate advertising program designed to provide a means for sites to earn advertising fees by advertising and linking to Amazon.com. Amazon, the Amazon logo, AmazonSupply, and the AmazonSupply logo are trademarks of Amazon.com, Inc. or its affiliates. As an Amazon Associate we earn affiliate commissions from qualifying purchases.