In an era defined by technological advancement, the modern vehicle is a sophisticated blend of engineering and digital innovation. Among the myriad gadgets designed to enhance the driving experience, the backup camera stands out as a crucial safety and convenience feature. What was once a luxury reserved for high-end models has now become an accessible and invaluable tool for everyday drivers. This comprehensive guide will walk you through the process of installing a backup camera, transforming your vehicle into a smarter, safer, and more user-friendly machine. Whether you’re a seasoned DIY enthusiast or a newcomer eager to tackle a rewarding project, understanding how to install a backup camera can save you money, boost your confidence behind the wheel, and significantly enhance your car’s functionality. This isn’t just about adding a gadget; it’s about embracing a smart tech solution that offers tangible benefits, aligning perfectly with our focus on practical technology, financial savvy, and enhancing your personal brand through capable self-sufficiency.
The Indispensable Value of a Backup Camera in Modern Vehicles
The decision to install a backup camera extends far beyond mere convenience; it’s a strategic enhancement that touches upon personal safety, driving proficiency, and even the financial aspects of vehicle ownership. In today’s congested environments, navigating tight parking spots and bustling driveways can be a stressful ordeal. A backup camera provides an invaluable visual aid, transforming blind spots into clear views and turning potential hazards into manageable situations.
Enhancing Safety and Preventing Accidents
The primary and most compelling reason to install a backup camera is undoubtedly safety. Blind spots are an inherent challenge in any vehicle, and rearview mirrors simply cannot capture everything behind you. This is especially true for larger vehicles, SUVs, and trucks, where the rear blind zone can be substantial. Children, pets, and even small objects can easily go unnoticed, leading to tragic accidents. A backup camera provides a wide-angle view, typically spanning 120 to 170 degrees, displaying real-time footage of the area directly behind your vehicle. This visual feedback dramatically reduces the risk of backing over obstacles or colliding with other vehicles or pedestrians. It’s a proactive measure that embodies digital security in a physical sense, using technology to safeguard lives and property. By investing a modest amount of money and time, you’re investing in peace of mind, a priceless commodity.
Navigating Tight Spaces with Confidence
Beyond preventing severe accidents, backup cameras excel in practical, everyday scenarios. Parallel parking, backing into a garage, or maneuvering through a crowded parking lot can be intimidating for even experienced drivers. The precise visual information provided by a backup camera, often augmented with dynamic guidelines that show your projected path, empowers you to judge distances accurately and position your vehicle with confidence. This not only makes parking easier but also reduces the chances of minor bumps and scrapes that can chip away at your vehicle’s aesthetic and value. The stress reduction alone is a significant benefit, allowing you to approach challenging maneuvers with a newfound sense of control and ease, reflecting positively on your driving “brand.”
The Legal and Financial Case for Installation
From a financial perspective, a backup camera can be a shrewd investment. The cost of a minor fender bender, even if just cosmetic, can quickly escalate into hundreds or thousands of dollars in repairs, not to mention potential insurance premium increases. By preventing these incidents, a backup camera pays for itself many times over. Moreover, in some regions, backup cameras are becoming standard or even legally mandated for new vehicles dueifying their importance. For older vehicles, installing one not only modernizes the car but can also marginally increase its resale value by adding a highly sought-after safety feature. This falls squarely into the “Money” category of smart personal finance – an upgrade that protects your asset and potentially enhances its market appeal, making it a sensible addition to your “Tech” arsenal.
Choosing the Right Backup Camera System for Your Needs
Before you embark on the installation process, the first crucial step is selecting the right backup camera system. The market is flooded with various options, each offering different features, connectivity methods, and display solutions. Understanding these distinctions is key to making an informed decision that suits your vehicle, budget, and technological preferences. This choice significantly impacts the complexity of the installation and the overall user experience.
Wired vs. Wireless Systems: Pros and Cons
The fundamental distinction lies between wired and wireless backup camera systems.
- Wired Systems: These systems involve running a physical cable from the camera unit, typically mounted at the rear of your vehicle, all the way to a display unit in the dashboard or rearview mirror.
- Pros: Wired systems are generally known for their superior reliability, consistent image quality, and minimal interference. Since the signal travels directly through a cable, there’s less chance of lag, dropped signals, or degradation from external electronic noise. They also often offer more advanced features and higher resolution.
- Cons: The main drawback is the installation complexity. Running the cable requires more effort, involving routing it through the vehicle’s interior, often under trim panels, carpets, and the headliner, which can be time-consuming and daunting for beginners.
- Wireless Systems: These systems transmit the video signal from the camera to the display unit via a wireless transmitter, often using Wi-Fi or a dedicated radio frequency.
- Pros: The biggest advantage is the ease of installation, as you avoid the extensive cable routing of a wired system. This makes them a popular choice for DIYers looking for a quicker setup.
- Cons: Wireless systems can be prone to interference from other electronic devices, leading to occasional signal drops, lag, or lower image quality. Their reliability can vary significantly depending on the quality of the transmitter and receiver. They still require power wiring for both the camera and the transmitter, so it’s not entirely wire-free.
For a reliable, long-term solution, many tech enthusiasts still lean towards wired systems despite the added installation effort, prioritizing consistent performance and signal integrity. However, for those prioritizing ease of installation, a high-quality wireless system can still be a perfectly adequate and beneficial solution.
Display Options: From Dash Units to Rearview Mirrors
Once you’ve decided on wired or wireless, you need to consider how you’ll view the camera feed. Several display options are available:
- Dedicated Monitors: These are standalone screens that you mount on your dashboard or windshield. They are often larger and can offer excellent resolution, but they do add another piece of equipment to your dash.
- Rearview Mirror Monitors: These integrated solutions replace your existing rearview mirror or clip over it. When not in use, they function as a normal mirror. When the camera is active, a portion of the mirror transforms into a screen displaying the camera feed. This is a popular choice for a clean, factory-like look, as it doesn’t clutter the dashboard.
- Existing Infotainment Systems (Head Units): Many modern vehicles come with large in-dash infotainment screens. If your vehicle’s head unit has a video input (RCA or specific digital input), you can connect your backup camera to display the feed directly on this screen. This is often the most aesthetically pleasing and seamless integration, making it feel like an original factory feature.
- Smartphone Integration: Some wireless cameras can connect to your smartphone via an app, displaying the feed directly on your phone’s screen. This is a very cost-effective option if you prefer not to install a separate monitor, though it requires having your phone mounted and the app open when backing up.
Consider your vehicle’s existing setup, your aesthetic preferences, and how much “Tech” integration you desire. If you have an aftermarket head unit with a video input, that’s often the cleanest route.
Key Features to Consider Before Purchase
Beyond the basic type and display, several features can significantly impact your experience:
- Resolution: Higher resolution (e.g., 720p or 1080p) offers a clearer, more detailed image.
- Viewing Angle: A wider viewing angle (150-170 degrees) provides a broader perspective of the area behind your vehicle, minimizing blind spots.
- Night Vision: Infrared (IR) LEDs or advanced low-light sensors are crucial for clear visibility in dark conditions.
- Waterproofing (IP Rating): Look for a camera with a high IP (Ingress Protection) rating (e.g., IP67 or IP68) to ensure it can withstand rain, snow, and car washes.
- Parking Guidelines: Static or dynamic (turning with your steering wheel) lines overlaid on the video feed help you judge distance and trajectory.
- Durability and Build Quality: Investing in a reputable brand with good reviews can save you headaches down the line. This is where “Brand” awareness comes into play – choosing well-regarded products often means better components and reliability.
By carefully evaluating these options and features, you can select a backup camera system that not only fits your technical requirements but also provides the best value for your money, making the installation process worthwhile.
Preparing for Installation: Tools, Materials, and Safety First
A successful DIY backup camera installation hinges on thorough preparation. Rushing into the process without the right tools, materials, or safety precautions can lead to frustration, damage to your vehicle, or even personal injury. This phase is about planning your attack, ensuring you have everything you need, and prioritizing safety above all else. Think of it as the foundational “Tech” setup for your project, ensuring a smooth and efficient workflow.
Essential Tools and Supplies Checklist
Gathering all necessary tools and materials beforehand will prevent multiple trips to the hardware store and keep your installation momentum going. Here’s a typical checklist:
- Basic Hand Tools:
- Screwdrivers (Phillips and flathead)
- Socket wrench set (for license plate bolts, trim removal)
- Wire strippers/crimpers
- Pliers (needle-nose and regular)
- Multimeter or circuit tester (essential for identifying power and reverse trigger wires)
- Trim removal tools (plastic pry tools are crucial to avoid scratching interior panels)
- Drill and drill bits (if mounting the camera requires new holes)
- Gloves (for protection)
- Safety glasses
- Wiring Supplies:
- Electrical tape
- Heat shrink tubing (for secure, insulated connections)
- Zip ties or cable management clips (for tidying up wires)
- Wire loom or conduit (optional, for added protection of wires)
- Connectors (splice connectors, ring terminals, spade connectors – specific types depend on your camera kit and vehicle wiring)
- Add-a-circuit fuse tap (highly recommended for a safe and clean power connection)
- Miscellaneous:
- Shop rags or towels
- Isopropyl alcohol (for cleaning surfaces before adhesion)
- Headlamp or flashlight (for working in dark areas)
- Pencil or marker (for marking drill points)
- A helper (optional, but very useful for routing cables or testing)
Having these items on hand ensures you’re equipped for every step of the installation, minimizing delays and making the process much more efficient.
Crucial Pre-Installation Safety Measures
Working with vehicle electronics requires a degree of caution. Prioritizing safety is paramount to prevent electrical shorts, damage to your car’s systems, or personal injury.
- Disconnect the Battery: This is the most critical safety step. Always disconnect the negative terminal of your vehicle’s battery before working with any electrical components. This prevents accidental shorts and protects both you and your car’s sensitive electronics.
- Refer to Your Vehicle’s Manual: Consult your car’s owner’s manual for specific instructions regarding trim removal, fuse box locations, and any vehicle-specific electrical diagrams. This is an invaluable resource that can prevent damage and streamline the process.
- Work in a Well-Lit Area: Ensure your workspace is brightly lit, either naturally or with artificial lighting, to clearly see wires, connections, and interior panels.
- Wear Protective Gear: Gloves can protect your hands from sharp edges, and safety glasses are crucial for protecting your eyes from dust, debris, or errant sparks.
- Test Connections Before Finalizing: After making any electrical connections, temporarily reconnect the battery and test the camera system before fully reassembling everything. This allows you to troubleshoot issues easily.
By adhering to these safety guidelines, you significantly reduce risks and ensure a smoother, worry-free installation experience, demonstrating a responsible approach to “Tech” projects.
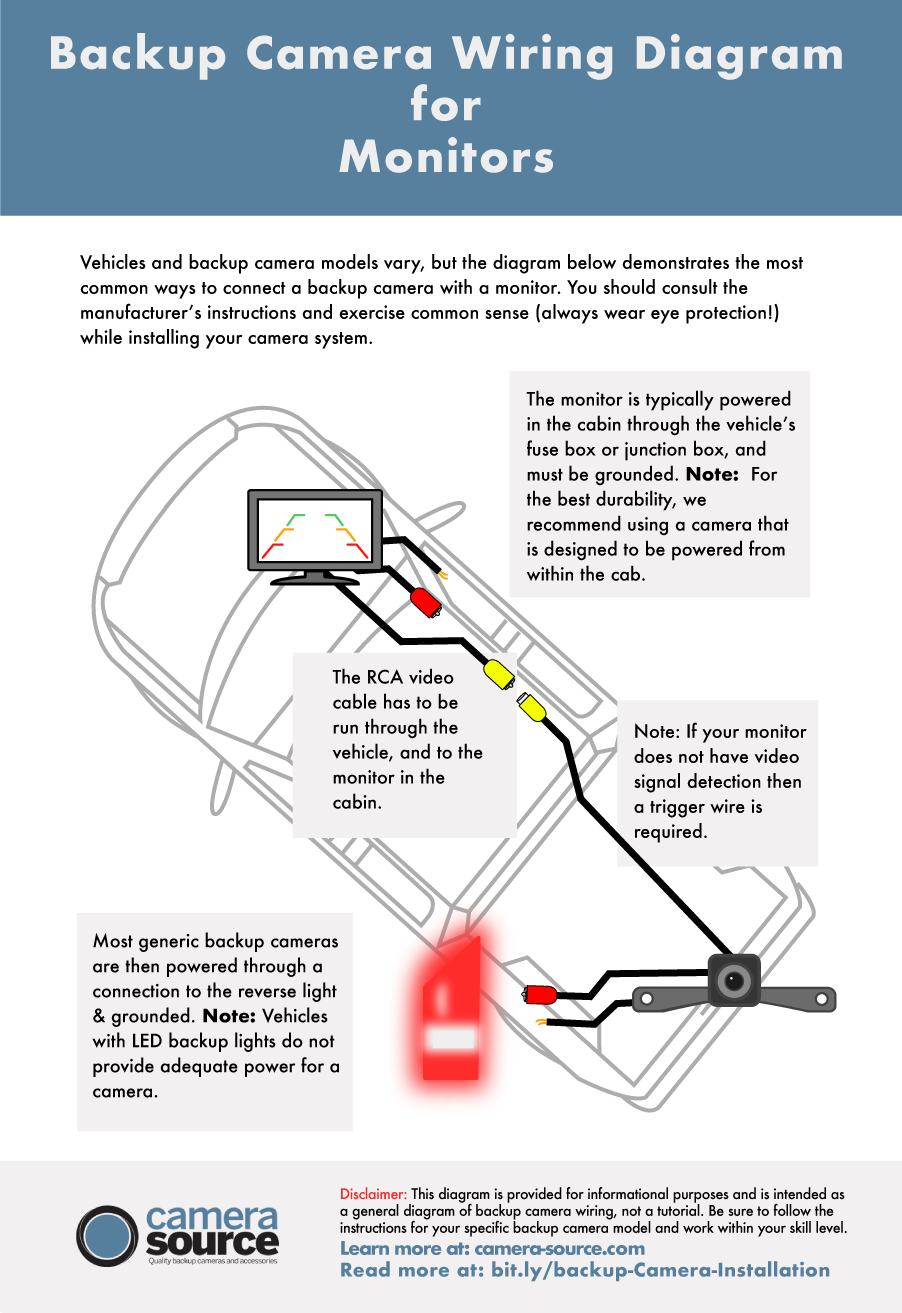
Mapping Out Your Wiring Route
Before you even touch a screwdriver, take time to plan the entire wiring route. This often involves the most challenging part of the installation:
- Camera to Reverse Light: The camera needs power, usually drawn from the vehicle’s reverse lights. Locate these wires.
- Camera to Display: The video cable needs to run from the rear of the vehicle, through the trunk/hatch, along the floor sills, under carpets, and up to the dashboard or rearview mirror where your display unit is.
- Display Power: Your display unit will also need power, usually from a constant 12V source (like an accessory fuse) or an ignition-switched source.
Planning Steps:
- Identify Entry Points: Determine where the camera cable will enter the vehicle’s interior from the exterior. Often, there are existing grommets or license plate light openings.
- Trace Interior Path: Mentally (or physically) trace the path the cable will take. Consider removing interior trim panels, running wires under carpets, and through the firewall (if necessary). Use your trim removal tools to carefully pry back panels.
- Avoid Obstructions: Plan to route cables away from moving parts (like seat rails), sharp edges, and high-heat sources.
- Secure Wires: Envision using zip ties or electrical tape to secure the wiring along its path, preventing rattles and ensuring a clean, professional finish.
- Fuse Box Location: Locate your vehicle’s interior fuse box, as this will likely be your connection point for powering the display unit via an add-a-circuit fuse tap.
A well-planned wiring route saves immense time and effort during the actual installation, leading to a much cleaner and more durable setup, a hallmark of good “Tech” implementation.
Step-by-Step Installation: From Mounting to Final Testing
With all your tools ready, safety precautions in place, and a clear wiring plan, you’re now ready to tackle the physical installation. This phase is where your “Tech” tutorial comes to life, translating preparation into a functional backup camera system.
Mounting the Camera: Placement and Precision
The camera’s placement is critical for optimal viewing and performance. Most backup cameras are designed for exterior mounting, offering several common options:
- License Plate Mount: This is perhaps the most common and easiest option. Many cameras come integrated into a license plate frame or mount directly above it, using existing license plate bolts. This requires minimal drilling (if any) and provides a good central view.
- Bumper Mount: Cameras can be mounted directly onto the rear bumper. This often involves drilling a small hole for the camera body and running wires discreetly. It can offer a slightly lower perspective, which some prefer.
- Flush Mount: For a more integrated, factory-like appearance, a flush-mount camera is installed directly into a drilled hole in the bumper or trunk lid, sitting flush with the surface. This requires precise drilling and careful measurement.
Installation Steps:
- Choose Location: Decide on the best mounting spot, considering your camera type and desired viewing angle.
- Test Fit: Temporarily hold the camera in place to ensure it doesn’t obstruct license plates, tail lights, or the trunk/hatch mechanism.
- Drill (if necessary): If drilling, mark the spot accurately, start with a pilot hole, and gradually increase the bit size. Deburr any sharp edges. Apply rust-preventative paint to bare metal if drilling into the body.
- Secure Camera: Mount the camera firmly using the provided hardware. Ensure it’s level and points correctly.
- Route Camera Wire: Carefully feed the camera’s wire into the vehicle’s interior. This often involves passing it through an existing grommet (e.g., near the license plate lights) or drilling a new, sealed hole. Use a silicone sealant around any new drilled holes to prevent water ingress.
Precision in this step ensures a clear, unobstructed view and protects your vehicle from the elements, upholding the quality of your “Tech” installation.
Wiring the Power and Video Signals: A Detailed Walkthrough
This is often the most intricate part of the installation, requiring careful attention to electrical connections.
Powering the Camera: The Reverse Trigger
The camera typically needs power whenever the vehicle is in reverse.
- Identify Reverse Light Wire: Locate the wiring harness for one of your vehicle’s reverse lights. You’ll need to identify the positive (+) wire that receives power only when the vehicle is in reverse. Use your multimeter or circuit tester: with the car in accessory mode (engine off), put it in reverse (with parking brake on for safety). Probe the wires until you find one that shows 12V.
- Tap into Power: Once identified, carefully tap into this positive reverse light wire. There are several ways:
- T-tap/Quick Splice Connectors: These allow you to tap into an existing wire without cutting it.
- Solder and Heat Shrink: For the most secure and reliable connection, strip a small section of the reverse light wire, solder the camera’s power wire to it, and cover the connection with heat shrink tubing.
- Ground Connection: The camera also needs a ground connection. Look for a nearby bolt or screw on the vehicle’s metal chassis in the trunk area. Use a ring terminal connector for a secure connection to bare metal. Ensure the connection is clean and free of paint for good conductivity.
Routing the Video Cable
The video cable (often an RCA-type) needs to run from the camera at the rear to the display unit at the front.
- From Trunk to Front: Start routing the cable from the camera’s location in the trunk/hatch.
- Under Trim Panels: Carefully tuck the cable under interior trim panels, along the floor sills, and beneath carpets. Use your plastic pry tools to gently lift panels without damaging them.
- Avoid Moving Parts: Ensure the cable is routed away from seat rails, pedals, or any other moving parts that could pinch or fray it.
- Secure with Zip Ties: Use zip ties or cable clips to secure the cable along its route, preventing it from dangling or rattling.
- To Display Location: Continue routing the cable to the desired display location (dashboard, rearview mirror, or existing head unit).
Proper wiring and routing are paramount for the long-term reliability and functionality of your “Tech” upgrade, akin to ensuring robust digital security for your data.
Connecting the Display Unit and System Integration
Once the camera is mounted and its wiring is routed, the final step is to connect the display unit and integrate it into your vehicle’s electrical system.
Powering the Display Unit
- Identify Power Source: The display unit typically requires a constant 12V power source (for dedicated monitors) or an ignition-switched 12V source (so it turns on and off with the car).
- Use an Add-a-Circuit Fuse Tap: This is the safest and cleanest method. Locate your vehicle’s interior fuse box. Find an appropriate fuse (e.g., one for the radio, cigarette lighter, or an accessory port that only powers on with the ignition). Remove the original fuse, insert it into the lower slot of the fuse tap, and insert a new fuse (matching the display’s current draw) into the upper slot. Plug the fuse tap into the empty fuse slot in your fuse box. Connect the display’s positive power wire to the fuse tap.
- Ground Connection: Connect the display’s ground wire to a nearby metal chassis point under the dashboard or a factory ground point.
Connecting the Video Cable
- RCA Connection: Plug the RCA video cable coming from the camera directly into the video input port on your display unit or existing head unit.
- Reverse Trigger Wire (for display): If your display unit or head unit has a “reverse trigger” or “reverse signal” wire, connect this wire to the same positive reverse light wire you tapped into at the rear of the vehicle (or a clean reverse signal closer to the dash, if available). This tells the display to automatically switch to the camera feed when you put the car in reverse.
Testing, Troubleshooting, and Final Adjustments
Before fully buttoning everything up, thorough testing is essential.
- Reconnect Battery: Reconnect the negative terminal of your vehicle’s battery.
- Initial Test: Put your vehicle in reverse (with the engine off, parking brake engaged, or on jack stands if safe). Check if the camera feed appears on the display.
- Check Functionality:
- Is the image clear and unobstructed?
- Do parking guidelines appear (if applicable) and are they roughly aligned?
- Does the camera activate quickly when shifting into reverse?
- Are there any flickers or interference?
- Troubleshooting Common Issues:
- No Image: Check all power and ground connections for both the camera and display. Ensure the video cable is securely plugged in. Verify the reverse trigger wire is correctly connected.
- Flickering/Interference: This is more common with wireless systems. Try rerouting wires away from other electronics, check for loose connections, or ensure adequate power supply. A ground loop isolator can sometimes help with wired systems.
- Image Upside Down/Mirrored: Some cameras have small wires you can cut to flip or mirror the image. Consult your camera’s manual.
- Final Adjustments: Once everything is working perfectly, make any final adjustments to the camera’s angle for the best view. Secure all loose wiring with zip ties, replace all interior trim panels, and ensure no wires are pinched.
A successful installation not only delivers immediate functional benefits but also adds tangible value to your vehicle and enhances your personal “Brand” as a capable, tech-savvy individual.
Maximizing Your Investment: Beyond the Installation
Installing a backup camera is more than just a one-time project; it’s an investment in your vehicle’s safety, functionality, and longevity. To truly maximize this “Money” and “Tech” investment, understanding its long-term care and potential for future enhancement is crucial. Just as you maintain your car’s engine, giving attention to your backup camera system ensures it continues to serve you reliably for years to come.
Maintenance Tips for Longevity
Like any automotive component exposed to the elements, a backup camera requires occasional maintenance to ensure its optimal performance and extended lifespan.
- Regular Cleaning: The camera lens, being exposed at the rear of the vehicle, will inevitably get dirty from road grime, dust, rain, and snow. Regularly wipe the lens with a soft, damp cloth and a mild cleaning solution (like glass cleaner). Avoid abrasive materials that could scratch the lens. A clear lens is fundamental for a clear image.
- Check Wiring Connections: Periodically inspect the visible wiring connections, especially at the camera end, for any signs of wear, corrosion, or looseness. Harsh weather and vibrations can affect connections over time. Re-secure any loose zip ties or cables.
- Inspect Mounting: Ensure the camera remains firmly mounted and hasn’t shifted due to vibrations or impacts. Tighten any bolts or screws if necessary.
- Software/Firmware Updates (if applicable): For more advanced camera systems, especially those integrated with infotainment units, check if there are any available software or firmware updates. These can improve performance, add features, or fix bugs.
- Protect from Extreme Weather: While most cameras are waterproof, extreme conditions like severe ice or prolonged exposure to direct, intense sunlight can take a toll. While not always practical to shield them, being aware of these factors can inform your cleaning and inspection routine.
Proactive maintenance not only ensures consistent performance but also protects your initial investment, preventing premature failure and the need for costly replacements.
Advanced Features and Future Upgrades
The world of automotive technology is constantly evolving, and backup cameras are no exception. Your initial installation can often be a stepping stone to more advanced features or system upgrades.
- Dynamic Parking Lines: If your current system has static parking lines, consider upgrading to a camera or display unit that offers dynamic lines that bend with your steering wheel, providing a more intuitive guide.
- Multi-Camera Systems: For ultimate visibility, you might consider adding front-view cameras, side-view cameras, or even a complete 360-degree bird’s-eye view system. Many aftermarket head units support multiple camera inputs.
- Dash Cam Integration: Some backup cameras can integrate with a front-facing dash cam, creating a comprehensive recording system for both front and rear views. This enhances digital security by providing evidence in case of an accident.
- Sensor Integration: Advanced systems can integrate with parking sensors, providing audible alerts in conjunction with the visual feedback from the camera, adding another layer of safety.
- Wireless Charging & Connectivity: As technology progresses, expect seamless wireless integration with smart devices and potentially even wireless power solutions for future iterations, further streamlining vehicle tech.
Thinking about future upgrades ensures that your initial purchase is compatible with potential enhancements, aligning with the “Technology Trends” aspect of our focus.
The Long-Term Benefits: Safety, Resale Value, and Peace of Mind
Ultimately, the commitment to installing and maintaining a backup camera culminates in enduring benefits that far outweigh the initial effort and cost.
- Enhanced Safety Profile: The continuous reduction of blind spots significantly lowers the risk of accidents involving pedestrians, children, pets, and other vehicles, making your daily drives safer for everyone. This is the cornerstone of “Digital Security” applied to real-world scenarios.
- Increased Driver Confidence: The ability to navigate tight spaces and challenging maneuvers with clear visual feedback instills a profound sense of confidence, reducing driving stress and making every journey more enjoyable.
- Preservation of Vehicle Value: By preventing costly cosmetic damage from minor bumps and scrapes, and by adding a highly desirable safety feature, a well-installed and maintained backup camera can contribute to preserving, and even slightly enhancing, your vehicle’s resale value. It showcases a modern, well-equipped vehicle, boosting its “Brand” appeal in the used car market.
- Financial Savings: Beyond accident prevention, the DIY aspect of the installation represents direct financial savings compared to professional installation costs, aligning directly with smart “Money” management.
In conclusion, installing a backup camera is a highly rewarding endeavor that offers immediate benefits in terms of safety and convenience, alongside long-term advantages that protect your investment and enhance your driving experience. By embracing this practical technology, you’re not just adding a gadget; you’re upgrading your vehicle for the modern road, making a smart choice for your safety, your wallet, and your peace of mind.
aViewFromTheCave is a participant in the Amazon Services LLC Associates Program, an affiliate advertising program designed to provide a means for sites to earn advertising fees by advertising and linking to Amazon.com. Amazon, the Amazon logo, AmazonSupply, and the AmazonSupply logo are trademarks of Amazon.com, Inc. or its affiliates. As an Amazon Associate we earn affiliate commissions from qualifying purchases.