In an increasingly connected world, where our lives intertwine with digital platforms, the backbone of our online experience lies within our home network. A robust and secure router is no longer just a luxury; it’s a fundamental necessity. ASUS, a leading name in networking hardware, consistently pushes the boundaries of home connectivity, offering not just raw speed but also advanced features that prioritize security and convenience. Among these innovations, Instant Guard stands out as a game-changer, transforming your ASUS router into a personal VPN server. This comprehensive guide will walk you through every step of installing your ASUS router and activating Instant Guard, ensuring your digital life remains private and protected, no matter where you are.
The modern home network is a complex ecosystem supporting everything from streaming devices and smart appliances to work-from-home setups and gaming consoles. Ensuring seamless performance and, more critically, impenetrable security for all these devices can seem daunting. However, with an ASUS router equipped with Instant Guard, you gain a powerful ally. This feature leverages the security of your home network, extending it to your mobile devices when you’re connected to unsecured public Wi-Fi. Imagine browsing confidently at a coffee shop, knowing your data is channeled through your secure home network. That’s the power of Instant Guard.
This article, tailored for the tech-savvy individual looking to optimize their digital security and connectivity, delves into the specifics of setting up your ASUS router from scratch. We’ll cover everything from the initial unboxing and physical connections to configuring your network settings and, finally, activating and utilizing the Instant Guard feature. By the end of this guide, you’ll not only have a fully functional and secure ASUS home network but also the peace of mind that comes with knowing your personal data is shielded, whether you’re at home or on the go.
Laying the Foundation: Unboxing and Initial Hardware Setup
The journey to a secure and high-performing home network begins with the physical installation of your new ASUS router. While it might seem like a straightforward process, paying attention to the details during this phase can significantly impact your network’s stability, speed, and overall reliability. Before diving into the software configuration, let’s ensure your hardware is perfectly positioned and connected.
Unpacking Your ASUS Router and Understanding the Components
Upon opening the box of your new ASUS router, you’ll typically find several key components:
- The Router Unit: This is the central hub of your network.
- Power Adapter: Essential for supplying power to the router.
- Ethernet Cable: Usually a Cat5e or Cat6 cable, used for initial setup or connecting your modem.
- Quick Start Guide/Manual: Contains basic setup instructions and warranty information.
- Antennas (if external): Some models have detachable antennas that need to be screwed in. Ensure these are securely attached and oriented for optimal signal dispersion. For routers with internal antennas, placement becomes even more critical.
Before proceeding, take a moment to familiarize yourself with the router’s ports and indicator lights. You’ll typically find:
- WAN Port (often blue): This is where your internet connection from your modem will connect. It’s the gateway to the outside world.
- LAN Ports (often yellow/black): These are for connecting wired devices like desktop PCs, gaming consoles, or network-attached storage (NAS) devices. Most modern routers offer Gigabit Ethernet for high-speed wired connections.
- Power Port: For the power adapter.
- USB Ports: Often found on higher-end models, these allow you to connect external hard drives for network storage (NAS functionality), printers, or even 4G/5G dongles for backup internet.
- Reset Button: A small, recessed button usually requiring a paperclip to press, used to revert the router to factory settings.
- WPS Button: For quick, PIN-based Wi-Fi Protected Setup, though often recommended to disable for enhanced security after initial setup.
Optimal Placement and Cable Connections for Performance
The physical location of your router is paramount to its performance. Radio waves, which Wi-Fi signals use, can be attenuated or blocked by physical obstructions.
- Central Location: Ideally, place your router in a central location within your home, minimizing the distance to all your devices.
- Elevated Position: Placing the router on a higher shelf or desk helps spread the signal more effectively, as Wi-Fi signals tend to propagate downwards.
- Avoid Obstructions: Keep the router away from large metal objects (filing cabinets, refrigerators), thick concrete walls, and signal-interfering electronics (microwaves, cordless phones, baby monitors), which operate on similar frequencies.
- Ventilation: Ensure the router has adequate airflow to prevent overheating, which can lead to performance degradation and shortened lifespan.
Once you’ve found the ideal spot, proceed with the cable connections:
- Power Connection: Connect the power adapter to the router’s power port and then plug it into a power outlet. Ensure the power switch on the router (if present) is in the ‘On’ position. Wait for the router to boot up; this usually takes a few minutes, during which various indicator lights will flash and stabilize. Pay attention to the power LED, which should turn solid, indicating the router is ready.
- WAN Connection to Modem: Connect one end of the included Ethernet cable to the WAN port on your ASUS router. Connect the other end of this cable to an available LAN port on your existing modem (if you have a separate modem and router setup) or directly to your fiber optic/cable wall jack (if you have an all-in-one modem/router or a direct ONT connection). Ensure your modem is also powered on and connected to your internet service provider (ISP). The WAN indicator light on your ASUS router should eventually turn on, indicating a successful connection to the internet.
- Optional Wired Devices: If you have desktop computers, smart TVs, or game consoles that you wish to connect via Ethernet for maximum speed and stability, use additional Ethernet cables to connect them to any of the LAN ports on your ASUS router.
With all physical connections established and power indicators showing readiness, your ASUS router is now poised for its digital transformation.
Configuring Your ASUS Router: Bringing Your Network to Life
Once your ASUS router is physically set up, the next crucial step is to configure its software settings. This process transforms it from a piece of hardware into a fully functional and secure network hub. ASUS offers a user-friendly interface, primarily through its mobile app or a web browser, to guide you through this setup. This phase is where you define your network’s identity, secure its access, and ensure optimal performance.
Connecting to Your Router and Launching the Setup Wizard
To begin configuration, you need to establish a connection between your device (smartphone, tablet, or computer) and the new ASUS router.
- Via Wi-Fi (Recommended for Mobile Setup):
- On your smartphone or computer, open your Wi-Fi settings.
- Look for a default Wi-Fi network name (SSID) typically printed on a sticker on the bottom or back of your ASUS router. It often starts with “ASUS” or “ASUS_XX.”
- Connect to this network using the default password/security key also found on the same sticker.
- Once connected, open the ASUS Router app (downloadable from your device’s app store) or a web browser and navigate to
router.asus.comor the default IP address (e.g.,192.168.1.1).
- Via Ethernet (Recommended for Initial PC Setup):
- Connect one end of an Ethernet cable to a LAN port on your ASUS router and the other end to the Ethernet port on your computer.
- Ensure your computer is set to obtain an IP address automatically (DHCP).
- Open a web browser and navigate to
router.asus.comor192.168.1.1.
Upon accessing router.asus.com or opening the app, the ASUS Quick Internet Setup (QIS) wizard will automatically launch. This wizard simplifies the setup process, guiding you through essential configurations.
Essential Network Configuration Steps
The QIS wizard will prompt you to perform several vital configurations:
- Internet Connection Type Detection: The wizard will attempt to automatically detect your internet connection type (e.g., Dynamic IP/DHCP, PPPoE, Static IP, L2TP, PPTP). For most home users with cable or fiber modems, Dynamic IP is common. If your ISP requires specific settings (like PPPoE username/password or a Static IP), you’ll need to input those details. This is the crucial step that gets your router connected to the internet.
- Wi-Fi Network Name (SSID) and Password:
- SSID (Service Set Identifier): This is the name of your Wi-Fi network that appears when devices scan for available networks. Choose a unique and recognizable name. Avoid using personal information.
- Password/Network Key: This is arguably the most critical security setting. Create a strong, complex password for your Wi-Fi network. It should be at least 12-16 characters long, combining uppercase and lowercase letters, numbers, and symbols. Avoid easily guessable information like birthdates or common phrases. Your Wi-Fi security protocol should default to WPA2-PSK or WPA3-Personal, which are the most secure options.
- Administrator Username and Password: These credentials are used to access your router’s settings interface. It is absolutely vital to change the default username (often ‘admin’) and password (often ‘admin’ or ‘password’) immediately. Create a unique, strong administrator username and a highly complex password, distinct from your Wi-Fi password. This protects your router’s configuration from unauthorized access, preventing anyone from tampering with your network settings, including Instant Guard.
- Firmware Update: After the initial setup, the wizard or the app will often prompt you to update your router’s firmware. This is a crucial step for security and performance. Firmware updates often include bug fixes, security patches for newly discovered vulnerabilities, and performance enhancements. Always perform firmware updates when prompted. ASUS makes this process straightforward, often with a single click within the interface.
- Time Zone Setting: Setting the correct time zone ensures that network logs and scheduled tasks (like parental controls or Wi-Fi schedules) operate accurately.
Once these steps are completed, your router will likely reboot to apply the new settings. After the reboot, your new Wi-Fi network with your chosen SSID and password will be active, and your administrator credentials will be in effect. You can then connect all your devices to your secure Wi-Fi network.
Activating and Leveraging ASUS Instant Guard: Your Personal VPN On-the-Go
With your ASUS router fully installed and configured, you’re ready to unlock one of its most powerful features: Instant Guard. This innovative solution transforms your home router into a personal VPN server, allowing you to establish a secure, encrypted connection to your home network from anywhere in the world. In an era where public Wi-Fi networks are notorious for their security vulnerabilities, Instant Guard provides a much-needed layer of protection, ensuring your data remains private and your online activities untraceable to prying eyes.
Understanding the Power of Instant Guard
Instant Guard is more than just a convenience; it’s a critical tool for digital security. When you connect to public Wi-Fi at a café, airport, or hotel, your data often travels unencrypted, making it susceptible to interception by malicious actors. Instant Guard addresses this by creating a secure tunnel directly to your home network.
- Enhanced Security: All your internet traffic is encrypted and routed through your home network, protecting your sensitive data (passwords, banking information, personal communications) from eavesdropping on unsecured networks.
- Privacy: It masks your real IP address when you’re out, replacing it with your home IP, thus enhancing your online anonymity and preventing tracking.
- Access to Home Network Resources: You can securely access devices or services on your home network, like a NAS drive, smart home cameras, or even stream local content, as if you were physically at home.
- Geo-Unblocking (Home-based): If you’re traveling abroad, you can access region-locked services or content that are normally only available within your home country, by routing through your home IP address.
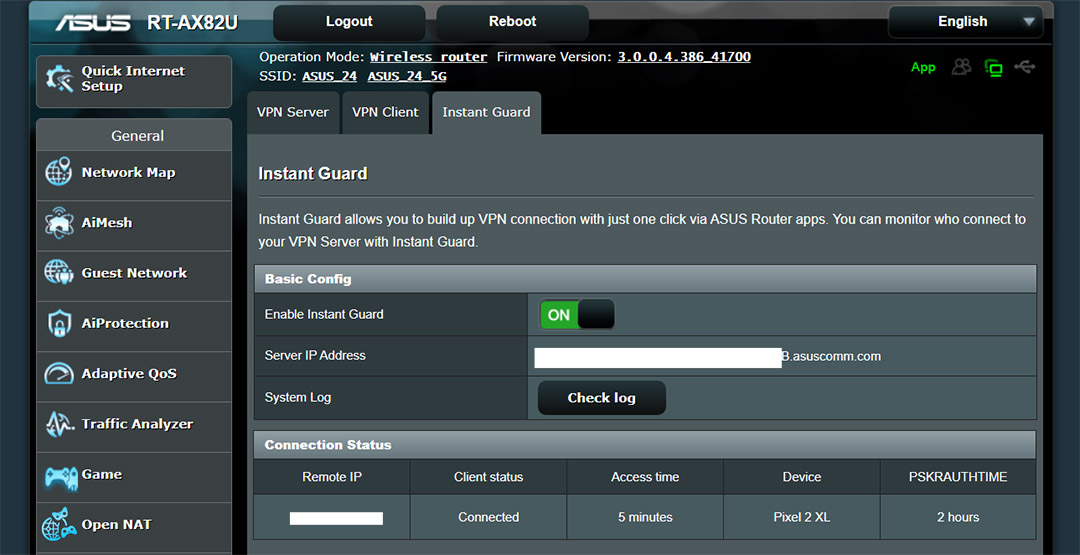
Activating Instant Guard Through the ASUS Router App
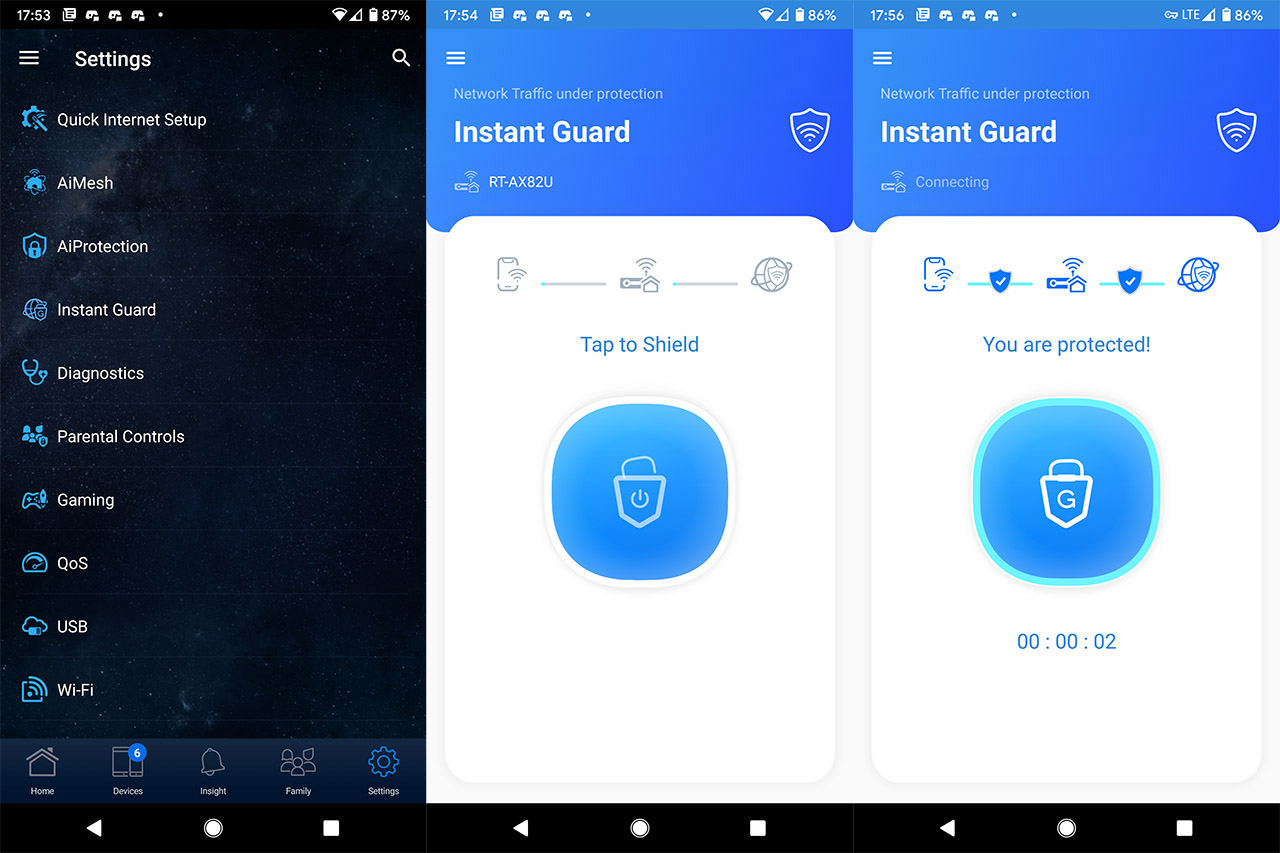
Setting up Instant Guard is remarkably simple, primarily done through the intuitive ASUS Router mobile app.
- Download and Log In to the ASUS Router App: If you haven’t already, download the ASUS Router app from the Apple App Store or Google Play Store. Open the app and log in using the administrator username and password you set up for your router during the initial configuration. The app will automatically detect and connect to your ASUS router if you are on the home network. If you are logging in remotely for the first time, you may need to enable remote connection in your router’s settings or use an existing connection.
- Navigate to the Instant Guard Feature: Once logged in, the app’s dashboard provides an overview of your network. Look for the “Instant Guard” section or icon, which is usually prominently displayed or accessible through a menu. Tap on it to proceed.
- Enable Instant Guard: In the Instant Guard interface, you’ll likely see an option to “Enable Instant Guard” or “Activate.” Tap this option. The app will guide you through the process, which usually involves a simple toggle or confirmation. Your router needs to be updated to the latest firmware to ensure Instant Guard functions optimally and securely. The app will typically verify this.
- VPN Profile Creation (Automatic): The app handles the technical complexities of VPN server setup. It will automatically configure the necessary settings on your router, effectively turning it into a VPN server. There’s usually no need for manual port forwarding or complex configurations on your end.
Connecting and Disconnecting with Instant Guard On-the-Go
Once Instant Guard is enabled on your router, using it on your mobile device is just as simple:
- Connecting to Instant Guard:
- When you are away from your home network and connected to a public Wi-Fi network (or even cellular data), open the ASUS Router app.
- Navigate back to the “Instant Guard” section.
- You will see an option to “Connect” or a toggle switch to activate the VPN. Tap it.
- The first time you connect, your device might prompt you to allow the app to add a VPN configuration. Accept this permission.
- Once connected, you’ll see a VPN icon (often a key or shield) appear in your device’s notification bar or status bar, indicating that your connection is now routed through your home network.
- Disconnecting from Instant Guard:
- To disconnect, simply open the ASUS Router app, go to the Instant Guard section, and tap the “Disconnect” option or toggle the switch off.
- You can also often disconnect directly from your device’s VPN settings in your phone’s general settings menu.
It’s important to remember that when Instant Guard is active, all your mobile device’s internet traffic will pass through your home network. This means your home network’s internet speed will influence your remote browsing speed, and any data caps on your home internet plan should be considered.
Maintaining Security and Troubleshooting Common Issues
Even after a successful installation and activation of Instant Guard, ongoing maintenance and knowing how to troubleshoot common issues are vital for a consistently secure and high-performing network. Digital security is an evolving landscape, and proactive measures are key to staying protected.
Essential Security Practices Beyond Installation
Your router is the first line of defense for your entire digital ecosystem. Beyond Instant Guard, here are crucial best practices to maintain robust network security:
- Regular Firmware Updates: This cannot be overstated. Router firmware updates often contain critical security patches against newly discovered vulnerabilities. ASUS provides easy-to-use update mechanisms within the router’s web interface or the ASUS Router app. Check for updates monthly or enable automatic updates if available and reliable.
- Strong and Unique Passwords:
- Wi-Fi Password: As mentioned, use a complex, lengthy password for your Wi-Fi network. Change it periodically (e.g., every 6-12 months).
- Administrator Password: This is for accessing your router’s settings. It must be different from your Wi-Fi password and equally, if not more, complex.
- Guest Network: Enable a guest network for visitors. This isolates guests from your main network, preventing them from accessing your private devices and data. Set a separate, simpler password for the guest network that you can change frequently.
- Disable WPS (Wi-Fi Protected Setup): While convenient, WPS has known security vulnerabilities that can allow attackers to guess your Wi-Fi password. It’s generally safer to disable it in your router settings and connect devices manually using the Wi-Fi password.
- Firewall and Security Features: ASUS routers come with built-in firewalls and often advanced security features like AiProtection (powered by Trend Micro). Ensure these are enabled and configured to your needs. AiProtection offers network vulnerability scanning, malicious site blocking, and intrusion prevention.
- Change Default IP Address: For advanced users, changing your router’s default local IP address (e.g., from 192.168.1.1 to something less common) can add a minor layer of obscurity, making it slightly harder for local attackers to find your router’s login page.
- Review Connected Devices: Regularly check the list of connected devices in your ASUS Router app or web interface. If you see unfamiliar devices, block them immediately.
- Consider a Router Reboot Schedule: A periodic reboot (e.g., once a week or month) can clear out temporary glitches, refresh network connections, and sometimes improve performance. Many ASUS routers allow you to schedule reboots.
Troubleshooting Common Connection and Performance Issues
Even with the best setup, network issues can arise. Here’s how to approach common problems:
- No Internet Connection:
- Check Cables: Ensure all Ethernet cables (especially WAN to modem) are securely plugged in.
- Modem Status: Check your modem’s indicator lights. If the internet/online light is off or blinking, the issue might be with your ISP.
- Router Reboot: Power cycle your router (unplug for 30 seconds, then plug back in). Do the same for your modem.
- ISP Outage: Check your ISP’s status page or contact them to see if there’s an outage in your area.
- Router Settings: Log into your router’s web interface and check the WAN/Internet status. Ensure your internet connection type (DHCP, PPPoE) is correctly configured.
- Slow Wi-Fi Speeds or Frequent Disconnections:
- Router Placement: Revisit optimal router placement (central, elevated, away from obstructions).
- Interference: Move the router away from other electronics. You can also try changing your Wi-Fi channel in the router settings to a less congested one (use a Wi-Fi analyzer app).
- Band Steering: If your router supports both 2.4GHz and 5GHz bands, ensure devices are connecting to the appropriate band (5GHz for speed, 2.4GHz for range). ASUS’s Smart Connect feature can manage this automatically.
- Firmware: Ensure your router has the latest firmware.
- Device Overload: Too many devices streaming or downloading simultaneously can saturate your bandwidth.
- Quality of Service (QoS): If your router has QoS, prioritize critical devices or applications (e.g., work laptops, streaming services).
- Instant Guard Connection Problems:
- Router Online: Ensure your home ASUS router is online and has an active internet connection. Instant Guard relies on your home internet.
- Router App Login: Ensure you are logged into the ASUS Router app with the correct administrator credentials.
- Instant Guard Enabled: Verify that Instant Guard is enabled in your router’s settings via the app.
- Firmware: Ensure both your router and the ASUS Router app are updated to their latest versions.
- Mobile Device VPN Settings: Sometimes, a stale VPN profile on your phone can cause issues. Go to your phone’s VPN settings and remove the Instant Guard profile, then try reconnecting from the ASUS Router app to create a new one.
- Public Network Restrictions: Some public Wi-Fi networks might block VPN connections. Try connecting Instant Guard from a different public network or your mobile data to isolate the issue.
By diligently following these security practices and knowing how to troubleshoot, you can ensure your ASUS router, with the robust protection of Instant Guard, remains a reliable and secure cornerstone of your digital life.
Conclusion: Empowering Your Digital Journey with ASUS and Instant Guard
The digital landscape is constantly evolving, presenting both incredible opportunities and persistent security challenges. By choosing an ASUS router and leveraging its advanced features like Instant Guard, you’ve made a significant investment in securing your personal online experience. This guide has taken you through the entire process, from the fundamental physical setup to the nuanced configuration and activation of your personal VPN.
You now possess a comprehensive understanding of how to establish a high-performing home network, secure it against common threats, and extend that same level of protection to your mobile devices, no matter where you roam. The convenience of connecting to your home network securely from anywhere is more than just a technological perk; it’s a profound enhancement to your digital freedom and peace of mind. Whether you’re safeguarding sensitive work data on a business trip, accessing your home smart devices while on vacation, or simply browsing securely at your local coffee shop, Instant Guard ensures that your private data remains just that: private.
As you continue to navigate the interconnected world, remember that your network’s health and security are ongoing responsibilities. Regular firmware updates, strong password hygiene, and an awareness of potential vulnerabilities are crucial to maintaining the robust defenses you’ve established. With your ASUS router and Instant Guard as your allies, you’re not just installing a device; you’re building a fortress for your digital life, ensuring that your tech experience remains productive, enjoyable, and, above all, secure. Embrace the power of your ASUS router and step confidently into a more secure online future.
aViewFromTheCave is a participant in the Amazon Services LLC Associates Program, an affiliate advertising program designed to provide a means for sites to earn advertising fees by advertising and linking to Amazon.com. Amazon, the Amazon logo, AmazonSupply, and the AmazonSupply logo are trademarks of Amazon.com, Inc. or its affiliates. As an Amazon Associate we earn affiliate commissions from qualifying purchases.