The Apple Watch has long transcended its role as a mere time-telling device, evolving into a sophisticated extension of our digital lives, a health and fitness companion, and perhaps most importantly, a powerful statement of personal style. Just as a smartphone case allows for customization, the Apple Watch band offers an unparalleled opportunity to reflect your individuality, match your outfit, or adapt to any occasion. Whether you’re a tech enthusiast keen on personalizing your latest gadget, a fashion-forward individual seeking to elevate your daily wear, or simply looking to refresh the look of your trusted wearable, knowing how to install and change an Apple Watch band is a fundamental skill.
This comprehensive guide will walk you through every step of the process, from understanding the different band types to flawlessly swapping them out, ensuring your Apple Watch always perfectly complements your lifestyle. Beyond the simple mechanics, we’ll delve into the nuances of various materials, offer tips for maintenance, and empower you to make informed choices that blend aesthetics with practicality. Prepare to unlock the full potential of your Apple Watch’s versatility and make it truly your own.
The Art of Personalizing Your Apple Watch
In a world increasingly dominated by personal technology, the ability to customize our devices speaks volumes about our identity and preferences. The Apple Watch, with its vast ecosystem of bands, stands as a prime example of this ethos. Changing your Apple Watch band isn’t just a utilitarian act; it’s a creative endeavor, a reflection of your mood, and a practical adaptation to different environments.
Why Changing Your Band Matters
At its core, swapping out an Apple Watch band serves multiple purposes:
- Style and Aesthetics: This is perhaps the most immediate and obvious reason. A sleek Milanese Loop can transform your Watch into an elegant accessory for a formal event, while a vibrant Sport Band makes it the perfect companion for a workout. Matching your band to your attire, season, or personal aesthetic allows your Watch to become a seamless part of your overall look.
- Comfort and Fit: Different materials offer varying levels of comfort. A breathable Nike Sport Band is ideal for high-intensity activities, minimizing sweat and irritation. A soft Leather Link might be preferred for everyday wear due to its supple feel. Experimenting with different bands helps you find the most comfortable fit for specific situations or prolonged wear.
- Durability and Activity: Not all bands are created equal when it’s about enduring specific conditions. Water-resistant fluoroelastomer bands are perfect for swimming or rigorous workouts, while delicate leather bands might be better reserved for office environments to prevent damage from moisture or abrasion.
- Expression of Individuality: Your Apple Watch is a personal item, and its band allows you to express your unique taste. With hundreds of official and third-party options available, you can curate a collection that truly represents who you are.
- Longevity and Hygiene: Regularly changing bands can also contribute to the longevity of your Watch itself by allowing for easier cleaning of both the band and the Watch casing. It also promotes better hygiene by preventing prolonged accumulation of sweat and dirt in a single band.
Getting Started: What You’ll Need
Before you embark on your band-swapping journey, ensure you have the following at hand:
- Your Apple Watch: The star of the show, of course. Ensure it’s clean and on a stable surface.
- Your New Apple Watch Band: Have the band you intend to install ready. Make sure it’s compatible with your Apple Watch model and size (e.g., 41mm, 45mm, 49mm).
- Your Old Apple Watch Band (if applicable): The band you’ll be removing.
- A Soft, Clean Cloth: Useful for wiping down your Watch or bands if needed, and for protecting your Watch from scratches if you’re placing it face down.
- A Well-Lit, Flat Surface: This provides stability and clear visibility, making the process much smoother and reducing the risk of dropping your Watch.
With these essentials ready, you’re set to begin the transformation process.
Mastering the Band Removal Process
The initial step in customizing your Apple Watch is to gracefully remove the existing band. This process is engineered for simplicity, designed to be quick and intuitive, yet requires a gentle touch and attention to detail to avoid accidental damage to your Watch or the band.
Step-by-Step Guide to Detaching Your Current Band
Follow these instructions carefully to ensure a smooth removal:
- Prepare Your Workspace: Lay your soft, clean cloth on a flat, stable surface. This protects your Apple Watch from scratches when you place it face down and provides a non-slip area to work on.
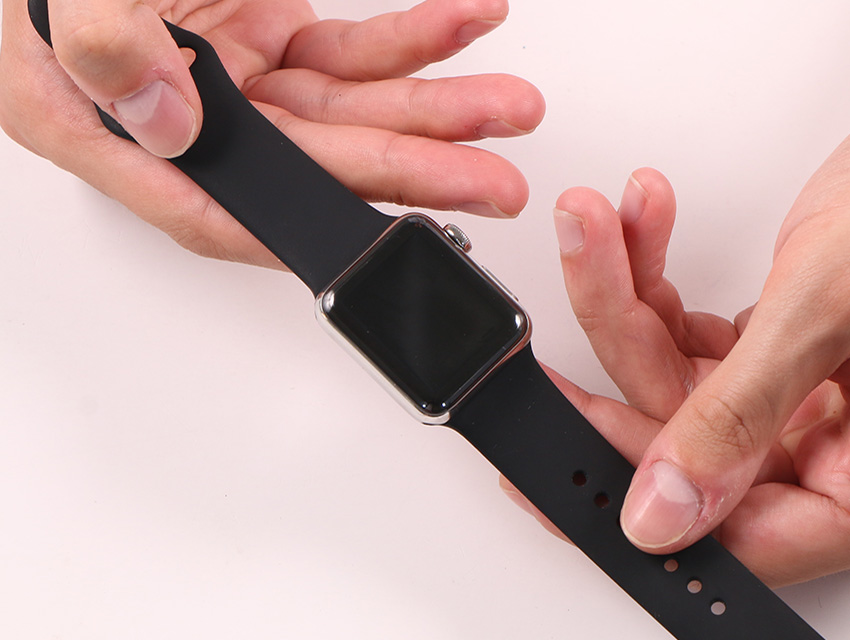
- Orient Your Apple Watch: Carefully place your Apple Watch face down on the cloth. You’ll notice two small, elongated buttons – one for each side of the band – located on the back of the Watch casing, near where the band connects. These are the band release buttons.
- Locate the Band Release Buttons: The buttons are subtly recessed and designed to be pressed firmly but gently. Some users find it easier to work on one side of the band at a time.
- Press and Slide (First Side): With your non-dominant hand, firmly press and hold down one of the band release buttons. While holding the button, use your dominant hand to gently slide the corresponding band horizontally away from the Watch casing. It should slide out smoothly. Do not force it. If it doesn’t move easily, ensure you are pressing the button firmly enough.
- Repeat for the Second Side: Once the first half of the band is removed, repeat the process for the other half. Press and hold the remaining band release button, then slide the second band piece out of its slot.
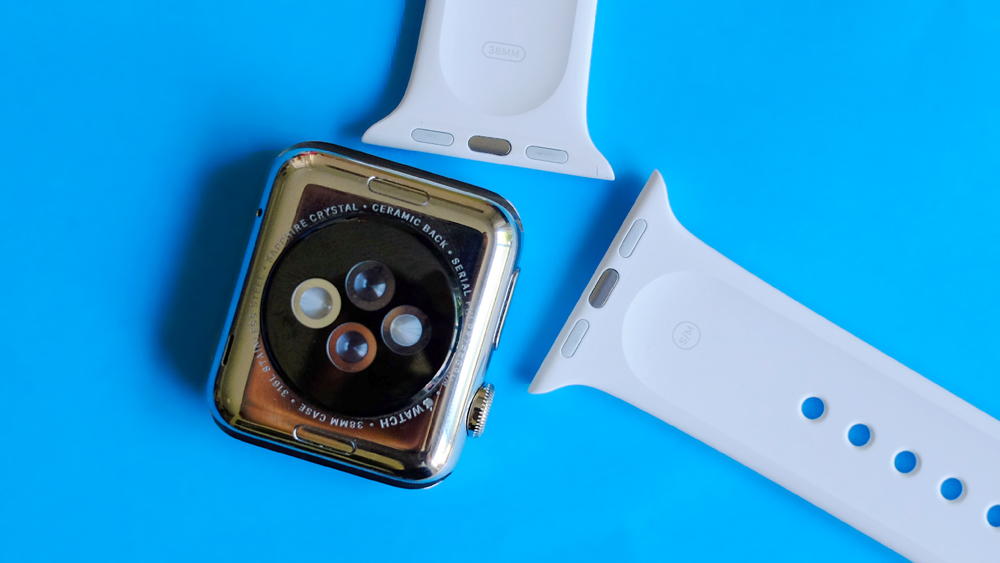
- Inspect and Clean: With both parts of the band removed, take a moment to inspect the band slots on your Apple Watch. If there’s any accumulated dust or debris, gently wipe it away with your clean cloth. This ensures a perfect fit for your new band.
Troubleshooting Common Removal Issues
While the process is generally straightforward, you might encounter minor hurdles. Here’s how to address them:
-
Band Won’t Slide Out:
- Are You Pressing Firmly Enough? Sometimes the release button requires a good, firm press to fully disengage the latch. Don’t be afraid to apply a little more pressure, but avoid excessive force that could damage the Watch.
- Is the Button Fully Depressed? Ensure your finger is completely covering and pressing the entire surface of the button.
- Gentle Wiggling: Try gently wiggling the band from side to side while pressing the release button. This can sometimes help dislodge a stubborn band.
- Dirt or Debris: Check if there’s any visible dirt or debris in the band slot that might be obstructing its movement. A soft brush or compressed air (used carefully and from a distance) can help clear it.
- Misalignment: Sometimes, bands might not have been installed perfectly straight, causing them to jam slightly. Ensure you are pulling it straight out.
-
Band Feels Stuck After Pressing the Button: This is often related to the firmness of the button press. The mechanism is designed to click into place securely, and sometimes a slight misalignment or a less-than-firm press means the latch hasn’t fully retracted. Re-press the button and try sliding again.
By following these steps and troubleshooting tips, you should be able to effortlessly remove any Apple Watch band, paving the way for its stylish successor.
Seamlessly Installing Your New Apple Watch Band
With your old band successfully removed, it’s time for the exciting part: attaching your new band. This process is largely the reverse of removal, but with an emphasis on ensuring a secure and satisfying “click” that confirms proper installation.
A Detailed Installation Walkthrough
Installing your new band is a precise yet simple operation. Take your time and follow these steps:
- Identify Top and Bottom (and Left and Right): Most Apple Watch bands are directional. They usually have a specific orientation for the top and bottom of the Watch. The “top” of your Apple Watch is typically where the Digital Crown is located, and the “bottom” is where the side button is. Many bands will have an arrow or a specific design that indicates the correct insertion direction. For example, on a standard Sport Band, the longer part with the buckle usually goes on the top of the Watch. Always double-check the manufacturer’s instructions for specific band types.
- Orient the Band for Insertion: Hold one half of your new band, ensuring it’s oriented correctly (e.g., the part that goes into the top slot). Look at the end of the band that connects to the Watch; you’ll see the metal connector with the release button notch.
- Slide the Band In: Gently slide the band into one of the slots on your Apple Watch casing. Slide it horizontally, pushing it in until you feel and hear a distinct “click.” This click is crucial as it signifies that the band has securely locked into place.
- Do Not Press the Release Button: Unlike removal, you do not press the band release button when installing. The spring-loaded mechanism is designed to retract automatically as the band slides in, then snap back into place once it’s correctly seated.
- Repeat for the Second Half: Take the other half of your band, orient it correctly for the remaining slot, and slide it in until it clicks securely.
- Final Check: Once both halves are installed, give each band a gentle tug up and down, and side to side, without pressing the release buttons. The band should feel firmly attached with no wobble or give. If it slides out, it wasn’t properly locked into place.
Ensuring a Secure Fit: The Click Test
The “click test” is your ultimate confirmation that your band is properly installed and secure. If you don’t hear or feel that distinct click, or if the band feels loose after installation, here’s what to do:
- Remove and Re-insert: If a band doesn’t click, gently press the release button, remove the band, and try inserting it again. Ensure you are pushing it in a straight, horizontal motion.
- Check Orientation: Double-check that the band is not inserted backward or upside down. While some bands are symmetrical, many have a specific orientation that affects how they lock.
- Inspect the Connector: Look closely at the metal connector on the band itself. Is it bent or damaged? Is there any debris stuck in the latch mechanism? If the connector is compromised, it may not be able to lock properly.
- Try the Other Slot: If one side is particularly stubborn, try installing the band half into the other slot. This can sometimes help diagnose if the issue is with the band or a specific Watch slot (though Watch slot issues are rare).
- Listen for the Sound: A clear, audible click is your best indicator. If you’re in a noisy environment, try to feel for the subtle tactile feedback of the lock engaging.
A securely attached band is vital not just for aesthetics but also to prevent your valuable Apple Watch from accidentally detaching and falling. Never wear your Watch with a band that doesn’t feel completely secure.
Exploring Diverse Apple Watch Band Types and Their Nuances
The beauty of the Apple Watch ecosystem lies in its incredible diversity of bands. Each material and design offers a unique aesthetic, feel, and functionality. Understanding these differences is key to choosing and handling your bands correctly.

Sport Bands and Silicone Loops: Simplicity and Comfort
These are often the default choice and incredibly popular for their versatility and durability.
- Sport Band: Made from high-performance fluoroelastomer, these bands are smooth, lightweight, and surprisingly strong. They are sweat-resistant and water-resistant, making them ideal for workouts, outdoor activities, and everyday wear. Their pin-and-tuck closure is simple and secure.
- Installation/Removal: Straightforward slide-and-click as described above.
- Care: Easily wiped clean with a damp cloth.
- Sport Loop: Woven from soft, breathable nylon, the Sport Loop is designed for extreme comfort. It’s incredibly lightweight and features a hook-and-loop fastener for quick and easy adjustment. Perfect for active users who prefer a softer feel against their skin.
- Installation/Removal: Standard slide-and-click.
- Care: Can be hand-washed with mild soap and air-dried.
- Solo Loop & Braided Solo Loop: These innovative bands are designed as a single, stretchy loop without buckles or clasps. Made from liquid silicone rubber (Solo Loop) or recycled yarn with silicone threads (Braided Solo Loop), they are incredibly comfortable and seamless. The crucial factor here is sizing.
- Installation/Removal: Standard slide-and-click. Once attached, you simply stretch them over your hand.
- Sizing: These bands come in precise sizes (1-12 or more, depending on the Watch model). It’s essential to measure your wrist carefully using Apple’s printable tool before purchasing. An incorrectly sized Solo Loop can be uncomfortable (too tight) or easily fall off (too loose).
Elegant Metal and Leather Options: Milanese Loop, Link Bracelet, and More
For those seeking a more sophisticated or professional look, Apple offers a range of premium materials.
- Milanese Loop: Crafted from a smooth, flexible stainless steel mesh, the Milanese Loop offers a refined, elegant look. Its magnetic closure system makes it infinitely adjustable for a perfect fit. It’s surprisingly lightweight and comfortable.
- Installation/Removal: Standard slide-and-click. The magnetic end of the band simply passes through the buckle for closure.
- Care: Wipe with a dry, lint-free cloth. Avoid harsh chemicals. Can be prone to snagging delicate fabrics if not careful.
- Link Bracelet: A masterpiece of engineering, the Link Bracelet is made from stainless steel and features a sophisticated butterfly closure. What makes it unique is its ability to add or remove links without special tools, making it highly customizable for wrist size.
- Installation/Removal: Standard slide-and-click.
- Adjusting Links: Each link has a small release button on its underside. Press this button firmly with a fingernail or a small tool, and the link will separate. Simply push the links back together until they click.
- Care: Wipe with a dry, lint-free cloth. Avoid contact with water as prolonged exposure can affect the steel’s finish or internal mechanisms.
- Leather Link & Modern Buckle: These leather bands offer a luxurious feel and distinct closures. The Leather Link uses flexible magnets for a smooth wrap-around fit, while the Modern Buckle (available only for smaller Watch sizes) features a unique two-piece magnetic closure system.
- Installation/Removal: Standard slide-and-click.
- Care: Leather is a natural material and requires careful maintenance. Avoid prolonged exposure to water, direct sunlight, and harsh chemicals. Wipe clean with a soft, dry cloth. Leather can develop a patina over time, which is natural.
Unique Fit: Solo Loop and Braided Solo Loop Considerations
As mentioned, the Solo Loop and Braided Solo Loop stand apart due to their single-piece, stretchy design.
- Sizing is Paramount: Unlike other bands where minor size discrepancies can be adjusted via buckles or links, the Solo Loops are fixed. An accurate measurement of your wrist circumference (using Apple’s online tool or a measuring tape) is crucial. A size that’s too large will cause the Watch to move excessively and potentially provide inaccurate sensor readings. A size that’s too small will be uncomfortably tight, restrict circulation, and leave marks on your skin.
- How to Wear: Once installed on the Watch, you simply stretch the loop over your hand and onto your wrist. It should feel snug but not constricting.
- Material Specifics: The silicone Solo Loop is very durable and water-friendly, perfect for any activity. The Braided Solo Loop offers a softer, more fabric-like feel and is also water-resistant, making it a comfortable all-day option with a unique textured look.
By understanding the unique characteristics of each band type, you can not only install them correctly but also choose the best band for your needs, ensuring optimal comfort, style, and durability.
Maintaining Your Bands for Longevity and Style
Investing in a collection of Apple Watch bands is an investment in your personal style and the functionality of your device. Proper care and maintenance are crucial to preserve their appearance, extend their lifespan, and ensure hygienic wear. Different materials require specific attention to keep them looking their best.
Cleaning and Care Tips for Different Materials
-
Silicone & Fluoroelastomer (Sport Band, Solo Loop, Nike Sport Band):
- Cleaning: These are the easiest to clean. Wipe them down regularly with a soft, damp, lint-free cloth. For a deeper clean, you can use a mild, non-abrasive soap diluted with water. Rinse thoroughly with clean water to remove any soap residue.
- Drying: Always air dry completely before reattaching to your Watch or storing.
- Avoid: Harsh chemicals, abrasive materials, or excessive scrubbing, which can damage the finish.
- Pro Tip: After workouts, wipe them down immediately to prevent sweat and oils from building up.
-
Nylon (Sport Loop, Nike Sport Loop, Trail Loop, Alpine Loop):
- Cleaning: Hand wash with a small amount of mild soap and cool water. Gently rub the band to remove dirt.
- Rinsing: Rinse thoroughly under cool, clean water.
- Drying: Gently squeeze out excess water with a clean towel and then lay flat to air dry completely. Avoid direct sunlight or high heat, which can damage the fabric.
- Avoid: Machine washing or using harsh detergents, which can damage the delicate weave.
-
Leather (Leather Link, Modern Buckle, Hermès Leather Bands):
- Cleaning: Leather bands should not be immersed in water. Wipe them clean with a soft, slightly damp, lint-free cloth. For deeper cleaning or conditioning, use a specialized leather cleaner or conditioner, following the product instructions carefully.
- Drying: Allow to air dry completely. Avoid direct sunlight or heat sources.
- Avoid: Water, harsh chemicals, abrasive cleaners, and prolonged exposure to direct sunlight, which can cause the leather to dry out, crack, or fade.
- Pro Tip: Leather develops a unique “patina” over time, which is a natural and desirable characteristic.
-
Metal (Milanese Loop, Link Bracelet, Solo Loop Ultra):
- Cleaning: Wipe with a soft, dry, lint-free cloth. For light grime, a slightly damp cloth can be used, followed by a dry one. For the Milanese Loop, you can use a soft brush (like an old toothbrush) to gently clean between the mesh, followed by wiping.
- Drying: Ensure completely dry, especially for the Link Bracelet, to prevent water spots or potential corrosion in the intricate mechanisms.
- Avoid: Harsh chemicals, abrasive cleaners, or sonic cleaners, which can damage the finish or internal components.
- Pro Tip: For the Link Bracelet, regularly check the link release buttons for any accumulation of dirt.
When to Consider a Replacement
Even with the best care, bands don’t last forever. Consider replacing a band if you notice:
- Significant Wear and Tear: Cracks, fraying, stretching, discoloration that can’t be cleaned, or visible damage to the connectors.
- Compromised Security: If a band no longer clicks securely into place, or if it frequently feels loose despite proper installation, it poses a risk of your Watch falling off.
- Loss of Comfort or Functionality: If a band becomes uncomfortable, causes skin irritation, or loses its intended functionality (e.g., a Solo Loop that has stretched too much), it’s time for a fresh one.
- Hygiene Concerns: If a band cannot be adequately cleaned and retains odors or stubborn stains, replacing it is often the best solution for hygiene.
- Simply for a New Look: Sometimes, the best reason for a replacement is simply to update your style or try something new!
Proper maintenance not only extends the life of your Apple Watch bands but also ensures your wearable continues to be a clean, comfortable, and stylish extension of yourself.
Choosing the Perfect Band for Every Occasion
The sheer variety of Apple Watch bands can be overwhelming, but it also presents an exciting opportunity to curate a collection that perfectly suits every facet of your life. Making the right choice goes beyond just aesthetics; it involves considering functionality, comfort, and value.
Factors to Consider: Material, Function, and Aesthetic
When selecting a new band, think about these key aspects:
-
Material:
- Silicone/Fluoroelastomer: Excellent for sports, swimming, and everyday wear. Durable, water-resistant, easy to clean, and affordable.
- Nylon: Breathable, lightweight, very comfortable, and ideal for active lifestyles or casual wear. Often adjustable with hook-and-loop fasteners.
- Leather: Offers a classic, sophisticated look, perfect for professional settings, formal events, or smart casual attire. Requires more delicate care and is not water-friendly.
- Metal (Stainless Steel, Titanium): Provides a premium, robust, and elegant appearance. Suitable for business, formal events, or a timeless aesthetic. Can be heavier and more expensive.
-
Functionality & Activity:
- Workouts/Sports: Opt for Sport Bands, Sport Loops, or Solo Loops made of silicone or nylon. They wick away sweat, are water-resistant, and provide a secure fit.
- Office/Professional: Leather Link, Modern Buckle, Milanese Loop, or Link Bracelet project a polished and refined image.
- Casual/Everyday: Most bands can work, but Sport Loops, Braided Solo Loops, or even certain colorful Sport Bands offer comfort and versatility.
- Swimming/Water Sports: Stick to silicone or woven nylon bands that are explicitly designed to be water-resistant and quick-drying.
-
Aesthetic & Personal Style:
- Minimalist: Solo Loop, Milanese Loop.
- Classic/Timeless: Leather Link, Link Bracelet.
- Sporty/Vibrant: Sport Band, Nike Sport Loop.
- Elegant/Luxurious: Hermès bands, Modern Buckle.
- Consider how the band color and texture complement your Watch casing (aluminum, stainless steel, titanium) and your personal wardrobe.
-
Comfort: This is highly subjective. Some prefer the lightness of nylon, others the smooth feel of silicone, and some the substantial weight of metal. If possible, try on different band types to see what feels best on your wrist for extended periods.
Official vs. Third-Party Bands: A Value Perspective
The market for Apple Watch bands is vast, encompassing both Apple’s official offerings and a multitude of third-party alternatives.
-
Official Apple Bands:
- Pros: Guaranteed compatibility, superior build quality, meticulous design, premium materials, and usually a perfect color match with Apple products. They undergo rigorous testing for durability and skin safety.
- Cons: Significantly higher price point.
- Best For: Those who prioritize quality, brand synergy, and don’t mind the premium cost for peace of mind and design excellence.
-
Third-Party Bands:
- Pros: Far more affordable, wider variety of styles, colors, and materials not offered by Apple, allowing for extensive customization without breaking the bank.
- Cons: Quality can vary dramatically. Some are excellent value, while others might have flimsy connectors, use lower-grade materials, or have less comfortable finishes. Skin irritation or poor fit can occasionally be an issue. Compatibility issues (like loose connections) are also more common.
- Best For: Those on a budget, individuals seeking unique designs or niche materials, or anyone wanting to experiment with many different looks.
- Tips for Buying Third-Party: Read reviews carefully, check seller ratings, and prioritize reputable brands that specify their materials and manufacturing standards. Always check the connectors for a secure fit upon arrival.
Ultimately, choosing the perfect band is a personal journey that blends practicality with personal expression. By understanding the options and considering your needs, you can build a versatile collection that keeps your Apple Watch fresh, functional, and perfectly suited for every moment.
The ability to easily change your Apple Watch band is one of its most compelling features, transforming it from a static gadget into a dynamic fashion accessory and a versatile tool for every aspect of your life. With the steps and insights provided in this guide, you are now equipped to confidently remove, install, and care for your bands, ensuring your Apple Watch remains a perfectly tailored reflection of your individuality and practical needs. Embrace the flexibility, experiment with new styles, and let your Apple Watch truly express you.
aViewFromTheCave is a participant in the Amazon Services LLC Associates Program, an affiliate advertising program designed to provide a means for sites to earn advertising fees by advertising and linking to Amazon.com. Amazon, the Amazon logo, AmazonSupply, and the AmazonSupply logo are trademarks of Amazon.com, Inc. or its affiliates. As an Amazon Associate we earn affiliate commissions from qualifying purchases.