In the ever-evolving landscape of technology, software distribution methods are constantly being refined to offer greater flexibility and ease of use. For Linux users, one particularly innovative and user-friendly approach is the AppImage format. Unlike traditional package managers that often involve complex installation processes, dependencies, and system-wide integration, AppImage offers a self-contained, portable solution. This means you can download an application and run it directly without needing to install it in the conventional sense. This article will serve as your comprehensive guide to understanding, installing, and effectively utilizing AppImage files.

The core appeal of AppImage lies in its simplicity and portability. Imagine being able to download a cutting-edge AI tool, a specialized graphic design application, or even a new productivity suite and have it up and running in mere moments, without worrying about conflicting libraries or leaving behind a trail of scattered files on your system. This is the promise of AppImage. It’s a method that resonates deeply with the principles of modern tech, emphasizing agility, accessibility, and user empowerment, and it aligns perfectly with the diverse interests covered on a website dedicated to Tech trends, Brand building, and smart Money management.
Whether you’re a seasoned Linux veteran or a curious newcomer exploring the vast world of open-source software, this guide will equip you with the knowledge to harness the power of AppImage. We’ll delve into what AppImage is, why it’s gaining popularity, and most importantly, the straightforward steps to get your applications running.
Understanding the AppImage Format: Portability Meets Simplicity
At its heart, an AppImage is a single executable file that contains an application and everything it needs to run. This includes libraries, icons, and even desktop integration files. Think of it as a self-sufficient package that doesn’t need to be integrated into your operating system’s package management system. This fundamental difference sets it apart from traditional installation methods like .deb or .rpm packages, which often require root privileges and modify your system’s file structure.
The “App” in AppImage refers to the application itself, while “Image” denotes that it’s a self-contained, runnable entity, similar to a disk image. The key advantage here is that AppImage applications are designed to run on a wide range of Linux distributions without modification. This universality significantly reduces the burden on developers who no longer have to create and maintain separate packages for every Linux variant. For users, it means less time spent troubleshooting compatibility issues and more time spent being productive.
Why Choose AppImage? Benefits for the Modern User
The benefits of using AppImage extend beyond mere convenience; they touch upon critical aspects of how we interact with technology and manage our digital lives.
Enhanced Portability and Flexibility
The most significant advantage is the sheer portability. You can copy an AppImage file to a USB drive, move it between different Linux machines, and run it without installing anything on the host system. This is invaluable for users who frequently switch between computers, need to test software on various setups, or want to keep their main system lean and uncluttered. For professionals managing multiple projects or working in diverse environments, this flexibility can be a game-changer. It’s akin to carrying your entire toolkit in a single, easily transportable case.
Reduced System Clutter and Dependency Issues
Traditional software installations can sometimes lead to a tangled web of dependencies. If you uninstall an application, some of its libraries might remain, or conversely, removing a shared library might break other applications. AppImages eliminate this problem entirely. Because each AppImage is self-contained, it brings its own set of libraries. When you’re done with the application, you simply delete the AppImage file, and your system remains as it was before. This simplifies system maintenance and minimizes the risk of software conflicts.
Seamless Updates and Version Management
While AppImage itself doesn’t inherently manage updates, the format facilitates it. Developers can provide updated AppImage files, and users can simply download the new version and replace the old one. Some AppImage applications even incorporate built-in update mechanisms, allowing for a smooth transition to the latest features and bug fixes without the hassle of traditional update processes. This streamlined approach to updates aligns with the productivity goals of many tech-savvy individuals and businesses.
Greater Control and Security Awareness
With AppImage, you have direct control over the software you are running. You download a single file, and you can inspect it (though inspecting binary executables can be complex). This direct interaction fosters a greater sense of security awareness. You know exactly what you’re executing. For individuals and brands concerned with digital security, understanding the provenance of your software is paramount, and AppImage offers a more transparent approach to software distribution.
Installing and Running Your First AppImage: A Step-by-Step Tutorial
The process of getting an AppImage up and running is remarkably simple. It typically involves just a few clicks and commands. Here’s how to do it:
Step 1: Downloading the AppImage File
The first step is to locate and download the AppImage file for the application you wish to use. Many software projects that support AppImage distribution will provide direct download links on their official websites. Look for files with the .appimage extension.
Example: Let’s say you want to download a hypothetical application called “AwesomeApp.” You would navigate to the AwesomeApp website and look for a download link that points to a file like AwesomeApp-x86_64.AppImage.
Step 2: Making the AppImage Executable
By default, downloaded files are often not marked as executable for security reasons. You need to grant permission for the AppImage file to be run as a program. There are two primary ways to do this: graphically or via the command line.
Graphical Method (Using File Manager)
- Locate the downloaded file: Open your file manager (e.g., Nautilus on GNOME, Dolphin on KDE) and navigate to the folder where you saved the AppImage file.
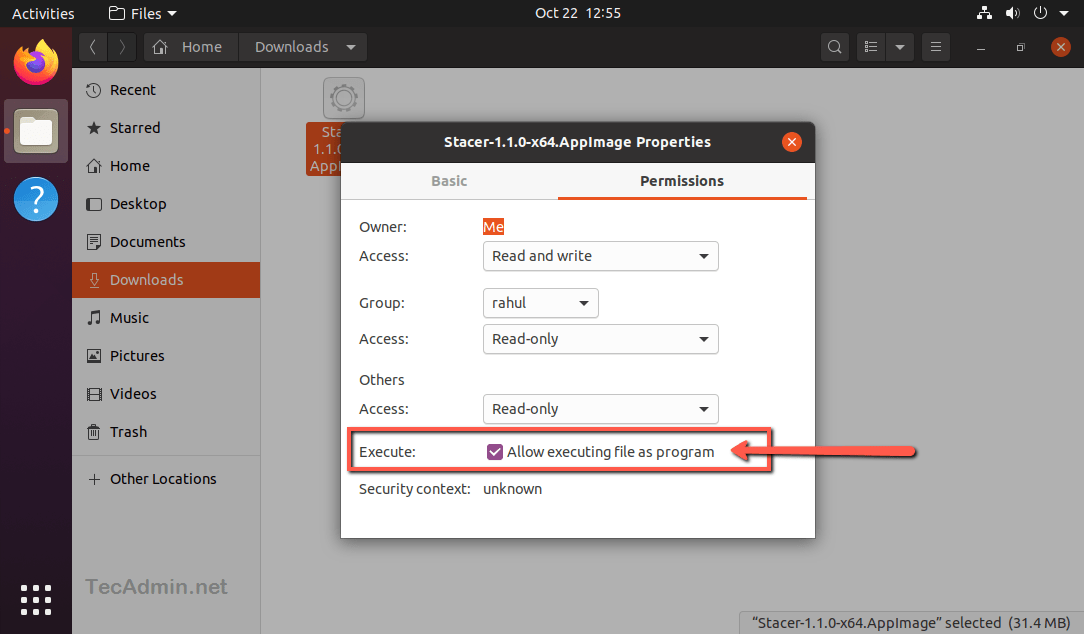
- Right-click the file: Right-click on the
.appimagefile. - Select “Properties”: In the context menu, choose “Properties.”
- Navigate to the “Permissions” tab: In the Properties window, find and click on the “Permissions” tab.
- Check “Allow executing file as program”: You should see a checkbox labeled something like “Allow executing file as program” or “Is executable.” Check this box.
- Close the Properties window: Close the Properties window.
Command Line Method (Using Terminal)
- Open your terminal: Launch your terminal application.
- Navigate to the download directory: Use the
cdcommand to change your current directory to where you downloaded the AppImage file. For example, if it’s in your “Downloads” folder, you’d type:
bash

cd Downloads
- Grant execute permissions: Use the
chmodcommand to make the file executable. ReplaceYourApp.AppImagewith the actual name of your AppImage file:
bash

chmod +x YourApp.AppImage
The+xflag adds execute permissions to the file.
Step 3: Running the AppImage
Once the file is executable, you can run the application. Again, you have a couple of options.
Graphical Method (Double-Click)
After making the AppImage executable using the graphical method, you can usually just double-click the .appimage file in your file manager, and the application should launch.
Command Line Method (Direct Execution)
You can also run the AppImage directly from the terminal. Navigate to the directory where the file is located and then execute it using one of the following commands:
- Using
./(if the file is in your current directory):
bash

./YourApp.AppImage
- Providing the full path:
bash

/path/to/your/appimage/YourApp.AppImage
Integrating AppImages with Your Desktop (Optional but Recommended)
While running AppImages directly is convenient, some users prefer to have them integrated into their desktop environment, appearing in application menus and allowing for easier launching. This is where tools like appimaged or the AppImageLauncher utility come into play.
Using AppImageLauncher
AppImageLauncher is a popular utility that simplifies the integration of AppImages. When you run an AppImage for the first time, AppImageLauncher can offer to move the AppImage to a central location (e.g., ~/Applications) and create a desktop entry for it, making it appear in your application menu.
- Download and install
AppImageLauncher: You can usually find instructions and download links forAppImageLauncheron its GitHub repository. It’s often distributed as an AppImage itself or as a package for your distribution. - Run
AppImageLauncher: Once installed, runAppImageLauncher. - Configure
AppImageLauncher: It will prompt you to set up its preferences, such as the default directory for storing integrated AppImages. - Run an AppImage: The next time you double-click an AppImage,
AppImageLauncherwill intercept it and offer to integrate it.
This integration provides a more polished user experience, bridging the gap between the portability of AppImages and the convenience of traditional desktop applications.
Advanced Tips and Troubleshooting for AppImages
While AppImages are generally straightforward, there are a few advanced considerations and common troubleshooting steps that can enhance your experience.
Managing Multiple AppImages
As you accumulate AppImages for various tools and applications, you might want a system for organizing them. Creating a dedicated directory (e.g., ~/Applications or ~/AppImages) and placing all your .appimage files there can be a good practice. Using AppImageLauncher as mentioned above can automate this organization.
AppImage Updates
As noted, AppImages themselves don’t automatically update like software installed through a package manager. However, many developers implement update mechanisms within their AppImages. Look for “Check for Updates” options within the application’s menus. If no built-in mechanism exists, you’ll need to periodically visit the developer’s website to download the latest .appimage file and replace the older one.
Security Considerations
While AppImages offer a degree of transparency, it’s crucial to download them only from trusted sources. Always obtain AppImages from the official websites of the software developers. Be wary of downloading them from unofficial third-party repositories, as these could potentially be tampered with. Regularly updating your system and antivirus software is also a good practice, even when using AppImages.
Troubleshooting Common Issues
- AppImage won’t run: The most common reason is that the file isn’t marked as executable. Double-check Step 2. Ensure you have the necessary FUSE (Filesystem in Userspace) libraries installed on your system, as AppImages rely on them. Most modern Linux distributions have FUSE installed by default, but it’s worth checking if you encounter persistent issues.
- Application crashes or errors: If an AppImage crashes or displays errors, it might be due to a missing runtime dependency that the AppImage developer overlooked or an incompatibility with your specific system configuration. Sometimes, running the AppImage from the terminal will provide more detailed error messages that can help diagnose the problem. If the issue persists, consider reporting it to the AppImage developer.
- Graphics or rendering issues: Some AppImages might have problems with specific graphics drivers or desktop environments. Again, checking the application’s documentation or reporting the issue to the developer is the best course of action.
AppImages and Your Brand/Money
The principles behind AppImage – simplicity, portability, and direct user control – can also be seen as metaphors for effective brand building and sound financial management. A strong brand, like a well-packaged AppImage, is self-contained, easily distributed, and doesn’t rely on complex, unstable dependencies. Similarly, personal finance and online income strategies that are clear, accessible, and under your direct control tend to be more robust and easier to manage. By embracing the flexibility and directness that AppImage offers, users are engaging with a technology that mirrors the best practices in other domains of their digital lives.

Conclusion: Embracing the Future of Software Distribution
The AppImage format represents a significant step forward in how software is delivered and consumed on Linux. Its emphasis on portability, ease of use, and reduced system clutter makes it an attractive option for a wide range of users, from casual users to power users and developers. By understanding the simple steps to download, make executable, and run AppImages, you unlock a vast world of applications without the typical installation headaches.
Whether you’re exploring new AI tools to boost your productivity, testing design software for your personal branding projects, or seeking out financial management applications to optimize your online income streams, AppImage offers a streamlined path to access these resources. It embodies the spirit of innovation and user empowerment that drives the modern tech landscape. So, the next time you encounter an .appimage file, don’t hesitate. Follow this guide, and experience the future of software distribution firsthand.