Apache Maven is a powerful open-source build automation tool that is essential for many Java development projects. It simplifies and standardizes the build process, managing dependencies, compiling code, running tests, and packaging applications. For developers working on Windows, integrating Maven into their development environment is a crucial step towards efficient and reproducible builds. This guide will walk you through the entire process of installing and configuring Apache Maven on your Windows machine, ensuring you’re set up for success with your Java projects.
Understanding Apache Maven and Its Importance
Before diving into the installation process, it’s beneficial to understand what Maven is and why it’s so widely adopted. Maven’s core philosophy revolves around the concept of a Project Object Model (POM). A POM file, typically named pom.xml, is located at the root of a Maven project and describes the project’s structure, dependencies, build process, and plugins. This declarative approach allows Maven to automate repetitive tasks and enforce best practices, leading to several key advantages:

- Dependency Management: Maven automates the downloading and management of external libraries and frameworks that your project relies on. This eliminates the manual effort of finding, downloading, and adding JAR files, as well as resolving version conflicts.
- Standardized Build Lifecycle: Maven defines a well-defined build lifecycle with distinct phases (e.g.,
compile,test,package,install,deploy). Developers can execute these phases directly, ensuring a consistent build process across different environments. - Convention over Configuration: Maven promotes a convention-over-configuration approach, meaning it assumes a standard project directory structure. This reduces the need for explicit configuration and makes it easier for developers to understand and contribute to projects.
- Extensibility through Plugins: Maven’s functionality can be extended through a vast ecosystem of plugins that support various tasks, from code generation and static analysis to deployment and reporting.
- Reproducible Builds: By managing dependencies and defining a clear build process, Maven helps ensure that builds are reproducible, meaning you can generate the same artifact reliably from the same source code.
For developers leveraging the vast Java ecosystem, mastering Maven is not just about installing a tool; it’s about embracing a robust framework for managing the complexity of modern software development. This is particularly true when integrating with various IDEs like Eclipse, IntelliJ IDEA, or VS Code, all of which have excellent Maven support.
Prerequisites for Maven Installation
Before you begin installing Maven, there are a few prerequisites that need to be in place on your Windows system. These are foundational elements that Maven relies on to function correctly.
1. Java Development Kit (JDK) Installation
Apache Maven is a Java-based tool, which means it requires a Java Runtime Environment (JRE) or, more commonly, a Java Development Kit (JDK) to run. You’ll need to have a JDK installed on your system, and it’s recommended to use a recent and stable version.
Checking for Existing JDK Installation:
You can check if you already have a JDK installed by opening your command prompt or PowerShell and typing the following command:
java -version
javac -version
If you see version information for Java and the Java compiler (javac), then you likely have a JDK installed. If not, you’ll need to download and install one.
Downloading and Installing the JDK:
- Download: Visit the official Oracle JDK download page or consider open-source alternatives like AdoptOpenJDK (now Eclipse Temurin) or Amazon Corretto. Choose the installer for your Windows architecture (64-bit is standard for modern systems).
- Installation: Run the downloaded installer and follow the on-screen instructions. It’s generally recommended to install the JDK in the default location, although you can choose a custom path if needed.
- Verification: After installation, re-run the
java -versionandjavac -versioncommands in a new command prompt window to ensure the installation was successful and the system recognizes the new Java installation.
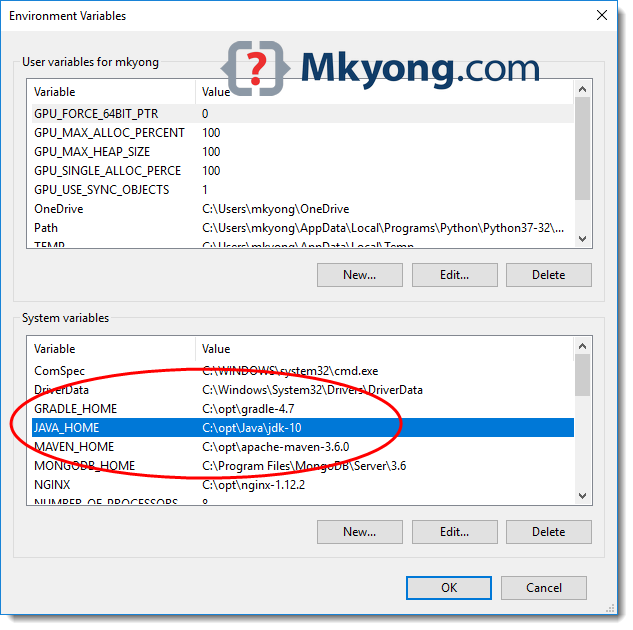
2. Setting Up the JAVA_HOME Environment Variable
For Maven and many other Java tools to correctly locate your JDK installation, you need to set up the JAVA_HOME environment variable. This variable points to the root directory of your JDK installation.
Steps to Set JAVA_HOME:
- Locate JDK Installation Path: Find the installation directory of your JDK. For example, it might be
C:Program FilesJavajdk-17.0.8. - Open Environment Variables:
- Search for “environment variables” in the Windows search bar and select “Edit the system environment variables.”
- In the System Properties window, click the “Environment Variables…” button.
- Create or Edit JAVA_HOME:
- Under “User variables for [YourUsername]”: Click “New…” and enter
JAVA_HOMEas the Variable name and the path to your JDK directory (e.g.,C:Program FilesJavajdk-17.0.8) as the Variable value. - Alternatively, under “System variables”: If you want to make it available to all users on the system, you can create or edit
JAVA_HOMEin the System variables section.
- Under “User variables for [YourUsername]”: Click “New…” and enter
- Update the PATH Variable: Maven also needs to be accessible from any directory in the command line. To achieve this, you need to add the
bindirectory of your JDK to the system’sPATHenvironment variable.- In the “Environment Variables” window, find the
Pathvariable (either under User variables or System variables – it’s generally better to edit the System variablePathfor broader access) and click “Edit…”. - Click “New” and add the following entry:
%JAVA_HOME%bin. - Ensure this entry is placed reasonably high in the list (though its exact position is usually not critical unless you have multiple Java installations).
- In the “Environment Variables” window, find the
- Apply Changes: Click “OK” on all open Environment Variables windows to save your changes.
- Verify JAVA_HOME and PATH: Open a new command prompt or PowerShell window and type:
bash

echo %JAVA_HOME%

java -version

javac -version
You should see the path to your JDK and the version information. If not, double-check the paths and ensure you’ve opened a new command prompt window after making the changes.
Once these prerequisites are met, you are ready to proceed with the actual installation of Apache Maven.
Installing Apache Maven
Now that your system is prepared with a working JDK and the JAVA_HOME environment variable correctly configured, you can download and install Apache Maven. The process involves downloading the binary distribution, extracting it, and then configuring your system’s PATH to include the Maven executables.
Downloading the Maven Binary Distribution
- Visit the Apache Maven Download Page: Navigate to the official Apache Maven download page. You can usually find this by searching for “Apache Maven download” or by going directly to
https://maven.apache.org/download.cgi. - Select the Binary Zip Archive: On the download page, look for the “Download” section. You will see links to various releases. It’s generally recommended to download the latest stable release. You’ll want to download the binary zip archive (e.g.,
apache-maven-x.y.z-bin.zip). Avoid downloading the source or other archives unless you have a specific reason. - Download the File: Click on the link for the binary zip file. Your browser will download the archive to your default download location.
Extracting the Maven Archive
- Choose an Installation Directory: Decide where you want to install Maven on your system. A common practice is to create a dedicated directory for development tools, such as
C:Program FilesorC:Tools. For this guide, let’s assume you’ll extract it toC:Program FilesApachemaven. - Extract the Zip File:
- Locate the downloaded zip file (e.g.,
apache-maven-3.9.6-bin.zip). - Right-click on the zip file and select “Extract All…” or use a file archiving tool like 7-Zip or WinRAR.
- Browse to your chosen installation directory (e.g.,
C:Program FilesApache) and extract the contents. This will create a new folder, typically namedapache-maven-x.y.z.
- Locate the downloaded zip file (e.g.,
- Rename for Simplicity (Optional but Recommended): For easier path management, it’s a good idea to rename the extracted folder to something simpler, like
maven. So, if you extracted toC:Program FilesApacheapache-maven-3.9.6, you would rename it toC:Program FilesApachemaven. This avoids having to update yourPATHvariable every time you upgrade Maven to a new minor version.
Configuring the PATH Environment Variable for Maven
To be able to run Maven commands from any directory in your command prompt, you need to add its bin directory to your system’s PATH environment variable.
-
Locate Maven’s
binDirectory: Navigate to the directory where you extracted Maven. The path will look something likeC:Program FilesApachemavenbin(based on our example). -
Open Environment Variables:
- Search for “environment variables” in the Windows search bar and select “Edit the system environment variables.”
- In the System Properties window, click the “Environment Variables…” button.
-
Edit the Path Variable:
- Under “System variables” (recommended for system-wide access) or “User variables for [YourUsername]”, find the
Pathvariable. - Click “Edit…”.
- Click “New” and add the full path to your Maven
bindirectory (e.g.,C:Program FilesApachemavenbin). - Ensure this entry is placed appropriately in the list.
- Under “System variables” (recommended for system-wide access) or “User variables for [YourUsername]”, find the
-
Apply Changes: Click “OK” on all open Environment Variables windows to save your changes.
-
Verify Maven Installation: Open a new command prompt or PowerShell window and type the following command:
mvn -versionIf the installation was successful, you should see output displaying your Maven version, Java version, and other relevant information. This confirms that Maven is correctly installed and accessible from your system’s command line.
Configuring Maven Settings and Best Practices
While Maven is now installed and accessible, there are a few optional but highly recommended configuration steps and best practices to enhance your Maven experience. These include setting up a local Maven repository, configuring settings.xml, and understanding Maven’s command-line interface.
Understanding the Local Maven Repository
Maven uses a local repository to store downloaded dependencies (JAR files) and project artifacts. When Maven needs a library, it first checks your local repository. If it’s not found there, Maven downloads it from a remote repository (like the Maven Central Repository) and stores it locally for future use.
By default, the local repository is located in your user’s home directory under .m2/repository. For example, C:UsersYourUsername.m2repository.
You can change the location of this repository by editing the settings.xml file.
Customizing Maven with settings.xml
The settings.xml file allows you to customize Maven’s behavior, such as defining your local repository location, configuring proxy settings, and setting global environment variables for builds.
-
Locate or Create
settings.xml:- Maven looks for
settings.xmlin two locations:$M2_HOMEconfsettings.xml(where$M2_HOMEis your Maven installation directory).~/.m2/settings.xml(in your user’s home directory, e.g.,C:UsersYourUsername.m2settings.xml).
- The
~/.m2/settings.xmlfile has higher precedence. If you don’t have a~/.m2directory, you can create it. - You can copy the default
settings.xmlfrom your Maven installation’sconfdirectory (e.g.,C:Program FilesApachemavenconfsettings.xml.sample) toC:UsersYourUsername.m2settings.xmland then rename it tosettings.xml.
- Maven looks for
-
Key Configurations in
settings.xml:-
Local Repository: To change the default local repository location, add or modify the
<localRepository>element within the<settings>tag:<settings xmlns_xsi="http://www.w3.org/2001/XMLSchema-instance" xsi_schemaLocation="http://maven.apache.org/SETTINGS/1.0.0 https://maven.apache.org/xsd/settings-1.0.0.xsd"> <localRepository>D:/MavenRepository</localRepository> <!-- other configurations --> </settings>Replace
D:/MavenRepositorywith your desired path. Ensure the directory exists or Maven will create it. -
Proxies: If you are behind a corporate proxy, you’ll need to configure it:
<proxies>
  <proxy>
    <id>myproxy</id>
    <active>true</active>
    <protocol>http</protocol>
    <host>proxy.example.com</host>
    <port>8080</port>
    <username>proxyuser</username>
    <password>proxypassword</password>
    <nonProxyHosts>local.maven.example.com|*.example.com</nonProxyHosts>
  </proxy>
</proxies>
Fill in your proxy details.
-
Servers: For accessing private repositories that require authentication:
<servers>
  <server>
    <id>my-nexus</id>
    <username>user</username>
    <password>password</password>
  </server>
</servers>
The
<id>here must match the<repository>or<pluginRepository>ID in your project’spom.xmlwhere you reference this server. -
Global Settings: You can also define environment variables that can be accessed in your POMs using the
<plugin>configuration.
-
-
Reload IDE Configuration: If you are using an IDE like IntelliJ IDEA or Eclipse, after modifying
settings.xml, you may need to re-import your Maven projects or refresh the Maven tool window for the changes to take effect.
Basic Maven Command-Line Usage
Once Maven is installed and configured, you can start using its command-line interface to manage your projects. Here are some fundamental commands:
mvn clean: Cleans the project by deleting the build output directory (usuallytarget).mvn compile: Compiles the source code of your project.mvn test: Compiles and runs the unit tests.mvn package: Compiles, tests, and packages the project into a distributable format (e.g., JAR, WAR).mvn install: Compiles, tests, packages, and installs the artifact into your local Maven repository. This makes it available as a dependency for other local projects.mvn deploy: Similar toinstall, but deploys the artifact to a remote repository.mvn site: Generates project documentation.mvn clean install: A common command that first cleans the project and then builds and installs it into the local repository.
You can execute these commands by navigating to your project’s root directory (where the pom.xml file is located) in your command prompt and typing mvn [phase].
By mastering these configurations and commands, you’ll be well-equipped to leverage the full power of Apache Maven in your Java development workflow on Windows.

Conclusion
Installing and configuring Apache Maven on Windows is a straightforward yet critical step for any Java developer. By following this comprehensive guide, you have successfully set up your environment with the necessary JDK and correctly configured the JAVA_HOME and PATH environment variables. You’ve learned how to download, extract, and integrate Maven into your system, ensuring that you can execute its powerful build commands from anywhere.
Furthermore, understanding the local Maven repository and the flexibility offered by the settings.xml file empowers you to tailor Maven to your specific needs, whether it’s defining custom repository locations or managing proxy configurations for corporate environments. The ability to run fundamental Maven commands like clean, compile, test, package, and install opens the door to efficient project management, automated builds, and robust dependency handling.
With Apache Maven now at your disposal on your Windows machine, you are ready to tackle Java projects with greater efficiency, consistency, and a standardized build process. Embrace these tools to streamline your development workflow, improve collaboration, and ensure the reliability of your software creations. Happy coding!
aViewFromTheCave is a participant in the Amazon Services LLC Associates Program, an affiliate advertising program designed to provide a means for sites to earn advertising fees by advertising and linking to Amazon.com. Amazon, the Amazon logo, AmazonSupply, and the AmazonSupply logo are trademarks of Amazon.com, Inc. or its affiliates. As an Amazon Associate we earn affiliate commissions from qualifying purchases.