and a “”D:”” drive for your personal files.
aViewFromTheCave is a participant in the Amazon Services LLC Associates Program, an affiliate advertising program designed to provide a means for sites to earn advertising fees by advertising and linking to Amazon.com. Amazon, the Amazon logo, AmazonSupply, and the AmazonSupply logo are trademarks of Amazon.com, Inc. or its affiliates. As an Amazon Associate we earn affiliate commissions from qualifying purchases.The operating system (OS) is the foundational software that manages your computer’s hardware and software resources, allowing you to interact with your device. Whether you’re building a new PC, upgrading an older machine, or troubleshooting issues, knowing how to install an OS is a crucial technical skill. This guide will walk you through the process, demystifying the steps involved and empowering you to successfully install or reinstall your chosen operating system. We’ll cover everything from preparing your system to the final configuration, ensuring a smooth and efficient installation.
Understanding the Basics: What You Need Before You Begin
Before diving into the installation itself, it’s essential to have a clear understanding of what an operating system is and what prerequisites are necessary for a successful installation. This preparatory phase is critical for avoiding common pitfalls and ensuring a hassle-free experience.
What is an Operating System?
Think of your computer as a complex ecosystem. The hardware – the physical components like your CPU, RAM, hard drive, and peripherals – are the raw materials. The applications you use, like web browsers, word processors, and games, are the organisms that inhabit this ecosystem. The operating system acts as the central nervous system and the governing body, orchestrating all these elements to work harmoniously. It provides a user interface (UI) that allows you to interact with the computer, manages memory and file storage, schedules tasks, and allows applications to communicate with the hardware. Without an OS, your computer would simply be a collection of inert electronic parts.
The most common operating systems for personal computers are Microsoft Windows, Apple macOS, and various distributions of Linux (such as Ubuntu, Fedora, or Debian). Each has its own strengths, user interface, and software compatibility. Your choice of OS will depend on your needs, preferences, and the hardware you’re using.
Gathering Your Installation Media and License
To install an operating system, you’ll need the installation media, which typically comes in the form of a bootable USB drive or a DVD. In recent years, USB drives have become the more prevalent and convenient option due to their speed and reusability.
- Operating System Image File (ISO): You’ll need to download the official OS image file, often referred to as an ISO file, from the software vendor’s website. For Windows, this can be obtained through the Microsoft Media Creation Tool. For Linux, you’ll download the ISO file for your chosen distribution directly from its official website.
- Bootable USB Drive: A USB flash drive with sufficient storage capacity (usually 8GB or more) will be required to create the bootable installation media.
- Software for Creating Bootable Media: You’ll need a tool to write the ISO file onto the USB drive, making it bootable. Popular options include Rufus (for Windows) or balenaEtcher (cross-platform).
- Product Key/License: For commercial operating systems like Windows, you’ll need a valid product key or license to activate the software after installation. While you can often install without it, full functionality and updates are usually tied to activation. Open-source operating systems like Linux are generally free to use and distribute.
Preparing Your Hardware and Backing Up Your Data
Before you begin the installation process, it’s crucial to ensure your hardware is ready and, most importantly, that your valuable data is safe.
- System Requirements: Check the minimum and recommended system requirements for the OS you intend to install. This includes CPU speed, RAM, storage space, and graphics capabilities. Installing an OS on hardware that doesn’t meet these requirements can lead to poor performance or even prevent the installation altogether.
- Backup Your Data: This is perhaps the most critical step. Installing an OS, especially if it involves formatting your hard drive, will erase all existing data. Crucially, back up all your important files, documents, photos, videos, and any other data to an external hard drive, cloud storage service, or another secure location before proceeding. Losing data during an OS installation is a common and devastating mistake.
- Check Hardware Compatibility: While most modern hardware is compatible with mainstream operating systems, it’s a good idea to check for any specific driver requirements, especially for older or specialized components. You can usually find compatibility information on the OS vendor’s website or the hardware manufacturer’s support pages.
The Installation Process: Step-by-Step
With your preparation complete, you’re ready to embark on the actual installation of your operating system. This process generally involves booting from your installation media, following on-screen prompts, and making key decisions about disk partitioning and user setup.
Booting from Your Installation Media
The first step in the installation is to tell your computer to start up from the USB drive or DVD containing the OS installer, rather than your existing hard drive.
- Insert Installation Media: Plug in your bootable USB drive or insert your OS installation DVD into the appropriate drive.
- Restart Your Computer: Reboot your computer.
- Access the Boot Menu or BIOS/UEFI: As your computer starts up, you’ll need to press a specific key to access the boot menu or the BIOS/UEFI settings. Common keys include F2, F10, F12, Delete, or Esc. You’ll usually see a message on the screen during the startup sequence indicating which key to press (e.g., “Press F12 for Boot Menu”).
- Select the Boot Device: In the boot menu or BIOS/UEFI settings, navigate to the boot order or boot priority section. Select your USB drive or DVD drive as the first boot device.
- Save and Exit: Save the changes you’ve made in the BIOS/UEFI and exit. Your computer will restart and should now boot from your installation media.
Navigating the Installation Wizard
Once your computer boots from the installation media, you’ll be greeted by the OS installer. This is a guided process with a series of screens presenting choices and information.

- Language, Time, and Keyboard Layout: The first screens will typically ask you to select your preferred language, the correct time and currency format, and your keyboard layout. Choose these options carefully as they affect how your system operates and how you interact with it.
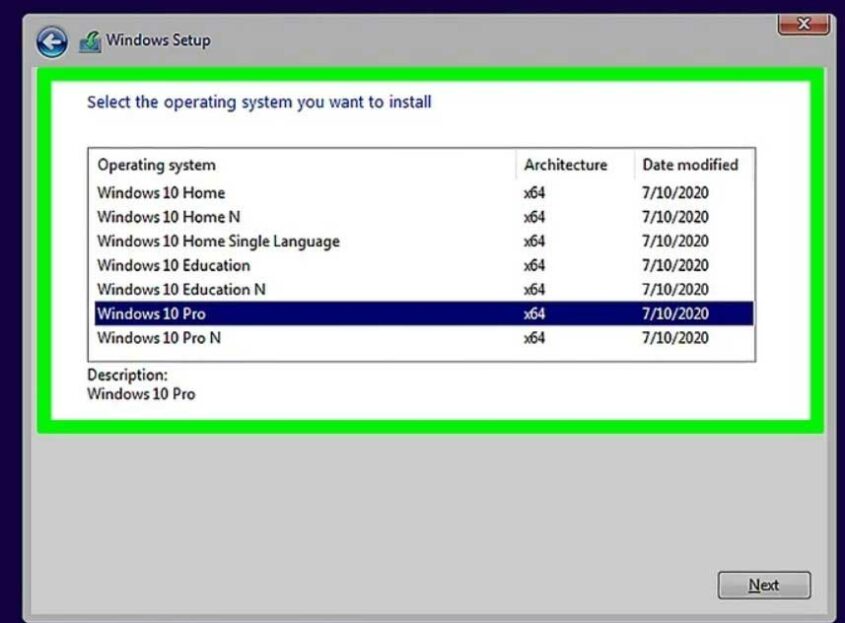
- Install Now/Repair: You’ll usually see an option to “Install Now” or, in some cases, to “Repair your computer.” Select “Install Now” to begin a fresh installation.
- Product Key Entry: For Windows, you’ll be prompted to enter your product key. If you don’t have it immediately or are reinstalling on hardware that was previously activated, you might have an option to skip this step for now.
- License Terms: You’ll need to accept the software license agreement to proceed. Read through it carefully, even though it’s often a lengthy legal document.
- Installation Type: This is a crucial step. You’ll typically be presented with two main options:
- Upgrade: This option attempts to install the new OS over your existing one, preserving your files, settings, and applications. This is suitable for upgrading from an older version of the same OS (e.g., Windows 10 to Windows 11). However, it’s not always the most stable method and can sometimes lead to issues.
- Custom (Advanced): This option gives you full control over disk partitioning. It’s the recommended choice for a clean installation, especially if you’re installing on a new drive, reformatting an existing drive, or installing a different OS. Choosing “Custom” will allow you to format your hard drive, which will erase all data on it.
Disk Partitioning and Formatting
If you chose the “Custom” installation type, you’ll need to manage your hard drive space by partitioning it.
Understanding Partitions: A partition is a logical section of a physical storage device. You can have multiple partitions on a single hard drive, each acting like a separate drive. For example, you might have a “C:” drive for the OS and programs