In the fast-evolving world of technology, where graphics processing units (GPUs) stand as the powerhouse behind everything from breathtaking gaming experiences to complex AI computations and professional design rendering, keeping your hardware running optimally is paramount. If you’re an owner of an NVIDIA graphics card, you’re tapping into some of the most advanced silicon on the market. However, the raw power of your GPU is only as good as the software that orchestrates it: the NVIDIA drivers.
Drivers are essentially the translation layer between your operating system and your hardware. They dictate how your GPU interacts with the rest of your system, ensuring smooth operation, unlocking new features, and providing critical performance enhancements. For anyone looking to maximize their NVIDIA investment – whether for cutting-edge gaming, accelerated productivity in creative applications, or even harnessing the potential of AI tools – knowing how to properly install and update these drivers is an indispensable skill. This comprehensive guide will walk you through everything you need to know, from understanding why drivers matter to executing a flawless installation, ensuring your NVIDIA GPU performs at its peak.
Why Keeping Your NVIDIA Drivers Updated Matters
The importance of regularly updating your NVIDIA drivers cannot be overstated. It’s not merely a task to perform when something goes wrong; it’s a proactive measure that yields significant benefits across the spectrum of your computing experience. From competitive gaming to professional design and robust digital security, current drivers are the foundation of optimal GPU performance.
Unlocking Peak Performance
One of the most immediate and tangible benefits of updated drivers is the performance boost they provide. NVIDIA frequently releases new drivers optimized for the latest game titles, ensuring higher frame rates, smoother gameplay, and reduced stuttering. For gamers, this can mean the difference between a frustrating experience and a seamlessly immersive one, potentially giving you a competitive edge. Beyond gaming, creative professionals using software like Adobe Premiere Pro, Blender, or Autodesk applications will notice faster render times, smoother previews, and improved responsiveness. For those exploring AI tools and machine learning, updated drivers often include CUDA performance enhancements, leading to quicker training times and more efficient computations, directly boosting your productivity.
Enhanced Stability and Bug Fixes
Older drivers can sometimes lead to system instability, manifesting as application crashes, freezing, or even the dreaded “blue screen of death.” NVIDIA’s development teams are constantly identifying and patching these bugs. Updating your drivers ensures you’re running the most stable version of the software, reducing the likelihood of unexpected interruptions and improving overall system reliability. This is particularly crucial for users who rely on their systems for time-sensitive work or uninterrupted gaming sessions. A stable system is a productive system, minimizing downtime and maximizing output.
Access to New Features and Technologies
NVIDIA is a leader in graphics technology, consistently introducing groundbreaking features like DLSS (Deep Learning Super Sampling) for AI-powered performance boosts, advanced Ray Tracing for hyper-realistic lighting, and innovative tools like NVIDIA Broadcast for streamers. These features aren’t magically available through your hardware alone; they require the accompanying driver software to function. New drivers frequently introduce support for these cutting-edge technologies, allowing you to experience the latest innovations and get the most out of your high-end GPU. Staying updated means staying at the forefront of graphical fidelity and technological capability.
Critical Security Patches
In an age where digital security is more critical than ever, even hardware drivers can be potential vectors for vulnerabilities. Like any complex software, drivers can contain security flaws that, if left unpatched, could be exploited by malicious actors. NVIDIA regularly releases security patches within its driver updates to address these potential weaknesses. By keeping your drivers current, you’re not just enhancing performance; you’re also bolstering your system’s defenses against potential threats, safeguarding your data and privacy. This often overlooked aspect of driver maintenance is a vital component of a comprehensive digital security strategy.
Essential Preparations Before Installation
Before embarking on the driver installation process, a few preparatory steps can save you significant headaches down the line. Proper preparation ensures that you download the correct driver, avoid compatibility issues, and have a fallback plan if anything unexpected occurs.
Identifying Your NVIDIA GPU
The first and most crucial step is to accurately identify your specific NVIDIA graphics card model. Installing the wrong driver can lead to compatibility problems, system instability, or simply a non-functional GPU.
- Device Manager (Windows): The easiest way to check is through Windows Device Manager. Press
Win + Xand select “Device Manager.” Expand “Display adapters,” and you should see your NVIDIA GPU listed (e.g., NVIDIA GeForce RTX 3080). - NVIDIA Control Panel: If you already have NVIDIA drivers installed, you can open the NVIDIA Control Panel (usually by right-clicking on your desktop) and navigate to “System Information” in the bottom-left corner.
- Physical Inspection: As a last resort, if your system isn’t booting or drivers aren’t installed, you might need to open your PC case and physically inspect the graphics card itself, looking for model numbers printed on the card or its shroud.
Knowing your exact GPU model is critical for downloading the correct driver package from NVIDIA’s website.
Checking Your Operating System
NVIDIA drivers are operating system-specific. You need to know which version of Windows you are running (Windows 10, Windows 11) and whether it’s a 64-bit or 32-bit architecture. Modern systems are almost exclusively 64-bit, but it’s good to confirm.
- Windows: Press
Win + Ito open Settings, then navigate to “System” > “About.” Under “Device specifications,” you’ll find “System type” which indicates 64-bit or 32-bit and “Edition” for your Windows version.
This information, along with your GPU model, will be required when selecting the appropriate driver from NVIDIA’s download portal.
Backing Up Important Data (Optional but Recommended)
While a driver installation is generally a safe process, it involves modifying core system files. In the rare event of an unforeseen issue that causes system instability or prevents booting, having a recent backup of your important documents, photos, and projects can be a lifesaver. This aligns with general best practices for digital security and data management. You can use cloud services, external hard drives, or Windows’ built-in backup tools. It’s better to be safe than sorry, especially when dealing with critical system updates.
Uninstalling Previous Drivers (Recommended for Clean Installs)
For a standard driver update, simply running the new installer is often sufficient. However, for troubleshooting issues, addressing persistent performance problems, or ensuring the cleanest possible installation to prevent conflicts, performing a “clean installation” is highly recommended. This involves completely removing all remnants of previous NVIDIA drivers before installing the new ones.
The most effective way to do this is by using a third-party utility called Display Driver Uninstaller (DDU).
- Download DDU: Obtain DDU from a reputable source like Guru3D.
- Boot into Safe Mode: This is crucial. DDU works best and is safest when run in Windows Safe Mode, as it prevents Windows from trying to reinstall generic drivers while DDU is working. To enter Safe Mode, restart your PC and repeatedly press the
F8orShift + F8key (or via Settings > Recovery > Advanced startup > Restart now > Troubleshoot > Advanced options > Startup Settings > Restart > F4 for Safe Mode). - Run DDU: Once in Safe Mode, launch DDU. Select “GPU” and “NVIDIA” from the dropdown menus. Then click “Clean and restart (Recommended).”
DDU will meticulously remove all NVIDIA driver components, registry entries, and files, preparing your system for a fresh installation. This step, while requiring a bit more effort, significantly minimizes the chance of driver-related conflicts and ensures optimal performance.
Step-by-Step Guide to Installing NVIDIA Drivers
With your preparations complete, you’re ready to install your NVIDIA drivers. There are several methods available, each suited to different user preferences and situations. We’ll cover the most common and effective approaches.
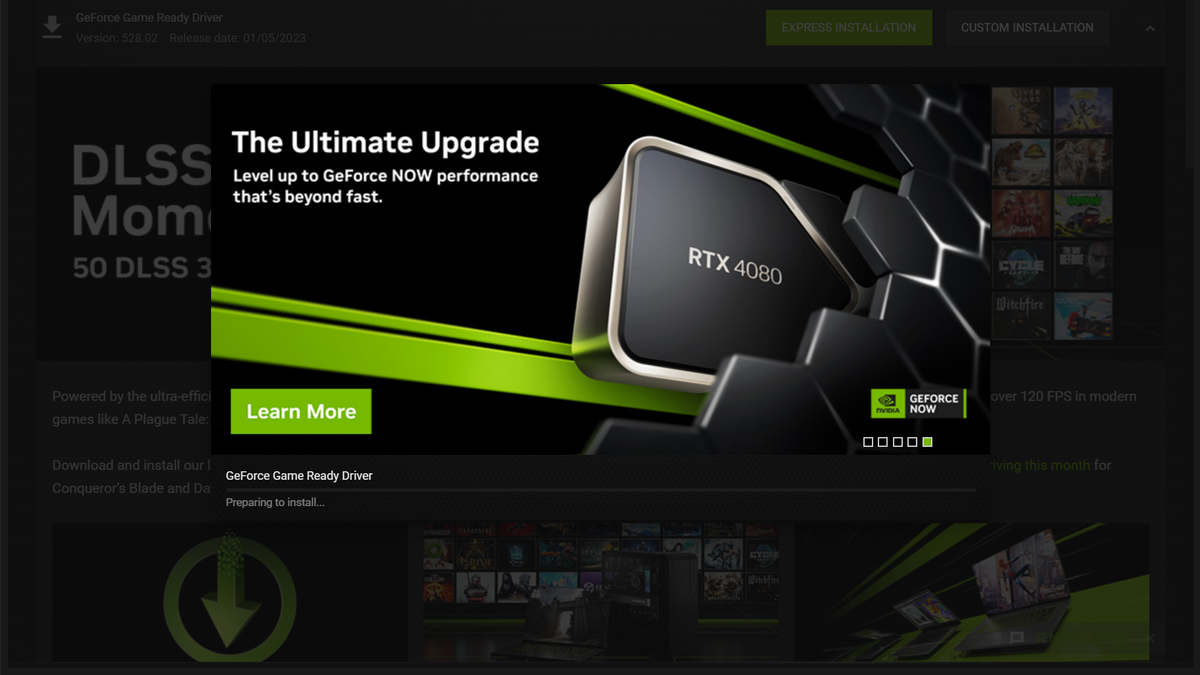
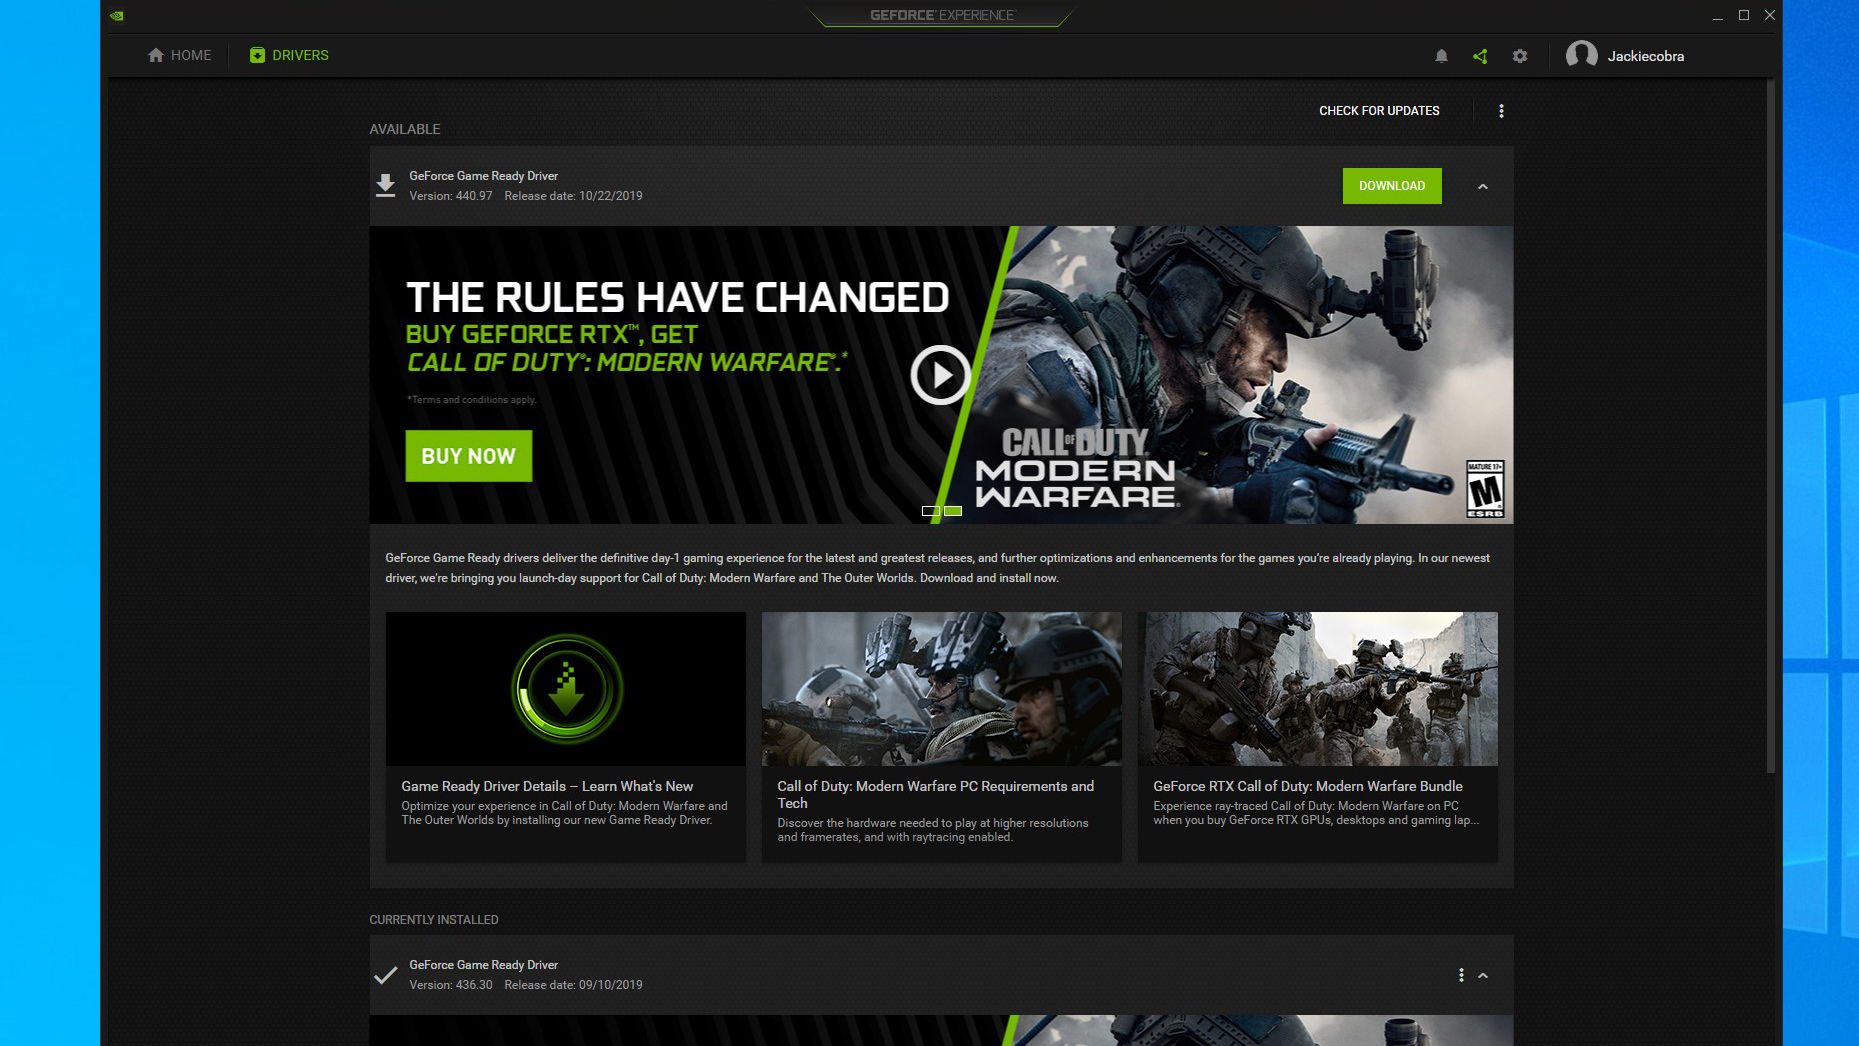
Method 1: Using NVIDIA GeForce Experience (Recommended for Gamers/General Users)
NVIDIA GeForce Experience is a utility designed to optimize your gaming settings, capture gameplay, and, crucially, keep your drivers up to date. It’s the easiest and most user-friendly method for most users.
- Install GeForce Experience: If you don’t already have it, download and install GeForce Experience from the official NVIDIA website. You’ll need to create or log in with an NVIDIA account.
- Launch GeForce Experience: Once installed, open the application.
- Navigate to Drivers: Click on the “Drivers” tab at the top of the window.
- Check for Updates: GeForce Experience will automatically check for new drivers tailored to your specific GPU. If an update is available, you’ll see a notification.
- Download Driver: Click the “Download” button next to the available driver.
- Installation Options: After the download completes, you’ll be presented with two installation options:
- Express Installation (Recommended): This is the simplest option. GeForce Experience will automatically install the driver with standard settings. It’s suitable for most users and performs a clean installation by default now (though it may not be as thorough as DDU).
- Custom Installation: This allows you to choose specific components to install (e.g., Audio Driver, GeForce Experience itself, PhysX) and offers an explicit “Perform a Clean Installation” checkbox. While “Express” usually performs a clean install, selecting “Custom” and ticking this box guarantees it, effectively removing previous driver files and starting fresh. This is recommended if you bypassed the DDU step.
- Complete Installation: Follow the on-screen prompts. Your screen may flicker or go black briefly during the process, which is normal. Once complete, you may be prompted to restart your system.
Method 2: Manual Download from NVIDIA Website (Recommended for Professionals/Specific Needs)
Manually downloading drivers from NVIDIA’s official website gives you the most control and is often preferred by power users, professionals, or when GeForce Experience isn’t installed or is causing issues. It’s also essential if you’ve performed a DDU clean uninstall.
- Visit NVIDIA Driver Download Page: Open your web browser and go to
www.nvidia.com/drivers. - Select Your Product: Use the dropdown menus to accurately select your:
- Product Type: (e.g., GeForce, Quadro, NVS)
- Product Series: (e.g., GeForce RTX 40 Series, GeForce GTX 16 Series)
- Product: (e.g., RTX 4080, GTX 1660 SUPER)
- Operating System: (e.g., Windows 11 64-bit, Windows 10 64-bit)
- Download Type: (Game Ready Driver – GRD, Studio Driver – SD). GRD is for gamers; SD is for creative professionals using applications like Adobe Creative Suite. Choose based on your primary use case.
- Search and Download: Click “Search.” The website will present the latest compatible driver. Click “Get Download” and then “Download” again to save the executable file to your computer.
- Run the Installer: Once downloaded, locate the
.exefile (usually in your Downloads folder) and double-click it to start the installation process. - Extractor Location: The installer will first extract the files. You can accept the default location.
- Agreement: Read and accept the NVIDIA Software License Agreement.
- Installation Options: Similar to GeForce Experience, you’ll typically have two main options:
- Express Installation (Recommended): This will install the driver with default settings.
- Custom (Advanced) Installation: This is generally the preferred choice for manual installations.
- Select “Custom (Advanced)” and click “Next.”
- You’ll see a list of components. Ensure “Graphics Driver” is selected. You can deselect other components like GeForce Experience or PhysX if you don’t need them (though keeping them usually doesn’t hurt).
- Crucially, check the box next to “Perform a clean installation.” This will remove all previous NVIDIA driver components before installing the new ones, preventing potential conflicts and ensuring a fresh start. This is the manual equivalent of using DDU (though DDU is more thorough for initial uninstalls).
- Complete Installation: Click “Next” and allow the installer to complete the process. Your screen may flicker or go blank. Once finished, click “Restart Now” if prompted, or manually restart your computer to finalize the installation.
Method 3: Via Windows Device Manager (Least Recommended for Optimal Performance)
While technically possible, updating drivers through Windows Device Manager is the least recommended method for NVIDIA GPUs. Windows often installs generic or older drivers, which typically lack the performance optimizations and features of NVIDIA’s official releases. This method is usually a last resort for getting basic display functionality or for very old systems.
- Open Device Manager: Press
Win + Xand select “Device Manager.” - Locate Display Adapters: Expand “Display adapters.”
- Update Driver: Right-click on your NVIDIA GPU (e.g., NVIDIA GeForce RTX 3080) and select “Update driver.”
- Search for Drivers: You’ll be given two options:
- “Search automatically for drivers”: Windows will try to find a driver online or on your system. This often results in a generic or outdated driver.
- “Browse my computer for drivers”: If you’ve manually downloaded the driver package but haven’t run the installer, you can point Windows to the extracted driver files (usually in
C:NVIDIADisplayDriverversion_numberInternational). This is generally not recommended as the full NVIDIA installer is designed to handle all necessary components.
For optimal performance and access to all features, always prioritize Method 1 or Method 2.
Post-Installation and Verification
After you’ve successfully installed your new NVIDIA drivers, it’s good practice to verify that everything is working as expected. This final check ensures your GPU is properly recognized and ready to deliver its full potential.
Verifying Driver Installation
There are a few ways to confirm your new drivers are active:
- NVIDIA Control Panel: Right-click on your desktop and select “NVIDIA Control Panel.” If it opens successfully, it’s a good sign. Inside, go to “Help” > “System Information” to check the driver version listed. It should match the version you just installed.
- GeForce Experience: Open GeForce Experience, navigate to the “Drivers” tab. It should indicate that you have the latest driver installed, displaying its version number.
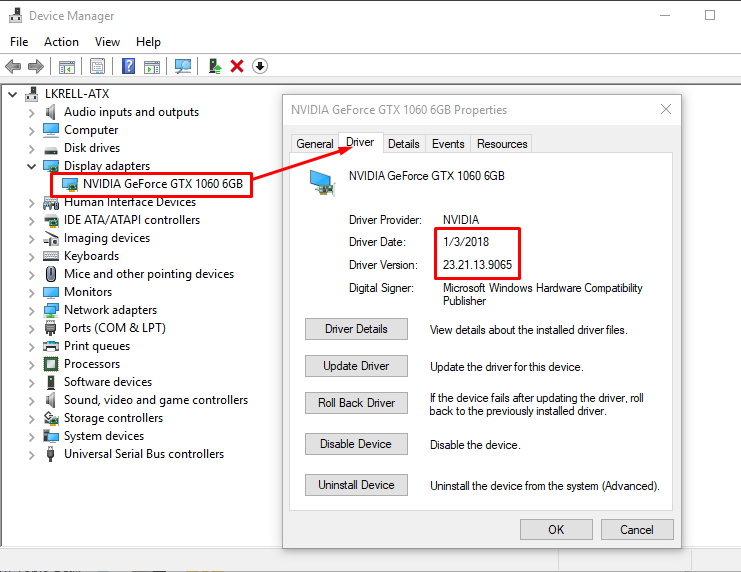
- Device Manager: Press
Win + Xand select “Device Manager.” Expand “Display adapters,” right-click on your NVIDIA GPU, select “Properties,” and then go to the “Driver” tab. Check the “Driver Version” and “Driver Date” to ensure they correspond to the newly installed driver.
Optimizing Settings
With the latest drivers in place, take a moment to fine-tune your settings.
- NVIDIA Control Panel: Explore options for 3D settings, resolution, and G-Sync/FreeSync if you have a compatible monitor. You can often set application-specific profiles for games and professional software here.
- GeForce Experience: Utilize the “Optimal Playable Settings” feature for games, allowing GeForce Experience to configure in-game settings for the best balance of performance and visual quality based on your hardware. This can significantly enhance your gaming experience without requiring manual tweaking.
Troubleshooting Common Issues
Despite best efforts, occasionally issues can arise after a driver installation.
- Black Screen/No Display: If your screen goes black and doesn’t recover, wait a few minutes. If it persists, try booting into Safe Mode (as described in the DDU section) and running DDU to completely uninstall the problematic driver. Then, attempt a fresh installation of an older, known-stable driver version or the latest one.
- Installation Failed: This can be due to corrupted download files, conflicts with existing software, or insufficient system resources. Re-download the driver, disable antivirus temporarily, and ensure you have enough free disk space. Running DDU in Safe Mode before trying again is also highly recommended.
- Performance Issues After Update: Rarely, a new driver might cause performance regressions for specific games or applications. In such cases, you can “rollback” the driver. In Device Manager (GPU Properties > Driver tab), there might be a “Roll Back Driver” option. Alternatively, perform a DDU uninstall and install a previous, known-stable driver version from NVIDIA’s driver archive.
Conclusion
Installing and maintaining updated NVIDIA drivers is far more than a routine chore; it’s a critical aspect of maximizing your GPU’s potential and ensuring a seamless, high-performance computing experience. From boosting frame rates in the latest AAA titles and accelerating rendering in professional applications to fortifying your digital security with essential patches, current drivers are the lifeblood of your NVIDIA graphics card.
By following the steps outlined in this guide – whether you prefer the automated convenience of GeForce Experience or the granular control of a manual installation – you empower your system to deliver its best. Remember the importance of preparation, the benefits of a clean installation, and how to verify your setup. Regular driver updates will ensure you continue to unlock new features, benefit from performance improvements, and maintain the stability and security of your valuable hardware investment for years to come. So, go forth and conquer, knowing your NVIDIA GPU is operating at its absolute peak.
aViewFromTheCave is a participant in the Amazon Services LLC Associates Program, an affiliate advertising program designed to provide a means for sites to earn advertising fees by advertising and linking to Amazon.com. Amazon, the Amazon logo, AmazonSupply, and the AmazonSupply logo are trademarks of Amazon.com, Inc. or its affiliates. As an Amazon Associate we earn affiliate commissions from qualifying purchases.