The modern smart home is no longer a futuristic concept but a tangible reality, and at the heart of this ecosystem lies the smart thermostat. Among the industry leaders, ecobee has distinguished itself by offering sophisticated hardware that blends aesthetic appeal with powerful data-driven climate control. However, transitioning from a traditional “dumb” thermostat to a high-tech ecobee requires a precise installation process.
This guide serves as a deep dive into the technical requirements, physical installation, and software configuration of your ecobee device. Whether you are a tech enthusiast or a homeowner looking to optimize your HVAC system, this walkthrough ensures your journey into smart climate control is seamless and efficient.

Pre-Installation Preparation and System Compatibility Analysis
Before unboxing your device, it is critical to understand the technical infrastructure of your current HVAC system. Unlike traditional thermostats that may run on batteries, the ecobee is a complex computer that requires a steady stream of power to support its Wi-Fi connectivity, touchscreen display, and advanced sensors.
Understanding the C-Wire Requirement
The most critical component of a smart thermostat installation is the “C-wire” or Common wire. This wire provides a continuous 24V AC power supply to the thermostat. Most modern HVAC systems include a C-wire, typically colored blue or black.
To verify your setup, remove the cover of your existing thermostat and inspect the wiring terminals. If you see a wire connected to the “C” terminal, your installation will be straightforward. If you do not see a C-wire, do not worry; ecobee includes a Power Extender Kit (PEK) in the box, which is a sophisticated technical workaround that leverages existing wires to provide power without requiring you to run new lines through your walls.
Technical Tools and Safety Protocols
Before beginning the physical labor, gather the necessary tools. You will likely need:
- A Phillips head screwdriver.
- A small flathead screwdriver (for terminal blocks).
- A drill with a 3/16″ bit (if mounting on drywall).
- Your smartphone with the ecobee app installed.
- A digital camera or smartphone to document the original wiring.
Safety Note: Technology and electricity require respect. Always navigate to your home’s electrical panel and switch off the circuit breaker controlling your HVAC system. Attempting to install the device on a live circuit can result in short-circuiting the thermostat’s logic board or damaging your furnace’s transformer.
Hardware Setup: Decommissioning and Mounting the New Interface
Once the power is confirmed off, the physical transition begins. This stage involves the careful removal of legacy hardware to make way for the ecobee’s modern architecture.
Documenting the Legacy Configuration
Before disconnecting any wires, take a high-resolution photo of your current thermostat’s backplate. Pay close attention to the letters corresponding to each wire. In the world of HVAC tech, wire colors are not always standardized, but terminal labels are. A wire plugged into “R” on your old unit must be accounted for in the new setup, regardless of its color. Use the adhesive labels provided by ecobee to mark each wire according to its terminal designation.
Mounting the ecobee Backplate
After labeling and disconnecting the wires, unscrew the old backplate. If the previous unit was larger than the ecobee, you may find unpainted drywall or holes. ecobee includes a trim plate (beauty plate) to cover these imperfections, maintaining a professional aesthetic.
Thread the wires through the center hole of the ecobee backplate. Use the built-in spirit level on the backplate to ensure the device is perfectly horizontal. A level installation isn’t just about looks; it ensures the internal sensors are oriented correctly for optimal performance. Secure the backplate to the wall using the provided drywall anchors and screws.
Wiring Configuration and the Power Extender Kit (PEK)
The wiring phase is where the technical heavy lifting occurs. This is the bridge between your home’s mechanical systems and the ecobee’s digital brain.
Standard 5-Wire Installation
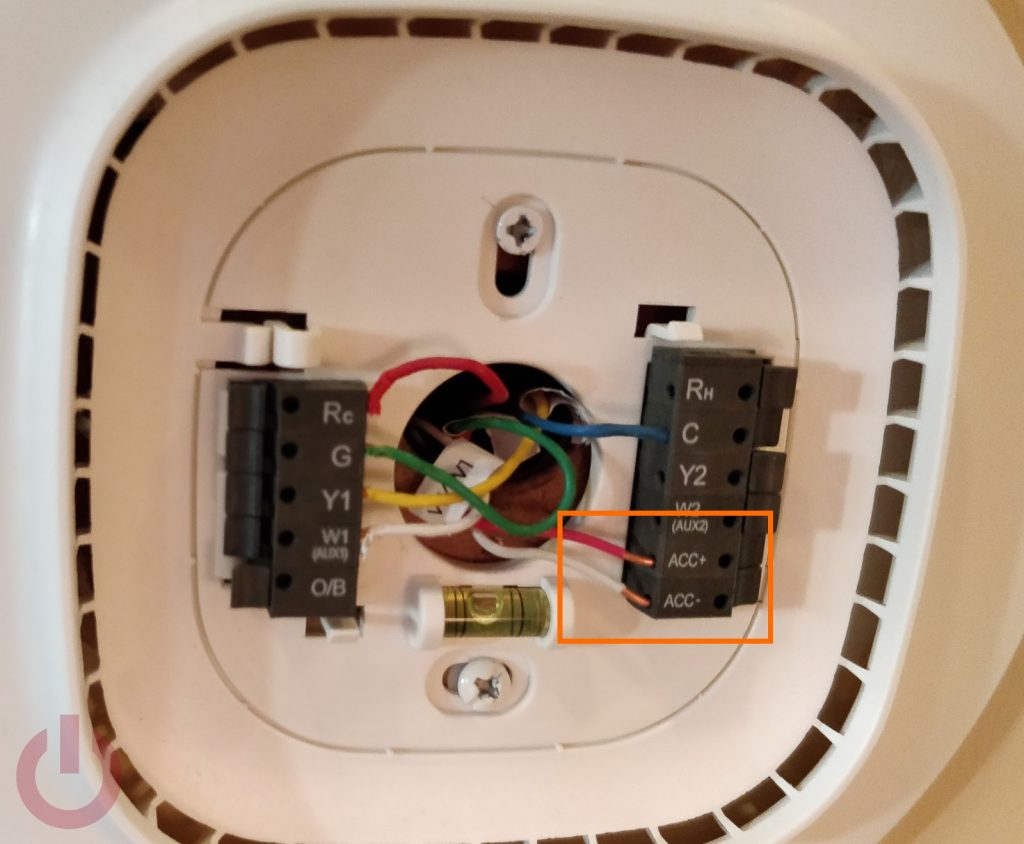
If your system has a C-wire, the process is “plug-and-play.” Simply insert each labeled wire into the corresponding terminal on the ecobee backplate by pressing the lever and sliding the wire into the hole. Ensure the copper lead is fully seated and the lever clicks back into place. Common terminal designations include:
- Rc/Rh: Power (24V).
- G: Fan control.
- Y1: Cooling.
- W1: Heating.
- C: Common (Power return).
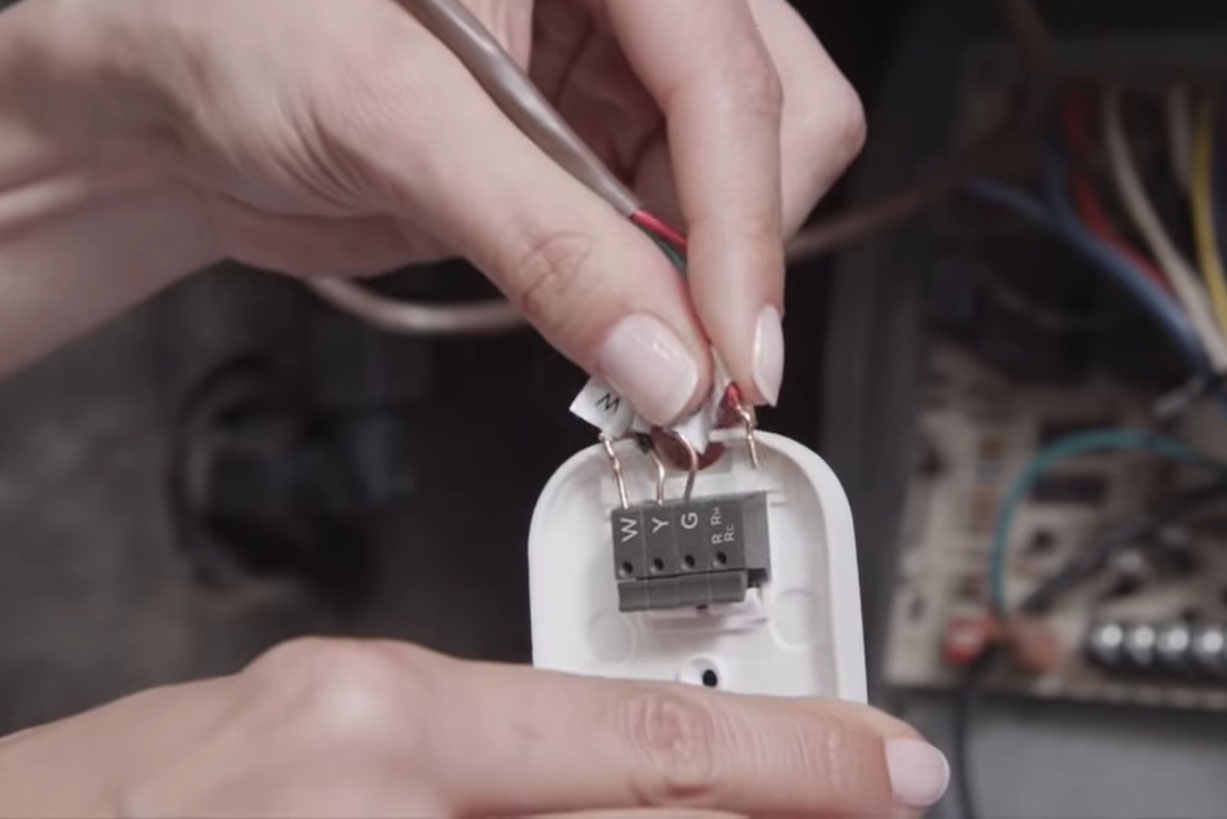
Advanced 4-Wire Installation with the PEK
If your system lacks a C-wire, you must install the Power Extender Kit at the HVAC control board (usually located in the furnace or air handler). This involves opening the furnace chassis and locating the control board where the thermostat wires terminate.
- Disconnect Wires: Remove the R, G, Y, and W wires from the furnace control board.
- Connect to PEK: Insert these wires into the “Thermostat” side of the PEK.
- Connect PEK to Board: Take the pre-terminated wires coming out of the PEK and connect them to the corresponding terminals on the furnace board (R to R, G to G, etc.).
- Complete the Circuit: At the wall, you will now use the “C” and “PEK” designations on the ecobee backplate to finish the circuit. This clever engineering allows the device to phantom-power itself through the existing four wires.
Software Initialization and Smart Home Integration
With the hardware securely mounted, snap the ecobee head unit onto the backplate and restore power at the circuit breaker. The device will undergo a boot-up sequence, displaying the ecobee logo as it initializes its operating system.
The Guided Configuration
The ecobee will guide you through a series of on-screen prompts. It will first ask you to confirm which wires it detects in its terminals. This is a crucial self-diagnostic step; if the device doesn’t detect a wire you know is plugged in, you may need to re-seat the wire for a better connection.
You will then configure your equipment. Are you running a heat pump? Do you have a multi-stage furnace? The ecobee uses these inputs to calibrate its algorithms, ensuring it doesn’t cycle the compressor too frequently, which extends the lifespan of your HVAC tech.
Wi-Fi and Ecosystem Pairing
To unlock the “smart” features, connect the device to your 2.4GHz or 5GHz Wi-Fi network. Once connected, the ecobee app on your smartphone will generate a registration code. Entering this code in the app links your device to the ecobee cloud.
This connection allows for integration with major smart home platforms:
- Apple HomeKit: Allows for Siri voice control and inclusion in “scenes.”
- Amazon Alexa: Many ecobee models have Alexa built-in, essentially turning your thermostat into a smart speaker.
- Google Assistant: Enables seamless control via the Google Home app.
- IFTTT: For advanced users, this allows for complex automation “recipes” (e.g., “If the outdoor air quality is poor, turn off the HVAC intake”).
Troubleshooting and Optimizing Your Smart Climate Control
Post-installation, the focus shifts to optimization. The ecobee is more than a remote-controlled switch; it is a data-driven tool designed to improve efficiency through advanced software features.
Calibrating Room Sensors
One of ecobee’s standout technical advantages is the use of remote Room Sensors. These sensors communicate via a proprietary sub-GHz wireless protocol to provide occupancy and temperature data from rooms other than where the thermostat is located. By placing a sensor in a drafty bedroom or a sun-drenched office, the ecobee can average the temperatures or prioritize the “occupied” room, solving the technical limitation of single-point sensing.
Troubleshooting Common Issues
If the device fails to power on, the most common technical culprit is a tripped “float switch” in your furnace’s condensate pan (caused by water buildup) or a loose C-wire connection. If the Wi-Fi signal is weak, consider the physical environment; large metal objects or thick plaster walls can interfere with the internal antenna.
Leveraging Smart Features
Finally, delve into the “Smart Features” menu. Enable Smart Recovery, which allows the thermostat to learn how long it takes to heat or cool your home, ensuring it reaches your desired temperature exactly at the scheduled time. Explore Eco+, a suite of software optimizations that analyze local weather patterns and electricity TOU (Time of Use) rates to minimize energy consumption without sacrificing comfort.
By following this technical guide, you have transformed your home’s climate management from a manual chore into a sophisticated, automated system. The ecobee isn’t just a gadget on the wall; it is a central hub for home efficiency, powered by thoughtful engineering and user-centric design.
aViewFromTheCave is a participant in the Amazon Services LLC Associates Program, an affiliate advertising program designed to provide a means for sites to earn advertising fees by advertising and linking to Amazon.com. Amazon, the Amazon logo, AmazonSupply, and the AmazonSupply logo are trademarks of Amazon.com, Inc. or its affiliates. As an Amazon Associate we earn affiliate commissions from qualifying purchases.