In an age where technology seamlessly integrates into every aspect of our lives, the convenience of starting your car with the push of a button from afar is no longer a luxury but an increasingly common expectation. Whether you’re battling a scorching summer heatwave or bracing against a frigid winter chill, an aftermarket remote start system offers the unparalleled comfort of a pre-conditioned vehicle. While many might assume this modern amenity requires a costly professional installation, the truth is that with the right tools, a bit of patience, and a comprehensive guide, installing an aftermarket remote start system is a highly achievable DIY project. Not only does tackling this project yourself offer significant cost savings—a key consideration for personal finance—but it also provides an invaluable opportunity to understand the intricate electronics that power your vehicle. This guide will walk you through the essential steps, from understanding the technology to the final test, ensuring you can confidently and safely equip your car with this fantastic piece of automotive tech.
Understanding Your Remote Start System: The Tech Behind the Convenience
Before diving into the intricate world of automotive wiring, it’s crucial to grasp the fundamental concepts and components of an aftermarket remote start system. This preliminary understanding forms the bedrock of a successful installation, ensuring compatibility and efficient operation.
Types of Remote Start Systems and Their Components
Aftermarket remote start systems come in various configurations, each offering a different level of functionality and technological sophistication:
- 1-Way Systems: These are the most basic and typically most affordable. They send a signal from your remote to the car to start it, but they don’t send feedback. You press the button and hope the car starts.
- 2-Way Systems: A significant upgrade, 2-way systems provide feedback to your remote. After you press the start button, the remote will confirm (often with a light, sound, or text on an LCD screen) that the car has started and locked. This feedback mechanism enhances user confidence and is a prime example of effective modern tech integration.
- Smartphone-Controlled Systems: Representing the pinnacle of convenience and connectivity, these systems integrate with a telematics module and an app on your smartphone. They allow you to start, lock, unlock, and even track your vehicle from virtually anywhere with cellular service. This taps directly into the trend of smart home and IoT devices, extending digital control to your vehicle.
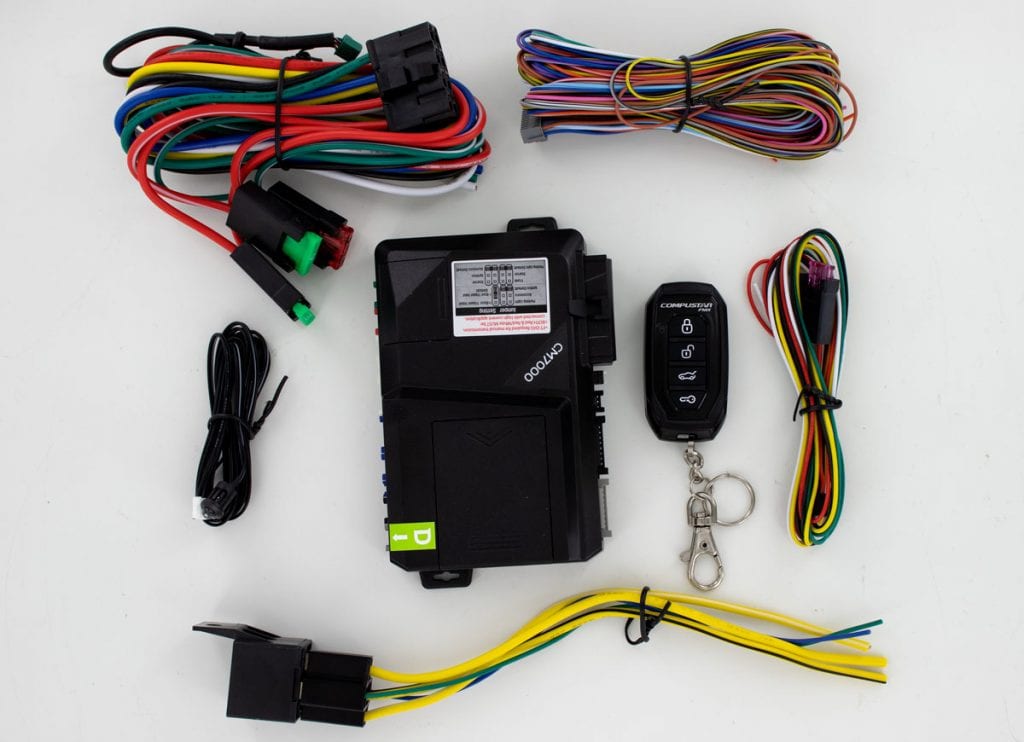
Regardless of the type, several core components are common to most systems:
- Main Control Module: The “brain” of the system, responsible for processing signals and controlling vehicle functions.
- Wiring Harness: A complex bundle of wires designed to connect the control module to your vehicle’s various electrical systems.
- Antenna: Receives signals from your remote or smartphone module.
- Remote Fobs: The physical handheld devices (for 1-way and 2-way systems) used to send commands.
- Bypass Module (Immobilizer Interface): A critical component for newer vehicles. Most modern cars have an immobilizer system that prevents the engine from starting without the correct key. The bypass module temporarily “tricks” the car into thinking the correct key is present, allowing the remote start to function. This component highlights the blend of security and convenience inherent in these systems.
Essential Compatibility Checks and Tools You’ll Need
Before purchasing a system, thorough compatibility checks are non-negotiable. You’ll need to confirm the system is suitable for your vehicle’s specific year, make, and model. Key considerations include:
- Key Type: Does your car use a traditional metal key, a transponder key, or a push-to-start button? This directly impacts the type of bypass module required.
- Immobilizer System: Nearly all modern vehicles have one. Identifying its presence and type is crucial for selecting the correct bypass.
- Vehicle-Specific Wiring: Every car is different. Accessing detailed wiring diagrams for your exact vehicle is paramount. Many online resources and specialized databases provide this information.
Once compatibility is confirmed, assembling the right toolkit is your next step. Investing in quality tools not only makes the job easier but also ensures a safer and more professional outcome. Essential tools include:
- Wire Strippers and Crimpers: For cleanly preparing and connecting wires. Precision here prevents future electrical issues.
- Multimeter: An indispensable diagnostic gadget for testing voltage, continuity, and polarity of wires. This tool is your best friend for identifying the correct wires in your car’s complex harness.
- Soldering Iron and Solder: While some prefer crimping, soldering provides the most robust and secure electrical connections, minimizing resistance and potential points of failure—a mark of true digital security and reliability.
- Electrical Tape and Heat Shrink Tubing: For insulating and protecting all connections.
- Zip Ties: For neatly routing and securing wires, preventing rattles and damage.
- Panel/Trim Removal Tools: Plastic pry tools are vital for safely disassembling interior panels without scratching or damaging them.
- Power Drill (with small bits): For mounting the main module securely.
- Safety Glasses: Eye protection is non-negotiable when working with tools and electrical systems.
Pre-Installation Preparation: Laying the Groundwork for Success
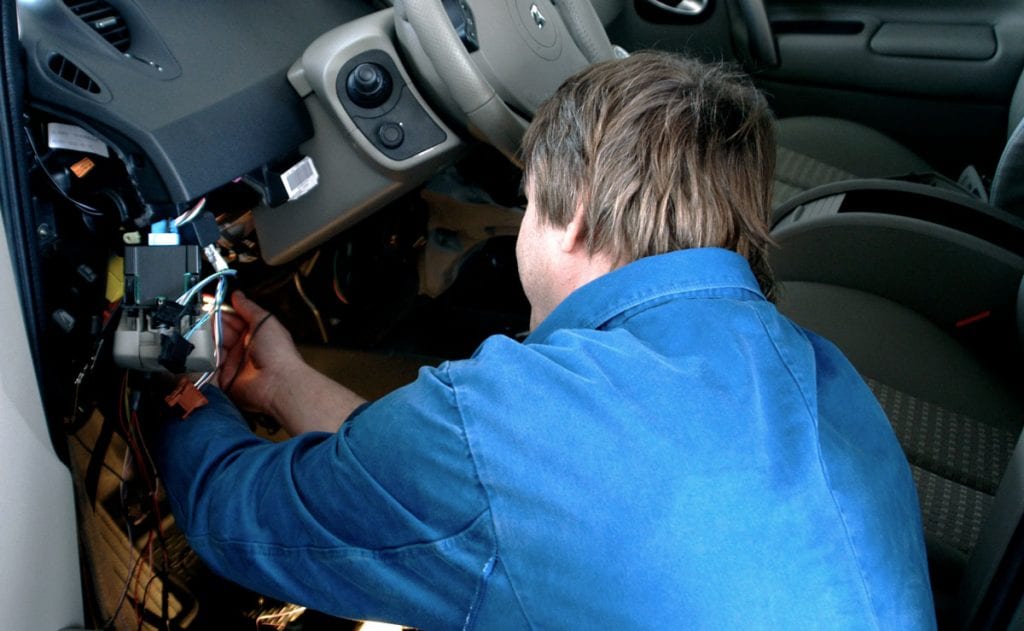
A well-prepared installation is a successful one. This phase focuses on safety, accurately identifying your vehicle’s electrical arteries, and meticulously preparing your remote start system’s wiring harness. Skipping these critical steps can lead to frustration, damage, or even electrical hazards.
Safety First: Disconnecting Power
The absolute first step in any automotive electrical work is to disconnect the vehicle’s battery. This is not merely a recommendation; it’s a fundamental safety precaution. Working on live electrical circuits poses risks of short circuits, damage to your vehicle’s sensitive electronics, and even serious personal injury. Locate your car’s battery (usually under the hood, but sometimes in the trunk or under a seat), and disconnect the negative (-) terminal first, followed by the positive (+) terminal. Secure the cables away from the battery posts to prevent accidental reconnection. This simple act safeguards both you and your vehicle’s electrical system throughout the installation process.
Decoding Your Vehicle’s Wiring: The Digital Blueprint
This is arguably the most critical and time-consuming part of the installation. Your vehicle’s wiring is its central nervous system, and connecting your aftermarket remote start requires tapping into specific “nerves.” You’ll need to identify the following key wires, ideally using vehicle-specific wiring diagrams found online or through specialized automotive resources:
- Constant 12V (Battery Positive): This wire provides continuous power to the remote start module, typically found at the ignition switch harness. Use your multimeter to confirm it has a constant 12V supply even with the ignition off.
- Ground: A secure connection to the vehicle’s chassis or a dedicated ground wire. Use your multimeter for continuity to ensure a good ground.
- Ignition Wires (Ignition 1, Ignition 2/Accessory): These wires power the vehicle’s electrical systems when the key is turned to the “on” or “accessory” positions. Your remote start needs to mimic these actions.
- Starter Wire: This wire sends power to the starter motor, engaging the engine. The remote start needs to pulse this wire to crank the engine.
- Accessory Wires: Power non-essential accessories like the radio or climate control when the key is in the accessory position.
- Brake Wire: The remote start system needs to detect when the brake pedal is pressed (typically to disengage remote start or for safety interlocks).
- Door Lock/Unlock Wires: If your remote start system includes door lock control, you’ll need to tap into these.
- Parking Light Wires: For visual confirmation that the car has started and for illumination during remote start.
- Horn Wire: Some systems offer a horn honk confirmation feature.
Using your multimeter, carefully test each identified wire. For example, test constant 12V for a steady 12V reading, ignition wires for 12V when the key is on, and the starter wire for 12V only when the key is in the start position. Pay close attention to wire colors, locations, and functions to avoid misconnections, which can lead to system malfunction or damage.
Preparing Your System’s Wiring Harness
With your vehicle’s wires identified, the next step is to prepare the remote start system’s wiring harness. This involves making your connections neat, organized, and secure.
- Labeling: As you identify and test each wire in your vehicle, label it clearly with masking tape. Do the same for the corresponding wires on your remote start harness. This prevents confusion later on.
- Pre-connecting Common Grounds: Many remote start systems have multiple ground wires. If your vehicle has a good chassis ground point, you can bundle and solder/crimp these together into a single, robust ground connection point, reducing clutter.
- Wire Length Adjustment: Measure and trim the remote start wires to the appropriate length for connection to your vehicle’s wires. Leave a little slack for flexibility but avoid excessive length, which can be messy and create potential interference.
- Stripping Wires: Carefully strip a small section of insulation from the ends of both your vehicle’s wires and the remote start wires. Ensure you don’t cut any strands of copper, as this weakens the connection.
This meticulous preparation, while time-consuming, significantly streamlines the actual installation phase and minimizes the chances of errors. It’s an investment in precision and digital security, ensuring the longevity and reliability of your new remote start system.
The Installation Process: Step-by-Step Integration

With all the groundwork laid, the actual installation involves connecting the remote start module to your vehicle’s electrical system. This phase requires careful attention to detail and secure connections to ensure proper functionality and safety.
Mounting the Core Module and Power Connections
First, select an appropriate mounting location for the main control module. It should be:
- Secure: Away from moving parts, pedals, and excessive vibration.
- Hidden: Out of sight to deter theft.
- Accessible (initially): Easy to reach for wiring and programming.
- Protected: Away from direct heat sources, moisture, and extreme temperature fluctuations. Many installers choose to mount it securely behind the dash, using zip ties or screws to fix it in place.
Once the module is mounted, begin with the primary power connections:
- Ground Wire: Connect the remote start system’s main ground wire(s) to a solid chassis ground point on your vehicle. Ensure it’s a metal-to-metal connection for optimal conductivity. A poor ground is a common source of electrical issues.
- Constant 12V Power: Connect the remote start’s constant 12V power wire(s) to the vehicle’s constant 12V wire, identified earlier. These connections are typically made at the ignition harness. Ensure these connections are robust, as they supply the module with continuous power.
For all connections, you have two primary methods: crimping or soldering. While crimping with high-quality connectors can be effective, soldering and then insulating with heat-shrink tubing provides the most reliable and durable connection, crucial for long-term electrical integrity in a vibration-prone automotive environment. This level of technical execution ensures the system’s digital security and longevity.
Integrating with Your Vehicle’s Ignition and Control Systems
This is where the remote start system truly takes over your vehicle’s operational functions. You will connect the remote start module to the wires that control ignition, accessories, and the starter motor:
- Ignition Wires: Connect the remote start’s ignition wires (Ignition 1, Ignition 2/Accessory, etc., depending on your system and vehicle) to the corresponding wires in your vehicle’s ignition harness. These connections tell the car to “turn on” its electrical systems when remotely started.
- Starter Wire: Carefully connect the remote start’s starter output wire to your vehicle’s main starter wire. This connection is responsible for sending the signal to crank the engine. Some vehicles may require a “starter kill” or “anti-grind” wire to prevent the starter from engaging while the engine is already running. Consult your specific system and vehicle diagrams.
- Accessory Wires: Connect the remote start’s accessory output wires to your vehicle’s accessory wires. This ensures that features like the radio and climate control fan turn on when the car is remotely started, enhancing the comfort aspect of the system.
- Control Wires: Proceed to connect the system’s control wires:
- Brake Switch: Tap into the positive output of your vehicle’s brake switch. This is a vital safety interlock, ensuring the car cannot be put into gear while remotely started without the brake pedal being pressed first.
- Parking Lights: Connect to your vehicle’s parking light wire (either positive or negative trigger, depending on your car). This provides visual confirmation that the remote start has activated.
- Door Lock/Unlock: If your system includes this feature, tap into the appropriate lock and unlock wires.
- Horn/Siren: Connect if you desire horn honk confirmation or if your system includes an alarm siren.
Addressing Security: The Bypass Module and Antenna Placement
For vehicles equipped with a factory immobilizer system, the bypass module is indispensable. Without it, your remote start will likely crank but not start, as the car’s security system will detect the absence of the correct transponder key.
- Install Bypass Module: Follow the specific instructions for your chosen bypass module. This typically involves connecting it to the vehicle’s data wires (CAN bus, data wire, or immobilizer wire) and sometimes requires “learning” the vehicle’s key by placing a spare key in a specific location or using a programming procedure. The bypass module temporarily emulates the key’s presence, allowing the remote start to operate.
- Antenna Placement: The antenna’s placement is crucial for optimal remote range and performance. Mount it securely to the top edge of the windshield or on a non-metallic surface within the dash, away from metal obstructions and other electronic components that could cause interference. Ensure it’s not obscured by window tint or metallic coatings. Proper antenna placement is a key factor in the system’s overall reliability and user experience.
Throughout this stage, take great care to double-check every connection against your wiring diagrams. Loose or incorrect connections are the primary causes of system failure and troubleshooting headaches.
Post-Installation and Troubleshooting: Ensuring Flawless Operation
After completing all physical connections, the work isn’t quite finished. This final phase involves reconnecting power, programming the system, thoroughly testing all functions, and knowing how to address common issues.
Finalizing Connections and System Programming
- Reconnect the Battery: Once all wires are securely connected, insulated, and neatly routed with zip ties, it’s time to reconnect your vehicle’s battery. Connect the positive (+) terminal first, then the negative (-) terminal. You may hear some clicks or see dashboard lights momentarily flicker as the vehicle’s systems power up.
- System Programming: Most aftermarket remote start systems require a programming sequence. This typically involves a series of steps detailed in the remote start module’s instruction manual, such as pressing buttons on the module, turning the ignition key to specific positions, or pressing buttons on the remote fobs. This step “marries” the remote fobs to the main module and configures vehicle-specific settings (e.g., crank time, door lock delays). Pay close attention to these instructions, as incorrect programming will prevent the system from working. If you’re using a smartphone-controlled system, you’ll also need to activate and configure the associated app.
Testing and Basic Troubleshooting
With programming complete, it’s time for the moment of truth: comprehensive testing.
- Initial Remote Start: Step out of the vehicle and attempt a remote start.
- Does the vehicle respond? Do the parking lights flash?
- Does the engine crank? Does it start and stay running?
- If you have a 2-way remote, does it provide feedback that the car has started?
- Test Safety Features:
- With the car running via remote start, approach the vehicle and unlock the doors.
- Open the door (the engine should shut off automatically – a crucial safety feature).
- Enter the vehicle, insert your key, turn it to the “on” or “run” position, and press the brake pedal (the engine should seamlessly transfer from remote start to key operation, or shut off if programmed to do so).
- Ensure the car cannot be put into gear without the key being in the ignition and the brake pedal pressed.
- Test All Functions: Check door locks/unlocks, trunk release (if connected), and any other features your system offers.
Common Issues and Troubleshooting Steps:
- Engine Cranks but Doesn’t Start: This often points to an immobilizer issue. Recheck your bypass module installation and programming.
- No Crank/No Response:
- Check all power and ground connections for looseness or corrosion.
- Verify the vehicle’s battery is fully charged.
- Check the main fuse(s) for the remote start system.
- Recheck wiring to the starter wire and ignition wires.
- Remote Range Issues:
- Ensure the antenna is properly mounted and not obstructed by metal.
- Check for local radio interference.
- System Disables Too Quickly/Unexpectedly: Recheck the brake wire connection and programming settings for safety shutdowns.
- Parking Lights Don’t Flash: Verify connection to the parking light wire and check its polarity (positive vs. negative trigger).
If you encounter persistent problems, revisit your wiring diagrams, meticulously check each connection, and consult the troubleshooting section of your remote start system’s manual. A multimeter remains your most valuable diagnostic tool here, helping you trace power flows and identify breaks in continuity.
Conclusion
Installing an aftermarket remote start system is a rewarding endeavor that combines technological savvy with practical application. By carefully navigating the steps from understanding system components and conducting thorough compatibility checks to meticulously connecting wires and performing comprehensive post-installation tests, you can successfully integrate this powerful piece of technology into your vehicle.
Beyond the undeniable convenience of a pre-conditioned car, undertaking this DIY project offers tangible benefits: significant cost savings compared to professional installation, a deeper understanding of your vehicle’s electrical systems, and the satisfaction of enhancing your daily driving experience with modern tech. While the process demands attention to detail and adherence to safety protocols, the result is a valuable upgrade that puts ultimate control and comfort at your fingertips. Remember, safety always comes first; if you ever feel out of your depth, don’t hesitate to seek assistance from a certified automotive technician. Embrace the tech, save some money, and enjoy the convenience!
aViewFromTheCave is a participant in the Amazon Services LLC Associates Program, an affiliate advertising program designed to provide a means for sites to earn advertising fees by advertising and linking to Amazon.com. Amazon, the Amazon logo, AmazonSupply, and the AmazonSupply logo are trademarks of Amazon.com, Inc. or its affiliates. As an Amazon Associate we earn affiliate commissions from qualifying purchases.