The Android ecosystem is celebrated for its openness and versatility, offering a level of customization that remains unrivaled in the mobile industry. For developers, power users, and tech enthusiasts, the true potential of an Android device is unlocked through a command-line utility known as the Android Debug Bridge (ADB). Whether you are looking to sideload an application, manage system files, or dive into the world of custom ROMs, ADB is the essential gateway. This guide provides an in-depth, professional tutorial on how to install ADB on Windows, ensuring you have the technical foundation to master your digital environment.
Understanding the Role of ADB in the Android Ecosystem
Before diving into the technical installation, it is crucial to understand what ADB is and why it occupies such a central role in Android development and device management. ADB is a versatile command-line tool that lets you communicate with a device. The ADB command facilitates a variety of device actions, such as installing and debugging apps, and it provides access to a Unix shell that you can use to run a variety of commands on a device.
What is ADB?
ADB operates on a client-server architecture. It includes three components:
- A client, which sends commands. The client runs on your development machine (your Windows PC). You can invoke a client from a command-line terminal by issuing an ADB command.
- A daemon (adbd), which runs commands on a device. The daemon runs as a background process on each device.
- A server, which manages communication between the client and the daemon. The server runs as a background process on your development machine.
By understanding this hierarchy, users can better troubleshoot issues. When you type a command in Windows, the client sends it to the server, which then identifies the connected Android device and passes the instruction to the daemon.
Why You Need ADB on Your Windows Machine
For the average user, the standard interface of Android is sufficient. However, the professional and the enthusiast require more. ADB allows for:
- Sideloading Apps: Installing APKs that are not available on the Play Store or testing your own builds.
- System Refinement: Removing “bloatware” (pre-installed carrier apps) without needing to root the device.
- Advanced Recovery: Booting into Recovery mode or Fastboot mode when the physical buttons are unresponsive or the OS is stuck in a boot loop.
- Logcat Analysis: Viewing real-time system logs to diagnose why an app is crashing or why the system is lagging.
Prerequisites and Initial Setup
Installing ADB on Windows is a two-part process. You must prepare the “host” (your Windows PC) and the “target” (your Android device). Without proper configuration on the Android side, the Windows machine will fail to establish a secure handshake.
Enabling Developer Options on Your Android Device
By default, Android hides its most powerful tools to prevent accidental system damage. To reveal them, follow these steps:
- Open Settings on your Android device.
- Navigate to About Phone (usually at the bottom of the menu).
- Locate the Build Number.
- Tap the Build Number seven times. You will see a toast notification saying, “You are now a developer!”
- Return to the main Settings menu and navigate to System > Developer Options (on some devices, this may be under “Additional Settings”).
Activating USB Debugging
Once the Developer Options are visible, you must enable the specific protocol that allows a PC to send commands via USB.
- Enter the Developer Options menu.
- Scroll down to the Debugging section.
- Toggle the switch for USB Debugging.
- A prompt will appear asking for confirmation; tap OK.
At this stage, your device is ready to listen for instructions. However, it will not trust your PC until you provide authorization during the first connection attempt later in the process.
Step-by-Step Installation of ADB on Windows

Google provides the necessary files via the “Platform-Tools” package. While there are many “15-second ADB installers” available online from third parties, it is a professional best practice to download the official tools directly from Google to ensure security and compatibility.
Downloading the Android SDK Platform-Tools
- Visit the official Android Developer website.
- Locate the section for “Download SDK Platform-Tools for Windows.”
- Review the terms and conditions, check the agreement box, and click the download button.
- The download will be a ZIP file (e.g.,
platform-tools_r34.0.4-windows.zip).
Extracting and Organizing the Files
Since ADB is a command-line tool, you don’t “install” it in the traditional sense like a standard Windows application (.exe). Instead, you extract it and point your system toward it.
- Right-click the downloaded ZIP file and select Extract All.
- Choose a location that is easy to access. A professional recommendation is to place it at the root of your C: drive, such as
C:adb. Avoid burying it deep in “Downloads” or “Desktop” folders to prevent long file paths that can sometimes cause issues in the command prompt. - Once extracted, you should see files such as
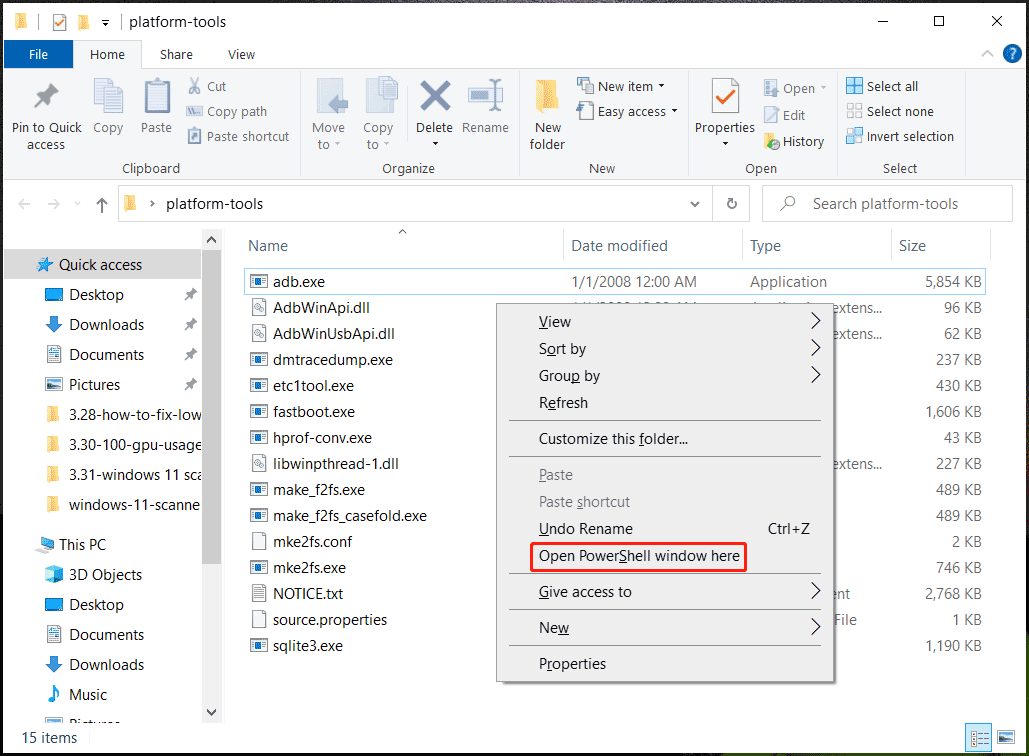
adb.exe,fastboot.exe, and several DLL files inside the folder.
Testing the Connection
To ensure the files are working and the device is recognized:
- Connect your Android device to your Windows PC using a high-quality USB cable.
- Open the
C:adbfolder. - Hold Shift and Right-click on an empty space inside the folder, then select Open PowerShell window here or Open Command Prompt window here.
- Type the following command and press Enter:
.adb devices
(Note: In Command Prompt, you can just typeadb devices. In PowerShell, the.is required.) - Look at your phone screen. A prompt will appear: “Allow USB Debugging?” Check the box “Always allow from this computer” and tap Allow.
- Run the command again. You should see a serial number followed by the word “device.” This confirms the connection is successful.
Optimizing the Workflow: Adding ADB to Windows System Path
While the previous step works, it is inconvenient to navigate to C:adb every time you want to run a command. By adding the folder to your Windows System Path, you can run ADB commands from any directory or folder in the Command Prompt.
Navigating Environment Variables
- Press the Windows Key and type “Environment Variables.”
- Select Edit the system environment variables.
- In the System Properties window, click the Environment Variables button near the bottom.
- Under the System variables section, find the variable named Path and select it. Click Edit.
- Click New and type the path where you extracted the tools:
C:adb. - Click OK on all three windows to save the changes.
Verifying Global Access via Command Prompt
To confirm that Windows now recognizes ADB globally:
- Close any open Command Prompt or PowerShell windows.
- Press Windows Key + R, type
cmd, and press Enter. - Type
adb versionand press Enter. - If the system returns the version number of the Android Debug Bridge, the installation is complete and optimized. You can now use ADB from any folder on your computer.
Troubleshooting and Best Practices for Digital Security
Even with a straightforward installation, technical hurdles can arise. Understanding how to troubleshoot and secure your connection is what separates a casual user from a professional.
Common Connectivity Issues and Driver Fixes
If adb devices returns an empty list or says “unauthorized,” consider the following:
- USB Connection Mode: Some devices require the USB mode to be set to “File Transfer” or “MTP” rather than just “Charging.” Check the notification shade on your phone.
- OEM Drivers: Windows usually installs generic drivers, but brands like Samsung, Google (Pixel), or Xiaomi may require specific OEM drivers. Visit the manufacturer’s website to download the “USB Drivers for Windows.”
- Cable Quality: Many “charging cables” do not have data lines. Ensure you are using a data-sync capable USB cable.
Ensuring Security While Using ADB
ADB is a powerful tool that bypasses many user-interface security layers. To maintain digital security:
- Revoke Authorizations: If you use ADB on a public or shared computer, go to Developer Options on your phone and select Revoke USB debugging authorizations.
- Disable When Not in Use: Do not leave USB Debugging enabled permanently. Turn it off when you are not actively debugging to prevent unauthorized access if your phone is lost or stolen.
- Official Sources: Only download platform tools from Google. Third-party “toolkits” often bundle outdated versions or, worse, malicious scripts that can compromise your Windows system or Android device.
By following this guide, you have not only installed a piece of software but have also integrated a powerful development tool into your Windows environment. Whether you are optimizing your device’s performance or developing the next great mobile application, your Windows machine is now fully equipped to bridge the gap to the Android subsystem.
aViewFromTheCave is a participant in the Amazon Services LLC Associates Program, an affiliate advertising program designed to provide a means for sites to earn advertising fees by advertising and linking to Amazon.com. Amazon, the Amazon logo, AmazonSupply, and the AmazonSupply logo are trademarks of Amazon.com, Inc. or its affiliates. As an Amazon Associate we earn affiliate commissions from qualifying purchases.