In the rapidly evolving landscape of personal computing, few upgrades offer as much immediate “bang for your buck” as increasing your system’s Random Access Memory (RAM). Whether you are a creative professional rendering high-resolution 8K video, a competitive gamer seeking to eliminate stutter, or a power user who keeps dozens of browser tabs open while running virtual machines, the amount and speed of your RAM serve as the primary bottleneck for multitasking. While the prospect of opening a computer case and touching sensitive electronic components can be daunting for the uninitiated, installing a stick of RAM is one of the most straightforward and rewarding hardware procedures. This guide provides a professional, deep-dive walkthrough into the technical nuances of memory installation, ensuring your system achieves peak stability and performance.
Understanding the Architecture: Pre-Installation Strategy and Compatibility
Before you even pick up a screwdriver, you must navigate the complex landscape of memory compatibility. Installing the wrong type of RAM can result in a system that refuses to boot or, worse, physical damage to the motherboard slots. The first step in any tech upgrade is a thorough audit of your existing hardware environment.
Identifying Your Motherboard and CPU Limitations
Every motherboard has a maximum capacity and a specific generation of memory it supports. Modern systems typically utilize DDR4 or the newer, faster DDR5 standard. These generations are not backward compatible; a DDR5 stick will not physically fit into a DDR4 slot due to the placement of the “key” (the notch in the middle of the contact pins). Furthermore, your processor’s memory controller dictates the maximum speed (measured in MT/s or MHz) that can be officially supported. Using tools like CPU-Z or checking your motherboard manufacturer’s QVL (Qualified Vendor List) is essential to ensure the RAM you purchase will run at its advertised speeds without instability.
Form Factors: DIMM vs. SO-DIMM
Desktop computers utilize DIMM (Dual In-line Memory Module) sticks, which are long and typically feature heat spreaders in high-performance kits. Laptops and small-form-factor PCs (like Intel NUCs) use SO-DIMM (Small Outline DIMM) modules, which are roughly half the length. When following a tutorial on how to install a stick of RAM, ensure you have purchased the correct form factor for your specific device.
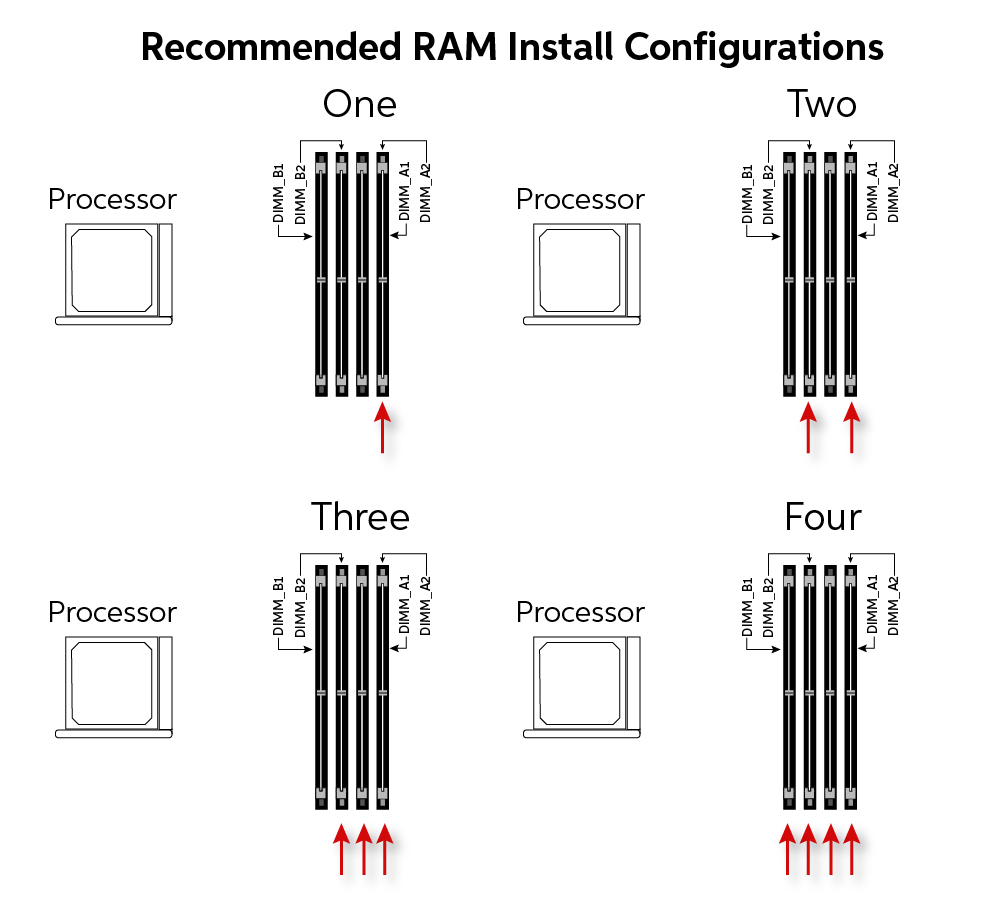
Capacity and Channel Configuration
While it is possible to install a single stick of RAM, modern architectures are designed for “Dual-Channel” or even “Quad-Channel” configurations. This allows the CPU to communicate with two or more sticks of RAM simultaneously, effectively doubling the data bandwidth. If your motherboard has four slots, you generally want to install sticks in pairs (slots 2 and 4 are common defaults) to trigger this performance boost. Mixing brands, speeds, or capacities is generally discouraged, as the system will default to the lowest common denominator, potentially causing timing mismatches and system crashes.
The Physical Installation: A Meticulous Walkthrough
Once you have verified compatibility and have your new memory modules in hand, it is time to perform the physical installation. Precision and cleanliness are the hallmarks of a professional hardware technician.
Workspace Preparation and Electrostatic Discharge (ESD) Safety
Static electricity is the silent killer of sensitive silicon components. Before touching your RAM or the interior of your PC, ensure you are working in a non-carpeted area. A wooden or plastic table is ideal. To prevent ESD, use an anti-static wrist strap connected to a grounded metal object, or frequently touch the metal chassis of your computer case while it is plugged in (but turned off) to equalize your electrical potential. Ensure the power supply is switched to the “Off” position and the power cable is removed to prevent any residual current from damaging components during the swap.
Accessing the Motherboard and Locating Slots
Open your case by removing the side panel—usually held by thumb screws. Once inside, locate the RAM slots, which are typically situated to the right of the CPU cooler. If you are replacing old RAM, you must press down on the small plastic tabs at either end of the slot to release the current stick. For new installations, identify the correct slots based on your motherboard manual to ensure dual-channel operation.
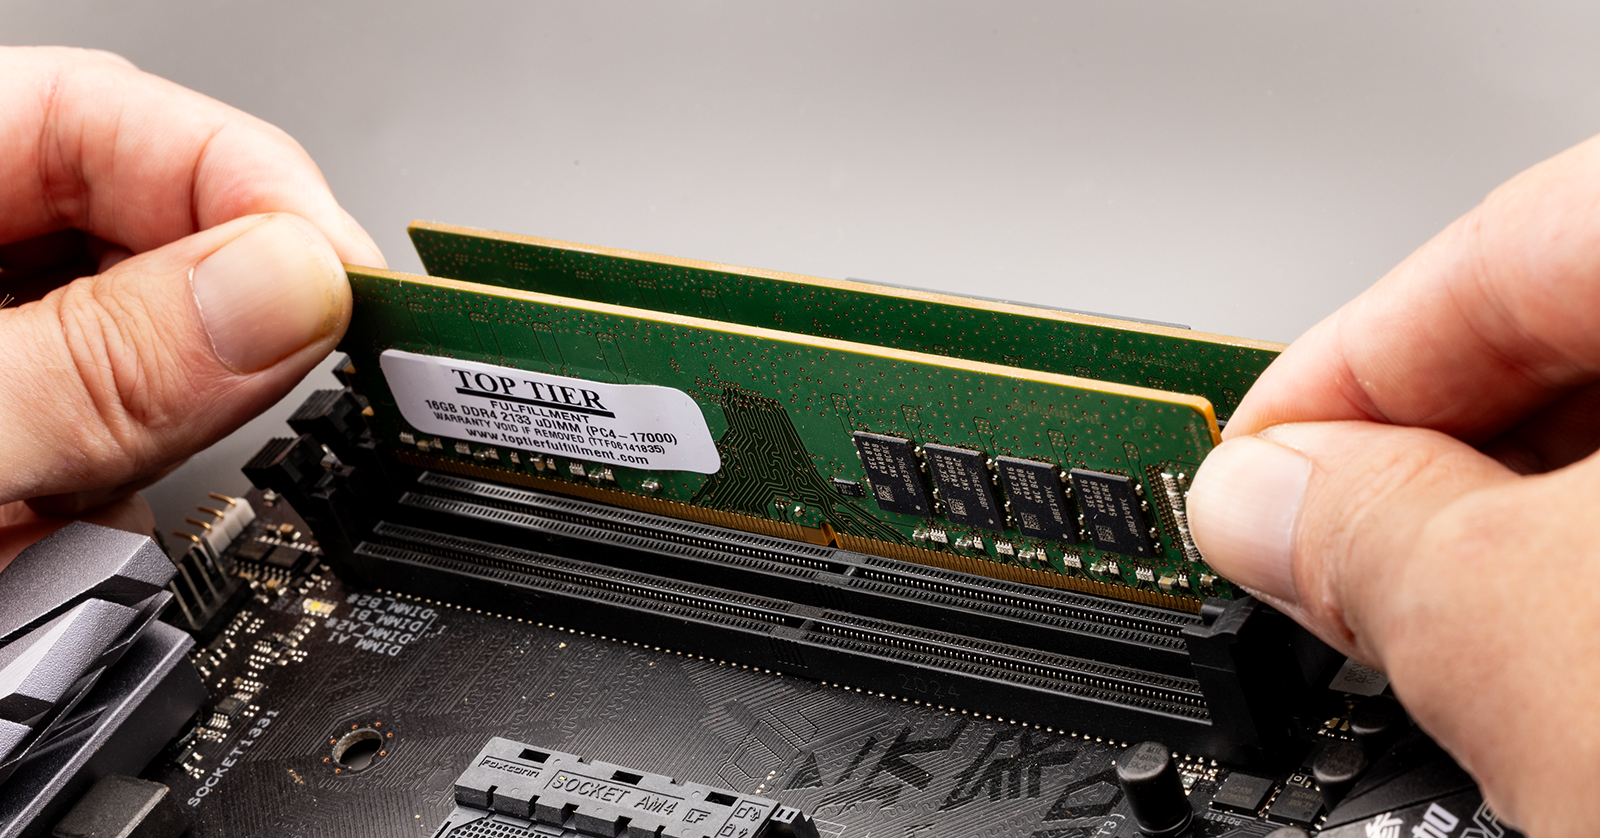
Seating the Module: The “Click” of Success
Align the notch on the bottom of the RAM stick with the rise in the motherboard slot. This notch is off-center to ensure the RAM cannot be installed backward. Once aligned, place the stick into the slot and apply firm, even pressure on both ends simultaneously. You should hear a distinct “click” as the side tabs snap into place, locking the module. If the tabs do not snap back automatically, the RAM is likely not fully seated. Avoid forcing the module; if it doesn’t go in with moderate pressure, double-check the notch alignment.
Software Configuration and Performance Optimization
Physical installation is only half the battle. To ensure the system recognizes the new hardware and utilizes its full potential, you must interact with the system’s firmware and operating system tools.
Entering the BIOS/UEFI for Initial Verification
Immediately after installing the RAM, plug the PC back in and boot it up while repeatedly tapping the ‘Delete’ or ‘F2’ key to enter the BIOS/UEFI. This is the low-level software that manages your hardware. The first screen should display the total amount of memory detected. If you installed 16GB but the BIOS only shows 8GB, one of your sticks is either faulty or not seated correctly.
Enabling XMP, DOCP, or EXPO Profiles
By default, most RAM will run at a “safe” JEDEC speed, which is often much lower than the speed advertised on the box. To get the performance you paid for, you must enable a memory profile. On Intel systems, this is called XMP (Extreme Memory Profile); on AMD, it might be called DOCP or EXPO. Enabling this profile tells the motherboard to automatically adjust the voltage and timings to the manufacturer’s optimized settings. Without this step, your high-performance 3600MHz RAM might be languishing at a mere 2133MHz.
Stress Testing for Stability
Once you have booted into Windows, Linux, or macOS, verify the installation through the OS. In Windows, you can open Task Manager (Ctrl+Shift+Esc), navigate to the “Performance” tab, and select “Memory.” This will show you the capacity and the current operating speed. For a truly professional setup, run a memory stress test using a tool like MemTest86 or Prime95 for a few hours. This ensures that the new RAM doesn’t have “silent” errors that could lead to data corruption or “Blue Screen of Death” (BSOD) errors during heavy workloads.
Troubleshooting Common RAM Installation Hurdles
Even with careful planning, hardware installation can encounter friction. Understanding how to diagnose these issues is what separates a novice from a tech professional.
The “No-Post” Scenario and Beep Codes
If your computer turns on but the screen remains black, you are experiencing a “No-Post” (Power-On Self-Test) failure. Many motherboards have small LED “Debug” lights or will emit a series of beeps to tell you what is wrong. A specific sequence of beeps often indicates a “Memory Not Detected” error. In this case, the first step is always to “reseat” the RAM—take it out and put it back in. Sometimes, microscopic dust on the gold contacts can prevent a solid connection.
Clearing the CMOS
If you changed settings in the BIOS that caused the system to become unstable, or if the motherboard is struggling to “train” the new memory, you may need to clear the CMOS. This resets the BIOS to factory defaults. You can do this by removing the small CR2032 coin-cell battery from the motherboard for 30 seconds or by shorting the “Clear CMOS” pins with a screwdriver. This often resolves compatibility loops where the motherboard is trying to apply old timings to new hardware.
Dealing with Mismatched Latency and Voltage
If you are adding a new stick of RAM to an existing one rather than replacing the whole kit, you may encounter stability issues if the CAS latency (CL) or voltages differ. High-end RAM might require 1.35V, while standard sticks run at 1.2V. If the motherboard fails to negotiate a middle ground, you may have to manually enter the timings in the BIOS. As a rule of professional practice, always try to buy “matched kits” (two sticks sold in one box) to guarantee they have been tested to work together perfectly.
The Future of Memory: Looking Toward New Horizons
The tech world never stands still, and memory technology is currently undergoing a significant transition. Understanding where the industry is headed can help you make better purchasing decisions today.
The Transition to DDR5 and Beyond
DDR5 is now the standard for both Intel’s and AMD’s latest platforms. It offers significantly higher bandwidth and features “On-Die ECC” (Error Correction Code), which improves reliability at high speeds. While DDR4 is still perfectly viable for budget builds, anyone looking to future-proof their system should look toward DDR5-compatible motherboards.

The Rise of CAMM2
In the laptop and mobile space, we are seeing the emergence of CAMM2 (Compression Attached Memory Module). This is a new form factor designed to replace SO-DIMM. It is thinner, allows for higher speeds, and provides better cooling. While not yet common in desktops, it represents the constant drive for efficiency and density in tech gadgets.
By following this guide, you have not just “installed a stick of RAM”—you have successfully executed a precision hardware upgrade. You have navigated the intricacies of compatibility, practiced safe physical handling, and optimized your software environment. This technical proficiency ensures that your computer remains a powerful tool, capable of handling the demanding software and AI-driven applications of the modern digital era. Whether for gaming, production, or general security through smoother system updates, a well-executed RAM upgrade is the foundation of a high-performance computing experience.
aViewFromTheCave is a participant in the Amazon Services LLC Associates Program, an affiliate advertising program designed to provide a means for sites to earn advertising fees by advertising and linking to Amazon.com. Amazon, the Amazon logo, AmazonSupply, and the AmazonSupply logo are trademarks of Amazon.com, Inc. or its affiliates. As an Amazon Associate we earn affiliate commissions from qualifying purchases.