The advent of the rearview camera has been a significant leap forward in automotive safety and convenience. Once a luxury feature found only in high-end vehicles, these cameras are now widely available and increasingly integrated into even entry-level models. The benefits are undeniable: reduced blind spots, easier parking, and a heightened awareness of your surroundings, especially crucial for avoiding accidents involving pedestrians, children, or low-lying obstacles. While professional installation is an option, understanding the process can empower you to undertake this upgrade yourself, saving money and gaining a deeper appreciation for your vehicle’s technology. This comprehensive guide will walk you through the essential steps of installing a rearview camera on your car, demystifying the process and making it accessible even for those with moderate DIY experience. We’ll cover everything from selecting the right camera system to routing wires and ensuring a secure, functional installation, all within the broader context of enhancing your car’s technological capabilities.
Understanding Your Rearview Camera System: Components and Considerations
Before you begin the physical installation, it’s crucial to familiarize yourself with the components of a typical rearview camera system and to make informed choices about the type of system that best suits your needs and your vehicle. Most aftermarket rearview camera kits will include the following key elements:
The Camera Itself
The camera is the eyes of your system. They come in various forms and functionalities:
- Mounting Style: Cameras can be designed to mount in several locations. Some are designed to replace your existing license plate light, offering a clean, factory-like integration. Others are surface-mounted, often adhered or screwed onto the bumper or trunk lid. Bullet-style cameras are also popular, offering a more robust and adjustable mounting option. Consider the aesthetics of your car and the ease of installation when choosing a mounting style.
- Field of View (FOV): This refers to how wide an angle the camera can see. A wider FOV (e.g., 150-170 degrees) provides a more comprehensive view of the area behind your car, significantly reducing blind spots. However, extremely wide-angle lenses can sometimes distort the image, making objects appear further away than they are. A balance is often best.
- Night Vision/Low-Light Performance: Look for cameras with good low-light performance or built-in infrared (IR) LEDs for effective night vision. This is crucial for safe backing up in dimly lit parking lots or at night.
- Waterproofing and Durability: Since the camera will be exposed to the elements, it’s essential to choose a unit with a high IP rating (e.g., IP67 or IP68) to ensure it’s waterproof and dustproof.
The Display Monitor
The monitor is where you’ll view the camera feed. Options range from simple, compact screens to more integrated solutions:
- Standalone Monitors: These are typically small screens that can be mounted on your dashboard or windshield. They often come with their own power source and can be easily wired into your car’s electrical system.
- Mirror Monitors: These replace your existing rearview mirror and integrate the display directly into the mirror itself. When the camera is active, the display appears on the mirror; otherwise, it functions as a regular mirror. This offers a very clean and unobtrusive integration.
- Head Unit Integration: If your car has an aftermarket head unit (stereo system) with a screen, many rearview cameras are designed to integrate directly with it. This is often the most seamless solution, as you won’t need an additional screen. Check your head unit’s specifications or consult its manual to confirm compatibility.
Wiring and Connectors
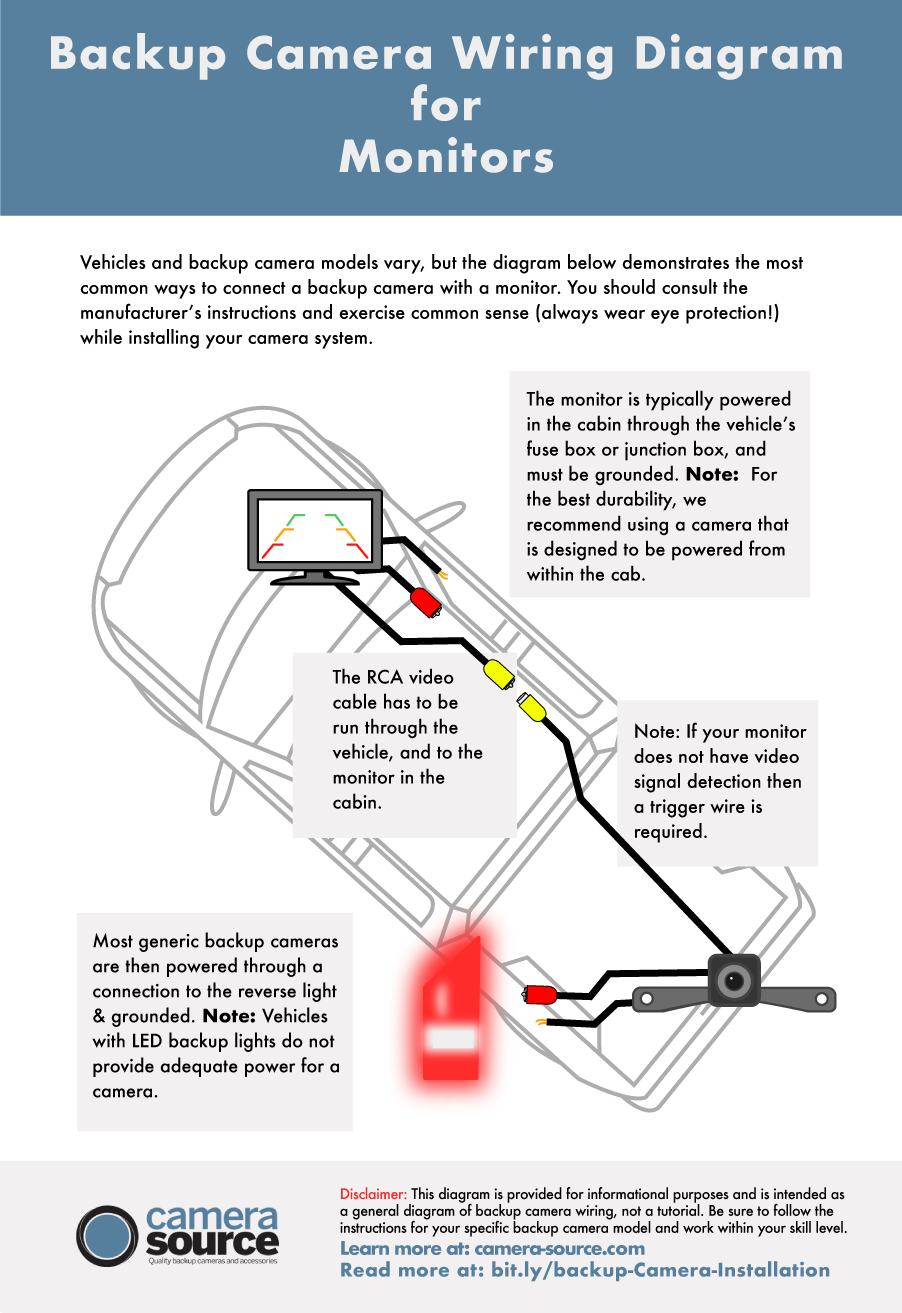
The wiring connects the camera to the monitor and the power source. Most systems use RCA connectors for the video signal, which are standard in most automotive audio/video applications. You’ll also need to run power wires to both the camera and the monitor.
Power Supply
Rearview cameras and monitors require power. This is typically drawn from your car’s electrical system. You’ll need to identify a suitable power source, usually related to your reverse lights or ignition.
Tools and Supplies
Beyond the camera kit, you’ll need a few basic tools:
- Wire Strippers and Crimpers: For connecting wires.
- Screwdrivers and Pliers: For removing trim panels and making adjustments.
- Drill and Drill Bits (if necessary): For mounting some types of cameras or running wires.
- Electrical Tape and Zip Ties: For securing wiring and ensuring a neat installation.
- Trim Panel Removal Tools: Plastic tools are ideal for prying open interior trim panels without causing damage.
- Multimeter (optional but recommended): To test for voltage and continuity, ensuring you’re connecting to the correct power sources.
Making an informed choice about your camera system is the first step towards a successful and satisfying installation. Consider your budget, the desired level of integration, and your car’s specific characteristics.
The Installation Process: A Step-by-Step Guide
Installing a rearview camera involves a series of methodical steps, from initial mounting to final wiring. Patience and attention to detail are key to achieving a professional and reliable result.
Step 1: Pre-Installation Planning and Camera Mounting
Before you start cutting or drilling, it’s wise to plan your wiring routes and determine the best location for your camera.
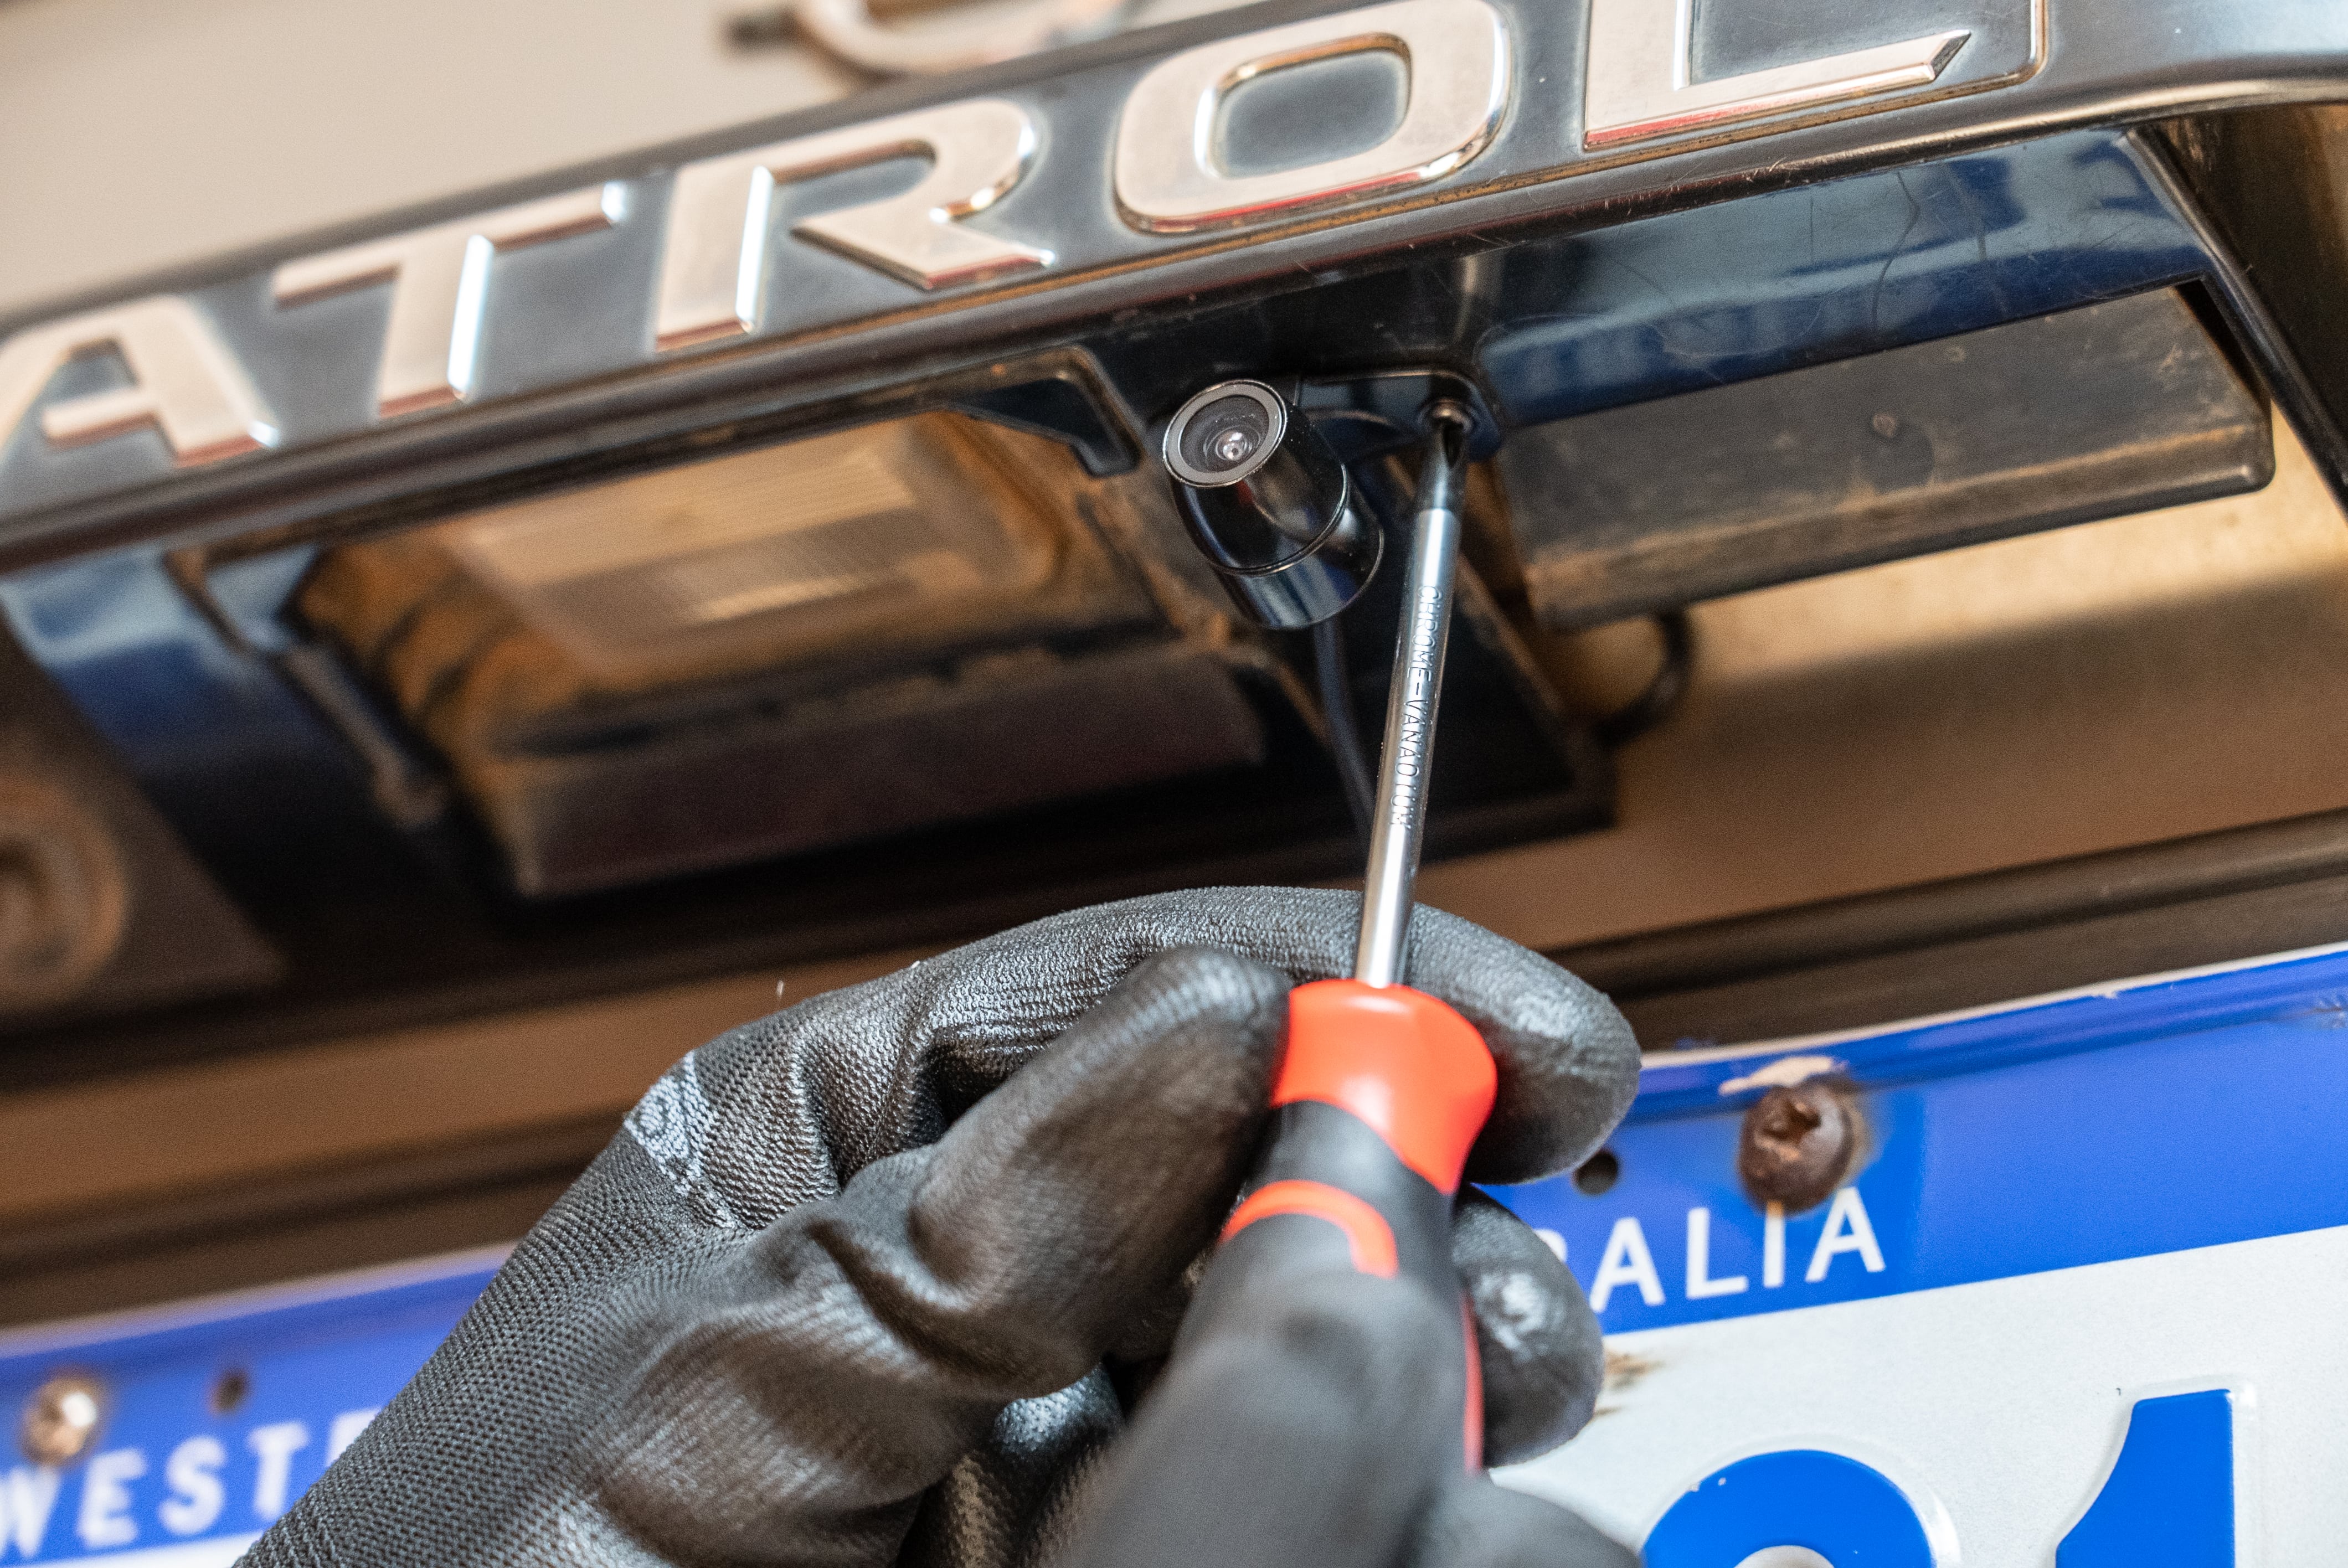
- Camera Placement: For license plate cameras, this is straightforward. For bumper or trunk lid mounted cameras, consider the cleanest and most unobtrusive location that still offers an optimal view of the area directly behind your vehicle. Ensure the mounting location won’t interfere with the trunk or tailgate operation.
- Drilling (if necessary): If your chosen camera requires drilling, measure carefully and mark your pilot hole location. Start with a small pilot hole to ensure accuracy before using a larger drill bit. If mounting through a metal panel, consider applying a touch of paint to the drilled hole to prevent rust.
- Initial Wiring Check: Before permanently mounting anything, it’s a good idea to temporarily connect your camera and monitor to a power source (e.g., a 12V battery or power adapter) to ensure they are functioning correctly. This helps troubleshoot any faulty components before you’ve invested significant time in installation.
Step 2: Running the Video Cable
The video cable carries the image from the camera to the monitor. This is often the most time-consuming part of the installation.
- Accessing Interior Panels: You’ll need to route the cable from the rear of the car to the front. This usually involves removing interior trim panels along the door sills, under the carpeting, or along the headliner. Use plastic trim removal tools to avoid scratching or damaging your car’s interior.
- Through the Trunk and Cabin: Most vehicles have a rubber grommet or a designated opening in the firewall or trunk bulkhead that allows for wiring to pass from the exterior to the interior. You may need to carefully push or pull the cable through this opening.
- Securing the Cable: As you run the cable, use zip ties to secure it to existing wiring harnesses or structural points in the vehicle. This prevents the cable from dangling, vibrating, or becoming a tripping hazard. Avoid routing the cable near hot engine components or moving parts.
Step 3: Powering the Camera and Monitor
Proper power connections are crucial for the system’s operation.
- Camera Power: The camera typically needs to be powered whenever the reverse lights are on. The easiest way to achieve this is to tap into the wiring for your reverse light. Locate the reverse light bulb socket and identify the positive (+) and negative (-) wires. You can use a multimeter to confirm which wire is positive when the reverse gear is engaged. Connect the camera’s power wire to the positive reverse light wire and the ground wire to the vehicle’s chassis ground.
- Monitor Power: The monitor will also need a power source. Depending on your monitor type, it may connect directly to the camera’s power harness, or it may have its own dedicated power and ground wires. Often, monitors are wired to an ignition-switched power source (e.g., the cigarette lighter or a fuse tap) so they only turn on when the car is running, or to a constant power source if they have an on/off switch.
- Splicing and Connecting: When splicing into existing car wires, use proper crimp connectors or solder the connections and insulate them with heat shrink tubing or electrical tape. This ensures a secure and reliable connection that won’t fail over time.
Step 4: Connecting and Testing
With the wiring in place, it’s time to connect everything and test your installation.
- Video Connection: Connect the RCA video cable from the camera to the video input on your monitor.
- Power Up: Turn on your car and shift into reverse. The rearview camera should activate, and the image should appear on your monitor.
- Troubleshooting: If the camera doesn’t activate or the image is distorted, recheck all your wiring connections. Ensure the camera and monitor are receiving the correct voltage. Check that the RCA cable is securely plugged in at both ends. Some systems have adjustment screws for camera angle or image settings on the monitor.
Step 5: Final Touches and Reassembly
Once you’ve confirmed everything is working correctly, it’s time to neaten up your installation.
- Tidy Up Wiring: Use zip ties to bundle and secure any loose wires. Ensure all connections are insulated and protected.
- Reassemble Trim Panels: Carefully reattach all the interior trim panels you removed, ensuring they snap securely into place.
- Final Test: Perform one last test by backing up your car in a safe area to ensure you have a clear and unobstructed view.
This step-by-step process, while detailed, is designed to be manageable. By approaching it systematically and paying attention to each stage, you can successfully install a rearview camera and significantly enhance your vehicle’s safety and utility.

Enhancing Your Driving Experience: Beyond Installation
The installation of a rearview camera is more than just a technical upgrade; it’s an investment in your driving experience, safety, and peace of mind. From a Tech perspective, it represents a practical application of modern sensor and display technology to solve everyday driving challenges. This integration of sophisticated electronics into vehicles is a testament to how far automotive technology has come, offering tangible benefits that were once the domain of much more expensive vehicles.
From a Brand standpoint, especially for car manufacturers, offering advanced safety features like rearview cameras has become a key differentiator in a competitive market. It signals a commitment to innovation, customer well-being, and a premium driving experience. For individuals who choose to retrofit their cars, it’s about enhancing their personal brand as a car owner – someone who values safety, embraces technology, and is proactive in maintaining and improving their vehicle. The ability to undertake such an installation yourself also speaks to a level of personal competence and resourcefulness.
From a Money perspective, the decision to install a rearview camera can be viewed through several lenses. The most immediate is the cost savings compared to professional installation or purchasing a vehicle with this feature pre-installed. Furthermore, the safety benefits translate into potential savings by preventing accidents, which can lead to costly repairs, increased insurance premiums, and potential medical expenses. The ability to confidently navigate tight parking spaces also reduces the risk of minor fender benders, further protecting your investment. In essence, installing a rearview camera is a wise financial decision that pays dividends in safety, convenience, and long-term cost avoidance. The DIY aspect allows for further cost reduction, aligning with the principles of resourceful personal finance and maximizing value from technological investments.
aViewFromTheCave is a participant in the Amazon Services LLC Associates Program, an affiliate advertising program designed to provide a means for sites to earn advertising fees by advertising and linking to Amazon.com. Amazon, the Amazon logo, AmazonSupply, and the AmazonSupply logo are trademarks of Amazon.com, Inc. or its affiliates. As an Amazon Associate we earn affiliate commissions from qualifying purchases.