In today’s digitally driven world, a printer remains a surprisingly essential tool, bridging the gap between our virtual documents and tangible reality. Whether you’re a student needing to print essays, a professional preparing reports, or simply someone who prefers hard copies of important information, knowing how to install and manage your printer on Windows 10 is a fundamental skill. This guide will walk you through the entire process, from initial setup to troubleshooting common issues, ensuring you can get back to printing without a hitch.
Our website, dedicated to all things Tech, Brand, and Money, understands that reliable technology is a cornerstone of productivity and even personal finance. A malfunctioning printer can disrupt workflows, lead to unexpected expenses (like rush printing services), and generally cause frustration. Therefore, mastering printer installation on your Windows 10 machine is a valuable investment in your digital well-being.
Getting Started: What You’ll Need and Initial Considerations
Before diving into the installation process, it’s crucial to have a few things in hand and consider the type of printer you’re working with. This preparatory stage can save you a lot of time and potential headaches down the line.
Types of Printer Connections
Printers connect to your computer in a few primary ways, and understanding this will dictate the installation steps:
- USB Printers: These are the most common type for home and small office use. They connect directly to your computer via a USB cable. Installation is typically straightforward, with Windows often recognizing them automatically.
- Network Printers (Wi-Fi or Ethernet): These printers connect to your home or office network, allowing multiple devices to share them wirelessly or via an Ethernet cable plugged into your router or network switch. This offers greater flexibility but may involve slightly more complex setup.
- Bluetooth Printers: Less common for traditional document printing, but found in some mobile or portable printers, these connect wirelessly via Bluetooth.
Essential Items for Installation
Regardless of the connection type, you’ll likely need:
- Your Printer: Obviously! Ensure it’s powered on.
- Printer Cables: For USB printers, this is the USB cable that usually comes with the printer. For Ethernet printers, you’ll need an Ethernet cable.
- Power Source: Ensure your printer is plugged in and has power.
- Wi-Fi Network Name (SSID) and Password: If you’re installing a wireless printer.
- Printer Manufacturer’s Website: It’s always a good idea to have the manufacturer’s support website bookmarked. This is where you’ll find the latest drivers and software.
Pre-Installation Checks
Before plugging anything in or starting the Windows setup, perform these quick checks:
- Unpack and Set Up Your Printer: Follow the physical setup instructions provided by the manufacturer. This usually involves removing packing materials, installing ink or toner cartridges, and loading paper.
- Power On: Make sure the printer is powered on and any startup routines are complete.
- Driver Location: While Windows 10 is excellent at auto-detecting printers, having the latest drivers from the manufacturer’s website is often the best way to ensure full functionality and access to advanced features. You can often find these by searching for your printer model number on the manufacturer’s support page.
Installing a Printer: Step-by-Step on Windows 10
Windows 10 offers a user-friendly interface for adding new hardware, including printers. The process can vary slightly depending on whether your printer is automatically detected or requires manual intervention.
Adding a Printer Automatically (Plug and Play)
For many USB and some network printers, Windows 10’s “Plug and Play” feature will do most of the heavy lifting.
- Connect the Printer:
- For USB printers: Connect the USB cable from your printer to an available USB port on your computer.
- For Network printers: Ensure the printer is connected to your network (either via Ethernet cable to your router or connected wirelessly to your Wi-Fi).
- Windows Detection: Windows 10 should detect the new hardware and begin installing the necessary drivers. You might see a notification in the bottom-right corner of your screen indicating that a device is being set up.
- Wait for Installation: Let Windows complete the driver installation. This can take a few minutes. Once it’s done, your printer should appear in the list of available printers.
- Test Print: Open a document (like a simple text file) and try to print it. Select your newly installed printer from the print dialog box.
Adding a Printer Manually
If Windows 10 doesn’t automatically detect your printer, or if you need to install a printer that’s already on your network but not immediately visible, you can add it manually.
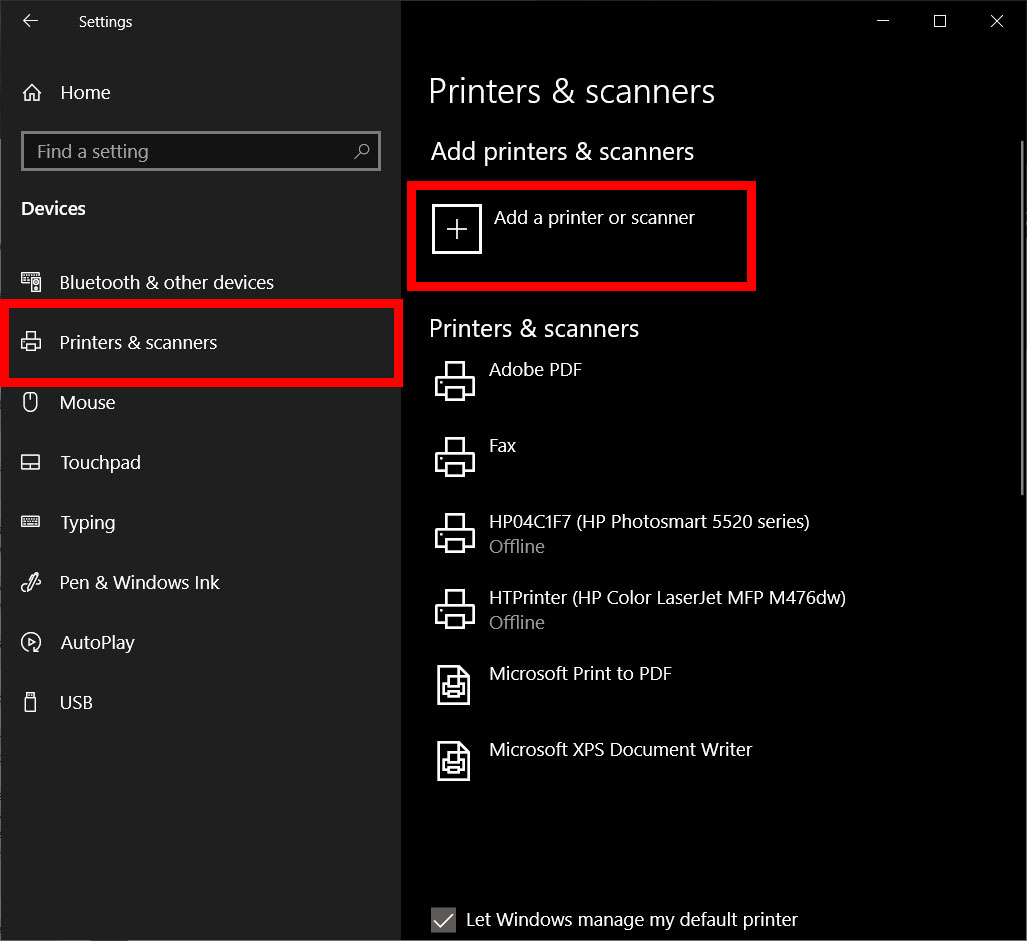
- Access Printer Settings:
- Click the Start button.
- Click on the Settings gear icon.
- Select Devices.
- In the left-hand menu, click on Printers & scanners.
- Add a Printer:
- Click the + Add a printer or scanner button.
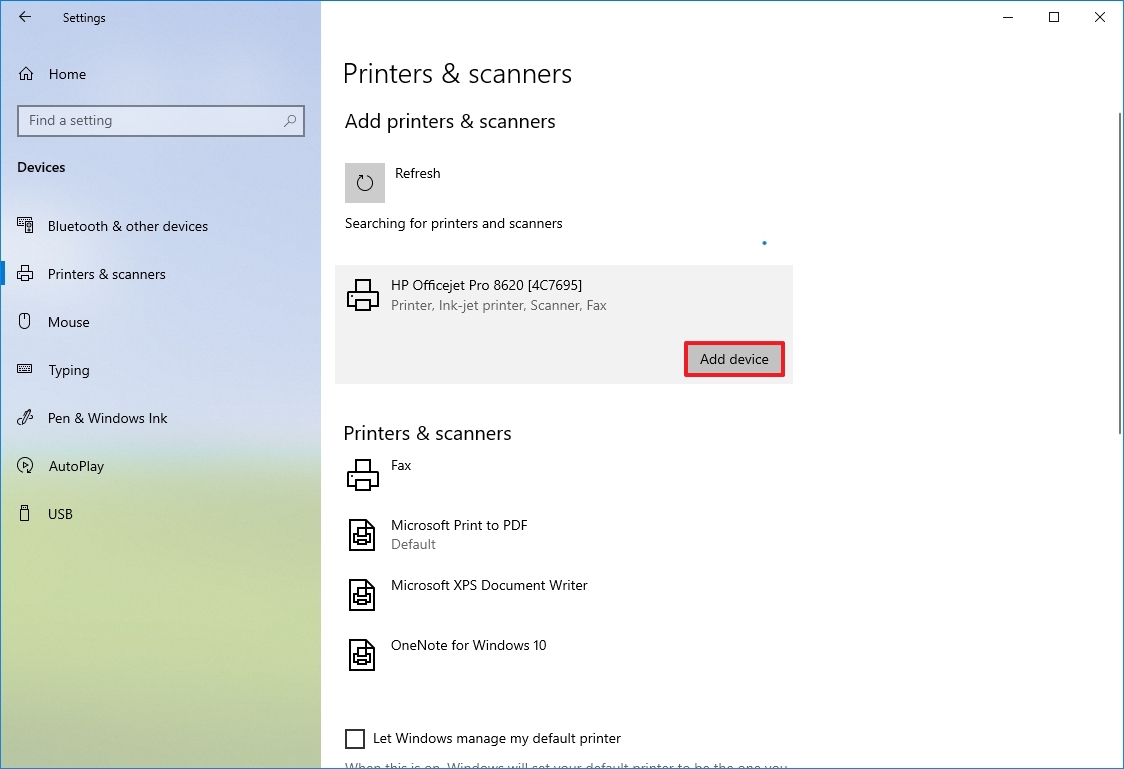
- Windows will scan for available printers on your network and connected via USB.
- If Your Printer Appears: If your printer is found in the list, click on it, and then click Add device. Windows will attempt to install it.
- If Your Printer Doesn’t Appear: If your printer is not listed after the scan, click the link that says The printer that I want isn’t listed. This will open a new window with several options.
Advanced Manual Installation Options
The “The printer that I want isn’t listed” dialog box offers more control:
Option 1: Add a Bluetooth, Wireless or Network Discoverable Printer
This is the most common choice for network printers that weren’t automatically found.
- Select the Option: Choose Add a Bluetooth, wireless or network discoverable printer.
- Windows Scan: Windows will perform another scan of your network.
- Enter Printer Information: If your printer is still not found, you may need to enter its IP address or hostname. You can usually find this information in your printer’s network settings menu (accessible via the printer’s physical control panel or its web interface).
- Follow Prompts: Once Windows identifies the printer, it will guide you through the installation. You might be prompted to select the correct driver from a list or to specify the location of the driver files if you downloaded them separately.
Option 2: Add a Printer Using a TCP/IP Address or Hostname
This is useful for network printers that are accessible via their IP address but might not be discoverable by Windows’ standard search.
- Select the Option: Choose Add a printer using a TCP/IP address or hostname.
- Device Type: Select TCP/IP Device from the dropdown.
- Hostname or IP Address: Enter the IP address or hostname of your printer. You can often find this by looking at your router’s connected devices list or by checking the printer’s own network settings.
- Port Name: This will usually auto-populate based on the IP address.
- Query the printer and automatically select the driver to use: It’s generally recommended to leave this checked, as Windows will try to identify the correct driver.
- Click Next: Windows will attempt to connect to the printer and install the appropriate driver. If it can’t automatically find the driver, you’ll be prompted to select it manually from a list or provide the path to downloaded driver files.
Option 3: Add a Local Printer or Network Printer with Manual Settings
This option is for printers connected directly to your computer (often via USB) or for more advanced network configurations where you need to manually specify connection details.
- Select the Option: Choose Add a local printer or network printer with manual settings.
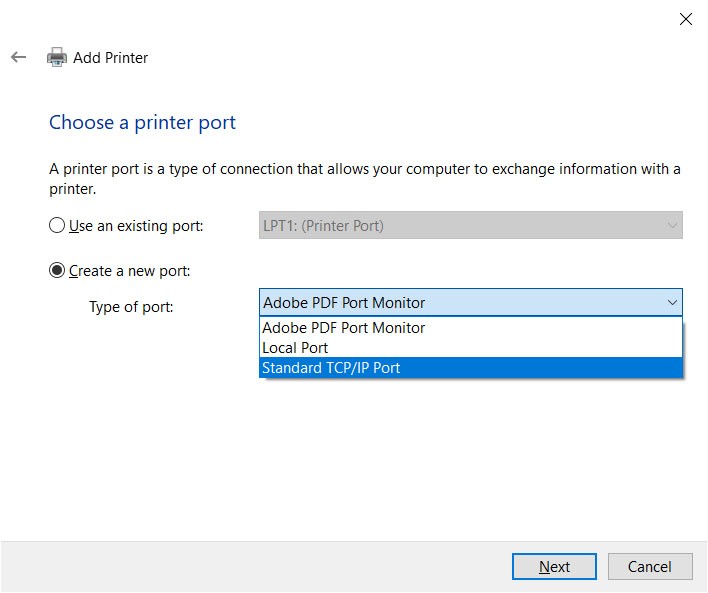
- Choose Printer Port:
- For USB printers: If you connected the printer via USB and Windows didn’t auto-detect it, you might need to select a USB port. However, usually, a new USB printer is detected automatically. If you’re using a legacy parallel port, select the corresponding port (e.g., LPT1).
- For Network printers: You can choose to create a new port and specify a TCP/IP address or hostname, similar to Option 2.
- Install the Printer Driver:
- Manufacturer and Model: Windows will present a list of manufacturers and their printer models. Scroll through the list to find your printer.
- Have Disk…: If your printer is not listed, or if you’ve downloaded drivers from the manufacturer’s website, click the Have Disk… button. Browse to the location where you saved the driver files (usually a folder containing a
.inffile) and select it.
- Printer Name: Give your printer a descriptive name (e.g., “Office LaserJet,” “Home Photo Printer”).
- Printer Sharing: You can choose to share the printer with other computers on your network.
- Finish: Click Next and then Finish to complete the installation.
Installing Drivers from Manufacturer Software
Many printer manufacturers provide their own installation software that goes beyond just installing the basic driver. This software often includes utilities for scanning, faxing (if applicable), ink level monitoring, and other printer-specific functions.
- Download Software: Visit your printer manufacturer’s website and navigate to their support or downloads section. Search for your specific printer model. Download the full driver and software package.
- Run the Installer: Double-click the downloaded file to run the installer.
- Follow On-Screen Instructions: The installer will guide you through the process. It will typically prompt you on how to connect the printer (USB, network) and will install all necessary drivers and bundled software.
- During Installation: Pay attention to prompts. You might be asked to connect the printer only when instructed by the installer.
Managing Your Printer in Windows 10
Once your printer is installed, you’ll want to know how to manage it, set it as default, and access its properties.
Setting a Default Printer
If you print frequently, setting your most-used printer as the default will save you the step of selecting it each time you print.
- Go to Printer Settings: Go to Settings > Devices > Printers & scanners.
- Manage Default Printer:
- By default, Windows 10 has an option called “Let Windows manage my default printer.” If this is checked, Windows will automatically set the last used printer as the default.
- To manually set a default printer, uncheck this box.
- Select Your Printer: In the list of printers, click on the printer you want to set as default, and then click the Manage button.
- Set as Default: Click the Set as default button. Your chosen printer will now be the default.
Accessing Printer Properties
Printer properties allow you to configure various settings, such as print quality, paper size, color options, and duplex (double-sided) printing.
- Go to Printer Settings: Go to Settings > Devices > Printers & scanners.
- Select Your Printer: Click on the printer you want to configure, and then click the Manage button.
- Open Properties: Click on Printer properties.
- Explore Tabs: You’ll find several tabs:
- General: Displays printer information, allows you to print a test page, and provides access to printing preferences.
- Sharing: To share your printer with other users on your network.
- Ports: To view and change the port your printer is using.
- Advanced: To configure default print settings, spooling options, and other advanced features.
- Color Management: For fine-tuning color profiles.
- Device Settings: Specific to your printer model, allowing you to configure installed options like duplex units or paper trays.
Using Printing Preferences vs. Printer Properties
It’s important to distinguish between “Printer properties” and “Printing preferences.”
- Printing Preferences: These are the settings that apply to your user account and affect how documents are printed by default when you initiate a print job. You can access these from the “General” tab of “Printer properties” or often directly from the print dialog box of an application by clicking “Printer properties” or “Preferences.”
- Printer Properties: These settings are more system-wide and affect the printer’s behavior for all users on the computer or network. They include driver information, port settings, and sharing options.
Troubleshooting Common Printer Installation and Printing Issues
Even with straightforward installation, you might encounter issues. Here are some common problems and their solutions:
Printer Not Detected by Windows
- Check Connections: Ensure all cables (USB, Ethernet) are securely plugged into both the printer and the computer/router.
- Power On: Verify the printer is powered on.
- Restart Devices: Try restarting your printer, computer, and router.
- Check Network (for Network Printers): Ensure your printer is connected to the same network as your computer. Check its IP address and try pinging it from your computer’s Command Prompt (
ping [printer IP address]). - Firewall: Your firewall might be blocking the printer’s discovery. Temporarily disable it to test, but remember to re-enable it afterwards.
- Run Troubleshooter: Windows has a built-in printer troubleshooter. Go to Settings > Update & Security > Troubleshoot > Additional troubleshooters, and select Printer.
“Printer Offline” Message
- Check Power and Connections: Again, ensure the printer is on and properly connected.
- Cancel All Print Jobs: Sometimes a stuck print job can cause this. Go to Printers & scanners, click your printer, then Manage, and select See what’s printing. In the print queue window, go to Printer > Cancel All Documents.
- Check Printer Status: Look at the printer’s display panel for any error messages or indicators.
- Print Spooler Service: The Print Spooler service might have stopped. Press Windows Key + R, type
services.msc, and press Enter. Find “Print Spooler,” right-click it, and select Restart. If it’s stopped, select Start.
Print Quality Issues (Streaks, Faded Prints, Wrong Colors)
- Clean Print Heads: Most inkjet printers have a utility to clean the print heads, which can resolve streaks and faded output.
- Check Ink/Toner Levels: Ensure cartridges are not empty.
- Paper Type: Make sure the paper type setting in your print preferences matches the paper loaded in the printer.
- Driver Update: Outdated or corrupt drivers can cause print quality issues. Reinstall the latest drivers from the manufacturer’s website.
- Printer Calibration: Some printers have a calibration or alignment feature that can improve color and print accuracy.
Driver Installation Fails
- Download Latest Drivers: Always use the most recent drivers from the manufacturer’s official website.
- Run as Administrator: Right-click the driver installer file and select “Run as administrator.”
- Uninstall Previous Drivers: If you’ve had previous issues or attempted installations, it’s best to uninstall any existing printer drivers and software before installing a fresh set. Go to Settings > Apps > Apps & features, find your printer software, and uninstall it. Then, go to Printers & scanners, remove the printer, and restart your PC before attempting reinstallation.
By following these steps, you should be able to successfully install and manage your printer on Windows 10, ensuring a smooth and productive printing experience. Remember that patience and attention to detail are key when dealing with hardware installations.
aViewFromTheCave is a participant in the Amazon Services LLC Associates Program, an affiliate advertising program designed to provide a means for sites to earn advertising fees by advertising and linking to Amazon.com. Amazon, the Amazon logo, AmazonSupply, and the AmazonSupply logo are trademarks of Amazon.com, Inc. or its affiliates. As an Amazon Associate we earn affiliate commissions from qualifying purchases.