In today’s digital age, while much of our work resides in the cloud, the humble printer remains an indispensable tool for countless individuals and businesses. From printing important documents and reports to cherished photos and creative projects, a reliable printer is a cornerstone of productivity. However, getting your new or existing printer to communicate seamlessly with your Windows 10 machine can sometimes feel like navigating a maze. This comprehensive guide, steeped in practical tech wisdom, will walk you through every step of installing a printer to Windows 10, ensuring a smooth setup process and empowering you to tackle your printing needs with confidence.
Whether you’re connecting a brand-new device fresh out of the box or reconnecting an older model after a system upgrade, understanding the different installation methods is key. We’ll cover everything from simple plug-and-play USB setups to intricate network configurations, ensuring that no matter your printer type or technical proficiency, you’ll find the answers you need to get your device up and running efficiently.
The Essential First Steps: Preparing for Installation
Before you even think about plugging in cables or clicking through settings, a little preparation goes a long way. Proper groundwork can prevent frustrating delays and potential issues down the line. This foundational stage ensures you have all the necessary components and information to make the installation process as smooth as possible.
Gathering Your Tools and Information
Think of this as your pre-flight checklist. Having everything ready beforehand saves you from scrambling mid-installation.
- Your Printer: Ensure your printer is out of its packaging, powered on, and has sufficient ink/toner and paper loaded. If it’s a new printer, follow the manufacturer’s instructions for initial setup (e.g., installing cartridges, removing protective tapes).
- Connection Cables:
- USB Cable: If you plan to connect directly, make sure you have a standard USB 2.0 or 3.0 Type-B cable (the square-ish end goes into the printer).
- Ethernet Cable: For wired network printers, an Ethernet cable will be needed to connect the printer to your router or network switch.
- Power Cable: Obvious, but essential. Make sure it’s connected securely to both the printer and a working power outlet.
- Wi-Fi Network Details: For wireless printers, you’ll need your Wi-Fi network name (SSID) and password (security key). Have this information readily accessible.
- Printer Drivers (Optional but Recommended): While Windows 10 is excellent at finding generic drivers, the specific drivers from your printer manufacturer often unlock full functionality and advanced features.
- Installation CD: Some older printers come with an installation CD. If your computer has an optical drive, this can be an easy option.
- Manufacturer’s Website: This is the most reliable source for the latest drivers. Locate your printer’s model number (usually on a sticker on the printer itself) and visit the manufacturer’s support website (e.g., HP Support, Canon Drivers, Epson Downloads). Download the relevant drivers for Windows 10 (32-bit or 64-bit, depending on your system).
Understanding Printer Types and Connectivity
Printers primarily connect to your computer in three ways. Knowing your printer type will guide you to the correct installation method.
- Local Printers (USB Connected): These printers connect directly to your computer via a USB cable. They are typically straightforward to install and are ideal for single-user setups or when you don’t need network sharing.
- Wireless Printers (Wi-Fi): These printers connect to your home or office Wi-Fi network, allowing multiple devices (computers, smartphones, tablets) to print to them without physical cables. They offer flexibility and reduce cable clutter.
- Network Printers (Ethernet or Shared): These printers are connected directly to your network router via an Ethernet cable or are shared from another computer on the network. Like wireless printers, they are accessible by multiple users. Often found in office environments.
Method 1: Adding a Local Printer (USB Connection)
Connecting a printer via USB is often the simplest method, especially for personal use. Windows 10 usually handles the detection and driver installation automatically, making it a true plug-and-play experience.
Physical Connection and Automatic Detection
This is the most common and easiest way to install a USB printer.
- Power On: Ensure your printer is powered on and ready.
- Connect USB Cable: Plug one end of the USB cable into an available USB port on your Windows 10 computer and the other end into the corresponding USB port on your printer.
- Windows Detection: Windows 10 should immediately detect the new hardware. You might see a notification pop up, indicating “Setting up a device” or “Installing device driver software.”
- Automatic Driver Installation: Windows 10 will attempt to locate and install the necessary drivers automatically, often pulling them from its built-in driver library or Windows Update.
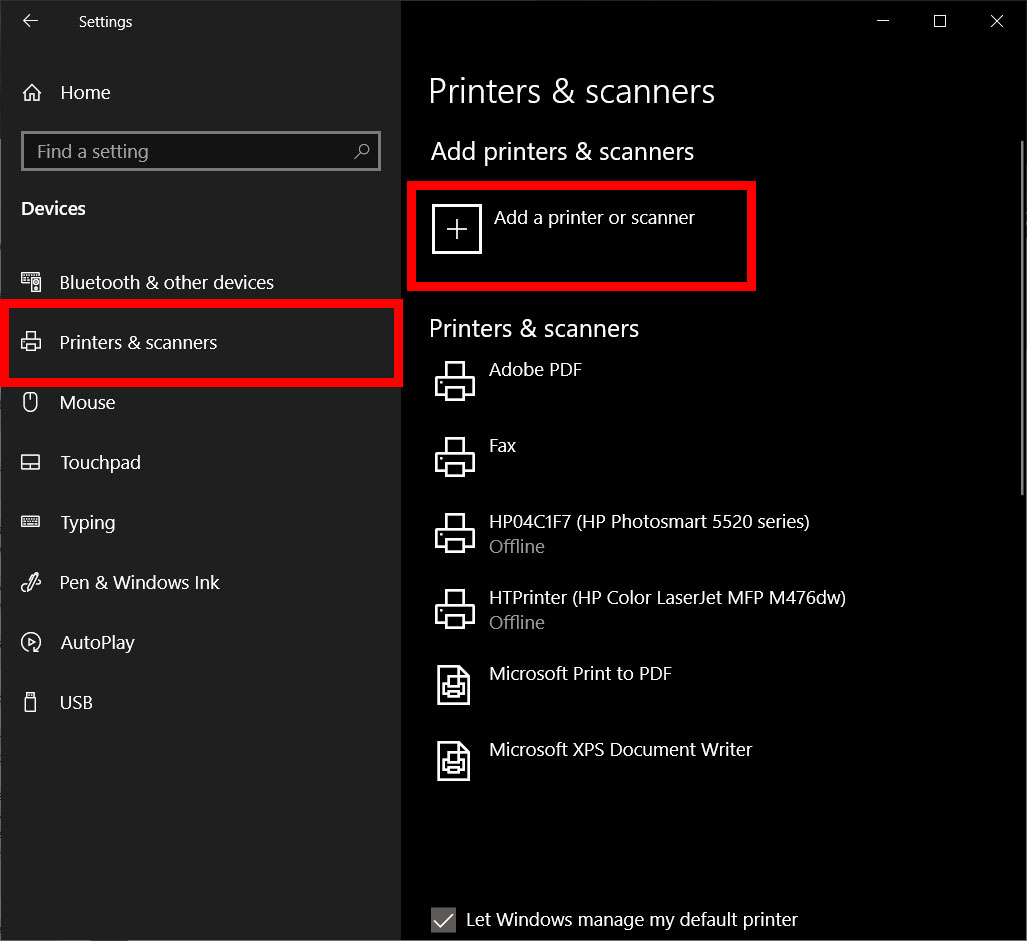
- Confirmation: Once the installation is complete, you’ll receive a notification confirming that your device is ready for use. You can then navigate to
Settings > Devices > Printers & scannersto see your newly installed printer listed.
Manual Installation via Windows Settings
If Windows doesn’t automatically detect your USB printer, or if you prefer a more hands-on approach, you can manually add it through the Windows 10 settings.
- Open Settings: Click on the Start button, then click the Settings icon (gear).
- Navigate to Devices: Select Devices, then click Printers & scanners in the left-hand pane.
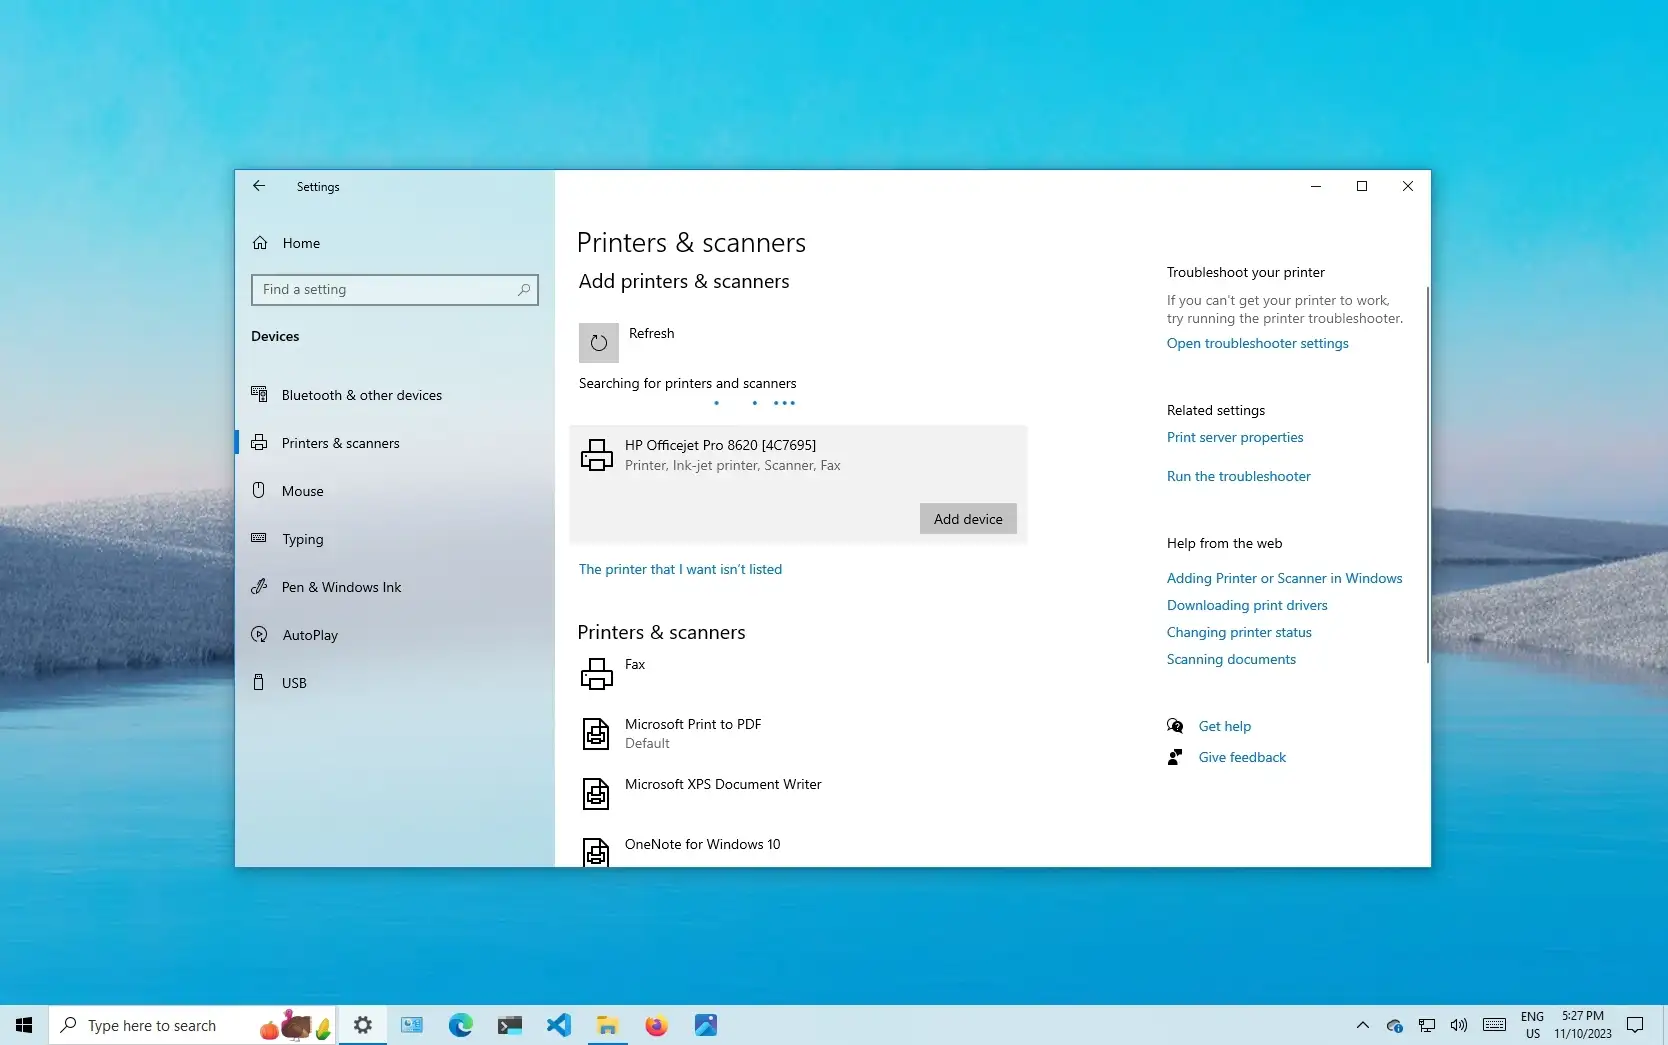
- Add a Printer: Click the Add a printer or scanner button.
- Wait for Scan: Windows will scan for available printers. Even if it finds your printer, wait a moment.
- Select Your Printer: If your printer appears in the list (e.g., “HP LaserJet P1102”), select it and click Add device. Windows will then attempt to install the necessary drivers.
- “The printer that I want isn’t listed”: If your printer doesn’t appear, or if the automatic installation fails, click on the The printer that I want isn’t listed link.
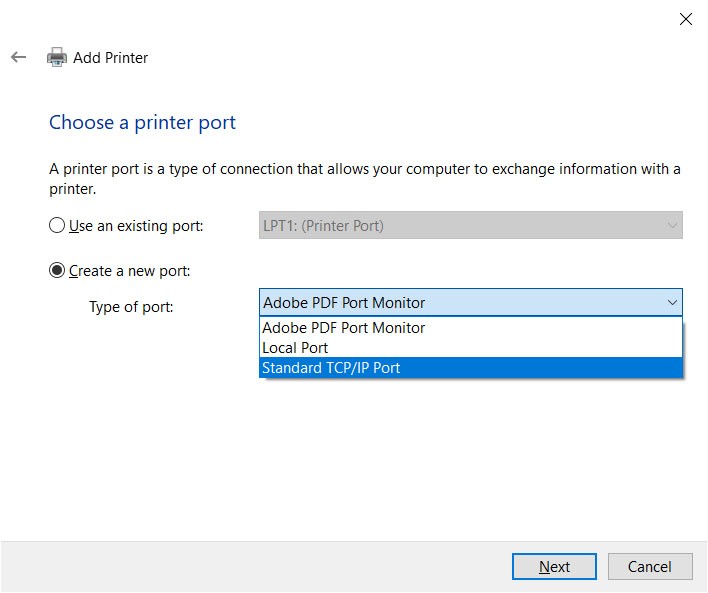
- Choose “Add a local printer or network printer with manual settings”: In the “Find a printer by other options” window, select this option and click Next.
- Select a Printer Port:
- Existing Port: If you’ve already plugged in the USB cable, Windows might have created a “USB Virtual Printer Port” (e.g.,
USB001,USB002). Select this port. - New Port: If no such port exists, select “Create a new port,” choose “Standard TCP/IP Port” (even for USB, sometimes this pathway is used internally for driver assignment, but typically USB ports are auto-generated). Correction: For a USB printer, you specifically look for a
USBXXport. If you don’t see one, it means the connection isn’t being properly recognized, or the driver hasn’t created the virtual port yet. In most cases, if your printer is physically connected via USB, it should appear as an existing port likeUSB001once Windows has performed initial detection.
- Existing Port: If you’ve already plugged in the USB cable, Windows might have created a “USB Virtual Printer Port” (e.g.,
- Install Printer Driver:
- From List: Windows will present a list of manufacturers and models. Select your printer’s manufacturer from the left column and your model from the right.
- From Disk: If you downloaded drivers from the manufacturer’s website, click Have Disk…, then Browse to the folder where you saved the driver files (look for
.inffiles).
- Printer Name: Give your printer a name. This is how it will appear in your device list.
- Sharing (Optional): Decide if you want to share the printer on your network. For a local USB printer, you typically won’t.
- Print a Test Page: Once finished, print a test page to confirm successful installation.
Method 2: Installing a Wireless or Network Printer
Wireless and network printers offer greater flexibility, allowing multiple users and devices to print without being tethered by cables. This method is slightly more involved but incredibly rewarding for modern setups.
Automatic Network Detection
Windows 10 is often capable of finding network-connected printers automatically, especially if they are on the same local network.
- Ensure Printer is Network-Ready: For wireless printers, make sure it’s connected to your Wi-Fi network first. This usually involves configuring the printer itself (using its control panel or a dedicated setup app) to join your Wi-Fi. For wired network printers, ensure the Ethernet cable is securely connected to your router/switch and the printer.
- Open Settings: Go to
Start > Settings > Devices > Printers & scanners. - Add a Printer: Click the Add a printer or scanner button.
- Windows Scan: Windows will scan your local network for available printers. This might take a few moments.
- Select and Add: If your wireless or network printer appears in the list (e.g., “Canon MG5700 series (Network)”), select it and click Add device. Windows will then try to install the necessary drivers from its database or Windows Update.
- Test Print: Once the installation is complete, print a test page to confirm connectivity and functionality.
Manual Addition via IP Address or Hostname
If your printer doesn’t show up during the automatic scan, or if you’re connecting to a shared network printer with a known IP address, you can add it manually. This is common in more complex network environments or for specific corporate printers.
- Find Printer’s IP Address:
- Printer’s Control Panel: Most network printers have a menu option to view network settings or print a network configuration page, which will list its IP address.
- Router’s Interface: You can often find a list of connected devices and their IP addresses within your router’s administration interface (accessed via a web browser).
- Open “Add Printer” Wizard: Go to
Start > Settings > Devices > Printers & scanners, click Add a printer or scanner, then click The printer that I want isn’t listed. - Choose TCP/IP Port: Select Add a printer using a TCP/IP address or hostname and click Next.
- Enter IP Address:
- Device type: Keep it as “Autodetect” or select “TCP/IP Device”.
- Hostname or IP address: Enter the printer’s IP address (e.g.,
192.168.1.150). - Port name: This will usually auto-fill based on the IP address.
- Driver Installation: Windows will attempt to detect the printer and install the appropriate drivers.
- If it succeeds, you can proceed to name the printer and finish.
- If it asks for drivers, you may need to select them from the Windows list or click Have Disk… to install downloaded drivers from the manufacturer.
- Complete Installation: Follow the on-screen prompts to name your printer and optionally share it. Print a test page.
Connecting via Wi-Fi Direct or WPS
Some wireless printers offer specific features like Wi-Fi Direct or Wi-Fi Protected Setup (WPS) for easier connection, especially with mobile devices, but they can also be used with Windows 10.
- Wi-Fi Direct: Allows your computer to connect directly to the printer without needing a central router. You essentially connect to the printer’s own Wi-Fi signal. Look for a Wi-Fi Direct option on your printer’s control panel to enable it and get the direct network name and password. Then, on your PC, connect to this network via the Wi-Fi icon in the taskbar. Once connected, your computer should detect the printer for installation.
- WPS (Wi-Fi Protected Setup): A quick way to connect to your existing Wi-Fi network without manually entering the password.
- On your printer, locate and press the WPS button.
- Within two minutes, press the WPS button on your Wi-Fi router.
- The printer should then automatically connect to your Wi-Fi network.
- Once connected, you can then add the printer using the “Automatic Network Detection” method described above (Method 2.1).
Method 3: Advanced Installation and Driver Management
Sometimes, standard methods don’t cut it, or you need more control over the drivers. This section delves into scenarios where you need to guide Windows more explicitly or manage drivers directly.
Using the “Printer not listed” Option
As mentioned earlier, this option is a versatile gateway when Windows can’t find your printer automatically. It’s particularly useful for specific network configurations or older printers.
- Access “Add Printer” Wizard: Go to
Start > Settings > Devices > Printers & scanners, click Add a printer or scanner, then The printer that I want isn’t listed. - Specific Scenarios:
- My printer is a little older. Help me find it: While this option might try a more thorough scan, it often leads back to the manual options.
- Add a Bluetooth, wireless or network discoverable printer: This is generally covered by the automatic detection, but you can retry here.
- Add a printer using a TCP/IP address or hostname: (Covered in Method 2.2)
- Add a local printer or network printer with manual settings: (Covered in Method 1.2 for USB, but also applicable for manually specifying a network port if needed).
- Add a shared printer by name: If you know the exact network path to a shared printer (e.g.,
\ComputerNamePrinterShareName), you can enter it here. This is common in small office networks where one computer shares its attached printer.
Manually Installing Drivers from Manufacturer’s Website
For optimal performance, full functionality, and access to specific printer features (like advanced duplex printing, specific paper trays, or monitoring ink levels), using drivers directly from the manufacturer is highly recommended.
- Download Drivers: Go to the official support website of your printer manufacturer (e.g., HP, Canon, Epson, Brother, Lexmark).
- Locate Your Model: Use the search bar or navigation to find your specific printer model number.
- Select OS: Choose “Windows 10” and your system’s architecture (32-bit or 64-bit). If unsure, you can check by going to
Settings > System > Aboutand looking under “System type.” - Download: Download the full driver package or the “full feature software” if available. This often includes utilities and diagnostic tools.
- Run Installer: Once downloaded, run the installer executable (.exe file). Most manufacturer installers are designed to be user-friendly and will guide you through the process, often including connecting the printer at the appropriate time.
- Follow On-Screen Prompts: The installer will typically detect your printer (if connected and powered on) and install the necessary software and drivers. This method often streamlines the process more effectively than relying solely on Windows’ built-in tools.
Updating and Managing Printer Drivers
Maintaining up-to-date drivers is crucial for printer stability and functionality, especially after Windows updates.
- Check for Updates (Manufacturer): Periodically visit your printer manufacturer’s website to see if newer drivers are available.
- Update via Device Manager:
- Right-click the Start button and select Device Manager.
- Expand “Print queues” or “Printers”.
- Right-click on your printer and select Update driver.
- Choose Search automatically for updated driver software (relies on Windows Update) or Browse my computer for driver software if you’ve downloaded a specific driver.
- Remove and Reinstall: If you’re experiencing persistent issues, sometimes a clean reinstall can resolve them.
- Go to
Settings > Devices > Printers & scanners. - Select your printer and click Remove device.
- Then, go to Device Manager, expand “Print queues” or “Printers”, and uninstall any remaining printer entries related to your device.
- Reboot your computer and then attempt to install the printer again using one of the methods above, preferably with the latest drivers from the manufacturer.
- Go to
Troubleshooting Common Printer Installation Issues
Even with the best preparation, you might encounter bumps in the road. Knowing how to troubleshoot common problems can save you time and frustration, getting you back to printing quickly.
Connection Problems
- Printer Not Found (USB):
- Check Cable: Ensure the USB cable is firmly connected to both the printer and the computer. Try a different USB port on your computer.
- Try Different Cable: The cable itself might be faulty.
- Power Cycle: Turn off both the printer and your computer, then turn them back on.
- Printer Not Found (Wireless/Network):
- Network Connectivity: Make sure the printer itself is connected to the network. Check its control panel for network status or print a network configuration page.
- Router Issues: Restart your Wi-Fi router.
- Firewall: Temporarily disable your computer’s firewall (or Windows Defender Firewall) to see if it’s blocking the connection. If this solves the issue, you’ll need to add an exception for your printer software.
- IP Address Conflicts: Ensure the printer has a unique IP address on your network. Your router typically handles this via DHCP, but static IPs can sometimes conflict.
Driver-Related Errors
- “Driver Unavailable”: This means Windows couldn’t find or install the correct driver.
- Download from Manufacturer: Your best bet is to manually download and install the latest drivers directly from the printer manufacturer’s website.
- Windows Update: Ensure your Windows 10 is fully updated, as driver updates are sometimes included.
- Installation Fails/Errors During Driver Install:
- Run as Administrator: Right-click the driver installer file and choose “Run as administrator.”
- Compatibility Mode: For older printers, try running the installer in compatibility mode for an earlier version of Windows (e.g., Windows 7 or 8). Right-click the installer, go to “Properties,” then “Compatibility.”
- Antivirus Interference: Temporarily disable your antivirus software during the installation process, then re-enable it.
Spooler Service and Print Queue Issues
The print spooler service manages print jobs. If it’s acting up, nothing will print.
- Print Jobs Stuck in Queue:
- Clear Queue: Go to
Start > Settings > Devices > Printers & scanners, click on your printer, then Open queue. Right-click any stuck jobs and select Cancel. - Restart Spooler:
- Search for “Services” in the Windows search bar and open the Services desktop app.
- Find Print Spooler in the list.
- Right-click it and select Restart.
- If it won’t restart, select Stop, then wait a few seconds and select Start.
- You may also want to clear the spooler folder manually: Go to
C:WindowsSystem32spoolPRINTERSand delete all files inside. (You might need to stop the Print Spooler service first to do this).
- Clear Queue: Go to
Windows Updates and Compatibility
Sometimes, a Windows update can introduce compatibility issues with existing printer drivers, or an update might fail to properly install new printer components.
- Check Update History: Go to
Settings > Update & Security > Windows Update > View update historyto see if a recent update correlates with your printer problems. - Roll Back Drivers: In Device Manager, if you updated a driver and then had problems, you can right-click the printer, go to “Properties,” then the “Driver” tab, and select Roll Back Driver if the option is available.
- Pause Updates: If a known problematic update is causing issues, you can temporarily pause Windows updates until a fix is released.
Conclusion: Keeping Your Printing Setup Smooth
Installing a printer to Windows 10, while sometimes seemingly complex, is a manageable task when approached methodically. By understanding the different connection types, following the step-by-step instructions for each installation method, and knowing how to troubleshoot common issues, you can ensure your printer is always ready for action.
A well-configured printer isn’t just a convenience; it’s a vital component of a productive tech ecosystem. Whether for personal document management, professional reports, or creative projects, a smooth printing workflow contributes significantly to efficiency and organization. Always remember to prioritize official manufacturer drivers for the best performance and functionality, and don’t hesitate to consult their support resources if you encounter persistent difficulties. With this guide in hand, you are now equipped to conquer printer installation challenges and maintain a reliable printing setup for years to come. Happy printing!
aViewFromTheCave is a participant in the Amazon Services LLC Associates Program, an affiliate advertising program designed to provide a means for sites to earn advertising fees by advertising and linking to Amazon.com. Amazon, the Amazon logo, AmazonSupply, and the AmazonSupply logo are trademarks of Amazon.com, Inc. or its affiliates. As an Amazon Associate we earn affiliate commissions from qualifying purchases.