In today’s interconnected digital world, a printer remains an indispensable tool for countless individuals and businesses. Whether you’re a student needing to print assignments, a home office professional handling documents, or a small business managing invoices, a reliable printer ensures your physical paperwork keeps pace with your digital workflow. Yet, the initial setup process, often perceived as daunting, can deter even tech-savvy users. This comprehensive guide aims to demystify printer installation, providing clear, step-by-step instructions for various printer types and connection methods. We’ll cover everything from unboxing to advanced troubleshooting, ensuring your new device integrates smoothly into your tech ecosystem.
Preparing for Printer Installation: The Essentials
Before you even plug in your new printer, a little preparation can save significant time and frustration. Understanding your device, identifying your connection options, and gathering necessary information are crucial first steps toward a hassle-free setup.
Understanding Your Printer Type and Its Implications
Printers come in a variety of forms, each designed for specific purposes and offering different capabilities. Knowing what kind of printer you have can inform your installation approach and help you set realistic expectations for its performance.
- Inkjet Printers: These are perhaps the most common for home and small office use. They spray tiny droplets of liquid ink onto paper, excelling at producing vibrant color documents and high-quality photos. While initially inexpensive, their running costs can accumulate due to ink cartridge replacements. Installation typically involves loading ink cartridges and aligning print heads.
- Laser Printers: Ideal for high-volume text printing, laser printers use toner powder and a laser beam to fuse text and images onto paper. They are generally faster and more cost-effective per page for black-and-white documents, making them a staple in offices. Color laser printers are also available but tend to be pricier. Installation usually requires inserting toner cartridges and possibly a drum unit.
- All-in-One (Multifunction) Printers (MFPs): Many modern printers are MFPs, combining printing with scanning, copying, and often faxing capabilities. These devices offer excellent versatility, saving space and consolidating functions. Their installation process might be slightly more involved, requiring software that manages all these functions.
- Photo Printers: Specialized for producing high-quality photographic prints, these often use specific ink sets (e.g., more than four colors) and advanced paper handling. Their software might include photo editing and enhancement tools.
- Thermal Printers: Less common for general use, these are often found in retail (receipt printers) or label printing. They use heat to transfer images onto special paper and typically have a very straightforward, driver-focused installation.
Regardless of the type, each printer will have unique physical features and software requirements, so always consult your printer’s manual for specific instructions.
Choosing Your Connection Method: Wired vs. Wireless
The method you use to connect your printer to your computer or network is a fundamental decision that impacts both setup and daily use. Modern printers offer several connectivity options, each with its advantages and considerations.
- USB Connection (Universal Serial Bus): This is the simplest and most direct method for connecting a single computer to a printer. You simply plug a USB cable from the printer into an available USB port on your computer. It’s reliable, fast, and generally “plug and play.” However, it limits the printer’s accessibility to only the connected computer unless that computer shares it over a network.
- Wi-Fi Connection (Wireless Fidelity): The most popular choice for homes and modern offices, Wi-Fi allows multiple devices (computers, smartphones, tablets) to print wirelessly to a single printer from anywhere within the network range. This offers unparalleled flexibility and reduces cable clutter. Setup involves connecting the printer to your existing Wi-Fi network, which can be done via WPS (Wi-Fi Protected Setup), the printer’s control panel, or manufacturer software.
- Ethernet Connection (Wired Network): Common in office environments, an Ethernet connection uses a physical cable to connect the printer directly to your router or network switch. This provides a highly stable and fast connection, ideal for shared printers in busy workgroups. Like Wi-Fi, it allows multiple network-connected devices to access the printer.
- Bluetooth Connection: Less common for primary printing, Bluetooth is typically used for mobile printing from devices like smartphones or tablets, often for smaller, portable printers. Its range is more limited than Wi-Fi, and it might not be suitable for general-purpose office printing due to speed and device pairing requirements.
When choosing, consider how many people will use the printer, from where they’ll print, and the stability requirements. For most home users, Wi-Fi offers the best balance of convenience and functionality.
Gathering Your Tools and Information
Before you begin, ensure you have these items readily available:
- The Printer Itself: Unboxed and placed in its desired location, with all protective tapes removed.
- Power Cable: To connect the printer to a power outlet.
- USB Cable (if applicable): While not always included, you might need a Type-A to Type-B USB cable for wired connections.
- Ink/Toner Cartridges: Unpack these carefully according to the printer’s manual.
- Installation CD/DVD (optional): Many modern printers rely on web downloads, but some still include a disc.
- Internet Connection: Essential for downloading the latest drivers and software.
- Your Computer/Device: The one you’ll be installing the printer on.
- Wi-Fi Network Name (SSID) and Password (for wireless setup): Crucial for connecting to your network.
- User Manual/Quick Start Guide: Your primary reference for specific instructions.
Step-by-Step Installation Guides
With preparations complete, let’s dive into the actual installation process. We’ll cover the most common connection methods.
Method 1: Installing a USB Printer (Wired Connection)
This is often the most straightforward method, especially for single-user setups.
- Unpack and Power On: Carefully remove the printer from its packaging, remove all protective tapes and packing materials (inside and out), and place it on a stable surface. Connect the power cable and plug it into a wall outlet. Turn on the printer.
- Install Ink/Toner Cartridges: Follow the printer’s display prompts or the manual to install the ink or toner cartridges. Ensure they click into place securely. The printer might perform an initial calibration or alignment.
- Connect the USB Cable: With the printer powered on and your computer also running, connect one end of the USB cable (usually the square, Type-B end) to the printer and the other end (the rectangular, Type-A end) to an available USB port on your computer.
- Automatic Driver Installation (Plug and Play): In most modern operating systems (Windows, macOS), the computer will detect the new hardware and attempt to install the necessary drivers automatically. You might see a notification indicating “Device setup in progress” or “Installing printer driver.” Allow this process to complete.
- Manual Driver Installation (if necessary): If automatic installation fails or doesn’t provide full functionality, you’ll need to install drivers manually.
- From CD/DVD: Insert the installation disc into your computer’s optical drive and follow the on-screen instructions.
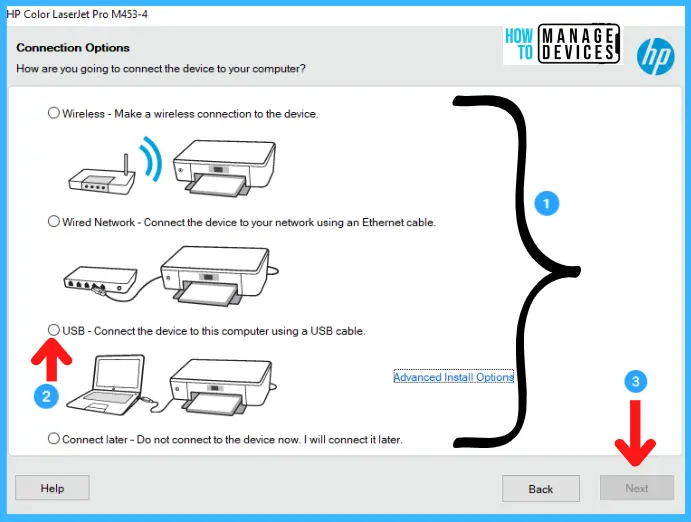
- From Manufacturer’s Website: This is the recommended method as it ensures you get the latest drivers. Go to the printer manufacturer’s official support website (e.g., HP, Epson, Canon, Brother). Navigate to the “Support” or “Downloads” section, enter your printer’s model number, and download the full software package or driver. Run the installer and follow the prompts.
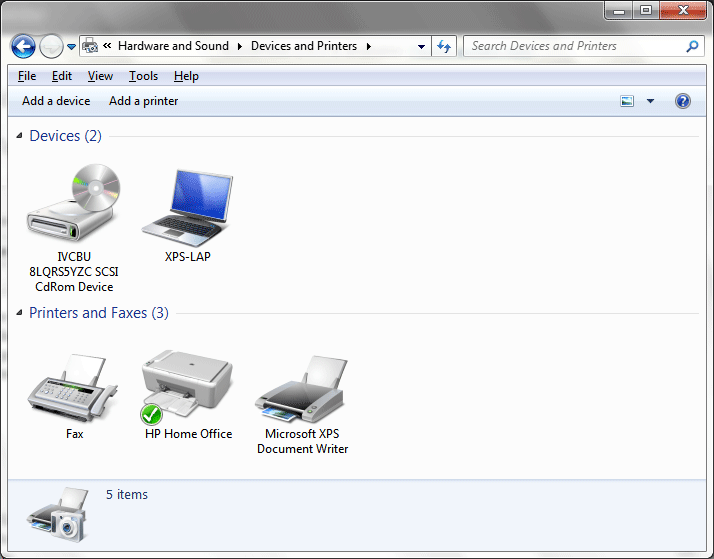
- Add Printer (Windows/macOS):
- Windows: Go to
Settings > Devices > Printers & scanners. Your printer should appear in the list. If not, click “Add a printer or scanner” and let Windows search. If still not found, click “The printer that I want isn’t listed,” then select “Add a local printer or network printer with manual settings” and choose the correct USB port. - macOS: Go to
System Settings (or System Preferences) > Printers & Scanners. Click the ‘+’ button to add a printer. Your USB-connected printer should appear in the list. Select it and click “Add.”
- Windows: Go to
- Test the Printer: Open a document (e.g., a Word document, a web page) and initiate a print command. If it prints successfully, your USB printer is ready to use!
Method 2: Installing a Wireless Printer (Wi-Fi Connection)
Wireless printing offers maximum flexibility. This method is slightly more involved but well worth the effort.
- Unpack and Initial Power On: As with USB printers, unpack the printer, remove all packing materials, install ink/toner, and connect it to power. Turn it on.
- Connect to Your Wi-Fi Network: This is the crucial step. Most wireless printers have a control panel or LCD screen that guides you.
- WPS (Wi-Fi Protected Setup): If your router and printer both support WPS, this is the easiest method. On your printer’s control panel, select the WPS option. Within two minutes, press the WPS button on your Wi-Fi router. The printer should automatically connect.
- Manual Wi-Fi Setup: If WPS isn’t an option or fails, you’ll need to manually select your network. On the printer’s control panel, navigate to the “Network Settings” or “Wireless Setup Wizard.” It will scan for available Wi-Fi networks. Select your network’s SSID (name) and enter your Wi-Fi password (WPA2 key). Confirm the connection.
- Using Manufacturer Software (from a computer): Some printers can be set up wirelessly by connecting them temporarily via USB to a computer, running the manufacturer’s installer, and selecting the “wireless setup” option. The software will then transfer the Wi-Fi credentials to the printer, allowing you to disconnect the USB cable.
- Install Drivers on Your Computer: Once the printer is successfully connected to your Wi-Fi network, your computer needs to recognize it.
- Manufacturer’s Website (Recommended): Go to the printer manufacturer’s support website, enter your model number, and download the full software package for your operating system. Run the installer and select the option for “wireless network connection” or “connect to a network printer.” The installer will usually detect the printer on your network and guide you through the driver installation.
- Windows: Go to
Settings > Devices > Printers & scanners. Click “Add a printer or scanner.” Windows will search for network printers. Select your printer when it appears and follow the prompts. If it doesn’t appear, click “The printer that I want isn’t listed,” then select “Add a printer using a TCP/IP address or hostname” (if you know the printer’s IP address) or “Add a Bluetooth, wireless or network discoverable printer.” - macOS: Go to
System Settings (or System Preferences) > Printers & Scanners. Click the ‘+’ button. Your wireless printer should appear under the “Default” tab or “IP” tab if you know its IP. Select it and click “Add.”
- Add the Printer to Mobile Devices:
- AirPrint (iOS/macOS): If you have an Apple device and a compatible printer, AirPrint allows direct printing without extra drivers. Simply open the item you want to print, tap the share icon, select “Print,” choose your AirPrint-enabled printer, and print.
- Android/Google Cloud Print (or alternatives): For Android devices, many printer manufacturers offer dedicated apps (e.g., HP Smart, Canon PRINT Inkjet/SELPHY, Epson iPrint). Install the app, and it will help you discover and print to your wireless printer. Google Cloud Print has been deprecated, but modern Android devices often support “Default Print Service” that can discover network printers.
- Test Wireless Connectivity: Send a print job from your computer and a mobile device to confirm the printer is accessible across your network.
Method 3: Installing an Ethernet Printer (Network Connection)
Ethernet connections are best for speed, stability, and shared access in larger network environments.
- Unpack, Power On, and Install Consumables: Follow the same initial steps as with other printers: unbox, remove packing materials, install ink/toner, connect power, and turn on.
- Physical Connection to Router/Switch: Connect one end of an Ethernet cable to the printer’s Ethernet port and the other end to an available LAN port on your router or network switch. The printer should automatically obtain an IP address from your network’s DHCP server.
- Find the Printer’s IP Address: You’ll likely need the printer’s IP address to add it to your computer. You can typically find this by:
- Checking the printer’s control panel (Network Settings, Status, or Information menu).
- Printing a network configuration page from the printer’s menu.
- Checking your router’s connected devices list.
- Install Drivers and Add Printer:
- Manufacturer’s Website (Recommended): Download the full software package for your printer model and operating system. During installation, select “network connection” or “connect via Ethernet/IP address.” The installer will prompt you for the printer’s IP address or attempt to discover it on the network.
- Windows: Go to
Settings > Devices > Printers & scanners. Click “Add a printer or scanner.” If Windows doesn’t automatically find it, click “The printer that I want isn’t listed.” Choose “Add a printer using a TCP/IP address or hostname,” enter the printer’s IP address, and let Windows try to install the driver. You might need to manually select the driver from a list or provide the driver file you downloaded. - macOS: Go to
System Settings (or System Preferences) > Printers & Scanners. Click the ‘+’ button. Select the “IP” tab. Choose “HP Jetdirect – Socket” or “LPD (Line Printer Daemon)” as the protocol, enter the printer’s IP address, and select the correct driver from the “Use” dropdown or browse for the downloaded driver.
- Test Network Printing: Send a test print job to ensure your computer can communicate with the printer over the network.
Post-Installation Best Practices and Troubleshooting
A successful installation is just the beginning. Maintaining your printer and knowing how to tackle common issues will ensure long-term reliability.
Optimizing Your Printer’s Performance
- Update Drivers Regularly: Manufacturer websites frequently release updated drivers that improve performance, add features, and fix bugs. Check periodically for new versions.
- Calibrate Print Heads/Clean Nozzles: If you notice streaky prints or incorrect colors, use your printer’s utility software (usually found in the printer’s properties/preferences on your computer) to perform print head cleaning or calibration.
- Manage Ink/Toner Levels: Keep an eye on your consumables. Many printers have software that monitors levels and warns you when they’re low. Don’t let cartridges completely run dry if possible, as this can sometimes affect print head health.
- Firmware Updates: Occasionally, manufacturers release firmware updates for the printer itself. These can improve functionality, security, or address hardware-level issues. Follow manufacturer instructions carefully when performing firmware updates, as interruptions can brick the device.
- Securing Your Wireless Printer: Change the default administrator password if your printer has one, and ensure your Wi-Fi network uses strong encryption (WPA2/WPA3). This prevents unauthorized access to your printer and potentially your network.
Common Installation Problems and Solutions
Even with careful setup, issues can arise. Here’s how to address some frequent problems:
- Printer Not Detected:
- USB: Ensure the cable is securely plugged into both the printer and the computer. Try a different USB port or a different USB cable. Restart both the printer and the computer.
- Wireless/Ethernet: Check that the printer is powered on and correctly connected to your network (Wi-Fi light on, Ethernet cable securely plugged in). Restart your router, printer, and computer. Verify the printer has an IP address (check its control panel or network configuration page). Ensure your computer and printer are on the same network segment (e.g., same Wi-Fi network, not one on guest Wi-Fi and the other on main Wi-Fi).
- Drivers Not Installing Correctly:
- Download the latest drivers directly from the manufacturer’s website.
- Disable antivirus/firewall temporarily during installation (remember to re-enable afterward).
- Run the installer as an administrator.
- Try uninstalling any previous printer drivers completely before attempting a fresh install.
- Printing Blank Pages/Poor Quality:
- Check ink/toner levels.
- Ensure ink/toner cartridges are properly seated.
- Run a print head cleaning and alignment utility from your printer software.
- Check for any protective seals or tapes that might still be on the cartridges.
- Connection Drops (Wi-Fi/USB):
- Wi-Fi: Ensure the printer is within good range of your Wi-Fi router. Minimize interference from other electronic devices. Assign a static IP address to your printer on your router to prevent it from changing.
- USB: Avoid using long or unpowered USB hubs. Connect directly to a primary USB port on your computer.
- Firewall Issues: Your computer’s firewall might be blocking communication with the printer, especially for network printers. Temporarily disable the firewall to test, then create an exception for the printer’s ports or IP address.
- “Printer Offline” Message: This usually means your computer can’t communicate with the printer. Check all physical connections and network status. In Windows, go to
Settings > Devices > Printers & scanners, click on your printer, thenManage. Ensure “Use Printer Offline” is unchecked. Restart the print spooler service (services.msc > Print Spooler > Restart). - Network Configuration Errors: If manually entering IP addresses, double-check for typos. If using DHCP, ensure your router is functioning correctly.
Advanced Tips and Resources
- Setting Default Printer: To save time, set your most frequently used printer as the default in your OS settings.
- Sharing a Printer on a Network: If you have a USB printer connected to one computer, you can often share it over your home network so other devices can print to it. This is done through your operating system’s sharing settings (e.g.,
Control Panel > Network and Sharing Center > Change advanced sharing settingsin Windows). - Using Manufacturer Support and Online Forums: If you encounter persistent issues, your printer manufacturer’s support website is invaluable. They often have detailed FAQs, troubleshooting guides, and even live chat or phone support. General tech forums and communities can also provide solutions from other users who’ve faced similar problems.

Conclusion
Installing a printer, while seemingly a minor task, is a critical step in setting up a functional home or office environment. By following these detailed steps, understanding your printer’s capabilities, and leveraging the appropriate connection method, you can transform a potentially frustrating experience into a seamless integration. Remember that proper preparation, methodical execution, and knowing how to troubleshoot common issues are the keys to not just installing, but also maintaining, an efficient printing solution. With your printer now successfully set up, you’re ready to tackle everything from important documents to cherished memories, bridging the gap between your digital world and the tangible pages in your hand.
aViewFromTheCave is a participant in the Amazon Services LLC Associates Program, an affiliate advertising program designed to provide a means for sites to earn advertising fees by advertising and linking to Amazon.com. Amazon, the Amazon logo, AmazonSupply, and the AmazonSupply logo are trademarks of Amazon.com, Inc. or its affiliates. As an Amazon Associate we earn affiliate commissions from qualifying purchases.