In an increasingly data-driven world, the demand for digital storage is constantly growing. Whether you’re a gamer needing more space for the latest titles, a content creator managing vast media libraries, a professional handling large datasets, or simply someone whose old hard drive is struggling to keep up, installing a new disk drive is one of the most impactful upgrades you can perform on your computer. It offers a significant boost in performance, expands your storage capacity, and can even breathe new life into an aging system. Far from being a daunting task reserved for IT professionals, installing a new disk drive is a relatively straightforward process that most users can accomplish with a little guidance and the right tools.
This comprehensive guide will walk you through every step of the journey, from choosing the right drive and preparing your workspace to the physical installation and crucial post-installation software configuration. We’ll demystify the process, ensuring you have the confidence to upgrade your machine and unlock its full potential.
I. Preparation is Key: Gathering Your Tools and Knowledge
Before you even think about opening your computer case, a solid preparation phase will save you time, prevent potential headaches, and ensure a smooth installation. This involves understanding your needs, selecting the appropriate hardware, and gathering the necessary tools while prioritizing safety.
A. Identifying Your Needs: Internal vs. External, HDD vs. SSD
The first step in any upgrade project is to assess your current system and future requirements. What kind of drive do you need?
- Internal vs. External: This guide primarily focuses on internal drives, which are installed directly inside your computer’s chassis, offering superior speed and integration. External drives, while convenient for portability and quick backups, connect via USB and typically offer lower performance for primary storage.
- Hard Disk Drive (HDD) vs. Solid State Drive (SSD): This is perhaps the most crucial decision.
- HDDs (Hard Disk Drives) are traditional storage devices that use spinning platters to store data. They offer a very high capacity for a lower cost, making them ideal for bulk storage of large files like movies, photos, and documents. However, they are slower, more susceptible to physical shock, and consume more power. They typically connect via SATA.
- SSDs (Solid State Drives) store data on flash memory chips, similar to a large USB drive. They offer dramatically faster read/write speeds, silent operation, superior durability (no moving parts), and lower power consumption. While generally more expensive per gigabyte than HDDs, their performance benefits are immense, making them the preferred choice for operating systems, applications, and games. SSDs come in several form factors:
- 2.5-inch SATA SSDs: These look similar to laptop HDDs and connect via SATA data and power cables, just like HDDs. They are a direct performance upgrade for older systems.
- M.2 SATA SSDs: These are smaller, stick-like modules that plug directly into an M.2 slot on your motherboard. They still use the SATA protocol, so their speed is similar to 2.5-inch SATA SSDs, but they are more compact.
- M.2 NVMe SSDs: These also plug into an M.2 slot but utilize the much faster PCIe interface. NVMe (Non-Volatile Memory Express) SSDs offer significantly higher performance than any SATA drive, making them the fastest option available for consumer PCs. They are ideal for primary boot drives, demanding applications, and high-speed data transfer.
Before purchasing, check your motherboard’s specifications to determine what type of drives it supports (SATA ports, M.2 slots, NVMe compatibility). Most modern motherboards support both SATA and NVMe M.2 drives. If you’re unsure, consult your motherboard’s manual or look up your PC’s model online.
B. Essential Tools and Safety Precautions
Once you’ve selected your drive, it’s time to gather your tools and prepare for a safe installation.
- Screwdriver Set: A basic Phillips-head screwdriver is usually sufficient. Some cases or drive cages might require specific Torx or flathead screwdrivers. Magnetic tips are a bonus for preventing dropped screws.
- Anti-static Wrist Strap: This is highly recommended to prevent electrostatic discharge (ESD) from damaging sensitive components. ESD can occur without you feeling it and can cause irreparable harm.
- Flashlight or Headlamp: To illuminate the often-dark interior of your PC case.
- Zip Ties or Velcro Cable Straps: For effective cable management, which improves airflow and aesthetics.
- Your New Drive: Ensure it’s out of its packaging but handle it by the edges.
- SATA Data Cable (if installing a SATA drive): Many new SATA drives don’t include this, so you might need to purchase one separately. Your motherboard likely came with a few spares.
- Operating System Installation Media (Optional): If you plan to install your operating system on the new drive, have your Windows installation USB or disc ready.
- Backup: This is crucial. Before making any significant hardware changes, always back up your important data. While installing a new drive is relatively safe, unforeseen issues can occur. Use an external drive or cloud service to safeguard your files.
Safety Precautions:
- Power Down and Unplug: Completely shut down your computer and unplug it from the wall outlet.
- Ground Yourself: Wear your anti-static wrist strap and attach it to an unpainted metal surface of your PC case (e.g., the power supply housing). If you don’t have a strap, periodically touch an unpainted metal part of your case to discharge any static electricity.
- Work in a Clean, Well-Lit Area: Ensure you have enough space and good lighting to see what you’re doing.
- Handle Components Carefully: Avoid touching the gold contacts on circuit boards. Hold drives by their sides.
II. The Physical Installation Process
With preparation complete, you’re ready to open your computer and physically install the new drive. This section will guide you through the process for typical desktop PCs, with notes for laptop considerations.
A. Opening Your Computer Case (Desktop) / Accessing Drive Bay (Laptop)
The first physical step is gaining access to the internal components.
-
Desktop PC:
- Lay the Case Down: Place your PC tower on its side on a stable, flat surface. This makes it easier to work inside.
- Remove Side Panel(s): Most desktop cases have thumb screws or regular screws securing the side panel(s) at the back. Unscrew them and gently slide the panel backward, then lift it away. You’ll typically only need to remove the main panel (the left side when looking from the front) to access the motherboard and drive bays. Some cases might require removing both panels for optimal cable management.
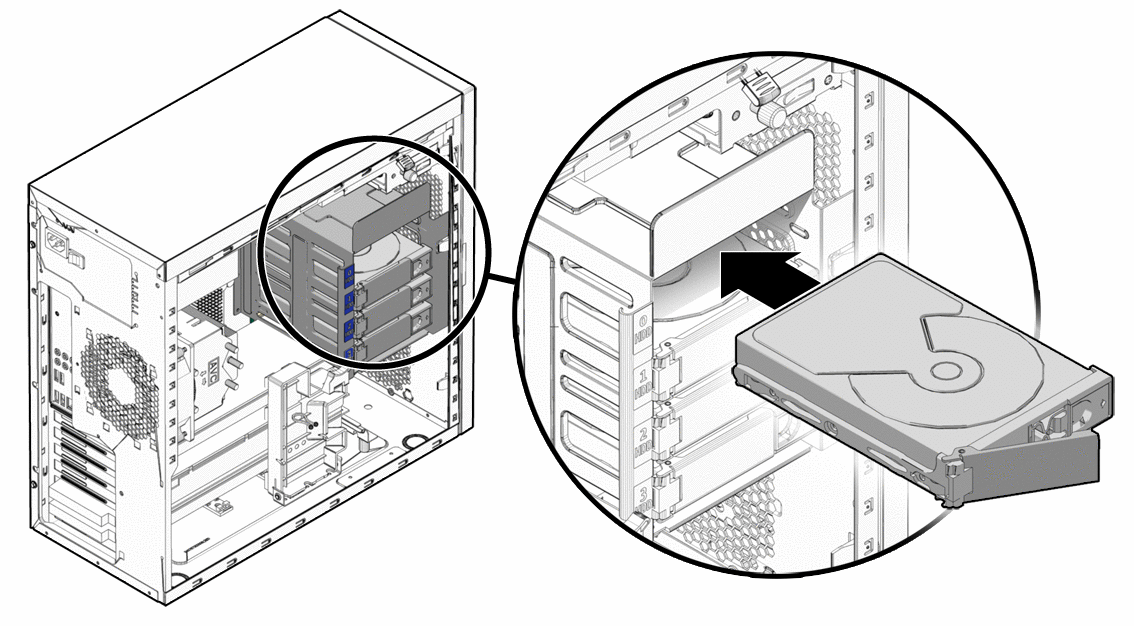
- Locate Drive Bays: Inside your case, look for dedicated drive bays. These are usually metal cages or brackets designed to hold 3.5-inch HDDs or 2.5-inch SSDs. M.2 slots are typically found directly on the motherboard, often under a heatsink.
-
Laptop: Laptop drive installation is generally more complex and varies greatly by model.
- Consult Your Laptop Manual: This is essential as some laptops may have easily accessible drive bays (e.g., a dedicated panel on the bottom), while others require significant disassembly (e.g., removing the entire back cover, battery, and even the motherboard).
- Remove Battery: If possible, always remove the laptop’s main battery before working inside.
- Locate Drive Slot: Laptops typically use 2.5-inch SATA drives or M.2 NVMe/SATA drives. The process will involve unscrewing a panel or the entire back cover and carefully removing/inserting the drive.
- Note: If you’re unsure about laptop disassembly, consider consulting a professional or watching specific video tutorials for your exact laptop model.
B. Connecting the Drive: Power and Data Cables
This is where your new drive gets connected to your system.
-
For 3.5-inch HDD or 2.5-inch SATA SSD:
- Mount the Drive:
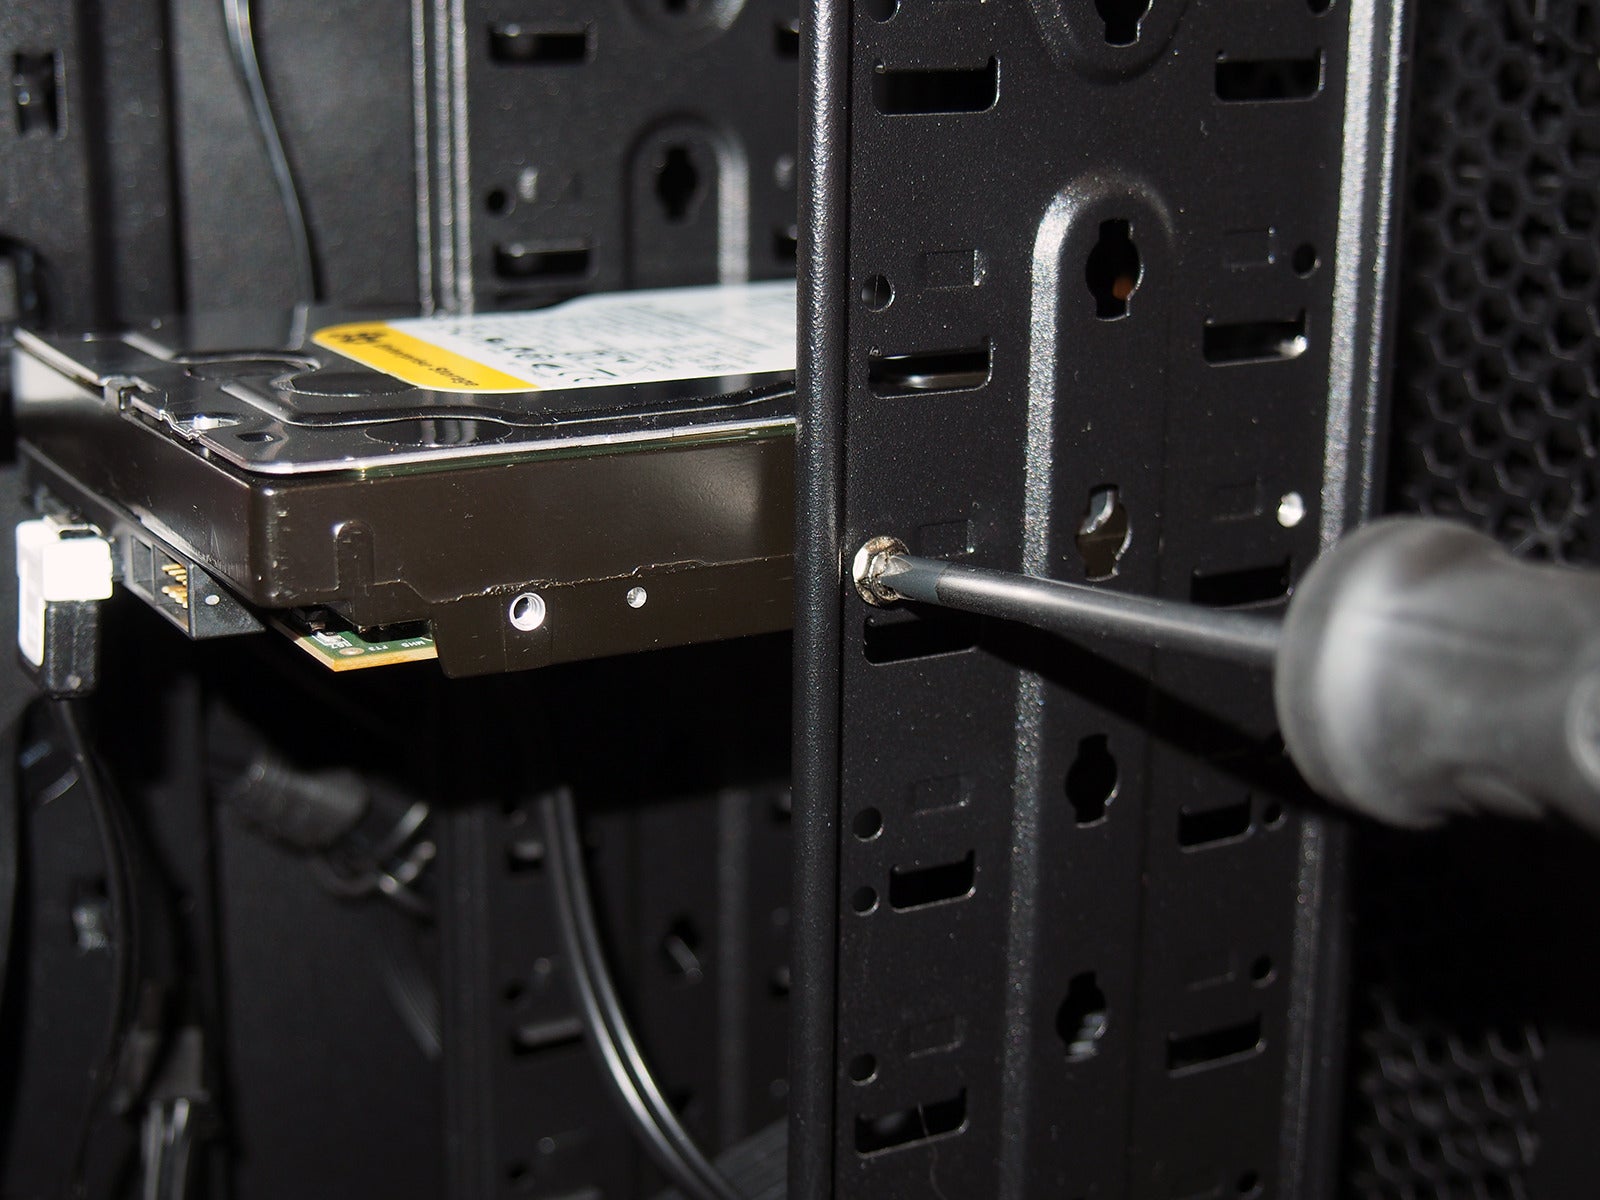
- In a Drive Bay: Slide the drive into an available 3.5-inch or 2.5-inch drive bay. Many modern cases have tool-less drive cages that use plastic sleds or clips. If not, secure the drive with screws through the side of the bay. For 2.5-inch SSDs in 3.5-inch bays, you might need a 2.5-inch to 3.5-inch adapter bracket (often sold separately or included with some SSDs).
- Behind Motherboard Tray: Some cases have mounting points for 2.5-inch SSDs directly behind the motherboard tray, allowing for cleaner cable management. Secure the SSD with screws.
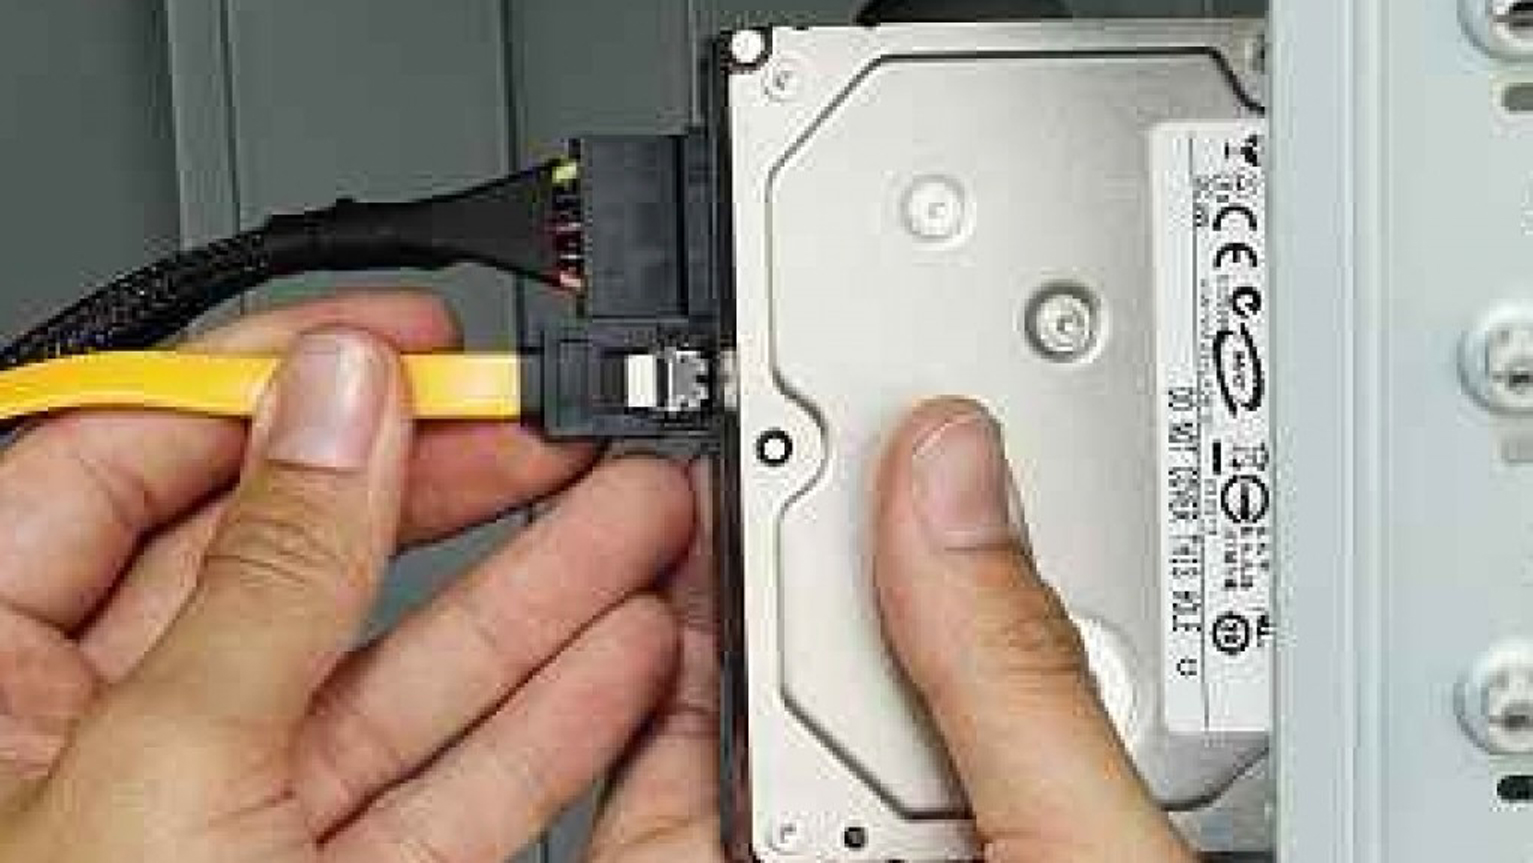
- Connect SATA Data Cable: Plug one end of the SATA data cable into the L-shaped port on the back of your new drive. Plug the other end into an available SATA port on your motherboard. Motherboard SATA ports are usually labeled (e.g., SATA0, SATA1, etc.).
- Connect SATA Power Cable: Locate a SATA power connector coming from your power supply unit (PSU). These are wider, flat L-shaped connectors. Plug one into the corresponding port on the back of your new drive. Ensure it clicks into place firmly.
- Mount the Drive:
-
For M.2 NVMe/SATA SSD:
- Locate M.2 Slot: Find an available M.2 slot on your motherboard. They are horizontal slots, often labeled and sometimes covered by a small heatsink or metal cover.
- Remove Standoff/Screw: Most M.2 slots have a small screw and a standoff (a raised metal cylinder) at the end of the slot. Unscrew the screw and remove it, but keep the standoff in place if it’s adjustable for different M.2 lengths.
- Insert M.2 SSD: Gently slide the M.2 SSD into the slot at a slight angle (around 30 degrees). The notch on the SSD should align with the key in the slot. Push it in until it’s firmly seated.
- Secure the Drive: Push the M.2 SSD down so it lies flat against the motherboard. Reinsert the screw into the standoff to hold the drive in place. If your motherboard has an M.2 heatsink, remove the protective film (if any) and place it over the SSD, securing it with its dedicated screws. M.2 drives do not require separate power or data cables; all connectivity is handled through the slot itself.
C. Securing the Drive and Closing the Case
Once all connections are made and the drive is physically secured:
- Cable Management (Optional but Recommended): Use zip ties or Velcro straps to tidy up any loose cables. Route them neatly along the back of the case or through dedicated channels to improve airflow and make future access easier.
- Double-Check Connections: Ensure all power and data cables are firmly seated in both the drive and the motherboard/PSU.
- Replace Side Panel(s): Carefully slide the side panel(s) back into place and secure them with the screws you removed earlier.
- Reconnect Peripherals: Reconnect your monitor, keyboard, mouse, and other peripherals.
- Plug in Power Cord: Finally, plug your computer back into the wall outlet.
III. Post-Installation Software Configuration
Installing the hardware is only half the battle. For your operating system to recognize and utilize the new drive, you’ll need to perform some software configuration steps.
A. Initializing and Partitioning Your New Drive
When you first boot up your computer with a new drive, it won’t immediately appear in “This PC” (Windows) or Finder (macOS). It needs to be initialized and partitioned.
-
For Windows Users:
- Boot Up Your PC: Turn on your computer.
- Open Disk Management: Right-click the Start button (or press
Win + X) and select “Disk Management.” - Initialize Disk: A “Initialize Disk” window should automatically pop up for your new drive. If not, right-click on the new drive (it will typically show as “Disk X, Unknown, Not Initialized”) and select “Initialize Disk.”
- Choose Partition Style: You’ll be prompted to choose between MBR (Master Boot Record) and GPT (GUID Partition Table).
- GPT is the modern standard, supporting drives larger than 2TB and more partitions. It’s required for UEFI boot on Windows. Always choose GPT unless you have a very old system or specific compatibility requirements for legacy boot.
- MBR is older, limited to 2TB drive size and four primary partitions.
- Click “OK.”
- Choose Partition Style: You’ll be prompted to choose between MBR (Master Boot Record) and GPT (GUID Partition Table).
- Create New Simple Volume: After initialization, the drive will show as “Unallocated Space.” Right-click on the “Unallocated Space” and select “New Simple Volume…”
- Follow the Wizard:
- Click “Next” on the Welcome screen.
- Specify the volume size: You can use the entire drive or divide it into multiple partitions. For most users, using the maximum available space for one partition is fine. Click “Next.”
- Assign a drive letter: Choose an available letter (e.g., D:, E:). Click “Next.”
- Format the partition: See the next section for details on formatting.
-
For macOS Users (Disk Utility):
- Boot Up Your Mac: Turn on your computer.
- Open Disk Utility: Go to Applications > Utilities > Disk Utility.
- Select Your New Drive: In the sidebar, select your new drive (it will usually appear as an unformatted drive, perhaps with its manufacturer name).
- Erase/Format: Click the “Erase” button in the toolbar.
- Name: Give the drive a descriptive name.
- Format: Choose an appropriate file system (see below). For macOS, choose APFS (Apple File System) for internal SSDs/NVMe drives or Mac OS Extended (Journaled) for HDDs if it’s solely for macOS.
- Scheme: Select GUID Partition Map.
- Click “Erase.”
B. Formatting the Drive for Use
Formatting prepares the drive to store data by creating a file system.
-
For Windows Users (Continuing from Disk Management):
- File System:
- NTFS (New Technology File System): This is the default and recommended file system for Windows drives. It supports large files, provides security features, and is highly robust.
- exFAT (Extended File Allocation Table): This is a good choice if you need to use the drive with both Windows and macOS systems, as both can read and write to it. It supports large files.
- FAT32 (File Allocation Table 32): An older file system with limitations (e.g., maximum file size of 4GB), generally not recommended for primary storage but sometimes used for compatibility with older devices.
- Allocation unit size: Leave this at “Default.”
- Volume label: Give your drive a name (e.g., “Data Drive,” “Games”).
- Check “Perform a quick format.”
- Click “Next,” then “Finish.” Your drive should now appear in “This PC.”
- File System:
-
For macOS Users (Continuing from Disk Utility):
- File System:
- APFS (Apple File System): The modern, default file system for macOS on SSDs and NVMe drives. Offers excellent performance and features like snapshots.
- Mac OS Extended (Journaled) / HFS+: The older default for macOS, still suitable for HDDs.
- exFAT: If you need cross-platform compatibility with Windows.
- Click “Erase.” Once the process is complete, your new drive will appear in Finder.
- File System:
C. Data Migration and OS Installation (Optional, but Important for Some Scenarios)
If your new drive is replacing your old boot drive, or if you want to move your operating system to a faster SSD:
- Clean OS Installation: This is often the best option for performance and stability. You’ll install Windows or macOS onto the new drive from scratch using your installation media. This requires reinstalling all your applications and transferring your personal files from your old drive (after installation).
- Cloning/Data Migration: This involves creating an exact copy of your old drive onto the new drive. This is popular for migrating an OS from an HDD to an SSD without reinstalling everything. You’ll need third-party cloning software (e.g., Macrium Reflect, Acronis True Image, or software often bundled with SSDs like Samsung Data Migration). The new drive must be equal to or larger than the used space on the old drive.
IV. Troubleshooting Common Issues
While the process is generally smooth, you might encounter a few hurdles. Here are some common issues and their solutions:
A. Drive Not Detected
- Check Physical Connections: The most common culprit. Power down, unplug, open the case, and ensure both the SATA data and power cables (or M.2 connection) are firmly seated on both ends. Try a different SATA port on the motherboard or a different power cable from the PSU.
- Check BIOS/UEFI:
- Restart your computer and repeatedly press the key to enter your BIOS/UEFI settings (commonly
Del,F2,F10,F12– check your motherboard manual). - Look for a “Storage” or “SATA Configuration” section. Ensure the SATA port the drive is connected to is enabled. The drive should be listed among the detected devices.
- If you installed an NVMe M.2 drive, ensure the M.2 slot is enabled and configured correctly (sometimes M.2 use shares PCIe lanes with SATA ports, disabling some SATA ports).
- Ensure AHCI mode is enabled for SATA drives (it usually is by default but worth checking).
- Restart your computer and repeatedly press the key to enter your BIOS/UEFI settings (commonly
- Driver Issues (Less Common for New Drives): For very old motherboards or specific NVMe controllers, you might need to ensure the latest chipset drivers are installed.
- Faulty Drive/Cable: If none of the above work, try a different SATA data cable or, as a last resort, test the drive in another computer or with a USB enclosure to determine if the drive itself is faulty.
B. Performance Problems
- SATA Speed Mismatch: Ensure your drive is connected to a SATA III (6Gbps) port on your motherboard to get full speed. Older SATA II (3Gbps) ports will limit performance. M.2 NVMe drives should be in PCIe Gen3 x4 or Gen4 x4 slots for optimal speed.
- AHCI Mode: As mentioned, ensure AHCI (Advanced Host Controller Interface) is enabled in your BIOS/UEFI for SATA SSDs. If not, performance will be severely hampered.
- TRIM Enabled (for SSDs): TRIM is a command that helps maintain SSD performance over time. It’s usually enabled by default in modern operating systems (Windows 7+ and macOS). You can check its status in Windows via Command Prompt:
fsutil behavior query DisableDeleteNotify. A result of0means TRIM is enabled. - Full Drive: SSD performance can degrade significantly when they are nearly full. Try to keep at least 15-20% of your SSD space free.
Conclusion
Congratulations! You’ve successfully installed a new disk drive, enhancing your computer’s capabilities and extending its lifespan. This seemingly complex task, broken down into manageable steps, empowers you to take control of your hardware and tailor your system to your evolving digital needs. Whether it’s the lightning-fast responsiveness of an NVMe SSD or the vast storage capacity of a traditional HDD, your new drive is ready to serve. Enjoy the improved performance, ample space, and the satisfaction of a successful DIY upgrade! If you encountered any issues, remember that troubleshooting is part of the learning process, and reliable resources are always available. Stay curious, stay informed, and continue to explore the endless possibilities that technology offers.
aViewFromTheCave is a participant in the Amazon Services LLC Associates Program, an affiliate advertising program designed to provide a means for sites to earn advertising fees by advertising and linking to Amazon.com. Amazon, the Amazon logo, AmazonSupply, and the AmazonSupply logo are trademarks of Amazon.com, Inc. or its affiliates. As an Amazon Associate we earn affiliate commissions from qualifying purchases.