In today’s interconnected world, a reliable network connection isn’t just a convenience; it’s a fundamental necessity. Whether you’re working from home, streaming your favorite content, engaging in online gaming, or simply browsing the web, your computer’s ability to connect to a network hinges on a crucial component: the network controller, often referred to as a Network Interface Card (NIC) or network adapter. Without a properly functioning network controller, your digital life comes to a standstill.
While modern operating systems and hardware often make the installation of new components a plug-and-play affair, there are times when manual intervention is required. Perhaps you’re building a new PC, upgrading an older system for faster speeds (like moving from Wi-Fi 5 to Wi-Fi 6E, or Gigabit Ethernet to 2.5GbE/10GbE), or replacing a faulty adapter. Whatever the reason, understanding how to correctly install a network controller is a valuable skill for any tech enthusiast or even a regular computer user. This comprehensive guide will walk you through every step of the process, from understanding your hardware to troubleshooting common issues, ensuring you can confidently get your system connected and optimized.
Understanding Your Network Controller: The Gateway to Connectivity
Before diving into the installation process, it’s essential to understand what a network controller is, why it’s so important, and the various types available. This foundational knowledge will help you make informed decisions and tackle any challenges that may arise during installation.
What is a Network Controller?
At its core, a network controller is a piece of hardware that allows your computer to connect to a network. It acts as an intermediary, translating data from your computer into a format that can be sent over a network medium (like an Ethernet cable or Wi-Fi signal) and vice versa. Every device that connects to a network—be it a desktop, laptop, server, or even a smartphone—has some form of a network controller built-in or attached.
These controllers come equipped with unique MAC (Media Access Control) addresses, which are physical addresses burned into the hardware, identifying your device uniquely on a local network. They manage the flow of data, handle error checking, and ensure that information packets reach their intended destination. Without a functional network controller, your computer would be an isolated island, unable to communicate with the internet, local printers, other computers, or any network-attached devices.
Why is a Reliable Network Controller Essential?
The importance of a reliable network controller extends beyond mere connectivity. It directly impacts your online experience and productivity. A high-quality, properly installed network controller ensures:
- Stable Connection: Minimizes disconnections and dropped packets, crucial for uninterrupted streaming, video conferencing, and online gaming.
- Optimal Speed: Supports the maximum possible speeds offered by your internet service provider (ISP) and local network infrastructure, preventing bottlenecks. For instance, a Gigabit Ethernet port is essential to fully utilize a Gigabit internet plan, just as a Wi-Fi 6E adapter is needed to tap into the fastest speeds of a Wi-Fi 6E router.
- Enhanced Security: A well-configured network controller, especially in conjunction with updated drivers, can contribute to better network security by supporting modern encryption standards and protocols.
- System Performance: Prevents system slowdowns or freezes that can occur with faulty or poorly integrated network hardware, which might consume excessive system resources trying to establish or maintain a connection.
In the context of the website’s “Tech” focus, a network controller is a fundamental building block of modern computing. Its proper installation and maintenance are essential for leveraging software, AI tools, apps, and accessing digital security measures and productivity tools online.
Types of Network Controllers: Choosing the Right Fit
Network controllers come in various forms, each suited for different use cases and system configurations. Understanding these types is crucial for selecting the correct component and planning your installation.
- Integrated (Onboard) Controllers: Most modern motherboards come with integrated Ethernet ports and often built-in Wi-Fi and Bluetooth modules. These are convenient and don’t require separate installation. However, they might lack advanced features, faster speeds, or the latest wireless standards.
- Internal Expansion Cards (PCIe/M.2):
- PCIe (Peripheral Component Interconnect Express) Cards: These are the most common type for desktop upgrades. They slot directly into a PCIe expansion slot on your motherboard and are available for both wired (Ethernet, often 1GbE, 2.5GbE, 10GbE) and wireless (Wi-Fi, often with Bluetooth) connectivity. PCIe cards offer robust performance and can support higher bandwidths.
- M.2 Modules: Smaller form factor modules primarily found in laptops and increasingly on modern desktop motherboards. These are common for Wi-Fi and Bluetooth combinations, offering a compact and high-speed solution. They usually require a specific M.2 slot.
- External USB Adapters: These plug into an available USB port on your computer. They are incredibly convenient for laptops without built-in Wi-Fi or for desktops needing an easy upgrade. USB adapters are available for both wired (USB to Ethernet) and wireless (USB Wi-Fi dongles) connectivity. While simpler to install, their performance can sometimes be limited by the USB standard (e.g., USB 2.0 vs. USB 3.0/3.1/3.2) and the adapter’s internal chipset.
- Thunderbolt Adapters: For high-performance external networking, especially for professional workstations or Macs, Thunderbolt adapters can offer extremely fast wired Ethernet (e.g., 10GbE) or even multi-Gigabit solutions, leveraging the high bandwidth of Thunderbolt ports.
Your choice will depend on your computer’s available slots/ports, your desired network speed and type (wired/wireless), and your budget. This guide will primarily focus on the installation of internal PCIe cards and external USB adapters, as these are the most common scenarios for manual installation.
Pre-Installation Essentials: Preparing for a Seamless Setup
Before you even think about opening your computer case or plugging in a new device, a thorough preparation phase can save you significant time and frustration. This step-by-step checklist ensures you have all the necessary components, information, and safeguards in place.
Gathering Your Tools and Resources
Depending on the type of network controller you’re installing, you’ll need a few basic tools:
- Screwdriver: A Phillips-head screwdriver is usually sufficient for opening most computer cases and securing internal components. For some internal components like M.2, a smaller jeweler’s screwdriver might be required.
- Anti-Static Wrist Strap (Recommended): When working inside a computer, electrostatic discharge (ESD) can damage sensitive components. An anti-static wrist strap connected to a grounded metal object (like your computer’s chassis) safely dissipates static electricity from your body. If unavailable, frequently touch a metal part of your unpowered computer case to discharge yourself.
- Flashlight (Optional but Helpful): To illuminate cramped spaces inside the computer case.
- Your New Network Controller: Unboxed and ready.
- Driver Disc/USB or Downloaded Driver File: Crucial for the software aspect of the installation.
- Ethernet Cable (for wired controllers): Ensure it’s the correct category (Cat5e, Cat6, Cat6a) for your desired speed.
- Internet Access (from another device): In case you need to download drivers or consult online resources during the installation.
Driver Download and Preparation
Drivers are software programs that allow your operating system to communicate with hardware devices. While many modern network controllers are “plug-and-play” (PnP), meaning Windows or macOS might install a generic driver automatically, it’s almost always best practice to install the official, latest drivers from the manufacturer.
- Identify the Manufacturer and Model: Look for this information on the packaging of your new network controller or directly on the device itself.
- Visit the Manufacturer’s Website: Navigate to the support or downloads section. Search for your specific model.
- Download the Latest Drivers: Ensure you select the drivers compatible with your operating system (e.g., Windows 10 64-bit, Windows 11) and its version. Download these drivers to a USB flash drive or another accessible location.
- Why download beforehand? If your current network controller is faulty or non-existent, you won’t have internet access on the target machine to download drivers later. Having them ready is key.
- Check for Firmware Updates (Advanced): Some advanced network controllers, especially higher-end models, may have firmware updates available. While not usually necessary for initial installation, checking for these later can improve performance and stability.
System Compatibility Check
A quick check can prevent headaches later:
- Operating System: Ensure your OS version is supported by the network controller and its drivers.
- Available Slots/Ports:
- For PCIe cards: Does your motherboard have an open PCIe x1, x4, x8, or x16 slot? Most network cards use x1 slots, but some high-end multi-Gigabit cards might use x4.
- For M.2 modules: Does your motherboard have a free M.2 slot that supports network cards (typically an “E-key” slot, though check documentation for specific compatibility)?
- For USB adapters: Do you have a free USB port? If it’s a high-speed adapter, ensure you use a USB 3.0/3.1/3.2 port for optimal performance.
- Power Supply (for internal cards): While most standard network cards draw power directly from the PCIe slot, some higher-end cards (especially 10GbE or server-grade NICs) might require an additional power connector. Check your card’s documentation.
Finally, always remember to back up any critical data on your computer before performing hardware installations. While installing a network controller is generally low-risk, it’s a good practice when making any internal changes to your system.
Hardware Installation: Integrating Your New Network Controller
This section details the physical installation process, which varies depending on whether you’re installing an internal PCIe/M.2 card or an external USB adapter. Always ensure your computer is powered off and unplugged from the wall outlet before opening the case or handling internal components.

For Internal PCIe/M.2 Network Cards
Installing an internal card requires opening your computer case and working with the motherboard. Proceed with caution and follow anti-static precautions.
- Power Down and Unplug: Shut down your computer completely. Unplug the power cable from the back of the PC and any peripherals.
- Open the Computer Case: Refer to your computer’s or case’s manual for instructions on how to safely open it. Typically, this involves removing a few screws from the rear panel and sliding off the side panel.
- Discharge Static Electricity: Touch a bare metal part of the computer case or wear your anti-static wrist strap.
- Locate an Available Expansion Slot:
- PCIe: Identify an empty PCIe slot on your motherboard. They are typically long, narrow slots. PCIe x1 slots are the smallest, while x16 slots are the longest (often used for graphics cards). Most network cards use x1 slots, but they can physically fit into larger x4, x8, or x16 slots.
- M.2: Look for an M.2 slot, often with a small screw or standoff nearby, typically labeled or identifiable by its unique connector. Ensure it’s an M.2 slot suitable for Wi-Fi/Bluetooth cards (often “E-key”).
- Remove the Corresponding Slot Cover: For PCIe cards, you’ll need to remove the metal slot cover from the rear of the computer case that aligns with the chosen PCIe slot. This might involve unscrewing it or breaking it off (for older cases).
- Insert the Network Card:
- PCIe: Align the gold contacts on the network card with the PCIe slot. Apply firm, even pressure to push the card straight down into the slot until it clicks securely into place. Do not force it. Ensure the bracket on the card is flush with the back of the case.
- M.2: Angle the M.2 module into its slot (usually about a 30-degree angle), then gently push it down until it rests flat. Secure it with the small screw provided with your motherboard or M.2 card.
- Secure the Card: For PCIe cards, re-insert the screw you removed from the slot cover (or use a new screw if the cover broke off) to firmly hold the card’s bracket in place at the back of the case.
- Attach Antennas (if wireless PCIe/M.2): If your wireless card came with external antennas, screw them onto the connectors on the card’s bracket at the back of the computer. For M.2 cards, you’ll typically need to connect tiny antenna cables to the module and route them to external antenna connectors provided by your case or a separate bracket.
- Close the Computer Case: Once the card is securely installed, replace the side panel and fasten the screws.
- Reconnect and Power On: Plug in your power cable and peripherals, then power on your computer.
For External USB Network Adapters
Installing a USB adapter is significantly simpler, requiring no internal access to your computer.
- Power On Your Computer: Ensure your computer is running and at the desktop.
- Plug in the USB Adapter: Locate an available USB port on your computer. For optimal performance with high-speed adapters, use a USB 3.0 (blue interior) or higher port if available. Simply plug the adapter firmly into the port.
- Attach Antennas (if wireless USB): If your wireless USB adapter came with an external antenna, screw it into place.
- Observe System Recognition: Your operating system should immediately detect the new hardware. You might see a “New hardware found” notification.
Software Installation and Configuration: Bringing Your Network to Life
Once the hardware is physically in place, the next crucial step is to install the necessary drivers and configure your network settings. This is where your computer truly begins to communicate with the network.
Automatic Driver Detection and Installation
Modern operating systems, particularly Windows and macOS, often have a vast repository of generic drivers built-in or accessible via Windows Update.
- For USB Adapters: After plugging in a USB adapter, Windows will typically attempt to install a suitable driver automatically. You might see a notification in the system tray indicating that “Device driver software was successfully installed.”
- For PCIe/M.2 Cards: Upon booting your computer with a newly installed internal card, the OS may detect the new hardware and attempt to install a driver. If your computer has an existing internet connection (e.g., from an onboard Ethernet port), it might even download the latest drivers from Windows Update.
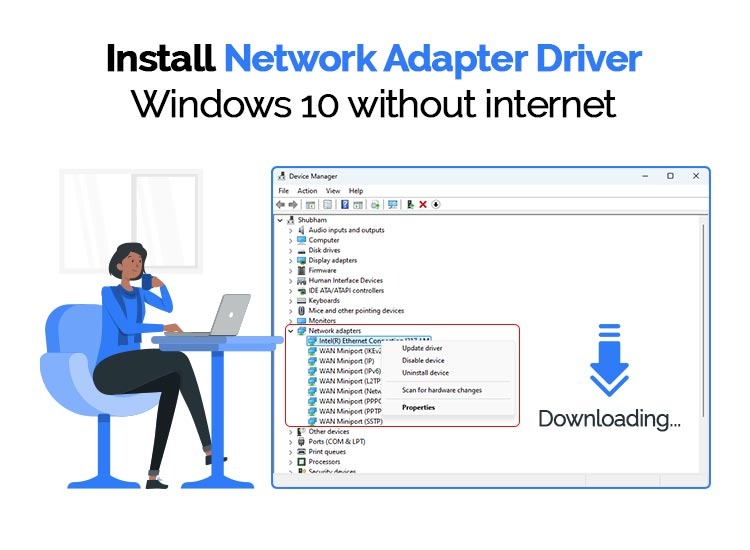
- Check Device Manager (Windows): To verify if the driver was successfully installed, right-click the Start button, select “Device Manager.” Expand “Network adapters.” You should see your new network controller listed without any yellow exclamation marks or red X’s. If it’s listed with a yellow mark, it indicates a driver issue.
Manual Driver Installation: When PnP Fails
Sometimes, automatic detection doesn’t work, or it installs a generic driver that doesn’t unlock the full potential of your new hardware. This is when your pre-downloaded drivers come into play.
- Locate Your Drivers: Insert the driver CD/USB or navigate to the folder where you saved the downloaded driver files.
- Run the Installer: Many driver packages come with an executable file (e.g.,
setup.exeorinstall.exe). Double-click this file and follow the on-screen prompts. This typically involves accepting license agreements and selecting an installation path. - Install via Device Manager (if no installer):
- Open Device Manager (as described above).
- Locate your network controller. It might appear under “Other devices” as an “Ethernet Controller” or “Network Controller” with a yellow exclamation mark.
- Right-click on the device and select “Update driver.”
- Choose “Browse my computer for driver software.”
- Click “Browse…” and navigate to the folder where you saved your downloaded drivers. Ensure “Include subfolders” is checked.
- Click “Next,” and Windows will attempt to find and install the driver.
- Reboot Your System: After driver installation, it’s almost always a good idea to restart your computer to ensure the new drivers are fully loaded and recognized by the operating system.
Verifying Installation and Initial Configuration
After installing drivers and rebooting, confirm your connection and configure basic settings.
- Check Network Status:
- Windows: Click the network icon in the system tray (bottom-right). You should see your new wired (Ethernet) or wireless (Wi-Fi) connection available.
- Wireless: If it’s a Wi-Fi adapter, click the Wi-Fi icon, select your desired network, enter the password, and click “Connect.”
- Wired: If it’s an Ethernet adapter, connect an Ethernet cable from your router/modem to the network port on your new card. The network icon should indicate a connected state.
- Test Internet Connectivity: Open a web browser and try navigating to a few websites (e.g., google.com, globalizethis.com). If you can browse, your installation is successful!
- Adjust Network Settings (Optional):
- IP Addressing: Most home networks use DHCP (Dynamic Host Configuration Protocol) to automatically assign IP addresses. For advanced users or specific network setups, you might need to configure a static IP address. This is done via Network and Internet settings > Ethernet/Wi-Fi > IP settings.
- Driver Settings: In Device Manager, right-click your network controller, go to “Properties,” then “Advanced” tab. Here you can tweak settings like “Jumbo Frame,” “Speed & Duplex,” “Power Management,” etc., to optimize performance, especially for wired connections. Caution: Only change these if you know what you’re doing, as incorrect settings can cause issues.
Troubleshooting Common Issues: Restoring Your Connection
Even with careful planning, sometimes things don’t go as smoothly as expected. Here are some common problems and their solutions.
“No Network Connection” or “Limited Connectivity”
- Check Physical Connections: Ensure the Ethernet cable is securely plugged into both the computer and the router/modem. For wireless, confirm antennas are attached firmly.
- Verify Router/Modem: Ensure your router and modem are powered on and functioning correctly. Try restarting them.
- Check Network Status in OS: In Windows, go to “Settings” > “Network & Internet.” Is your adapter listed? Is it enabled? Run the “Network troubleshooter.”
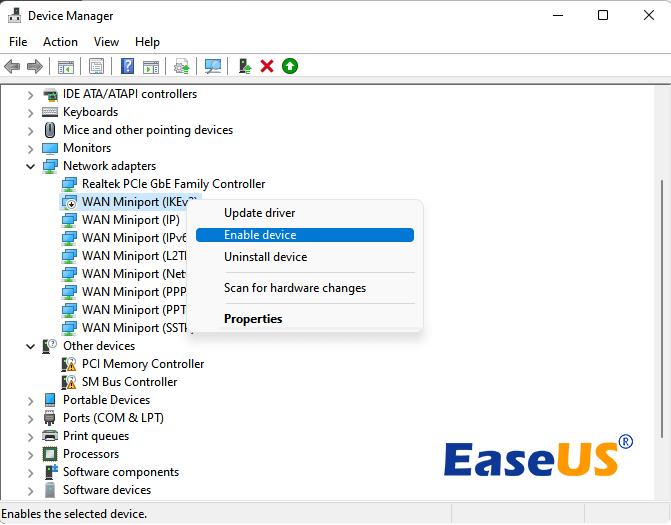
- Disable/Enable Adapter: In Device Manager, right-click your network adapter and choose “Disable device,” then “Enable device.” This can sometimes refresh the connection.
- IP Address Issues: If you have “Limited Connectivity,” your computer might not be getting a valid IP address. Open Command Prompt (as administrator) and type
ipconfig /releasethenipconfig /renew.
Driver-Related Problems
- Yellow Exclamation Mark in Device Manager: This indicates a driver issue.
- Reinstall Drivers: Follow the manual driver installation steps outlined earlier, ensuring you’re using the correct drivers for your OS and device.
- Uninstall Old Drivers: If you’re replacing a faulty card, sometimes residual old drivers can conflict. In Device Manager, right-click the old or problematic adapter, choose “Uninstall device,” and check the box to “Delete the driver software for this device.” Then restart and install the new drivers.
- Incorrect Drivers: Double-check that you downloaded drivers specifically for your network controller model and operating system version (e.g., 64-bit vs. 32-bit).
Performance and Stability Issues
-
Slow Speeds:
- Wired: Ensure your Ethernet cable is of the correct category (e.g., Cat5e for Gigabit, Cat6 for 10GbE) and not damaged. Check the “Speed & Duplex” setting in your network adapter’s advanced properties in Device Manager to ensure it’s set to “Auto Negotiation” or the correct maximum speed (e.g., 1.0 Gbps Full Duplex).
- Wireless: Move closer to your Wi-Fi router. Check for interference from other devices (microwaves, cordless phones). Ensure your router’s firmware is up to date and you’re using the correct Wi-Fi standard (e.g., Wi-Fi 6 for a Wi-Fi 6 adapter).
-
Intermittent Disconnections:
- Power Management: In Device Manager, right-click your network adapter, go to “Properties,” then “Power Management.” Uncheck “Allow the computer to turn off this device to save power.” This often resolves intermittent disconnects, especially on laptops.
- Driver Update: Sometimes, unstable connections are resolved by installing a newer, more stable driver.
-
Hardware Not Detected:
- Internal Cards: Power off, unplug, and open the case. Reseat the card firmly in its PCIe or M.2 slot. Try a different slot if available. Ensure the card is fully inserted and the slot cover is removed.
- USB Adapters: Try a different USB port. Ensure the port is functioning by plugging in another known-good USB device.
If you’ve exhausted these troubleshooting steps and are still experiencing issues, consult the manufacturer’s support resources, online forums, or consider professional assistance.
Conclusion: Empowering Your Digital Experience
Successfully installing a network controller is a fundamental step toward a robust and reliable digital experience. Whether you’re upgrading for faster internet speeds, replacing a faulty component, or building a new system from scratch, the process, while potentially daunting at first, is manageable with the right approach.
By understanding the different types of network controllers, meticulously preparing for installation, carefully following the hardware and software setup procedures, and knowing how to troubleshoot common issues, you empower yourself to take control of your computer’s connectivity. A properly installed and configured network controller is the silent hero of your online activities, ensuring seamless streaming, productive work sessions, and uninterrupted communication in an increasingly connected world. With the insights from this guide, you are now well-equipped to ensure your computer remains a vital, connected hub in your personal or professional tech ecosystem.
aViewFromTheCave is a participant in the Amazon Services LLC Associates Program, an affiliate advertising program designed to provide a means for sites to earn advertising fees by advertising and linking to Amazon.com. Amazon, the Amazon logo, AmazonSupply, and the AmazonSupply logo are trademarks of Amazon.com, Inc. or its affiliates. As an Amazon Associate we earn affiliate commissions from qualifying purchases.