In an increasingly connected world, reliable and widespread Wi-Fi is no longer a luxury but a necessity. From streaming 4K content and participating in crucial video conferences to smart home automation and online gaming, a robust wireless network underpins almost every aspect of our digital lives. However, even the most powerful Wi-Fi routers often struggle to deliver a consistent signal across larger homes or offices, leading to frustrating “dead zones” where connectivity falters or vanishes entirely. This is where a Wi-Fi extender becomes an invaluable tool, and Netgear, a leading name in networking technology, offers a range of extenders renowned for their performance and ease of use.

This comprehensive guide will walk you through the process of installing a Netgear Wi-Fi extender, transforming your patchy network into a seamless, high-speed experience. We’ll delve into the ‘why’ and ‘how,’ ensuring you not only set up your device correctly but also understand the underlying principles to optimize its performance. By the end of this article, you’ll have the knowledge to banish Wi-Fi dead zones for good, unlocking the full potential of your home or office network.
Understanding WiFi Extenders and Why Netgear Stands Out
Before diving into the installation process, it’s beneficial to grasp what a Wi-Fi extender does and why Netgear has become a go-to brand for many consumers seeking to enhance their wireless networks. Understanding the technology will empower you to make more informed decisions about network optimization.
The Problem of WiFi Dead Zones
The signals emitted by your Wi-Fi router are essentially radio waves. Like any radio wave, they can be obstructed, absorbed, or reflected by physical barriers such as walls, floors, ceilings, and even large furniture. The further you move from your router, the weaker the signal becomes, until it eventually fades into nothingness, creating those dreaded dead zones. This issue is particularly prevalent in multi-story homes, buildings with thick walls, or expansive layouts where a single router simply cannot cover every nook and cranny. The result is sluggish internet speeds, dropped connections, and a frustratingly inconsistent digital experience.
Investing in an extender is often a more cost-effective solution than purchasing an entirely new, more powerful router, especially if your current router is otherwise performing well in its immediate vicinity. It’s a strategic “tech investment” that maximizes your existing infrastructure, saving you money while significantly improving your digital reach.
Why Choose a Netgear Extender?
Netgear has built a strong reputation in the networking industry for producing reliable, high-performance, and user-friendly devices. Their Wi-Fi extenders are no exception, embodying several key advantages:
- Reliability and Performance: Netgear extenders are engineered to offer stable connections and high-speed data transfer. They often feature advanced technologies like dual-band Wi-Fi (2.4 GHz and 5 GHz) and sometimes even tri-band, allowing them to communicate with both your router and your devices efficiently, minimizing latency and maximizing throughput. This focus on cutting-edge technology ensures a superior user experience.
- Ease of Installation: One of Netgear’s most significant selling points is its commitment to user-friendliness. Many of their extenders feature intuitive setup processes, including WPS (Wi-Fi Protected Setup) and a straightforward web-based Smart Setup Wizard, making installation accessible even for those without extensive technical knowledge. This attention to user experience solidifies their brand image as a consumer-centric technology provider.
- Broad Compatibility: Netgear extenders are designed to work seamlessly with almost any standard Wi-Fi router, regardless of brand. This universal compatibility means you won’t need to worry about intricate matching requirements, simplifying your purchasing decision.
- Advanced Features: Depending on the model, Netgear extenders can offer features like Access Point mode (converting a wired connection into a Wi-Fi hotspot), FastLane technology (dedicating a band for extender-to-router communication), and customizable settings via the Netgear Nighthawk app or web interface, allowing for fine-tuned network control and security management.
- Strong Brand Support: Netgear provides extensive online resources, including detailed manuals, FAQs, and customer support, ensuring that help is readily available should you encounter any issues during or after installation. This robust support system enhances the overall value proposition of the Netgear brand.
Choosing a Netgear extender is not just about extending your Wi-Fi; it’s an investment in a trusted brand known for its technological innovation and commitment to consumer satisfaction.
Preparing for Installation: Essential Pre-Setup Steps
A smooth installation process begins with proper preparation. Taking a few moments to gather what you need and strategically select a location for your extender can save you significant time and frustration later on. This pre-setup phase is crucial for ensuring optimal performance and a hassle-free experience.
What You’ll Need
Before you unbox your Netgear Wi-Fi extender, ensure you have the following at hand:
- Your Netgear Wi-Fi Extender: Of course! Make sure it’s the model you intended to purchase and that all included accessories (like an Ethernet cable, if applicable) are present.
- Your Existing Wi-Fi Router: This is the device whose signal you intend to extend. You’ll need to know its Wi-Fi network name (SSID) and password (network key). It’s a good practice to have this information written down or readily accessible.
- A Computer or Mobile Device: You’ll need a device (laptop, smartphone, tablet) with a Wi-Fi connection to perform the web browser setup if you don’t use WPS, or to test the connection afterward.
- Power Outlet: Your extender will need to be plugged into an electrical outlet.
- A Pen and Paper (Optional but Recommended): For jotting down any new network names or passwords you create during the setup process.
Choosing the Optimal Location for Your Extender
The placement of your Netgear Wi-Fi extender is arguably the most critical factor influencing its effectiveness. A common misconception is that the extender should be placed in the dead zone itself. However, this is incorrect. An extender works by receiving the signal from your main router and then rebroadcasting it. If it’s too far from the router, it will receive a weak signal, and consequently, it will only be able to rebroadcast a weak signal.
The ideal location is roughly midway between your main Wi-Fi router and the area where you experience poor Wi-Fi coverage (the dead zone).
Consider these points when selecting the perfect spot:
- Signal Strength: The extender needs to receive a strong, stable signal from your main router. Look for a spot where your existing Wi-Fi signal indicator on a device (like your phone) shows at least 2-3 bars of signal strength. Netgear extenders often have LED indicators that help you determine optimal placement (e.g., green for good, amber for fair, red for poor).
- Obstructions: Avoid placing the extender near large metal objects, cordless phones, microwave ovens, Bluetooth devices, or thick concrete walls, as these can interfere with Wi-Fi signals. Open spaces are generally better.
- Line of Sight: While not always possible, a clear line of sight between the extender and the router is ideal.
- Height: Placing the extender at a similar height to your router (e.g., on a shelf, not on the floor) can often yield better results.
- Power Access: Ensure there’s a readily available power outlet that isn’t connected to a switch that might accidentally turn off the extender.
Think of your extender as a relay runner; it needs to pick up the baton (Wi-Fi signal) cleanly to pass it on effectively. A well-chosen location ensures your extender acts as a powerful bridge, rather than just another weak link in the chain.
Step-by-Step Installation Methods
Netgear offers two primary methods for installing their Wi-Fi extenders: the quick and convenient Wi-Fi Protected Setup (WPS) or the more comprehensive manual setup via a web browser. We’ll detail both approaches, allowing you to choose the one that best suits your comfort level and router’s capabilities.

Method 1: Easy Setup with WPS (Wi-Fi Protected Setup)
WPS is designed for speed and simplicity, allowing devices to connect securely with minimal user input. If your main router has a WPS button, this is often the quickest way to get your extender up and running.
- Power On Your Extender: Plug your Netgear Wi-Fi extender into a power outlet at your chosen optimal location. Wait for the Power LED on the extender to light up and become solid. This typically takes a minute or two as the device boots up.
- Activate WPS on Extender: Locate the WPS button on your Netgear extender. This button is usually clearly labeled and might have a WPS icon (two arrows circling each other). Press this button. The WPS LED on the extender will start blinking, indicating it’s actively searching for a router to connect to. You usually have about two minutes to complete the next step.
- Activate WPS on Your Router: Within two minutes of pressing the WPS button on the extender, you need to press the WPS button on your main Wi-Fi router. The WPS button on routers can be located in various places, often on the back or side panel. Consult your router’s manual if you can’t find it. The WPS LED on your router will also start blinking.
- Wait for Connection: The extender and router will now attempt to establish a secure connection. This process can take a minute or two. Once successfully connected, the WPS LED on your extender (and sometimes on your router) will stop blinking and become solid, usually green. The Link Rate LED on the extender should also light up green, indicating a good connection to the router.
- Relocate and Test (if necessary): If you initially set up the extender very close to the router for WPS, you can now move it to your previously identified optimal location (midway between the router and the dead zone). Once moved, ensure the Link Rate LED on the extender still shows a good connection (green).
Note: If your router supports dual-band Wi-Fi (2.4 GHz and 5 GHz) and your extender is also dual-band, you may need to repeat the WPS process for the second band. Some Netgear extenders have a separate WPS button for each band or automatically connect both. Refer to your extender’s manual for specific instructions.
Method 2: Manual Installation via Web Browser (Smart Setup Wizard)
If your router doesn’t have a WPS button, or if you prefer more control over your network settings, the web browser setup method is ideal. This process uses Netgear’s intuitive Smart Setup Wizard.
- Power On and Connect: Plug your Netgear Wi-Fi extender into a power outlet. Wait for the Power LED to light up solid.
- Connect Your Device to the Extender’s Network: On your computer, smartphone, or tablet, open your Wi-Fi settings. You will see a new Wi-Fi network broadcasting from the extender, typically named “NETGEAREXT” or “NETGEAREXT_5G” (or something similar with a unique identifier). Connect to this network. This connection is usually unsecured for initial setup.
- Launch the Smart Setup Wizard: Once connected to the extender’s network, open a web browser (Chrome, Firefox, Edge, Safari) and type
www.mywifiext.netinto the address bar and press Enter. Alternatively, you can tryhttp://192.168.1.250orhttp://192.168.0.250. - Create an Account: The Smart Setup Wizard will appear. If this is your first time setting up the extender, you will likely be prompted to create a Netgear account. This involves setting a username (usually
admin) and a password. Make sure to choose a strong password and keep it secure. This account is for accessing the extender’s settings, not your Wi-Fi network. - Select Router Network: The wizard will scan for available Wi-Fi networks. Select your main home Wi-Fi network (SSID) from the list.
- Enter Router Password: You will be prompted to enter the Wi-Fi password (network key) for your main router’s network. Carefully type this in.
- Configure Extended Network (Optional): The wizard will then ask you to configure the extended network. You have a few options:
- Same Network Name (SSID) as Router: This creates a single network name that devices will seamlessly switch between. This is often called “One Wi-Fi Name” or “Smart Roaming.”
- New Network Name (SSID): You can choose to give your extended network a new name (e.g., “MyHomeEXT” or “MyHome5G_EXT”). This allows you to manually connect devices to the stronger extended signal when in the dead zone.
- Security: Ensure the security type (WPA2-PSK) and password are the same as your main router or choose a new strong password if creating a new SSID.
- Apply Settings and Restart: Review your settings and click “Apply” or “Finish.” The extender will then apply the settings and restart. This process can take a few minutes.
- Relocate and Test: Once the extender has restarted, you can unplug it and move it to your optimal location (midway point). Plug it back in and wait for the Link Rate LED to turn green, indicating a good connection to your main router.
Post-Installation: Testing and Optimization
Once your Netgear Wi-Fi extender is installed, the job isn’t quite finished. It’s crucial to verify that it’s working effectively and to understand how to optimize its performance for the best possible experience. This final phase ensures you’re getting the most out of your new hardware.
Verifying Your Extended Network
The primary goal of installing an extender is to eliminate dead zones. To verify its success:
- Move to a Previously Dead Zone: Take your computer or mobile device to an area where you previously experienced poor or no Wi-Fi signal.
- Connect to the Extended Network:
- If you chose to use the same network name for your extended network, your device should automatically connect to the strongest signal (either from your router or the extender).
- If you created a new network name for your extended network, manually connect your device to this new SSID.
- Perform a Speed Test: Once connected, open a web browser and go to a speed test website (e.g., Speedtest.net). Run a speed test to check your download and upload speeds. Compare these results to the speeds you get when connected directly to your main router in a good signal area. While you might not get the exact same speed as directly next to the router, it should be significantly better than what you had in the dead zone.
- Check Signal Strength: Observe your device’s Wi-Fi signal indicator. You should see a strong signal (full bars) in the area that was previously problematic.
- Stream Content: Try streaming a video, browsing graphics-heavy websites, or making a video call. If these activities are smooth and lag-free, your extender is working as intended.
Maximizing Your Extender’s Performance
Even after successful installation, a few tweaks can help you squeeze every drop of performance out of your Netgear extender:
- Firmware Updates: Always ensure your Netgear extender’s firmware is up to date. Firmware updates often include performance enhancements, bug fixes, and security patches. You can usually check for and install updates through the extender’s web interface (
www.mywifiext.net). Keeping your tech current is key to security and performance. - Optimal Placement (Revisited): If you’re still not satisfied with the coverage or speed, try slightly adjusting the extender’s position. Sometimes even a few feet can make a difference. Use the extender’s LED indicators (often a “Link Rate” or “Router Link” LED) to guide you; green usually means an excellent connection to the router, while amber or red suggests you should move it closer.
- Dual-Band Usage: If your extender supports dual-band (2.4 GHz and 5 GHz), try to connect devices that require high bandwidth (like streaming devices, gaming consoles, or modern laptops) to the 5 GHz extended network. The 5 GHz band offers faster speeds but has a shorter range and is more susceptible to obstructions. The 2.4 GHz band provides better range and penetration through walls but is generally slower and more prone to interference. Leverage both bands strategically.
- FastLane Technology (if available): Some Netgear extenders feature FastLane technology, which allows you to dedicate one Wi-Fi band for communication between the extender and the router and the other band for communication between the extender and your devices. This can significantly reduce bottlenecks and improve overall speed. Check your extender’s settings via
www.mywifiext.netto enable and configure this feature. - Minimize Interference: Keep the extender away from other electronics that emit radio frequencies (cordless phones, microwaves, Bluetooth devices). While some interference is unavoidable, minimizing it helps.
Troubleshooting Common Issues
While Netgear extenders are designed for ease of use, technical glitches can occasionally arise. Knowing how to troubleshoot common problems can save you a service call and get you back online quickly. This section focuses on practical, DIY solutions.
What to Do When Things Go Wrong
- No Power / Extender Not Turning On:
- Check Power Outlet: Ensure the power outlet is working by plugging in another device.
- Check Power Adapter: Make sure the extender’s power adapter is securely plugged into both the extender and the wall outlet.
- Try Another Outlet: Move the extender to a different, known-working power outlet.
- Extender Not Connecting to Router (WPS Fails / Link Rate LED is Red/Amber):
- Proximity: The most common issue. The extender might be too far from the main router. Move it closer, ideally in the same room as the router, to perform the setup, then relocate it to the optimal midway point.
- WPS Timeout: Ensure you press both the extender’s and router’s WPS buttons within the allowed time frame (usually 2 minutes).
- Router WPS Issue: Some routers have WPS disabled by default or have specific WPS modes (e.g., pin-based). Check your router’s manual.
- Try Manual Setup: If WPS consistently fails, switch to the web browser setup (
www.mywifiext.net), which is generally more robust. - Reboot Devices: Sometimes, a simple reboot of both your main router and the Netgear extender can resolve connection issues. Unplug both, wait 30 seconds, then plug them back in (router first, then extender).
- Connected to Extender, But No Internet Access:
- Router Internet Connection: First, verify that your main router itself has a working internet connection. Can devices connected directly to the router access the internet? If not, the issue is with your router or ISP, not the extender.
- Incorrect Password: During manual setup, double-check that you entered the correct Wi-Fi password for your main router. A single typo will prevent the extender from connecting to the internet.
- IP Address Conflict: This is rare but can happen. Try rebooting both your router and extender.
- Extender Placement: The extender might be getting a very weak signal from the router. Even if it connects, a weak upstream signal can result in no internet access downstream. Relocate the extender closer to the router.
Advanced Troubleshooting Tips
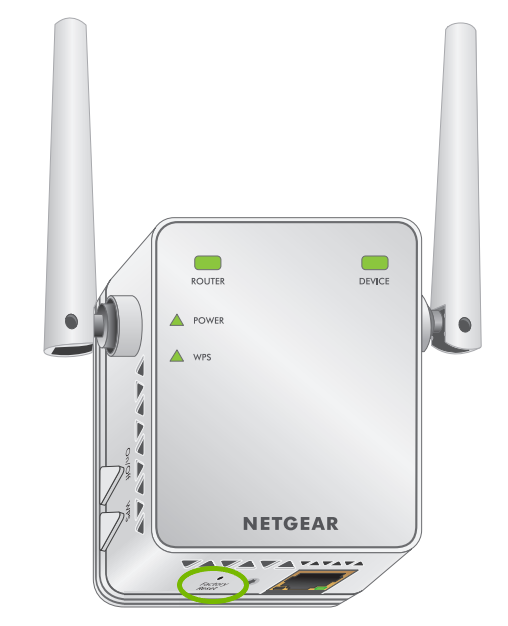
- Factory Reset: If all else fails, a factory reset can often resolve persistent issues. Most Netgear extenders have a small reset button (often recessed, requiring a paperclip to press). With the extender powered on, press and hold this button for 7-10 seconds until the LEDs flash. This will revert the extender to its factory default settings, requiring you to go through the setup process again.
- Check Extender’s Web Interface Status: Log into
www.mywifiext.net(using the admin credentials you created) and check the “Status” page. This page often provides valuable information about the extender’s connection to the router and the internet, including error messages. - Update Router Firmware: While focused on the extender, outdated router firmware can sometimes cause compatibility or performance issues. Check your router manufacturer’s website for firmware updates.
- Channel Interference: If you’re experiencing slow speeds even with a strong signal, there might be channel interference, especially in crowded urban environments. You can use Wi-Fi analysis apps on your smartphone (e.g., Wi-Fi Analyzer) to identify less congested channels for your router (and thus the extender to use). You might need to change your router’s Wi-Fi channel settings.
- Netgear Support: If you’ve tried everything and are still facing issues, don’t hesitate to contact Netgear’s customer support. They have dedicated teams to help troubleshoot specific product problems. Their website also offers extensive documentation and FAQs.
By methodically working through these troubleshooting steps, you can often diagnose and resolve most issues with your Netgear Wi-Fi extender, ensuring you maintain a robust and reliable home network.
Conclusion: Expanding Your Digital Horizon with Netgear
Installing a Netgear Wi-Fi extender is a smart, cost-effective strategy to eliminate frustrating dead zones and extend the reach of your wireless network. By following the steps outlined in this guide, you can transform your home or office’s connectivity, ensuring a seamless digital experience across every corner. From the initial preparation and strategic placement to the step-by-step installation via WPS or the Smart Setup Wizard, and finally, to post-installation optimization and troubleshooting, you now possess the knowledge to master your extended network.
Netgear’s commitment to user-friendly design and robust performance makes their extenders an excellent choice for anyone looking to enhance their Wi-Fi without replacing their entire networking setup. By understanding the technology, leveraging best practices, and knowing how to tackle common issues, you’re not just installing a device; you’re investing in reliable connectivity that empowers your daily digital life, boosts productivity, and enhances your entertainment options. Embrace the power of an extended network and say goodbye to buffering and dropped connections for good.
aViewFromTheCave is a participant in the Amazon Services LLC Associates Program, an affiliate advertising program designed to provide a means for sites to earn advertising fees by advertising and linking to Amazon.com. Amazon, the Amazon logo, AmazonSupply, and the AmazonSupply logo are trademarks of Amazon.com, Inc. or its affiliates. As an Amazon Associate we earn affiliate commissions from qualifying purchases.