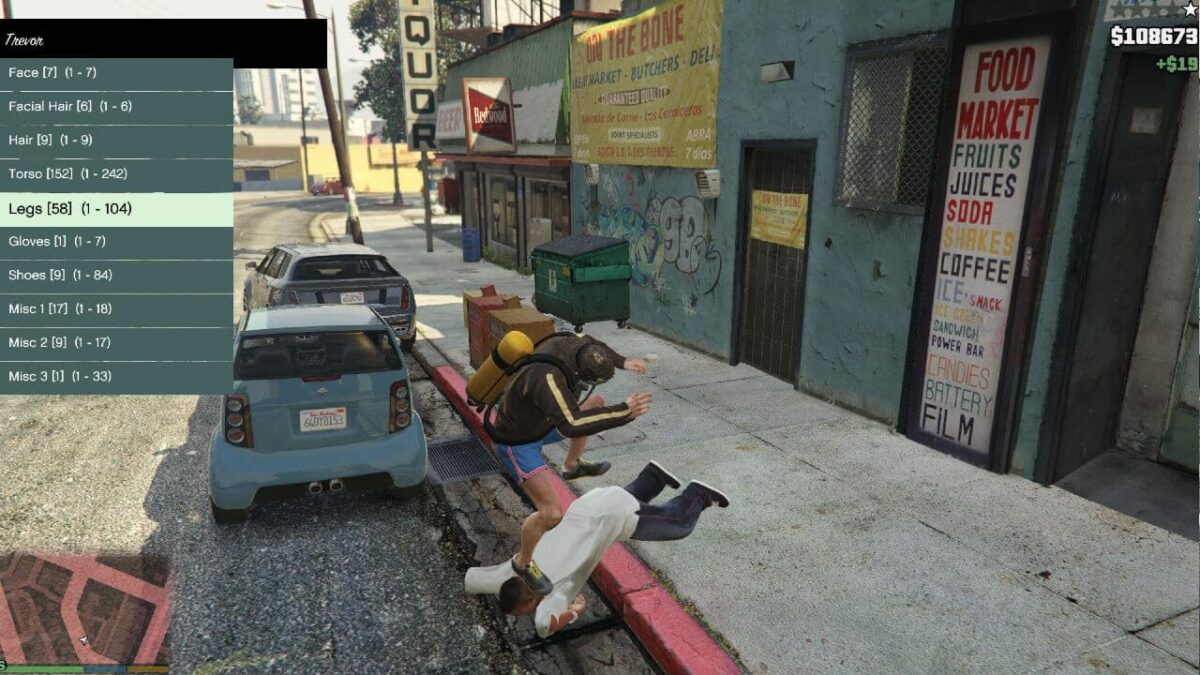
Grand Theft Auto V, even years after its initial release, continues to captivate millions of players worldwide. While Rockstar Games consistently provides official updates and new content for GTA Online, a significant portion of the game’s enduring appeal, particularly for PC players, lies in its vibrant and expansive modding community. Mods, short for modifications, allow players to inject an almost limitless array of custom content into their single-player experience, from realistic graphics overhauls and new vehicles to entirely new gameplay mechanics and even custom missions. This thriving ecosystem transforms GTA 5 into an endlessly customizable sandbox, offering fresh perspectives and extending its replayability far beyond what the developers initially envisioned.
For newcomers, however, the world of GTA 5 modding can seem daunting. With various tools, file types, and potential pitfalls, it’s easy to feel overwhelmed. This comprehensive guide aims to demystify the process, providing a clear, step-by-step roadmap to safely and successfully install mods in GTA 5, turning your Los Santos adventures into a truly unique experience. We’ll cover everything from the essential tools you’ll need to detailed installation instructions for different mod types, alongside crucial tips for troubleshooting and maintaining game stability.
Why Mod GTA 5? Understanding the Appeal and the Risks
Before diving into the technicalities, it’s worth exploring why modding GTA 5 has become such a cornerstone of its PC community, and equally important, understanding the inherent risks involved. Modding is a powerful way to reclaim agency over your game, shaping it to your preferences, but it’s not without its caveats.
The Allure of Custom Content
The primary draw of modding is the ability to transcend the boundaries of the base game. Want to fly a fighter jet through the city as a superhero? Install a script mod. Fancy cruising around in your dream car that isn’t officially in the game? Add a custom vehicle. Bored of the default weather effects? Download a realistic visual mod. The possibilities are truly endless, powered by the creativity and technical prowess of thousands of mod developers.
Beyond superficial changes, many mods introduce significant gameplay enhancements. Some improve AI behavior, others add new missions or activities, and some even bring entirely new cities or regions into the game world. This constant influx of new content breathes fresh life into a title that many players have already completed multiple times, ensuring that the single-player experience remains engaging and dynamic. Modding also fosters a strong community spirit, with players sharing their creations, troubleshooting tips, and showcasing their unique game setups. For many, the act of discovering, installing, and configuring mods becomes a rewarding meta-game in itself.
Navigating the Modding Landscape: Benefits vs. Potential Pitfalls
While the benefits of modding are clear, it’s crucial to approach it with a clear understanding of the potential downsides. The most significant risk comes when attempting to play GTA Online with mods enabled. Rockstar Games has a strict anti-cheat policy, and using any unofficial modifications in the online environment will almost certainly result in a ban, potentially permanent. Therefore, a golden rule of GTA 5 modding is: NEVER go online with mods installed or enabled. Always ensure your game is in its vanilla state before launching GTA Online.
Another common pitfall is game instability. Mods, especially poorly made or conflicting ones, can cause crashes, glitches, or even corrupt your save files. This is why proper preparation, including backing up your game files, is paramount. Furthermore, downloading mods from untrusted sources can expose your system to malware or viruses, making it essential to stick to reputable modding websites and communities. Finally, game updates from Rockstar can often break existing mods, requiring you to wait for mod developers to update their creations or revert to an older game version (which is generally not recommended for security and online play reasons). Understanding these risks allows for a more responsible and enjoyable modding experience.
Essential Tools for GTA 5 Modding: Your Digital Toolkit
Before you can unleash the full potential of GTA 5 modding, you’ll need to gather a few essential tools. These programs act as the backbone of most mod installations, providing the necessary framework for mods to function and allowing you to safely inject custom files into your game.
Script Hook V and Script Hook V .NET: The Core Foundations
-
Script Hook V: This is arguably the most fundamental tool for GTA 5 modding. Developed by Alexander Blade, Script Hook V injects itself into the game process, allowing custom scripts (mods) written in
.asiformat to interact with the game’s internal functions. Without it, the vast majority of script-based mods (those that alter gameplay mechanics, add new abilities, or introduce custom events) simply won’t work. It typically comes with adinput8.dllfile andScriptHookV.dll. Thedinput8.dllfile acts as a wrapper, loading theScriptHookV.dllwhen the game starts, thereby enabling the execution of other.asiplugins. -
Script Hook V .NET: While Script Hook V handles
.asiscripts, Script Hook V .NET extends modding capabilities to scripts written in .NET languages (C#, VB.NET). Many advanced and feature-rich mods are developed using .NET, making this tool almost as crucial as the original Script Hook V. It works in conjunction with Script Hook V, loading.dlland.cs(C# script) files that leverage the .NET framework to interact with the game. You’ll typically findScriptHookVDotNet.asiandScriptHookVDotNet.dllas its core components, often alongsideNativeTrainer.asi(a basic in-game trainer) and other dependency files. Both Script Hook V and Script Hook V .NET need to be kept up-to-date with the latest GTA 5 game patches to ensure compatibility.
OpenIV: The Gateway to Game Files
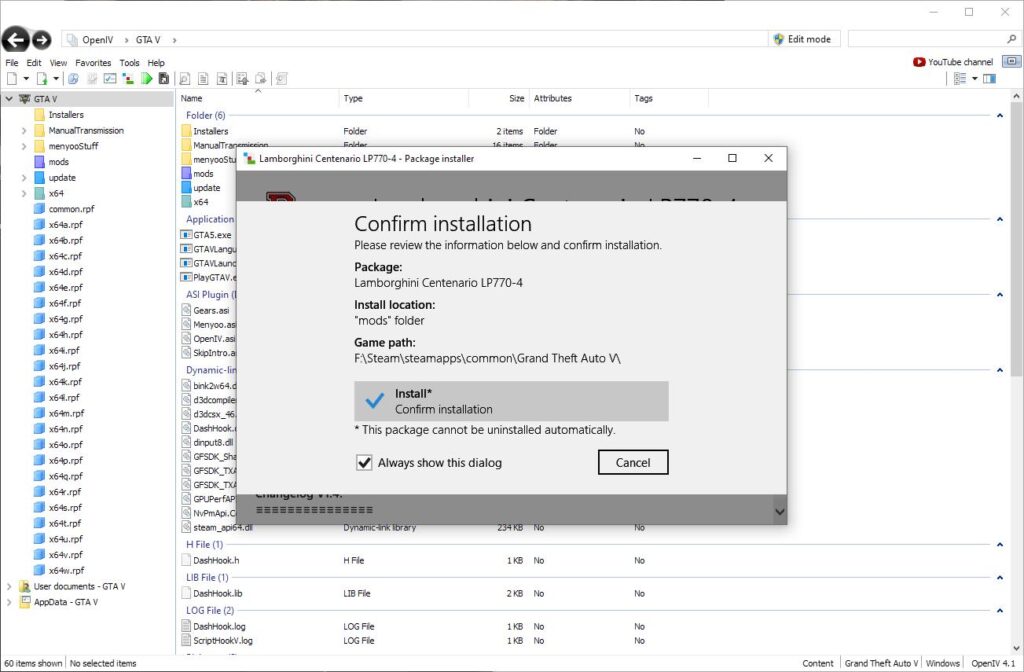
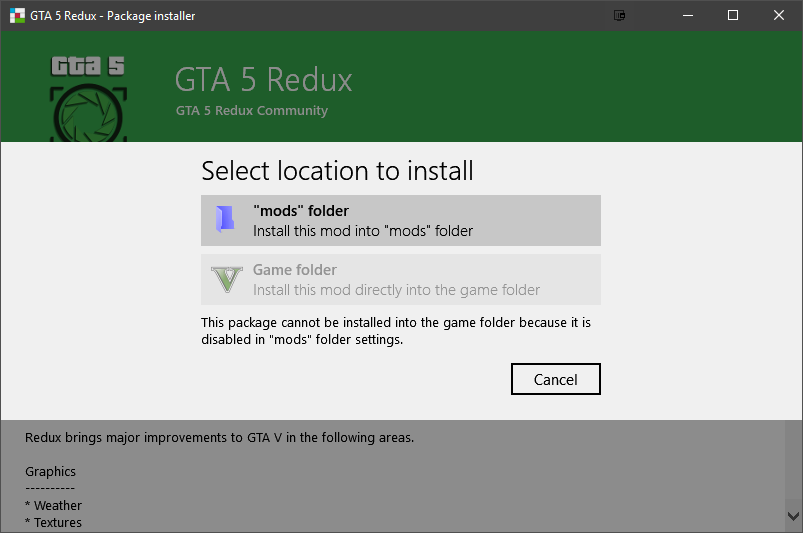
OpenIV is an essential multi-purpose archive editor and manager specifically designed for Grand Theft Auto IV, Grand Theft Auto V, Max Payne 3, and Red Dead Redemption 2. For GTA 5, it’s the primary tool you’ll use to open and edit the game’s RDR archive files (like update.rpf, x64a.rpf, etc.) which contain all the game’s assets – models, textures, audio, and more.
OpenIV provides a user-friendly interface to navigate these complex archives. Its most critical feature for modding is the “Edit Mode,” which allows you to replace original game files with modified versions. Crucially, OpenIV also facilitates the creation of a “mods” folder system. When you install it and first attempt to modify an RDR archive, it will prompt you to install an “ASI loader” and create a “mods” folder. This system is a lifesaver: instead of directly altering your original game files, OpenIV copies the specific RDR archives you’re modifying into a separate mods folder within your GTA 5 directory. The ASI loader then tells the game to prioritize loading files from this mods folder, leaving your original game files untouched. This makes it far easier to revert changes or troubleshoot issues without reinstalling the entire game.
Other Handy Utilities
- NativeUI: While not a standalone “tool” in the same vein as Script Hook V or OpenIV, NativeUI is a popular library used by many mod developers to create in-game menus and user interfaces for their scripts. If a mod requires NativeUI, you’ll simply need to download its files (usually
NativeUI.dllandNativeUI.asi) and place them in your game’s scripts folder or root directory, much like other script mods. - Trainers (e.g., Enhanced Native Trainer, Simple Trainer): These are essentially specialized script mods that provide a wide array of in-game options, such as spawning vehicles, changing weather, teleportation, invincibility, and more. While Script Hook V often comes with a basic trainer (
NativeTrainer.asi), many community-developed trainers offer far more features and a better user interface. These are installed like any other script mod.
Preparing Your Game: The Crucial First Steps
Before you even think about downloading your first mod, proper preparation is essential. Skipping these steps can lead to frustration, game instability, or even permanent bans from GTA Online.
Backing Up Your Game Files: A Safety Net
This cannot be stressed enough: ALWAYS back up your game files before modding. Even with the mods folder system facilitated by OpenIV, there’s always a slim chance of something going wrong, especially with script mods that directly interact with the game’s core files.
At a minimum, you should back up the following:
- Your
dinput8.dllfile (if it exists from a previous Script Hook V installation). - Your
ScriptHookV.dlland related.asifiles. - Your
updatefolder (Grand Theft Auto Vupdate). - Your
x64folder (Grand Theft Auto Vx64). - Your save game files (usually found in
DocumentsRockstar GamesGTA VProfiles[Your User ID]).
The most thorough backup method is to copy your entire GTA 5 game folder to another location on your hard drive. This can be large (over 100GB), but it guarantees you can always revert to a clean, unmodded state if anything goes awry without having to re-download the entire game. If you’re using the Steam version, you can also use Steam’s “Verify Integrity of Game Files” feature, but this will remove all mods and revert your game to its original state, making a separate backup copy crucial if you want to switch between modded and unmodded versions easily.
Understanding the ‘mods’ Folder Structure
As mentioned, OpenIV is designed to help protect your original game files. When you first use OpenIV to edit an .rpf archive (like update.rpf or x64a.rpf), it will prompt you to install the ASI loader and then ask if you want to create a “mods” folder. Always say yes.
This process creates a mods folder in your main GTA 5 directory (e.g., Grand Theft Auto Vmods). When you modify files within OpenIV, it will copy the update.rpf (and any other .rpf archives you modify) into this mods folder. For instance, if you edit updateupdate.rpf, OpenIV will create modsupdateupdate.rpf and apply your changes there. The game then automatically loads files from this mods folder, prioritizing them over the original files. This non-destructive approach is vital for easy mod management and troubleshooting.
Your GTA 5 directory should look something like this after setting up OpenIV and the mods folder:
Grand Theft Auto V/
├── GTA5.exe
├── GTAVLauncher.exe
├── update/ (original update files)
├── x64/ (original x64 files)
├── dinput8.dll (from Script Hook V)
├── ScriptHookV.dll (from Script Hook V)
├── ScriptHookVDotNet.asi (from Script Hook V .NET)
├── ScriptHookVDotNet.dll (from Script Hook V .NET)
├── NativeUI.dll (if installed)
├── mods/
│   ├── update/
│   │   ├── update.rpf (copied by OpenIV, contains your modded files)
│   ├── x64a.rpf (if you've modded files within this archive)
├── scripts/ (folder you might create for some script mods)
Step-by-Step Installation Guides for Different Mod Types
With your tools in place and your game backed up, you’re ready to start installing mods. We’ll break down the process for the most common types of modifications. Remember to always extract downloaded mod archives (usually .zip, .rar, or .7z files) before attempting to install their contents.
Installing Script Mods: Enhancing Gameplay Mechanics
Script mods are typically the easiest to install, as they don’t involve modifying the game’s .rpf archives directly. These mods often come with .asi, .dll, or .cs (C# script) files.
-
Download Script Hook V and Script Hook V .NET: Ensure you have the latest versions compatible with your GTA 5 game version. You can usually find these on GTA5-Mods.com or the developer’s official websites.
-
Install Script Hook V: Extract the downloaded archive. Copy
dinput8.dllandScriptHookV.dllinto your main GTA 5 directory (whereGTA5.exeis located). Do NOT copyNativeTrainer.asiif you plan to use a more advanced trainer or don’t want the default one. -
Install Script Hook V .NET: Extract the downloaded archive. Copy
ScriptHookVDotNet.asi,ScriptHookVDotNet.dll, andScriptHookVDotNet2.dll(if present) into your main GTA 5 directory. -
Install the Script Mod:
- Most script mods will instruct you to place their files (e.g.,
.asi,.dll,.csfiles, or folders containing these) directly into your main GTA 5 directory. - Alternatively, many modders recommend creating a
scriptsfolder within your main GTA 5 directory (Grand Theft Auto Vscripts). This helps keep your main directory cleaner. Place your mod’s files there. The game, with Script Hook V and .NET installed, will often recognize scripts in this dedicated folder. - Always refer to the specific mod’s
READMEfile or installation instructions, as some mods might have unique requirements (e.g., specific subfolders).
- Most script mods will instruct you to place their files (e.g.,
-
Launch the Game: Start GTA 5 (single-player only!) through
GTA5.exe(or your preferred launcher like Steam/Epic, ensuring the game isn’t automatically launching online). You should see a small black console window briefly appear and disappear, indicating Script Hook V has loaded. Test your mod according to its instructions.
Integrating Vehicle Mods: Replacing and Adding New Rides
Vehicle mods typically come in two forms: “replace” mods (which swap an existing in-game vehicle with a custom one) and “add-on” mods (which introduce entirely new vehicles without replacing anything). Add-on mods are generally preferred for keeping all original content, but they require a bit more effort. Both require OpenIV.
For Replace Vehicle Mods:
- Open OpenIV: Launch OpenIV and select “Grand Theft Auto V (Windows).”
- Enable Edit Mode: Click the “Edit Mode” button at the top right of the OpenIV window. You’ll be warned about modifying original files; remember, OpenIV is copying to your
modsfolder first. - Navigate to the Vehicle Files: Most vehicle files are located in
updatex64dlcpacks[dlcpack_name]dlc.rpfx64levelsgta5vehicles.rpf. A common path ismodsupdatex64dlcpackspatchdayNngdlc.rpfx64levelsgta5vehicles.rpf(wherepatchdayNngcan bepatchday1ng,patchday3ng,patchday8ng, etc. – check the mod’s instructions for the specific.rpfarchive to modify). The mod will tell you which specific files to replace (e.g.,sultan.yft,sultan.ytd,sultan_hi.yft). - Replace Files: Drag and drop the downloaded mod files (usually
.yft,.ytd,.hi.yft) into thevehicles.rpfarchive in OpenIV, replacing the existing ones. - Disable Edit Mode: Exit Edit Mode in OpenIV and close it.
- Launch the Game: The replaced vehicle should now appear in the game.
For Add-On Vehicle Mods (More Complex):
Add-on vehicles typically come with a new folder containing a dlc.rpf file and require modifying game configuration files to recognize the new content.
- Open OpenIV and Enable Edit Mode.
- Create a New DLC Pack Folder: Inside OpenIV, navigate to
modsupdatex64dlcpacks.- Create a new folder here with a unique name (e.g.,
myaddoncar, as specified by the mod developer). - Drag and drop the mod’s
dlc.rpffile (which should be inside the downloaded mod’s folder) into your newly created folder in OpenIV (e.g., intomodsupdatex64dlcpacksmyaddoncar).
- Create a new folder here with a unique name (e.g.,
- Edit
dlclist.xml: This file tells the game which DLC packs to load.- Navigate to
modsupdateupdate.rpfcommondata. - Right-click on
dlclist.xmland choose “Edit.” - Scroll to the bottom and add a new line within the
<Paths>section, just before</Paths>. The line should look like this:<Item>dlcpacks:myaddoncar</Item>(replacingmyaddoncarwith your custom folder name). - Click “Save.”
- Navigate to
- Edit
extratitleupdatedata.meta(Sometimes Required): Some mods also require an entry in this file.- Navigate to
modsupdateupdate.rpfcommondata. - Right-click
extratitleupdatedata.metaand choose “Edit.” - Add the required lines as specified by the mod developer, typically within the
<dataStore>section. This is less common for simple add-on cars but crucial for others. - Click “Save.”
- Navigate to
- Disable Edit Mode and Close OpenIV.
- Launch the Game: Use a trainer (like Simple Trainer or Enhanced Native Trainer) to spawn the new vehicle by its model name, which will be provided in the mod’s instructions.
Applying Visual and Texture Mods: A Graphical Overhaul
Visual and texture mods range from subtle improvements to complete graphical overhauls. These almost exclusively require OpenIV.
- Open OpenIV and Enable Edit Mode.
- Navigate to the Target Files: The mod’s instructions will specify which
.rpfarchives and folders within them need modification. Common locations include:modsupdateupdate.rpfx64texturesscript.rpf(for some UI elements or specific textures)modsupdatex64dlcpacks[dlc_pack_name]dlc.rpfx64graphicstextures.rpf(for environmental textures)modsx64a.rpfthroughmodsx64w.rpf(for general world textures, models, and assets).- Sometimes, specific
.ytd(texture dictionary) files withinvehicles.rpforped.rpfneed to be replaced for custom liveries or character textures.
- Replace or Add Files: Drag and drop the mod’s files (e.g.,
.ytd,.yft,.ydd,.ybn,.ytyp) into the corresponding archives and folders in OpenIV, replacing existing files or adding new ones as directed by the mod. - Disable Edit Mode and Close OpenIV.
- Launch the Game: The new visual elements should now be present in your game. Be aware that extensive graphics mods can significantly impact performance.
Troubleshooting Common Issues and Staying Safe
Modding can be temperamental, and issues can arise. Here’s how to tackle common problems and ensure a safe modding experience.
Diagnosing and Fixing Mod Conflicts
- Game Crashes on Startup:
- Script Hook V / .NET incompatibility: Your Script Hook V or Script Hook V .NET might be outdated. Check the official websites for the latest versions after a GTA 5 update.
- Conflicting script mods: If you’ve just added a new script mod, try removing it. If the game launches, that mod is likely the culprit or conflicts with another. Remove mods one by one to isolate the issue.
- Corrupted
dinput8.dll: Removedinput8.dllfrom your game folder; this effectively disables Script Hook V and all script mods. If the game launches, reinstall Script Hook V.
- Mod Not Appearing/Working In-Game:
- Incorrect file placement: Double-check that all mod files are in their correct directories as per the instructions.
- Missing dependencies: Did you install Script Hook V, Script Hook V .NET, and NativeUI if required?
- OpenIV ‘Edit Mode’ not active: Ensure you were in Edit Mode when making changes with OpenIV.
dlclist.xmlorextratitleupdatedata.metaerror: For add-on mods, re-check your entries in these files for typos or incorrect paths.
- General Instability/Glitches:
- Too many mods: An excessive number of complex mods can push your system and the game engine to its limits. Consider reducing your mod count.
- Outdated mods: Some mods become incompatible with newer game versions. Check the mod page for updates.
- Corrupted game files: Use Steam’s “Verify Integrity of Game Files” (or Epic Games’ equivalent) to repair your game. Be aware this will remove ALL mods, so a fresh install might be needed.
Best Practices for Online Play and Avoiding Bans
This is the most critical safety advice: NEVER launch GTA Online with any mods installed in your game directory. Rockstar’s anti-cheat system is robust and will detect even harmless single-player mods, leading to a ban.
To safely switch between modded single-player and unmodded online:
- Remove or Rename Mod Files: Before launching GTA Online, you must remove or rename the core modding files:
dinput8.dll(from Script Hook V)ScriptHookV.dllScriptHookVDotNet.asiScriptHookVDotNet.dll- Crucially, also move or rename your
modsfolder (e.g., to_modsormods_off). This prevents the game from loading any modded.rpffiles.
- Use a Mod Manager (Advanced): Tools like “GTA 5 Mod Manager” can automate the process of enabling/disabling mods by moving/renaming files. While convenient, always double-check that it has correctly reverted your game before going online.
- Separate Game Installations (Most Secure): The absolute safest method is to have two separate installations of GTA 5: one purely vanilla for GTA Online, and another modded for single-player. This requires significant disk space but completely eliminates the risk of accidental bans.
Keeping Your Mods Updated
GTA 5 receives regular updates from Rockstar, especially for GTA Online. These updates often break Script Hook V and other fundamental modding tools. Always monitor the modding community websites (like GTA5-Mods.com) for updates to Script Hook V and Script Hook V .NET immediately after a game patch. Installing an outdated Script Hook V on a new game version will almost certainly lead to crashes. It’s often best to pause modding for a few days after a major game update until the core tools have been updated.
Elevating Your GTA 5 Experience: Beyond Basic Modding
Once you’ve mastered the fundamentals of mod installation, a world of enhanced GTA 5 experiences awaits. The sheer volume and variety of mods available are staggering, ranging from subtle quality-of-life improvements to ambitious total conversions.
Discovering the Best GTA 5 Mods
To truly elevate your game, explore the best of what the community offers:
- Graphics Enhancements: Mods like “NaturalVision Remastered” or “QuantV” completely transform Los Santos into a photorealistic paradise with dynamic weather, lighting, and reflections.
- Realism Mods: Introduce elements like realistic car physics, fuel consumption, enhanced damage models, and improved police AI.
- Gameplay Overhauls: Mods that introduce entirely new mission systems, gang wars, job opportunities, or even turn the game into a survival simulator.
- Character and Vehicle Customization: Thousands of custom clothing items, tattoos, and real-world vehicles are available, allowing for unparalleled personalization.
- Tool/Utility Mods: Beyond the core tools, explore trainers with advanced features, camera tools for cinematic screenshots, and custom teleportation systems.
Always read mod descriptions, check user comments, and watch preview videos to ensure a mod is reputable, compatible, and meets your expectations.
Contributing to the Modding Community
If you enjoy the fruits of modding, consider contributing back. This could be as simple as leaving positive feedback for mod developers, reporting bugs, or sharing your unique modded setups. For those with technical skills, learning to create your own mods (using tools like 3ds Max for models, Photoshop for textures, or scripting in C# with the GTA 5 SDK) can be an incredibly rewarding experience, allowing you to bring your own vision to Los Santos.
In conclusion, modding Grand Theft Auto V offers an unparalleled opportunity to extend the life and expand the possibilities of an already phenomenal game. By following the guidelines in this comprehensive guide – understanding your tools, preparing your game, carefully installing mods, and prioritizing safety, especially regarding GTA Online – you can unlock a truly limitless single-player experience. Embrace the creativity, explore the endless possibilities, and enjoy your uniquely tailored Los Santos adventure!
aViewFromTheCave is a participant in the Amazon Services LLC Associates Program, an affiliate advertising program designed to provide a means for sites to earn advertising fees by advertising and linking to Amazon.com. Amazon, the Amazon logo, AmazonSupply, and the AmazonSupply logo are trademarks of Amazon.com, Inc. or its affiliates. As an Amazon Associate we earn affiliate commissions from qualifying purchases.