Whether you’re a seasoned gamer craving more space for your sprawling game library, a creative professional needing ample room for high-resolution video projects, or simply someone looking to breathe new life into an aging computer, installing a new hard drive in your PC is a fundamental upgrade that can significantly boost performance and storage capacity. This guide will walk you through the entire process, from understanding your options to physically connecting the drive and getting it ready for use. We’ll demystify the technical jargon and provide clear, step-by-step instructions, making this once-intimidating task accessible to everyone.
Understanding Your Hard Drive Options
Before you even think about opening your PC case, it’s crucial to understand the different types of storage drives available and which one best suits your needs and budget. The world of PC storage has evolved dramatically, offering faster speeds, greater capacities, and more efficient designs than ever before.
Traditional Hard Disk Drives (HDDs)
For years, Hard Disk Drives (HDDs) were the undisputed kings of PC storage. They operate using spinning magnetic platters to store data, accessed by a read/write head.
-
Pros:
- Cost-Effective: HDDs offer the most storage space per dollar, making them an excellent choice for bulk storage of media files, documents, and less frequently accessed data.
- High Capacity: You can find HDDs with capacities of several terabytes (TB) at very affordable prices.
-
Cons:
- Slower Speeds: The mechanical nature of HDDs means they are significantly slower than Solid State Drives (SSDs). This translates to longer boot times, slower application loading, and slower file transfer speeds.
- Durability: Due to their moving parts, HDDs are more susceptible to damage from physical shock or vibration.
- Noise and Power Consumption: Spinning platters and moving parts can generate audible noise and consume more power compared to SSDs.
Solid State Drives (SSDs)
Solid State Drives (SSDs) represent a significant leap forward in storage technology. Instead of mechanical parts, they use flash memory chips to store data, similar to USB drives and memory cards.
-
Pros:
- Blazing Fast Speeds: SSDs offer dramatically faster read and write speeds, resulting in near-instantaneous boot times, lightning-quick application launches, and rapid file transfers. This is the single biggest reason to upgrade to an SSD.
- Durability: With no moving parts, SSDs are much more resistant to physical shock and vibration, making them ideal for laptops and systems that might be moved.
- Quiet Operation and Lower Power Consumption: SSDs are virtually silent and consume less power than HDDs, contributing to a cooler and more energy-efficient system.
-
Cons:
- Higher Cost Per Gigabyte: While prices have been steadily decreasing, SSDs still generally cost more per gigabyte than HDDs.
- Finite Write Cycles: Flash memory has a finite number of write cycles before it begins to degrade. However, for typical consumer usage, modern SSDs are designed to last for many years, often exceeding the lifespan of the rest of the computer.
NVMe SSDs: The Pinnacle of Speed
Within the SSD category, there’s a further distinction: SATA SSDs and NVMe SSDs.
- SATA SSDs: These use the same SATA interface as traditional HDDs. They are a massive upgrade over HDDs but are limited by the SATA interface’s bandwidth.
- NVMe (Non-Volatile Memory Express) SSDs: These connect directly to the motherboard via a PCIe slot (often through an M.2 slot). NVMe is a communication protocol specifically designed for flash storage, allowing for significantly higher speeds than SATA. If your motherboard supports it, an NVMe SSD will offer the absolute best performance.
Deciding on Capacity and Interface
Once you’ve chosen between HDD and SSD (or a combination of both), you need to consider the capacity. For a primary drive (where your operating system and applications reside), a 250GB to 1TB SSD is usually sufficient for most users. For secondary storage, you can opt for larger HDDs (2TB, 4TB, or more) or larger SSDs if your budget allows.
Next, consider the interface. Most modern PCs will have SATA III (6Gb/s) ports for both HDDs and SATA SSDs. For NVMe SSDs, you’ll need a motherboard with an M.2 slot that supports NVMe. Check your motherboard’s specifications to confirm compatibility.
Preparing for the Installation
With your new drive in hand, it’s time to get your PC ready for the upgrade. This involves gathering the necessary tools and performing some crucial safety precautions.
What You’ll Need
- Your New Hard Drive: Ensure it’s compatible with your PC’s motherboard and power supply.
- Screwdriver Set: A Phillips head screwdriver is essential. Magnetic tips can be a lifesaver for tiny screws.
- Anti-Static Wrist Strap (Recommended): This inexpensive accessory grounds you and prevents electrostatic discharge (ESD), which can damage sensitive computer components.
- Your PC’s Manual or Motherboard Manual: This can be invaluable for identifying specific ports and mounting locations.
- SATA Data Cable (if not included with the drive): This cable connects the hard drive to your motherboard. Most motherboards come with a couple, but it’s good to have a spare.
- Power Supply Unit (PSU) SATA Power Cable: Your power supply will have these cables to provide power to the drive.
- Optional: Zip Ties or Velcro Straps: For cable management to improve airflow.
Safety First: Power Down and Ground Yourself
Before you touch anything inside your computer, follow these critical steps:
- Shut Down Your PC Completely: Don’t just put it to sleep or hibernate. Go to “Start” > “Power” > “Shut down.”
- Unplug the Power Cord: Crucially, disconnect the PC from the wall outlet.
- Turn Off the Power Supply Switch (if applicable): Many power supplies have a physical switch on the back; flip it to the “O” (off) position.
- Discharge Residual Power: Press and hold the PC’s power button for about 10-15 seconds. This drains any remaining power in the capacitors.
- Ground Yourself: This is where the anti-static wrist strap comes in. Attach one end to your wrist and the other to an unpainted metal part of your PC case. If you don’t have a strap, frequently touch an unpainted metal part of the case to discharge static electricity.
The Physical Installation Process
Now that your PC is prepped, let’s get hands-on with installing the drive.
Accessing Your PC’s Interior
- Open the PC Case: Most PC cases have side panels that are secured by screws at the back. Unscrew these and gently slide or lift off the panel. Refer to your case manual if you’re unsure.
- Identify Mounting Locations:
- For HDDs and 2.5-inch SATA SSDs: Look for drive bays. These are typically metal cages or brackets designed to hold 3.5-inch (for HDDs) or 2.5-inch (for SSDs) drives. Some cases have dedicated 2.5-inch bays, while others require an adapter bracket for SSDs to fit into 3.5-inch bays.
- For M.2 NVMe SSDs: These drives plug directly into an M.2 slot on your motherboard. These slots are usually small and horizontal, often located near the CPU socket. They might be covered by a heatsink that you’ll need to remove.
Mounting the Drive
-
For HDDs and 2.5-inch SATA SSDs:
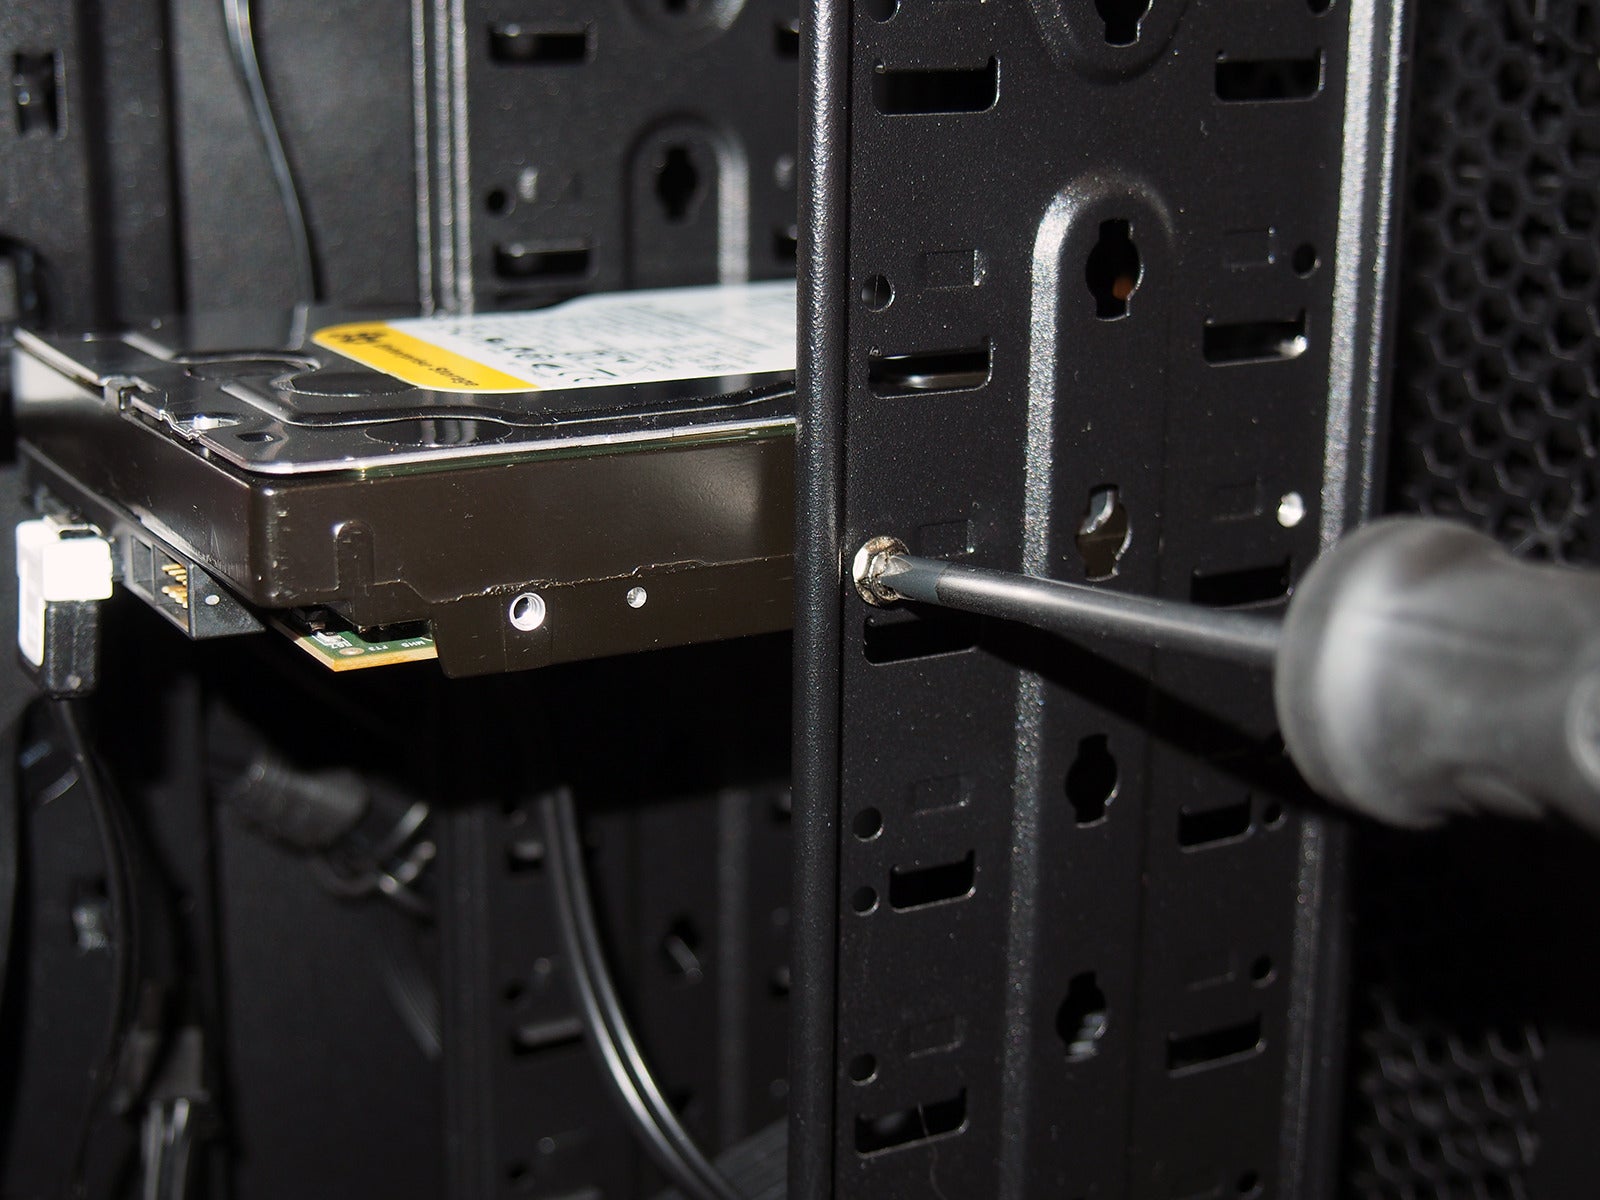
- Slide or Secure the Drive: Gently slide the drive into an available bay. Some bays use tool-less mechanisms, while others require you to screw the drive in place from the bottom or sides.
- Attach Mounting Screws: If your bay requires screws, align the drive with the screw holes and secure it with appropriate screws. Don’t overtighten.
-
For M.2 NVMe SSDs:
- Locate the M.2 Slot: Identify the M.2 slot on your motherboard.
- Remove the Retention Screw: There’s usually a small screw at the end of the slot that holds the drive in place. Unscrew and remove it. If there’s a heatsink, remove that first according to its specific instructions.
- Insert the Drive: Gently insert the M.2 drive into the slot at an angle (usually around 30 degrees). Ensure it’s fully seated.
- Secure the Drive: Push the drive down towards the motherboard and reinsert the retention screw to hold it in place. If your motherboard had a heatsink, reattach it now.
Connecting the Cables
This is where your new storage becomes part of your system.
-
For HDDs and 2.5-inch SATA SSDs:
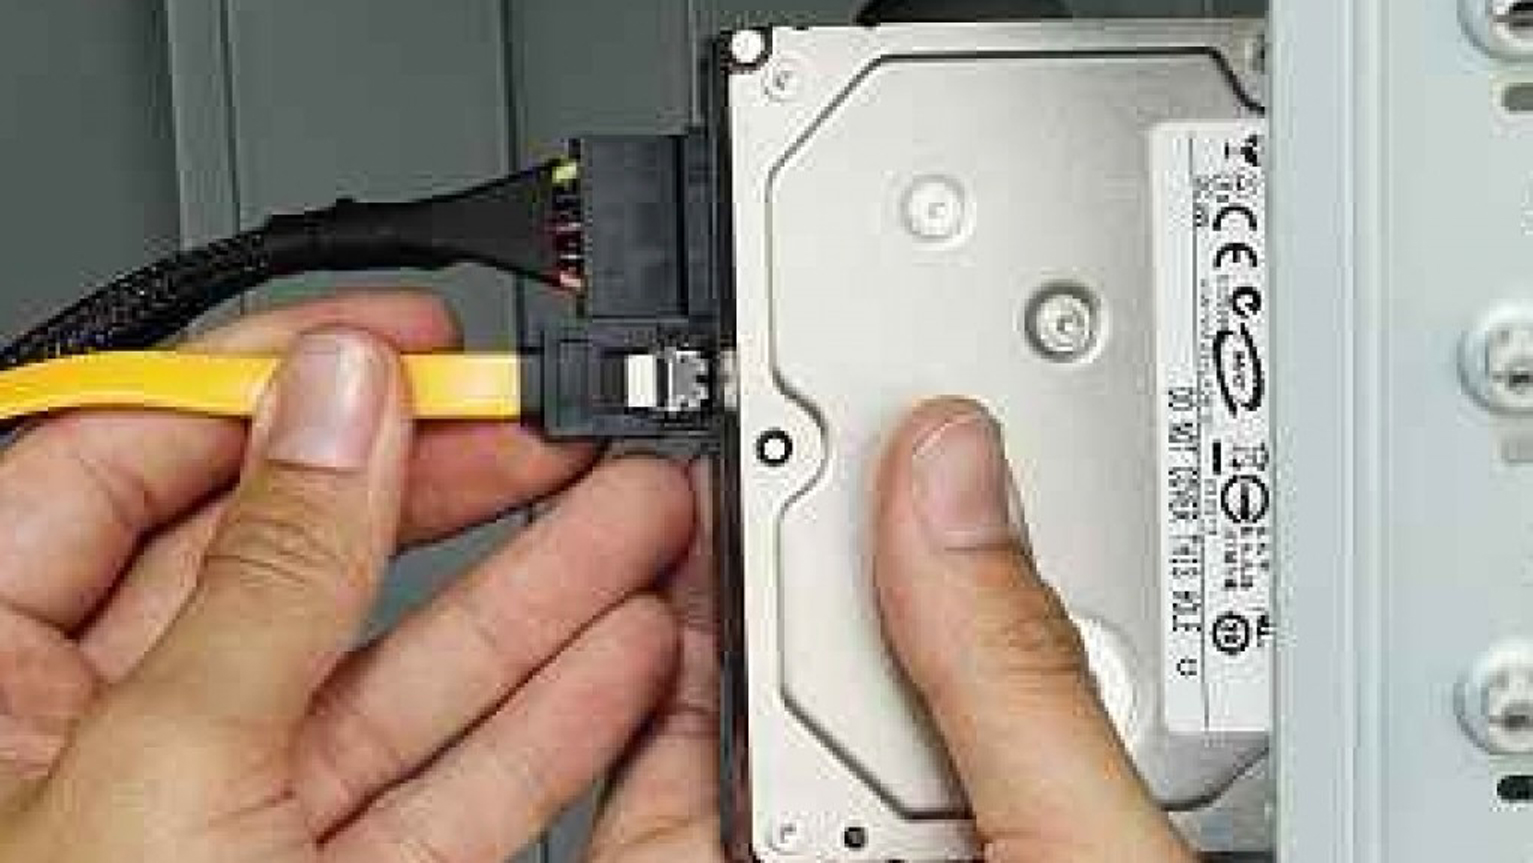
- Connect the SATA Data Cable: Plug one end of the SATA data cable into the back of your new drive (it’s a small, L-shaped connector). Plug the other end into an available SATA port on your motherboard. The ports are usually numbered (SATA0, SATA1, etc.). It’s good practice to use the lowest available numbered port.
- Connect the SATA Power Cable: Locate an available SATA power connector from your power supply unit. These are wider, flatter connectors. Plug it into the corresponding power port on your new drive.
-
For M.2 NVMe SSDs: These drives typically don’t require separate data or power cables as they draw power and communicate directly through the M.2 slot.
Cable Management (Optional but Recommended)
Once everything is connected, take a moment to tidy up your cables. Use zip ties or Velcro straps to bundle cables neatly. This not only makes your PC look cleaner but also improves airflow, which can help keep your components cooler.
Reassemble and Power On
- Replace the Side Panel: Carefully slide or place the side panel back onto your PC case and secure it with the screws you removed earlier.
- Reconnect Peripherals: Plug your monitor, keyboard, mouse, and speakers back in.
- Plug in the Power Cord: Reconnect the main power cord to your PC.
- Turn on the Power Supply Switch (if applicable): Flip the switch on the PSU back to the “I” (on) position.
- Boot Up Your PC: Press the power button.
Initializing and Formatting Your New Drive
Your PC should now boot up as usual. However, your new hard drive won’t be immediately visible in File Explorer because it needs to be initialized and formatted. This process prepares the drive for use by your operating system.
Accessing Disk Management
- Windows Key + X: Press the Windows key and the “X” key simultaneously. This will bring up a power user menu.
- Select “Disk Management”: From the menu, choose “Disk Management.”
Initializing the Drive
You’ll see a list of all the drives connected to your computer. Your new drive will likely appear as “Unallocated” or “Not Initialized.”
- Right-Click the New Drive: Find your new drive in the Disk Management window (it will usually be the largest unallocated space or identified by its model name if it’s a known drive). Right-click on the disk itself (not the unallocated space).
- Select “Initialize Disk”: A dialog box will appear, prompting you to choose a partition style.
- GPT (GUID Partition Table): This is the modern standard and recommended for most systems, especially if you have a UEFI BIOS. It supports larger drive sizes and more partitions.
- MBR (Master Boot Record): This is an older standard and has limitations on drive size (up to 2TB) and the number of primary partitions. Only choose MBR if you have a very old system or specific compatibility requirements.
- Click “OK”: Once you’ve selected GPT, click “OK.”
Creating a New Simple Volume (Formatting)
After initializing, the drive will show as “Unallocated.” Now you need to create a partition and format it.
- Right-Click the Unallocated Space: Right-click on the unallocated space of your new drive.
- Select “New Simple Volume”: This will launch the “New Simple Volume Wizard.”
- Follow the Wizard:
- Specify Volume Size: For most users, you’ll want to use the maximum available space. Just click “Next.”
- Assign Drive Letter: Choose an available drive letter (e.g., D:, E:, F:). Windows will usually suggest one. Click “Next.”
- Format Partition:
- File System: For Windows, choose NTFS.
- Allocation Unit Size: “Default” is usually fine.
- Volume Label: Give your drive a descriptive name (e.g., “Storage,” “Games,” “Projects”).
- Perform a Quick Format: This is usually sufficient for new drives. Unchecking it will perform a more thorough format that takes longer but can check for bad sectors.
- Click “Next” and then “Finish.”
Your new hard drive is now initialized, formatted, and ready to use! You should see it appear in File Explorer with the drive letter and label you assigned. You can now drag and drop files onto it, install software, or use it for whatever your storage needs dictate.
Important Considerations for New Installs
- BIOS/UEFI Recognition: In rare cases, your new drive might not show up in Disk Management. If this happens, restart your PC and enter your BIOS/UEFI settings (usually by pressing DEL, F2, F10, or F12 during startup). Ensure the SATA port your drive is connected to is enabled and that the drive is recognized in the BIOS/UEFI.
- Driver Updates: While most modern operating systems have built-in drivers for storage devices, it’s always a good idea to check your motherboard manufacturer’s website for the latest SATA or NVMe drivers, especially if you’re experiencing performance issues.
- Cloning vs. Fresh Install: If you’re replacing your primary boot drive, you might consider cloning your old drive’s contents to the new one instead of performing a fresh install of Windows. This saves you the hassle of reinstalling all your programs. However, for ultimate performance and a clean slate, a fresh install is often preferred.
By following these steps, you’ve successfully upgraded your PC’s storage. Enjoy the increased space and, if you opted for an SSD, the incredible speed boost that comes with it!
aViewFromTheCave is a participant in the Amazon Services LLC Associates Program, an affiliate advertising program designed to provide a means for sites to earn advertising fees by advertising and linking to Amazon.com. Amazon, the Amazon logo, AmazonSupply, and the AmazonSupply logo are trademarks of Amazon.com, Inc. or its affiliates. As an Amazon Associate we earn affiliate commissions from qualifying purchases.