The Sony PlayStation 4, a console that defined a generation of gaming, has undoubtedly brought countless hours of entertainment to millions worldwide. From epic open-world adventures to fast-paced competitive multiplayer, its library of games is vast and ever-growing. However, as game file sizes balloon with intricate graphics, high-definition textures, and mandatory updates, the humble internal hard drive of the PS4 often becomes the bottleneck, leading to a frustrating “storage full” message. This isn’t just an inconvenience; it can mean deciding which beloved game to uninstall to make room for a new title, or worse, for an essential update.
Fortunately, upgrading your PS4’s internal hard drive is a surprisingly straightforward process that can inject new life into your console. It’s a cost-effective way to expand your game library, potentially improve loading times, and ensure your PS4 remains a viable gaming machine for years to come. This comprehensive guide will walk you through every step, from selecting the right drive and backing up your precious data to the physical installation and the final software setup. By the end, you’ll have a rejuvenated PS4 ready to tackle the largest games without breaking a sweat, all while saving you the expense of buying a new console.
Why Upgrade Your PS4 Hard Drive?
Before diving into the mechanics, it’s essential to understand the compelling reasons behind a hard drive upgrade. It’s not merely about adding space; it’s about enhancing your entire gaming experience and extending the longevity of your investment.
The Inevitable Storage Crunch
When the PS4 first launched, its standard 500GB hard drive seemed adequate. Even the later 1TB models felt spacious for a time. However, modern games regularly demand 50GB, 100GB, or even more, before factoring in post-launch patches, downloadable content (DLC), and game saves. Digitally purchased titles, which are becoming increasingly common, consume space permanently. Furthermore, if you subscribe to services like PlayStation Plus, you might find yourself downloading “free” monthly games only to realize you have no room for them. The “storage full” notification has become an all too familiar sight for many PS4 owners, forcing difficult choices about which games to sacrifice. Upgrading to a larger drive – 2TB, 4TB, or even 8TB – eliminates this constant struggle, allowing you to install and keep a vast library of games ready to play at a moment’s notice.
Performance Boost: HDD vs. SSD
While the primary motivation for an upgrade is usually capacity, there’s a significant performance aspect to consider, especially when choosing between a traditional Hard Disk Drive (HDD) and a Solid State Drive (SSD).
Understanding Your Options: HDD
Traditional HDDs, like the one originally installed in your PS4, use spinning platters and read/write heads to store and retrieve data. They are cost-effective, especially for high capacities, making them ideal for gamers seeking maximum storage without breaking the bank. A modern 2.5-inch SATA HDD (the type compatible with the PS4) offers excellent value per gigabyte. While they won’t dramatically speed up game loading compared to the original, a newer, faster HDD (e.g., 7200 RPM instead of 5400 RPM, though PS4’s SATA II/III interface might cap the benefits) can offer marginal improvements and certainly won’t be slower.
Unleashing Speed: SSD
Solid State Drives (SSDs), on the other hand, store data on flash memory chips, similar to a large USB drive, but significantly faster. This lack of moving parts translates into dramatically quicker boot times for the console, faster loading screens within games, and a generally snappier user interface. Games that previously suffered from long waits to load new areas or textures will feel much more fluid. SSDs are also more durable, produce no noise, and consume less power. The main drawback is their higher price point per gigabyte compared to HDDs, meaning you might have to opt for a smaller capacity SSD (e.g., 1TB or 2TB) for the same budget as a larger HDD. For those prioritizing speed and responsiveness above all else, an SSD upgrade is arguably the most impactful enhancement you can make to your PS4.
Hybrid Drives (SSHD): A Middle Ground
A third option exists in the form of a Solid State Hybrid Drive (SSHD). These drives combine a small amount of NAND flash memory (like an SSD) with a larger traditional HDD. The drive’s firmware intelligently caches frequently accessed data onto the faster flash memory, providing a performance boost for commonly used games and applications while still offering the high capacity and lower cost of an HDD. While not as fast as a pure SSD, an SSHD offers a noticeable improvement over a standard HDD at a more palatable price point than a full SSD for larger capacities.
Extending the Lifespan of Your Console
In an era of rapid technological advancement, keeping older hardware relevant is key to sustainable tech use. Upgrading your PS4’s hard drive not only solves storage issues but also breathes new life into a console that might otherwise feel outdated. By providing ample space and potentially faster loading, you delay the need to purchase a newer console, saving money and reducing electronic waste. It ensures your PS4 remains a viable and enjoyable platform, allowing you to continue exploring its vast game library without limitations.
Essential Preparations Before You Begin
A successful hard drive upgrade hinges on meticulous preparation. Skipping any of these steps could lead to data loss or frustrating delays. Take your time to gather everything you need and complete the necessary backups.
Choosing the Right Drive
The first and most critical step is selecting a compatible replacement drive that meets your needs for capacity and performance.
Compatibility Check: Size and Type
The PS4 uses a standard 2.5-inch SATA hard drive. This is the same size typically found in laptops. The maximum thickness supported is 9.5mm, which is the standard for 2.5-inch drives, so most off-the-shelf laptop HDDs or SSDs will fit. The PS4 supports SATA II and SATA III interfaces. While a SATA III drive offers faster theoretical speeds, the PS4’s internal controller might limit the actual realized benefits, but it is fully backward compatible. Do not attempt to install a 3.5-inch desktop hard drive, as it will not fit.
Capacity Considerations: How Much Do You Really Need?
While the PS4 officially supports up to 8TB internal drives, practically, 2TB to 4TB are the most common and cost-effective upgrades. A 2TB drive offers four times the space of the original 500GB model, providing ample room for most gamers. If you have a massive digital library or plan to accumulate many large games, a 4TB drive might be a better long-term investment. Consider your gaming habits: do you play many games simultaneously, or do you cycle through a few at a time? Future-proofing your console with a larger drive will save you from another upgrade cycle down the line.
Gathering Your Toolkit
While not an overly complex procedure, having the right tools makes the process smooth and prevents potential damage.
Basic Tools for Disassembly
You’ll primarily need a Phillips head screwdriver (PH0 or PH1, depending on your PS4 model) to remove a few screws. For some PS4 models, a small flathead screwdriver or a plastic pry tool might be helpful to gently lift the top cover, though often it can be done by hand. A small bowl or magnetic mat to keep track of screws is highly recommended, as they are tiny and easily misplaced.
Data Transfer Essentials
To back up your existing PS4 data and install the new system software, you’ll need two USB storage devices:
- External Hard Drive (formatted to FAT32 or exFAT): This will be used to back up your existing PS4 data (game saves, captured media, system settings). Ensure it has enough free space to hold all your important data; a 500GB or 1TB external drive is usually sufficient.
- USB Flash Drive (at least 1GB, formatted to FAT32 or exFAT): This small drive will be used to transfer the PS4 system software (firmware) to your new internal drive.
Critical Data Backup
This is the most crucial step to prevent losing your game progress, screenshots, and videos. Do not skip this!
Saving Your Game Saves and Settings
There are two primary ways to back up your data:
- PlayStation Plus Cloud Storage: If you’re a PS Plus subscriber, your game saves are automatically uploaded to the cloud (for most games). This is convenient, but it doesn’t back up captured screenshots, videos, or full game installs.
- External Hard Drive Backup: This is the most comprehensive method. Connect your external hard drive to your PS4. Go to Settings > System > Back Up and Restore > Back Up PS4. Follow the on-screen prompts to select what you want to back up. Crucially, make sure to back up “Saved Data.” You can also choose to back up Applications (games) and settings, but reinstalling games after the upgrade is often faster than backing up and restoring them. Wait for the backup process to complete, which can take several hours depending on the amount of data.
Deactivating Your PS4 as Primary (If Applicable)

If your PS4 is set as your “Primary PS4” (allowing other users on the console to play your digital games and use your PS Plus benefits), it’s a good idea to deactivate it before the upgrade. Go to Settings > Account Management > Activate as Your Primary PS4 > Deactivate. You can reactivate it easily after the new drive is installed and the system software is set up. This step helps prevent potential licensing issues with your digital games.
Downloading the PS4 System Software
Your new hard drive will be blank. You’ll need to reinstall the PS4’s operating system onto it.
Locating the Official Firmware
Go to the official PlayStation website on a computer. Navigate to the PS4 support section for system software updates. You’ll find two download options: a smaller “Update File” (around 400MB) and a much larger “Reinstallation File” (around 1GB or more). You MUST download the “Reinstallation File” (often labelled “For Reinstallation Only”). The smaller update file is only for updating an existing system, not for installing on a fresh drive.
Formatting Your USB Drive for Firmware Installation
Take your small USB flash drive (at least 1GB). Format it to FAT32 or exFAT on your computer. Create a folder named “PS4” (all caps) in the root directory of the USB drive. Inside the “PS4” folder, create another folder named “UPDATE” (all caps). Place the downloaded “PS4UPDATE.PUP” file (the reinstallation file) into this “UPDATE” folder. Ensure the file name is exactly PS4UPDATE.PUP. Eject the USB drive safely from your computer.
The Physical Swap: Replacing Your PS4’s Internal Drive
With all preparations complete, it’s time for the physical installation. This process is generally straightforward and doesn’t require advanced technical skills.
Accessing the Hard Drive Bay
Before you begin, ensure your PS4 is completely powered off and unplugged from the wall socket and all peripherals.
- Original PS4 (Fat Model): The hard drive bay is typically accessed by sliding off the glossy top panel. Locate the side of the console with the shiny plastic cover. Gently push or slide this cover towards the back of the console, then lift it off. This will reveal the hard drive caddy.
- PS4 Slim and PS4 Pro Models: These models are designed for even easier access. On the Slim, the hard drive cover is usually a small, rectangular plastic panel located near the back of the console, often held in place by a single screw or clip. On the Pro, it’s often a small panel towards the back/side, also secured by a single screw. Remove this screw (if present) and slide or pop off the cover.
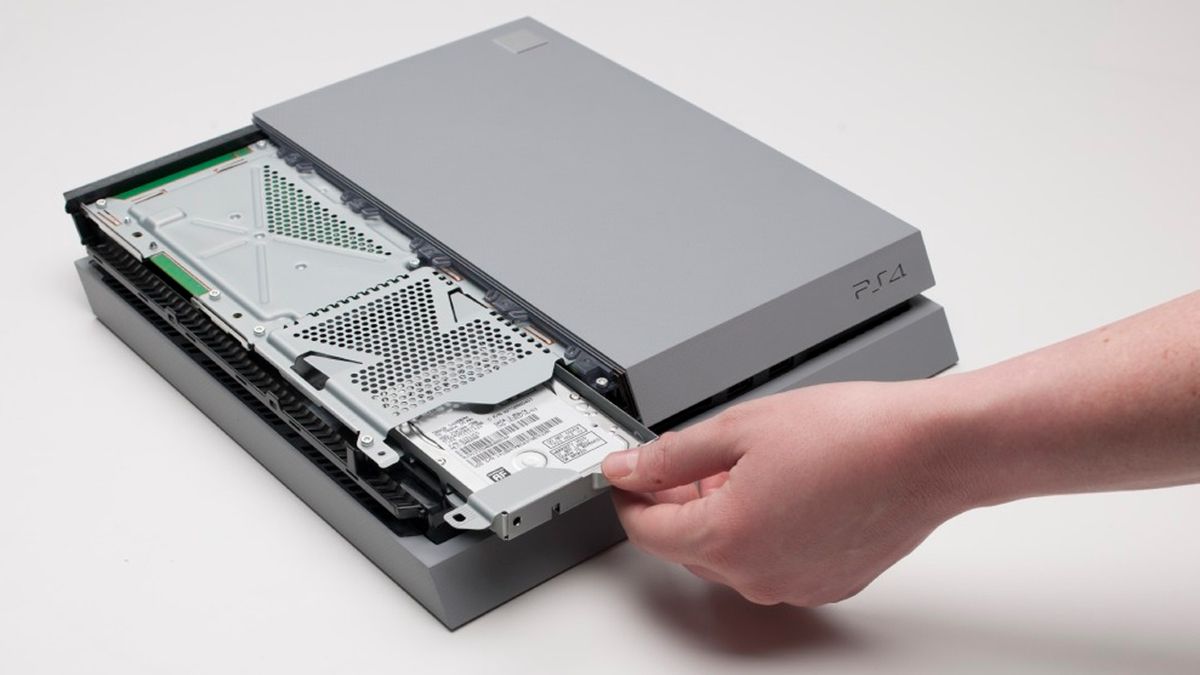
Removing the Old Hard Drive
Once the hard drive bay is exposed, you’ll see a metal caddy containing the existing hard drive.
- Locate the Securing Screw: There will be one large Phillips head screw (often marked with PlayStation symbols) holding the hard drive caddy in place. Unscrew this screw.
- Slide Out the Caddy: Gently pull the metal caddy outwards from the console. It should slide out easily.
- Remove the Drive from the Caddy: Once the caddy is out, you’ll see four smaller Phillips head screws (two on each side) holding the hard drive itself within the caddy. Unscrew these four screws.
- Lift Out the Old Drive: Carefully lift the old hard drive out of the metal caddy. Set it aside; you might want to keep it as an external backup drive in the future using an external enclosure.
Installing the New Hard Drive
Now, place your new, larger hard drive into the empty caddy.
- Mount the New Drive: Place your new 2.5-inch hard drive or SSD into the metal caddy. Ensure the SATA connector ports align with the opening in the caddy.
- Secure the Drive: Use the four small Phillips head screws you removed earlier to secure the new drive firmly within the caddy. Do not overtighten, but make sure it’s snug.
- Reinsert the Caddy: Carefully slide the caddy, with the new drive inside, back into the PS4’s hard drive bay. Make sure it’s fully seated and aligned with the internal connectors.
- Secure the Caddy: Reinstall the single large Phillips head screw (the one with the PlayStation symbols) to secure the caddy in place.
- Replace the Cover: Reattach the hard drive bay cover or the console’s top panel, ensuring it clicks securely into place or is screwed down.
Software Installation and Data Restoration
With the new drive physically installed, your PS4 is essentially a blank slate. The next steps involve installing the PS4 operating system and restoring your backed-up data.
Initializing Your New Drive
This process will install the PS4 system software onto your new hard drive.
- Connect USB Drive: Insert the USB flash drive (containing the
PS4UPDATE.PUPreinstallation file) into any of the PS4’s USB ports. - Enter Safe Mode: Plug your DualShock 4 controller into the PS4 via a USB cable. Press and hold the power button on the PS4 for about seven seconds (or until you hear a second beep). This will boot the console into Safe Mode.
- Select Initialization Option: On the Safe Mode menu, select option 7: “Initialize PS4 (Reinstall System Software).”
- Follow On-Screen Prompts: The system will detect the USB drive and the update file. Follow the on-screen instructions to proceed with the installation. This process will format the new drive and install the PS4 operating system. It may take 15-30 minutes. The PS4 will restart multiple times.
- Initial Setup: Once the system software is installed, the PS4 will boot to its initial setup screen, just like a new console. Follow the prompts to set your language, time zone, and connect to your network. Sign in with your PlayStation Network account.
Restoring Your Backed-Up Data
Once the initial setup is complete and you’ve signed into your PSN account, it’s time to restore your saved data and settings.
- Connect External Backup Drive: Connect the external hard drive (containing your backup data) to one of the PS4’s USB ports.
- Navigate to Restore Menu: On the PS4 dashboard, go to Settings > System > Back Up and Restore > Restore PS4.
- Select Backup File: The PS4 will detect your backup file on the external drive. Select it and follow the on-screen prompts to begin the restoration process.
- Wait for Completion: Depending on the amount of data, this can take a significant amount of time. Do not power off the PS4 during this process.
- Reinstall Games: After restoration, your game saves, profile data, and settings should be back. You will need to re-download or reinstall your games from disc. For digital games, head to your Library and start downloading them.
Post-Installation Checks and Optimizations
A few final steps ensure everything is running smoothly with your newly upgraded console.
- Verify Storage Capacity: Go to Settings > Storage to confirm that your new hard drive’s full capacity is recognized and available.
- Reactivate Your PS4 as Primary: If you deactivated your PS4 earlier, go to Settings > Account Management > Activate as Your Primary PS4 > Activate to restore full functionality for all users on the console.
- Update Games and Applications: Ensure all your reinstalled games and applications are fully updated to their latest versions for optimal performance and access to online features.
- Enjoy! Dive back into your gaming library, now with ample space and potentially faster load times.
Frequently Asked Questions and Troubleshooting Tips
Even with careful preparation, issues can sometimes arise. Here are some common questions and troubleshooting steps.
Common Issues & Solutions
- “Error CE-34335-8: Cannot Access Hard Disk Drive.” This error often indicates that the PS4 cannot detect the hard drive.
- Solution: Power off the PS4, unplug it, and recheck the physical installation of the hard drive caddy and the hard drive within the caddy. Ensure all screws are tightened (but not overtightened) and connections are secure. If the error persists, the new drive might be faulty, or it could be a compatibility issue (though rare with standard 2.5-inch drives).
- “My PS4 Isn’t Booting After the Swap.” If the PS4 doesn’t enter Safe Mode or show any video.
- Solution: Ensure your HDMI cable is properly connected. Double-check that you are holding the power button long enough (around 7 seconds) for the second beep to enter Safe Mode. If it still won’t boot, ensure the system software on your USB drive is the “Reinstallation File” and correctly placed in the
PS4/UPDATEfolder.
- Solution: Ensure your HDMI cable is properly connected. Double-check that you are holding the power button long enough (around 7 seconds) for the second beep to enter Safe Mode. If it still won’t boot, ensure the system software on your USB drive is the “Reinstallation File” and correctly placed in the
- “PS4 says ‘The USB storage device is not connected’ or ‘The update file cannot be used.'”
- Solution: This usually means the USB drive is not formatted correctly (must be FAT32 or exFAT) or the folder structure (
PS4/UPDATE/PS4UPDATE.PUP) is incorrect, or you downloaded the wrong update file (needs to be the “reinstallation” file).
- Solution: This usually means the USB drive is not formatted correctly (must be FAT32 or exFAT) or the folder structure (
External Drive vs. Internal Upgrade
- Can I use an external hard drive instead? Yes, PS4 (on firmware 4.50 or later) supports external USB 3.0 hard drives (up to 8TB) for storing and playing games. This is an easier option as it requires no internal modification.
- Which is better? An internal upgrade (especially to an SSD) typically offers better performance for games loaded onto it due to direct SATA connection, and it cleans up clutter around the console. An external drive is simpler to install, generally cheaper for large capacities, and lets you keep your original internal drive. The choice depends on your priorities: maximum performance and tidiness (internal) versus ease of installation and cost-effectiveness (external). For a comprehensive improvement, an internal SSD upgrade is paramount.

Conclusion: Revitalize Your Gaming Experience
Upgrading your PS4’s hard drive is a remarkably effective way to enhance your gaming experience. Whether you opt for a cavernous HDD to house every game imaginable or a lightning-fast SSD to slash loading times, the benefits are immediate and substantial. No more agonizing over uninstalling games, no more storage anxiety – just pure, unadulterated gaming freedom. By following this guide, you’ve not only expanded your console’s capabilities but also gained valuable insight into its inner workings, cementing its place as a reliable entertainment hub for years to come. Enjoy your revitalized PS4!
aViewFromTheCave is a participant in the Amazon Services LLC Associates Program, an affiliate advertising program designed to provide a means for sites to earn advertising fees by advertising and linking to Amazon.com. Amazon, the Amazon logo, AmazonSupply, and the AmazonSupply logo are trademarks of Amazon.com, Inc. or its affiliates. As an Amazon Associate we earn affiliate commissions from qualifying purchases.