Installing a graphics card, often referred to as a GPU (Graphics Processing Unit), might seem like a daunting task, especially for those new to PC building or upgrading. However, it’s one of the most impactful upgrades you can make to your computer, significantly enhancing its performance for gaming, content creation, and even general system responsiveness. This comprehensive guide will walk you through every step of the process, from initial preparation and compatibility checks to the physical installation and crucial software setup, ensuring a smooth and successful upgrade.
Our focus at [Website Name – implicitly GlobalizeThis] is to demystify technology, offering clear tutorials, insightful reviews of gadgets, and practical advice on digital security and productivity. Upgrading a graphics card perfectly aligns with this mission, empowering you to unlock new levels of performance from your existing hardware, whether you’re chasing higher frame rates in the latest games or accelerating your video editing workflow. By the end of this tutorial, you’ll have the confidence and knowledge to tackle this upgrade yourself, saving on technician fees and gaining valuable insight into your PC’s inner workings.
Why Upgrade Your Graphics Card?
The graphics card is the heart of your computer’s visual output. It’s responsible for rendering everything you see on your monitor, from simple desktop interfaces to complex 3D environments in games and high-resolution video edits. An upgrade can bring a multitude of benefits, transforming your computing experience.
Enhanced Gaming Performance
For many, gaming is the primary driver behind a GPU upgrade. Modern games are incredibly demanding, pushing graphics cards to their limits to render intricate worlds, detailed character models, and realistic lighting effects. An older or entry-level GPU might struggle to run these titles at acceptable frame rates or resolutions, leading to stuttering, low-quality visuals, and a less immersive experience.
Upgrading to a newer, more powerful graphics card can dramatically improve your gaming experience. You’ll be able to play the latest AAA titles at higher resolutions (like 1440p or even 4K), crank up graphical settings to “High” or “Ultra,” and enjoy consistently smooth frame rates. This not only makes games look stunning but also provides a competitive edge in fast-paced multiplayer titles where every millisecond counts. Technologies like NVIDIA’s DLSS or AMD’s FSR, leveraging AI and upscaling techniques, further enhance performance on modern GPUs, delivering even better visuals without a massive performance hit. The leap in performance from one generation to the next can be truly astounding, breathing new life into your gaming library.
Boosted Productivity for Creative Tasks
Beyond gaming, a powerful graphics card is an indispensable tool for professionals and hobbyists involved in content creation. Video editors, graphic designers, 3D animators, architects, and photographers all rely heavily on GPU acceleration to speed up their workflows. Software like Adobe Premiere Pro, After Effects, Blender, AutoCAD, and DaVinci Resolve can offload complex computations from the CPU to the GPU, significantly reducing rendering times, accelerating real-time previews, and enabling smoother manipulation of large files and intricate projects.
For instance, rendering a 4K video project with an older GPU might take hours, while a new high-end card could slash that time by half or more. This efficiency gain directly translates to increased productivity, allowing creators to complete projects faster, iterate more quickly, and take on more demanding tasks. Even for tasks like AI development and machine learning, modern GPUs with their thousands of CUDA or Stream processors are essential, providing the parallel processing power needed for training complex models. Thus, a GPU upgrade isn’t just about entertainment; it’s a strategic investment in your professional toolkit.
Future-Proofing Your System
Technology evolves at a rapid pace, and what’s cutting-edge today can quickly become obsolete tomorrow. While no component can truly future-proof your system indefinitely, investing in a robust graphics card can extend your PC’s lifespan and relevance considerably. A powerful GPU purchased today will be able to handle new software and game releases for a longer period, postponing the need for a complete system overhaul.
This is particularly true with new graphical APIs like DirectX 12 Ultimate and Vulkan, and ray tracing technology becoming more prevalent. These features require specific hardware capabilities often found only in newer generation GPUs. By upgrading, you ensure your system is compatible with these advancements, allowing you to experience the latest graphical innovations and utilize new productivity features as they emerge. It’s an intelligent way to ensure your digital security and experience remains cutting-edge, keeping pace with technological trends and software developments.
Essential Preparations Before You Begin
Before you even think about opening your PC case, thorough preparation is key. This stage is crucial for ensuring compatibility, gathering necessary tools, and performing preventative measures that will make the installation process smooth and hassle-free.
Compatibility Check: Motherboard, PSU, and Case
The most critical step is to ensure your new graphics card is compatible with your existing system. There are three main components to consider:
- Motherboard: Almost all modern graphics cards use the PCI Express (PCIe) x16 slot. Ensure your motherboard has an available PCIe x16 slot. While newer GPUs use PCIe 4.0 or 5.0, they are generally backward compatible with PCIe 3.0 slots, though you might experience a slight performance bottleneck depending on the card.
- Power Supply Unit (PSU): Graphics cards are often the most power-hungry component in a PC. Check the recommended PSU wattage for your chosen graphics card. This information is typically found on the manufacturer’s website or the product box. Add the wattage of your other components (CPU, storage, RAM) to get a total estimate and ensure your PSU can comfortably supply the required power, with some headroom. Also, verify that your PSU has the necessary PCIe power connectors (e.g., 6-pin, 8-pin, 12-pin, or 16-pin) that your new GPU requires. Adapters exist but it’s always best to have native connectors.
- PC Case: Graphics cards vary significantly in size. Measure the available space in your PC case, especially its length and height. Compare these measurements with the dimensions of your new graphics card. Pay attention to clearance around hard drive cages, front fans, or other components that might obstruct the card’s installation. Also, ensure your case has enough expansion slots (usually 2 or 3) at the back to accommodate the GPU’s bracket.
Failing to check these compatibilities can lead to frustration, costly returns, or even damage to components. Take your time with this step, researching your current system’s specifications if you’re unsure.
Gathering Your Tools and Supplies
Having the right tools at hand will make the installation process much smoother. You’ll typically need:
- Phillips Head Screwdriver: This is your primary tool for opening the case, removing existing components, and securing the new card.
- Anti-Static Wrist Strap: Crucial for preventing electrostatic discharge (ESD), which can damage sensitive electronic components. If you don’t have one, periodically touching a grounded metal object (like your PC’s unpainted metal frame) can help discharge static.
- Flashlight or Headlamp: PC interiors can be dark, and a light source will help you see connections and screws clearly.
- Zip Ties or Velcro Cable Straps: For cable management, to ensure good airflow and a tidy build.
- Canned Air (Optional but Recommended): To clean out dust from your case and existing components, especially if you’re reusing an older PC.
- Small Container: To hold screws so they don’t get lost.
Prepare a clean, well-lit workspace. Clear any clutter and ensure you have enough room to maneuver your PC.
Digital Housekeeping: Uninstalling Old Drivers
If you are upgrading from an existing graphics card, especially if it’s from a different manufacturer (e.g., switching from AMD to NVIDIA or vice versa), it’s highly recommended to uninstall its drivers before installing the new hardware. Old drivers can conflict with new ones, leading to stability issues, performance problems, or even a failure to boot.
- Download Display Driver Uninstaller (DDU): This free utility is widely regarded as the best tool for completely removing graphics drivers. Download it from a reputable source (e.g., Guru3D).
- Download New Drivers: Visit the manufacturer’s website (NVIDIA or AMD) and download the latest drivers for your new graphics card. Keep them handy on your desktop or a USB drive.
- Boot into Safe Mode: Disconnect your PC from the internet. Restart your computer and boot into Windows Safe Mode. This prevents Windows from automatically reinstalling generic display drivers.
- Run DDU: Once in Safe Mode, run DDU. Select your old GPU manufacturer (NVIDIA, AMD, or Intel) and choose the “Clean and restart” option. DDU will meticulously remove all traces of the old drivers and restart your PC.
After your PC restarts, it will likely be using a generic display driver, and your resolution might be low. This is normal and indicates a clean slate for your new GPU.
Step-by-Step Physical Installation
With all preparations complete, it’s time for the hands-on part of the process. Remember to work slowly and deliberately, taking care with each step.
Opening Your PC Case and Grounding Yourself
- Power Down and Unplug: Completely shut down your computer. Unplug the power cable from the back of the PSU. It’s also a good idea to unplug all other peripherals (monitor, keyboard, mouse) for easier access.
- Move to a Flat Surface: Place your PC case on a sturdy, flat, non-carpeted surface (like a wooden or laminate floor, or a desk). This reduces the risk of static buildup.
- Open the Side Panel: Most PC cases have thumb screws or regular screws holding the side panel in place. Remove these and carefully slide or swing open the main side panel (usually the left side when looking from the front). Set the panel aside safely.
- Ground Yourself: Before touching any internal components, ground yourself to discharge any static electricity. The easiest way is to put on an anti-static wrist strap and clip it to an unpainted metal part of your PC case. If you don’t have a strap, repeatedly touch the metal chassis of the case for several seconds. Do this periodically throughout the installation process.
Removing Your Old Graphics Card (If Applicable)
If you’re upgrading an existing GPU, you’ll need to remove it first.
- Disconnect Power Cables: Locate any PCIe power cables running from your PSU to the graphics card. These usually have 6-pin, 8-pin, or 12-pin connectors. Gently press the release clips on the connectors and pull them straight out.
- Unscrew the Mounting Bracket: The graphics card is secured to the PC case via one or more screws at the back, next to the video output ports. Unscrew these.
- Release the PCIe Retention Clip: At the end of the PCIe slot, there’s a small plastic or metal clip that holds the graphics card firmly in place. Depending on your motherboard, you might need to push it down, pull it away, or pivot it open. This clip is crucial and often overlooked.
- Gently Pull Out the Card: Once the power cables are disconnected, the screws removed, and the retention clip released, grasp the graphics card firmly with both hands (one near the front, one near the back) and pull it straight up and out of the PCIe slot. Avoid wiggling it excessively.
- Place it Safely: If you plan to sell or reuse the old card, place it in an anti-static bag (if you have one) or its original packaging.
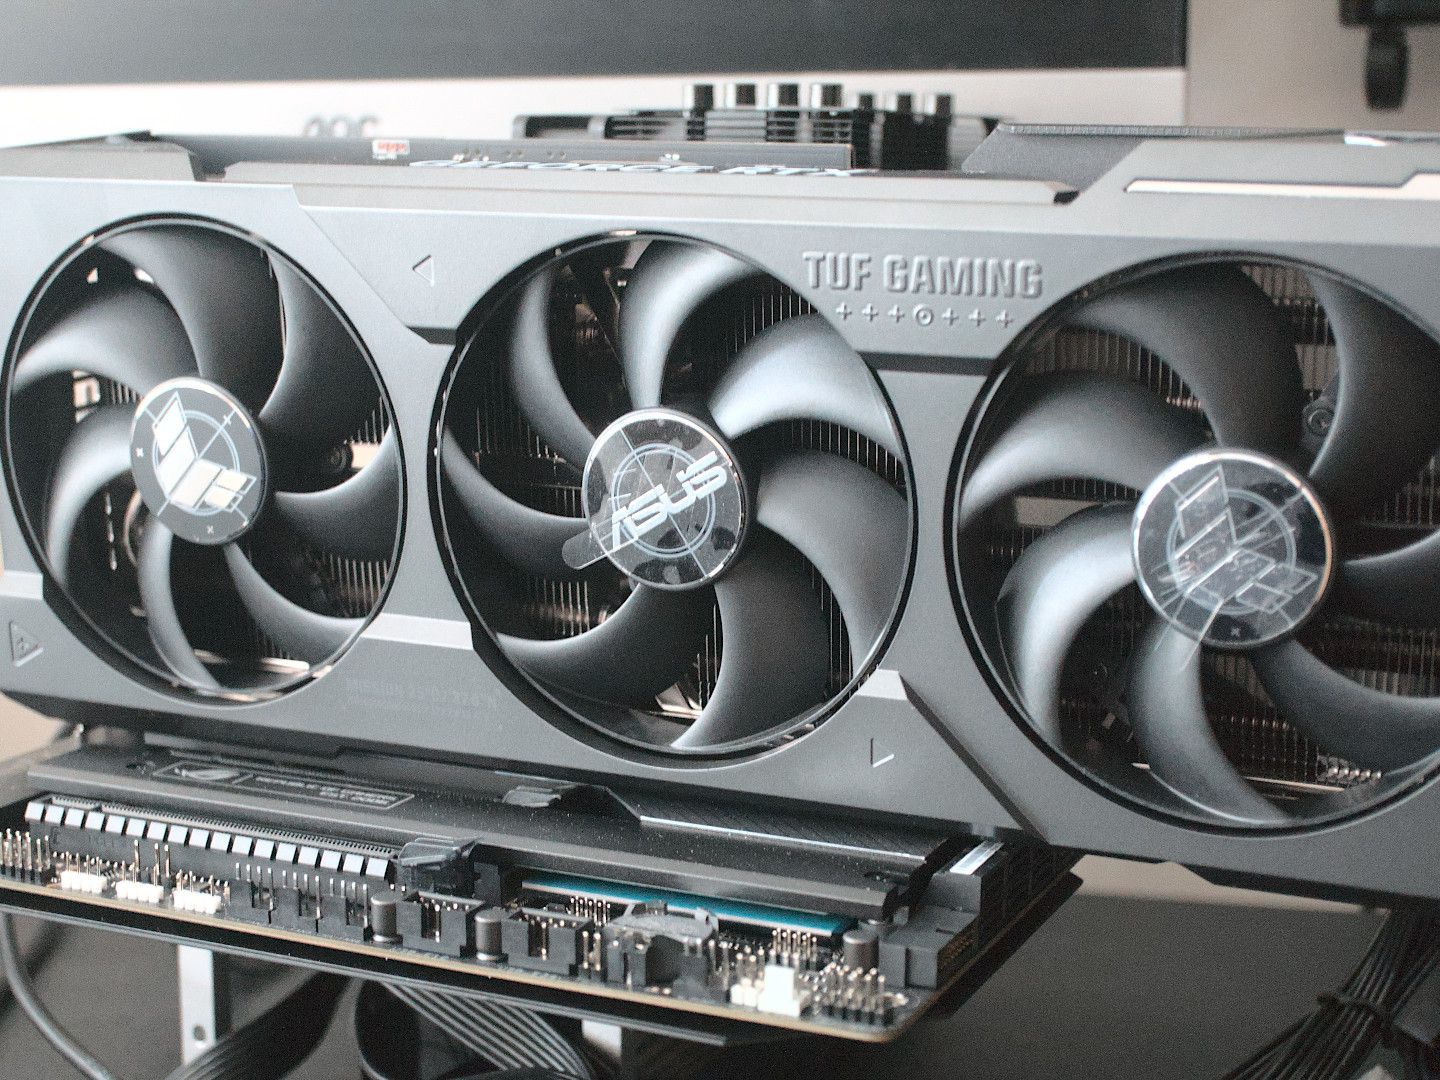
Installing the New Graphics Card
Now for the exciting part!
- Prepare the PCIe Slot: If you removed an old card, ensure the PCIe x16 slot is clear of any debris. If this is a new build or your first GPU, you might need to remove a metal “blank” cover from the back of your case that corresponds to the slot you’ll use. These blanks are usually held by a small screw or can be snapped off. Remove enough blanks to accommodate your new card’s bracket (typically two or three).
- Align and Insert the Card: Carefully align your new graphics card with the PCIe x16 slot on your motherboard. The gold contacts on the card should line up perfectly with the slot. Gently press the card down into the slot, applying even pressure at both ends. You should hear a satisfying “click” as the PCIe retention clip locks into place. Double-check that the card is fully seated and level. If the retention clip didn’t click, push down gently on the card’s end until it does.
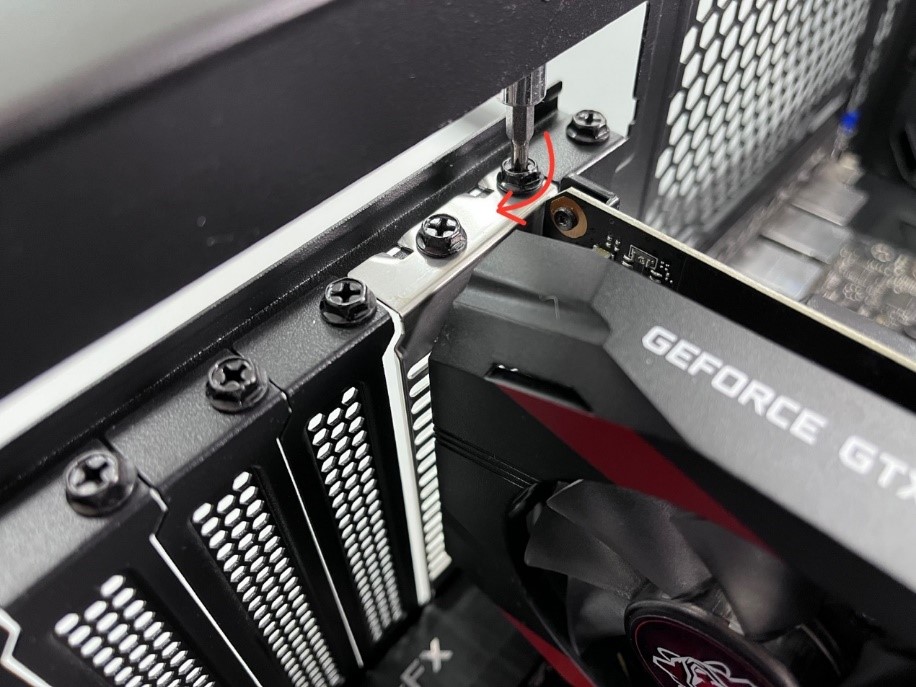
- Secure the Card: Once the card is fully seated, use the screws you removed earlier (or new ones provided with your case/GPU) to secure the graphics card’s mounting bracket to the PC case. This prevents the card from sagging or becoming loose.
Connecting Power to Your New GPU
This is a critical step for modern, powerful GPUs.
- Identify Power Connectors: Locate the PCIe power connectors on your new graphics card. They might be at the top edge or the end of the card. Most high-end cards require one or two 8-pin connectors, some might use a 6-pin and an 8-pin, or newer NVIDIA RTX 40 series cards use a 12VHPWR (12-pin or 16-pin) connector.
- Connect from PSU: Find the corresponding PCIe power cables from your PSU. These are usually labeled “PCIe” or “VGA” and have 6+2 pin configurations (which can be combined to form an 8-pin) or dedicated 6-pin/8-pin connectors. For 12VHPWR, use the dedicated cable provided with your PSU or GPU.
- Plug Them In: Firmly plug the power cables into the graphics card. Ensure they click into place and are fully seated. Do not force them if they don’t align; check the orientation. Use separate cables from your PSU for each required connection if possible, rather than using a single cable’s daisy-chained connectors, especially for high-power cards. This ensures stable power delivery.
Securing the Card and Closing the Case
- Double-Check Connections: Take a moment to visually inspect all connections. Is the GPU fully seated? Are the power cables firmly plugged in? Are the mounting screws tight? Are there any loose cables that could interfere with fans?
- Cable Management (Optional but Recommended): Use zip ties or Velcro straps to tidy up any loose cables. Route them behind the motherboard tray or along the case frame to improve airflow and aesthetics.
- Close the Side Panel: Carefully reattach the side panel of your PC case and secure it with its screws.
- Reconnect Peripherals: Plug your monitor cable (HDMI, DisplayPort, DVI, or VGA) directly into the new graphics card’s output ports. Then reconnect your power cable and other peripherals.
Post-Installation: Drivers, Testing, and Troubleshooting
The physical installation is complete, but the job isn’t quite finished. Software setup is equally important to get your new GPU running at its best.
Installing the Latest Graphics Drivers
- Boot Up Your PC: Power on your computer. Since you uninstalled old drivers and are running a generic display driver, the screen resolution might be low, and icons might appear large. This is normal.
- Install Downloaded Drivers: Navigate to where you saved the graphics drivers earlier (desktop or USB drive). Run the installer. Follow the on-screen prompts.
- Custom vs. Express Installation: Generally, “Express” or “Recommended” installation is sufficient for most users. “Custom” allows you to select specific components, which is useful if you want to exclude certain utilities.
- Clean Installation Option: Many driver installers offer a “Clean Installation” checkbox. It’s often a good idea to tick this even after using DDU, as it ensures a fresh install.
- Restart Your PC: The driver installation will likely prompt you to restart your computer. Do so.
After the restart, your screen resolution should return to normal, and your new graphics card will be fully recognized by the operating system.
Initial Boot-Up and Testing
Once your drivers are installed and your PC has restarted, it’s time to test your new GPU.
- Check Device Manager: In Windows, right-click the Start button, select “Device Manager,” and expand “Display adapters.” Your new graphics card should be listed there without any error symbols.
- Run a Benchmark (Optional but Recommended): To truly verify performance, download and run a reputable benchmark tool like 3DMark, Unigine Heaven, or FurMark. These tools will push your GPU to its limits, allowing you to see its performance relative to other systems and ensure stability under load.
- Test with Games/Applications: Load up your favorite game or a demanding creative application. Pay attention to frame rates, visual quality, and overall system responsiveness. Monitor GPU temperatures using software like HWMonitor or MSI Afterburner to ensure it’s operating within safe limits.
- Adjust Settings: Now you can dive into your game settings and crank up those graphical options you’ve been dreaming about! Experiment to find the optimal balance between visual fidelity and frame rate for your specific monitor and preferences.
Common Troubleshooting Tips
Even with careful preparation, issues can sometimes arise. Here are some common problems and their solutions:
- No Display/Black Screen:
- Ensure your monitor cable is plugged into the new graphics card, not the motherboard’s integrated graphics port.
- Double-check all power cables to the GPU and from the PSU.
- Reseat the graphics card in its PCIe slot.
- Ensure the PCIe retention clip clicked into place.
- Check your PSU’s wattage against the GPU’s requirements.
- System Boots, But Graphics Appear Garbled/Low Resolution:
- This usually indicates a driver issue. Re-run DDU in Safe Mode and then reinstall the latest drivers.
- Ensure you downloaded the correct drivers for your specific GPU model and operating system.
- Crashing During Games/Benchmarks:
- Could be a driver issue (try a clean reinstall).
- Could be insufficient power from your PSU (check wattage and connectors).
- Could be overheating (monitor temperatures).
- Could be a faulty card (contact the manufacturer for RMA if all else fails).
- Fans Not Spinning:
- Many modern GPUs have a “zero RPM” mode where fans only spin up when the card reaches a certain temperature. This is normal. If they never spin up under load, check power connections and drivers.
Maximizing Your New Graphics Card’s Potential
Installing your graphics card is a significant step, but maintaining and optimizing it will ensure you get the most out of your investment for years to come.
Keeping Drivers Updated
Graphics card manufacturers frequently release new driver updates. These updates often include performance improvements for the latest games, bug fixes, stability enhancements, and support for new features or technologies.
- Regular Checks: Make it a habit to periodically check the NVIDIA GeForce Experience software or AMD Radeon Software for driver updates. You can also visit their official websites directly.
- Read Release Notes: Before updating, quickly scan the driver release notes. Sometimes a specific driver might have known issues with certain hardware or software, though this is rare.
- Clean Installs: For major driver updates, especially if you encounter performance issues, consider performing a “clean install” through the driver software, or using DDU again for a completely fresh start.
Staying up-to-date with drivers ensures you’re always running your GPU with the latest optimizations and security patches, enhancing both performance and digital security.
Monitoring Performance and Temperature
Understanding how your GPU performs under different loads and keeping an eye on its temperature is crucial for longevity and stable operation.
- Monitoring Software: Tools like HWMonitor, MSI Afterburner, or NZXT CAM allow you to track GPU usage, clock speeds, VRAM usage, and crucially, temperature in real-time.
- Temperature Limits: Generally, GPUs are designed to operate safely up to around 80-85°C under full load. Consistently hitting temperatures above 90°C might indicate inadequate cooling (poor case airflow, dust buildup on heatsink, or fan issues) and can lead to thermal throttling (where the card reduces its performance to cool down) or shorten its lifespan.
- Fan Curves and Overclocking (Advanced): Software like MSI Afterburner also allows you to customize fan curves (how fast the fans spin at different temperatures) or even mildly overclock your GPU for a few extra frames per second. Always research and proceed with caution when overclocking, as it can increase heat and instability if not done properly. Ensure your system’s cooling can handle the increased heat.
By actively monitoring your GPU, you can proactively address potential issues, ensure optimal performance, and make informed decisions about your system’s overall health and productivity.
Conclusion
Congratulations! You’ve successfully navigated the process of installing a new graphics card. This upgrade not only boosts your system’s capabilities for gaming and creative work but also empowers you with a deeper understanding of your computer’s hardware. While it might seem intricate at first, breaking it down into manageable steps, focusing on compatibility, careful physical installation, and thorough software setup makes it an achievable and rewarding endeavor.
Your newly installed GPU will undoubtedly revolutionize your computing experience, delivering crisper visuals, smoother frame rates, and accelerated workflows. As technology continues to evolve, being able to confidently upgrade and maintain your own system is a valuable skill, enhancing your digital literacy and ensuring you always get the best out of your gadgets. Enjoy the enhanced performance and productivity that your powerful new graphics card brings!
aViewFromTheCave is a participant in the Amazon Services LLC Associates Program, an affiliate advertising program designed to provide a means for sites to earn advertising fees by advertising and linking to Amazon.com. Amazon, the Amazon logo, AmazonSupply, and the AmazonSupply logo are trademarks of Amazon.com, Inc. or its affiliates. As an Amazon Associate we earn affiliate commissions from qualifying purchases.